2000 MITSUBISHI MONTERO ECU
[x] Cancel search: ECUPage 824 of 1839
ENGINE AND EMISSION CONTROL -Auto-cruise Control System17-22
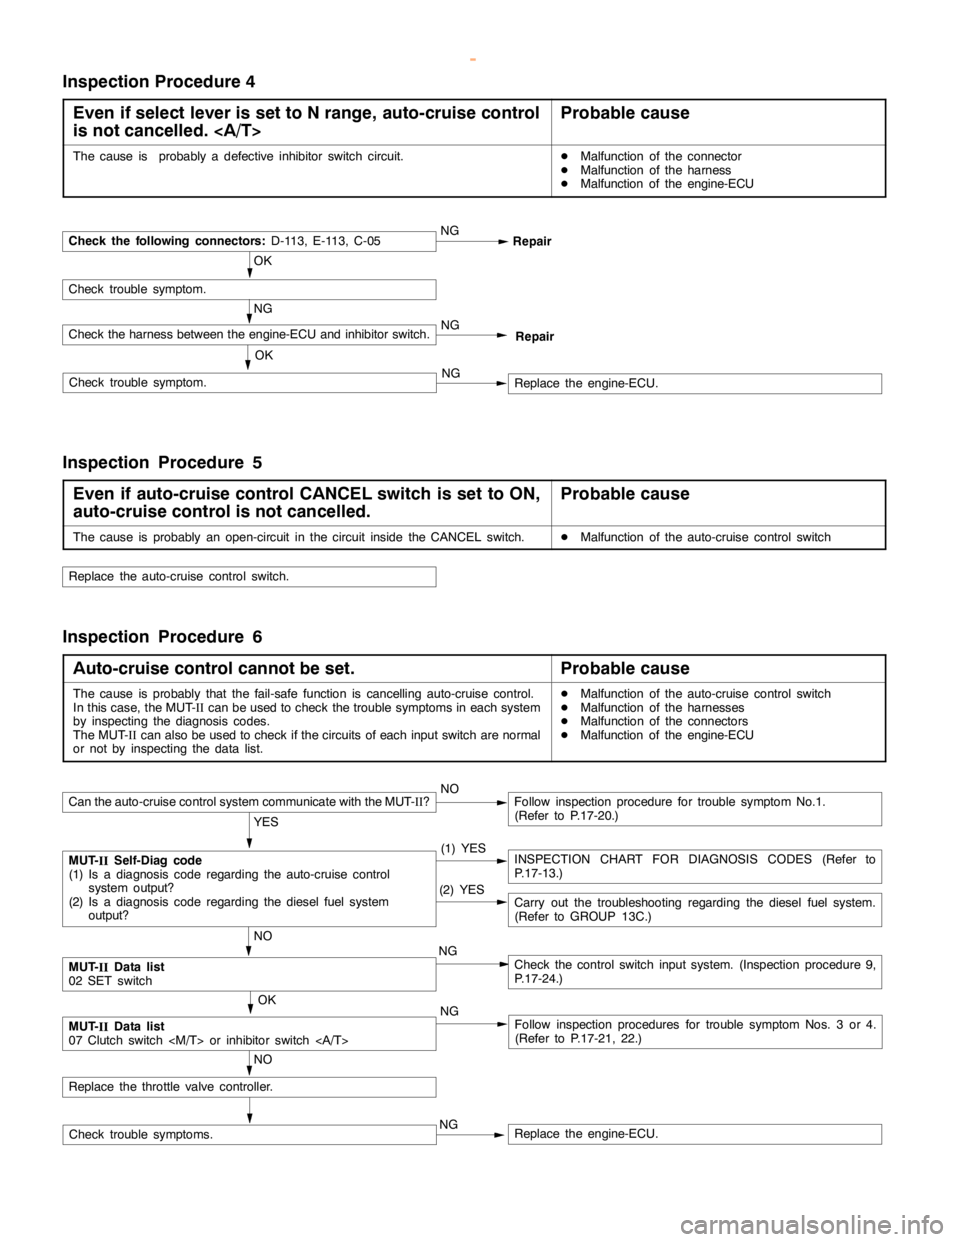
Inspection Procedure 4
Even if select lever is set to N range, auto-cruise control
is not cancelled.
Probable cause
The cause is probably a defective inhibitor switch circuit.DMalfunction of the connector
DMalfunction of the harness
DMalfunction of the engine-ECU
OK
Check trouble symptom.
Check the following connectors:D-113, E-113, C-05NG
Repair
NG
Check the harness between the engine-ECU and inhibitor switch.
NG
Replace the engine-ECU. OKCheck trouble symptom.NG
Repair
Inspection Procedure 5
Even if auto-cruise control CANCEL switch is set to ON,
auto-cruise control is not cancelled.
Probable cause
The cause is probably an open-circuit in the circuit inside the CANCEL switch.DMalfunction of the auto-cruise control switch
Replace the auto-cruise control switch.
Inspection Procedure 6
Auto-cruise control cannot be set.
Probable cause
The cause is probably that the fail-safe function is cancelling auto-cruise control.
In this case, the MUT-
IIcan be used to check the trouble symptoms in each system
by inspecting the diagnosis codes.
The MUT-
IIcan also be used to check if the circuits of each input switch are normal
or not by inspecting the data list.DMalfunction of the auto-cruise control switch
DMalfunction of the harnesses
DMalfunction of the connectors
DMalfunction of the engine-ECU
Check trouble symptoms.
Can the auto-cruise control system communicate with the MUT-
II?NOFollow inspection procedure for trouble symptom No.1.
(Refer to P.17-20.)
YES
MUT-
IISelf-Diag code
(1) Is a diagnosis code regarding the auto-cruise control
system output?
(2) Is a diagnosis code regarding the diesel fuel system
output?(1) YESINSPECTION CHART FOR DIAGNOSIS CODES (Refer to
P.17-13.)
NO
MUT-
IIData list
02 SET switchNGCheck the control switch input system. (Inspection procedure 9,
P.17-24.)
OK
MUT-
IIData list
07 Clutch switch
NG
NO
Replace the throttle valve controller.(2) YES
Carry out the troubleshooting regarding the diesel fuel system.
(Refer to GROUP 13C.)
Follow inspection procedures for trouble symptom Nos. 3 or 4.
(Refer to P.17-21, 22.) NG
Replace the engine-ECU.
www.WorkshopManuals.co.uk
Purchased from www.WorkshopManuals.co.uk
Page 825 of 1839
ENGINE AND EMISSION CONTROL -Auto-cruise Control System17-23
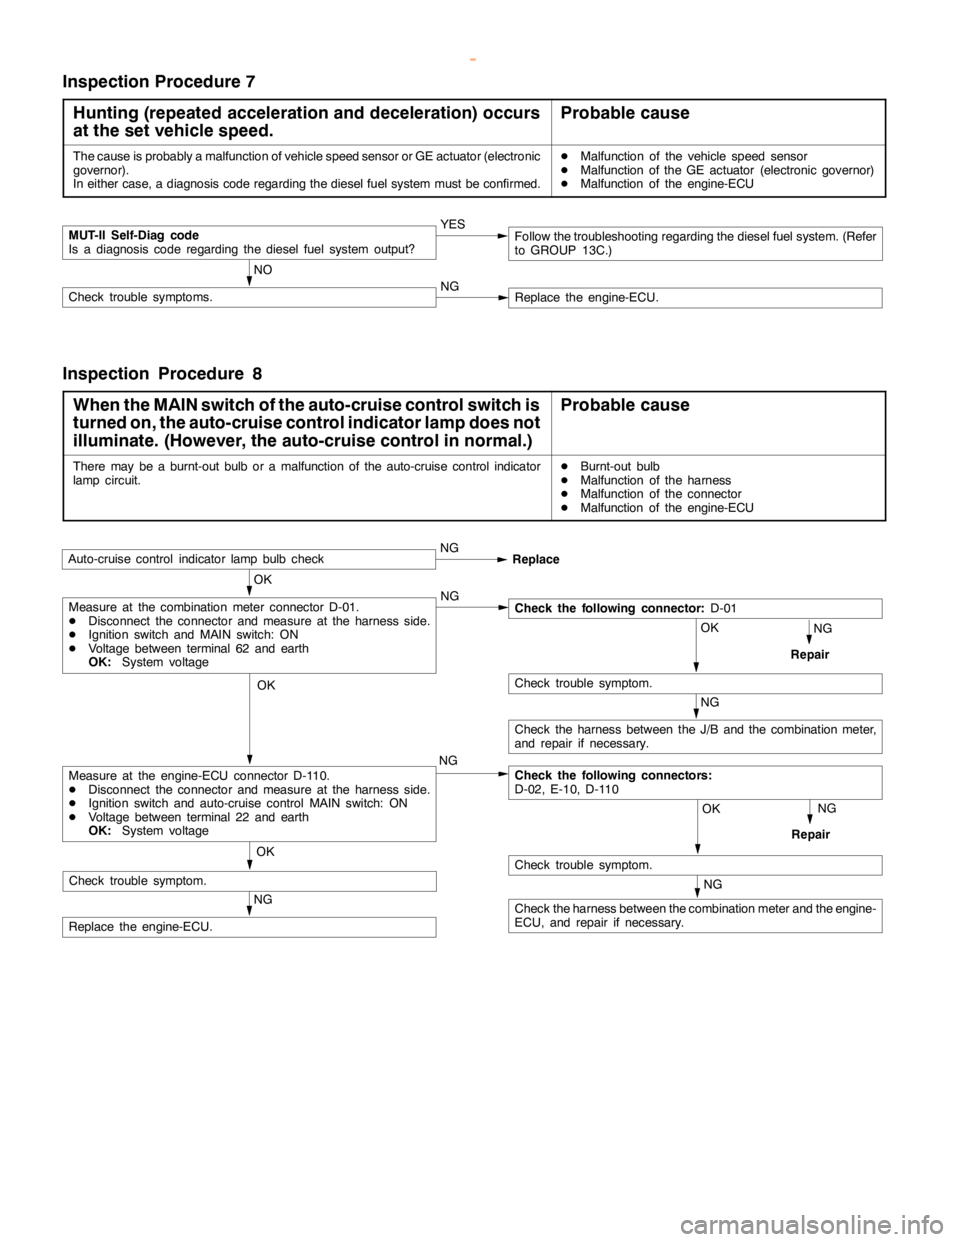
Inspection Procedure 7
Hunting (repeated acceleration and deceleration) occurs
at the set vehicle speed.
Probable cause
The cause is probably a malfunction of vehicle speed sensor or GE actuator (electronic
governor).
In either case, a diagnosis code regarding the diesel fuel system must be confirmed.DMalfunction of the vehicle speed sensor
DMalfunction of the GE actuator (electronic governor)
DMalfunction of the engine-ECU
MUT-II Self-Diag code
Is a diagnosis code regarding the diesel fuel system output?YES
NO
Check trouble symptoms.NGReplace the engine-ECU.
Follow the troubleshooting regarding the diesel fuel system. (Refer
to GROUP 13C.)
Inspection Procedure 8
When the MAIN switch of the auto-cruise control switch is
turned on, the auto-cruise control indicator lamp does not
illuminate. (However, the auto-cruise control in normal.)
Probable cause
There may be a burnt-out bulb or a malfunction of the auto-cruise control indicator
lampcircuit.DBurnt-out bulb
DMalfunction of the harness
DMalfunction of the connector
DMalfunction of the engine-ECU
OK
Auto-cruise control indicatorlamp bulbcheckNG
Replace
NG
Repair
OK
NG
OK
Check trouble symptom.
NG
Check the harness between the J/B and the combination meter,
and repair if necessary.
Check the following connectors:
D-02, E-10, D-110
OK
Check trouble symptom.
NG
Repair
NG
Replace the engine-ECU.NG
Measure at the engine-ECU connector D-110.
DDisconnect the connector and measure at the harness side.
DIgnition switch and auto-cruise control MAIN switch: ON
DVoltage between terminal 22 and earth
OK:System voltage
Measure at the combination meter connector D-01.
DDisconnect the connector and measure at the harness side.
DIgnition switch and MAIN switch: ON
DVoltage between terminal 62 and earth
OK:System voltageCheck the following connector:D-01
NG
Check the harness between the combination meter and the engine-
ECU, and repair if necessary. OK
Check trouble symptom.
www.WorkshopManuals.co.uk
Purchased from www.WorkshopManuals.co.uk
Page 826 of 1839
ENGINE AND EMISSION CONTROL -Auto-cruise Control System17-24
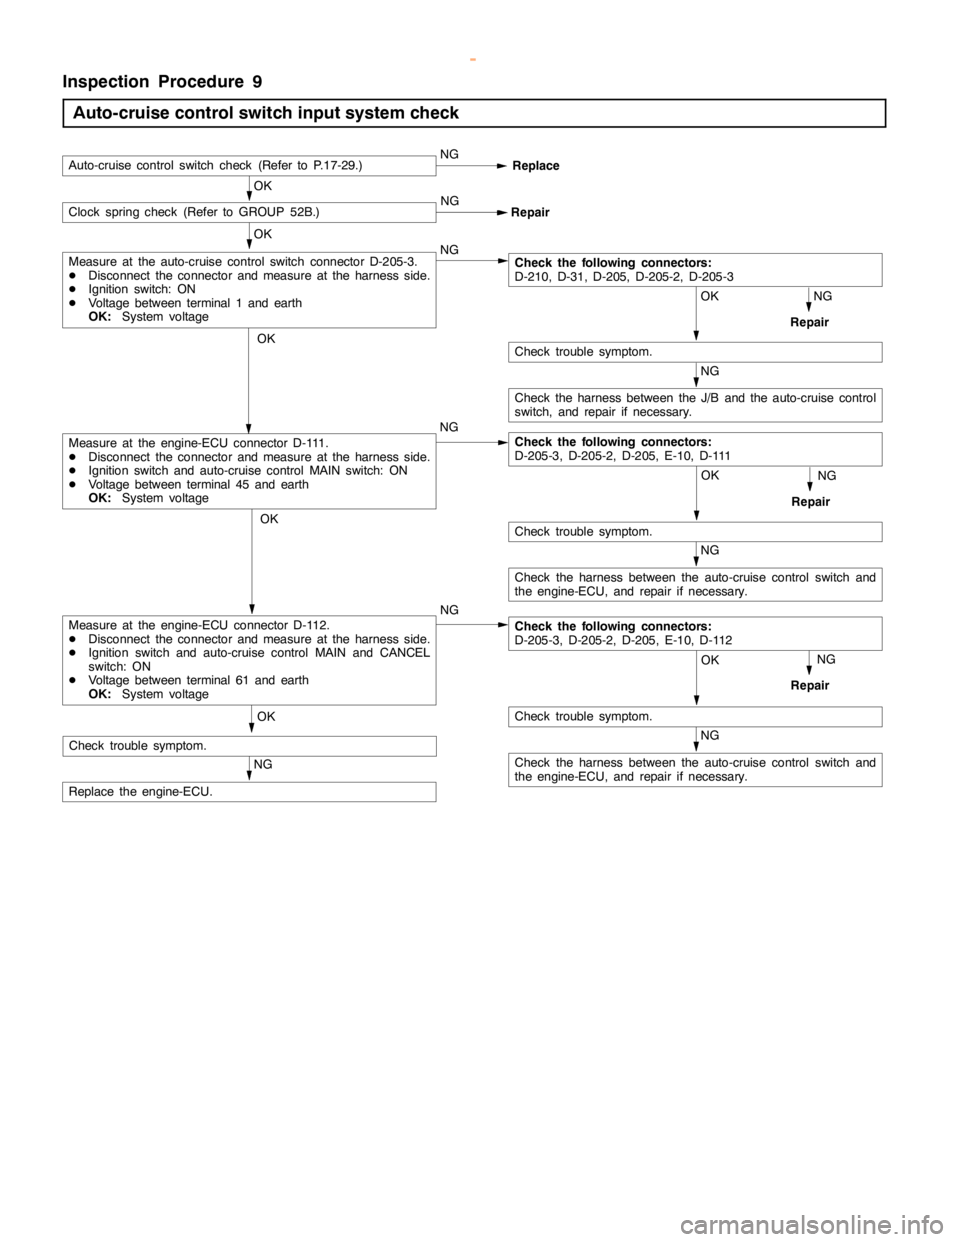
Inspection Procedure 9
Auto-cruise control switch input system check
NG
Check the harness between the auto-cruise control switch and
the engine-ECU, and repair if necessary.
OK
NG
Repair
OK
Check trouble symptom. NG
OK
Auto-cruise control switch check (Refer to P.17-29.)NG
Replace
NG OKClock spring check (Refer to GROUP 52B.)
Repair
OK
NG
Repair
NG
OK
Check trouble symptom.
NG
Check the harness between the J/B and the auto-cruise control
switch, and repair if necessary.
Check the following connectors:
D-210, D-31, D-205, D-205-2, D-205-3
OK
Check trouble symptom.
NG
Repair
NG
Replace the engine-ECU.NG
Measure at the engine-ECU connector D-111.
DDisconnect the connector and measure at the harness side.
DIgnition switch and auto-cruise control MAIN switch: ON
DVoltage between terminal 45 and earth
OK:System voltage
Measure at the auto-cruise control switch connector D-205-3.
DDisconnect the connector and measure at the harness side.
DIgnition switch: ON
DVoltage between terminal 1 and earth
OK:System voltage
NG
Check the harness between the auto-cruise control switch and
the engine-ECU, and repair if necessary.
OK
Check trouble symptom.
Check the following connectors:
D-205-3, D-205-2, D-205, E-10, D-111
Measure at the engine-ECU connector D-112.
DDisconnect the connector and measure at the harness side.
DIgnition switch and auto-cruise control MAIN and CANCEL
switch: ON
DVoltage between terminal 61 and earth
OK:System voltageCheck the following connectors:
D-205-3, D-205-2, D-205, E-10, D-112
www.WorkshopManuals.co.uk
Purchased from www.WorkshopManuals.co.uk
Page 827 of 1839

ENGINE AND EMISSION CONTROL -Auto-cruise Control System17-25
DATA LIST REFERENCE TABLE
For the data, which is input to the engine-ECU
<6G7-M/T, 4M4>, engine-A/T-ECU <6G7-A/T> andthrottle valve controller <6G7>, the following items
can be read out by using the MUT-II
.
HOW TO READ OUT DATA LIST
1. Connect the MUT-II
to the 16-pin diagnosis
connector.
Caution
Turn off the ignition switch befor connecting
and disconnecting the MUT-II
.2. Turn the ignition switch to “ON” position.
3. Select “auto-cruise control” on the MUT-II
menu, and then read out the data list.
<6G7>
Terminal
No.Check itemCheck conditionsNormal condition
01Auto-cruiseMAINMAIN switch: ONON
control
switchMAIN switch: OFFOFF
02SETMAIN switch:SET switch: ONON
(COAST)ONSET switch: OFFOFF
03RESUMERESUME switch: ONON
(ACCEL)RESUME switch: OFFOFF
04CANCELCANCEL switch: ONON
CANCEL switch: OFFOFF
05Stop lamp switchBrake pedal: DepressedON
(for stop lamp circuit)Brake pedal: ReleasedOFF
06Stop lamp switchBrake pedal: DepressedOFF
(for auto-cruise control
circuit)
Brake pedal: ReleasedON
07Clutch switch
Brake pedal: ReleasedOFF
Inhibitor switchSelector lever: “N“, “P” positionON
Selector lever: Other than “N“, “P” positionOFF
08Accelerator switchAccelerator pedal: ReleasedON
(Idle position switch)Accelerator pedal: DepressedOFF
09Auto-cruise controlAuto-cruise control system: ActivatedON
systemAuto-cruise control system: Not activatedOFF
10Vehicle speed sensorRoad test the vehicleThe speedometer and
the MUT-IIdisplay the
same value.
www.WorkshopManuals.co.uk
Purchased from www.WorkshopManuals.co.uk
Page 881 of 1839

22-1
MANUAL
TRANSMISSION
CONTENTS
GENERAL INFORMATION 2..................
LUBRICANTS 2..............................
SEALANTS 2................................
SPECIAL TOOL 2............................
TROUBLESHOOTING
ON-VEHICLE SERVICE 6.....................
Transmission Oil Check 6.......................
Oil Replacement 6.............................4WD Detection Switch Continuity Check
High/Low Detection Switch Continuity Check
TRANSMISSION CONTROL
TRANSMISSION CONTROL
TRANSMISSION ASSEMBLY 10..............
4WD INDICATOR-ECU/TRANSFER-ECU 17....
www.WorkshopManuals.co.uk
Purchased from www.WorkshopManuals.co.uk
Page 883 of 1839
MANUAL TRANSMISSION -Troubleshooting
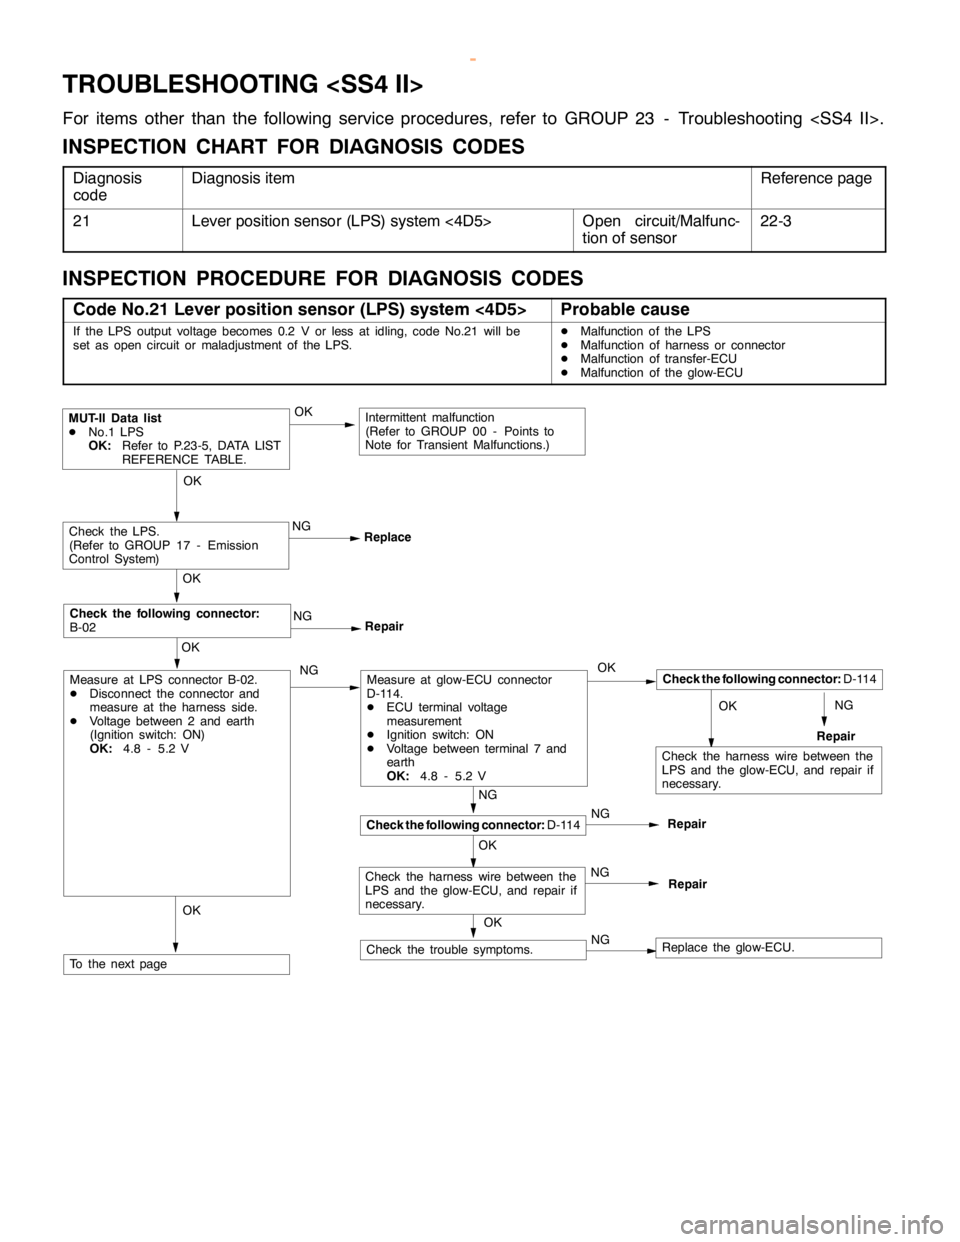
TROUBLESHOOTING
For items other than the following service procedures, refer to GROUP 23 - Troubleshooting
INSPECTION CHART FOR DIAGNOSIS CODES
Diagnosis
codeDiagnosis itemReference page
21Lever position sensor (LPS) system <4D5>Open circuit/Malfunc-
tion of sensor22-3
INSPECTION PROCEDURE FOR DIAGNOSIS CODES
Code No.21 Lever position sensor (LPS) system <4D5>Probable cause
If the LPS output voltage becomes 0.2 V or less at idling, code No.21 will be
set as opencircuit or maladjustment of the LPS.DMalfunction of the LPS
DMalfunction of harness or connector
DMalfunction of transfer-ECU
DMalfunction of the glow-ECU
NGOK
NG
Repair
MUT-II Data list
DNo.1 LPS
OK:Refer to P.23-5, DATA LIST
REFERENCE TABLE.
NG
ReplaceCheck the LPS.
(Refer to GROUP 17 - Emission
Control System)
OK
NG
Repair
OK
Check the following connector:
B-02
OK
OK
Check the following connector:D-114
Repair
NG
Repair
NG
Repair
OK
OK
Check the following connector:D-114
Measure at glow-ECU connector
D-114.
DECU terminal voltage
measurement
DIgnition switch: ON
DVoltage between terminal 7 and
earth
OK:4.8 - 5.2 V
NGNG
NGCheck the trouble symptoms.
OK
Measure at LPS connector B-02.
DDisconnect the connector and
measure at the harness side.
DVoltage between 2 and earth
(Ignition switch: ON)
OK:4.8 - 5.2 V
To the nextpage
Intermittent malfunction
(Refer to GROUP 00 - Points to
Note for Transient Malfunctions.)
OK
Check the harness wire between the
LPS and the glow-ECU, and repair if
necessary.
Check the harness wire between the
LPS and the glow-ECU, and repair if
necessary.
Replace the glow-ECU.
www.WorkshopManuals.co.uk
Purchased from www.WorkshopManuals.co.uk
Page 884 of 1839
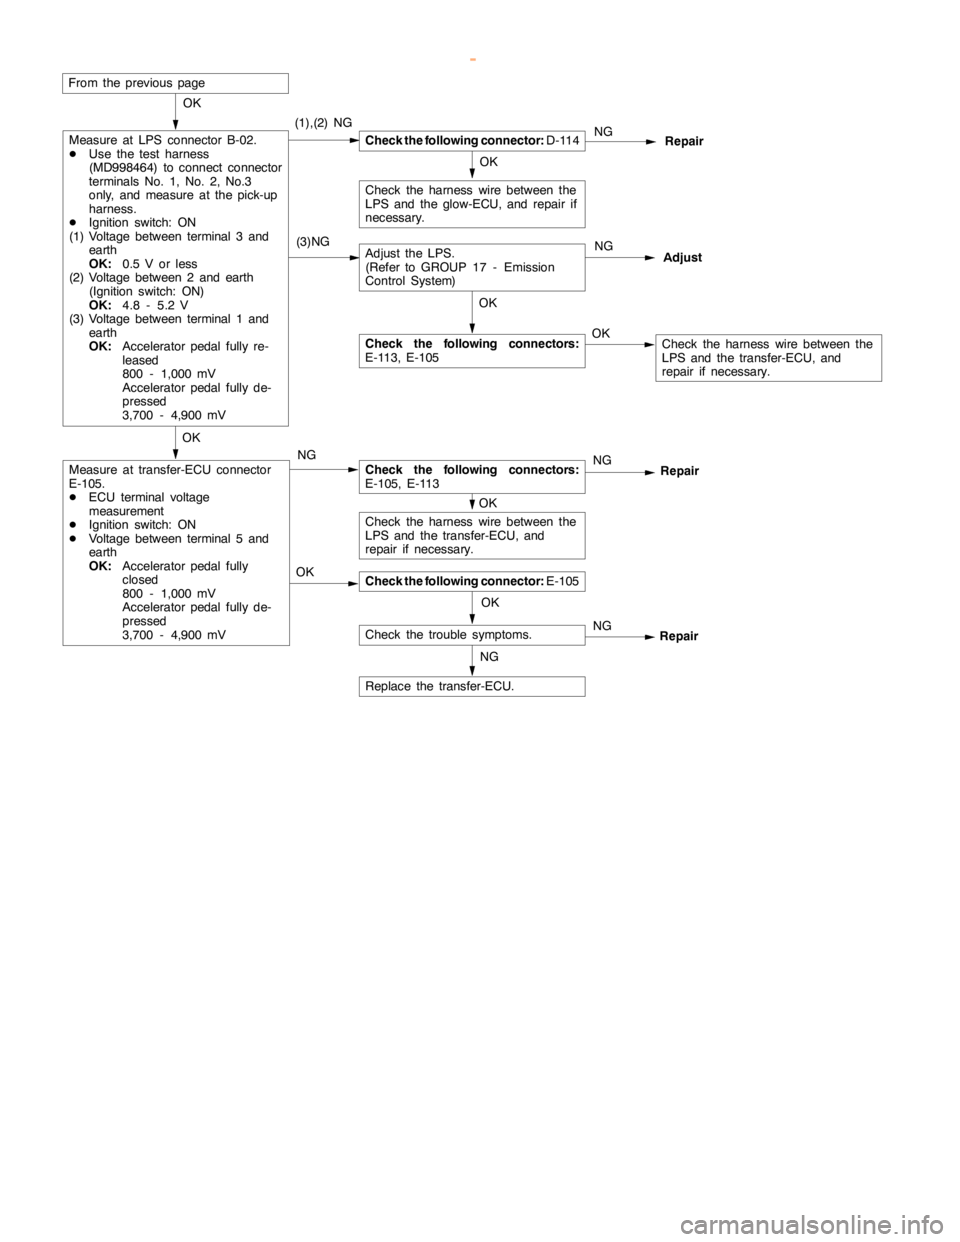
MANUAL TRANSMISSION -Troubleshooting
OKOKOK
NG
NG
NG(1),(2) NG
Check the following connector:D-114
Repair OK
OK
OK
Measure at transfer-ECU connector
E-105.
DECU terminal voltage
measurement
DIgnition switch: ON
DVoltage between terminal 5 and
earth
OK:Acceleratorpedalfully
closed
800 - 1,000 mV
Acceleratorpedalfully de-
pressed
3,700 - 4,900 mV
Check the following connector:E-105
Check the trouble symptoms.OK
Check the following connectors:
E-105, E-113 NG
Replace the transfer-ECU. OK
NGRepairAdjust
Check the harness wire between the
LPS and the transfer-ECU, and
repair if necessary.
Check the harness wire between the
LPS and the transfer-ECU, and
repair if necessary.
From the previouspage
(3)NG
Measure at LPS connector B-02.
DUse the test harness
(MD998464) to connect connector
terminals No. 1, No. 2, No.3
only, and measure at the pick-up
harness.
DIgnition switch: ON
(1) Voltage between terminal 3 and
earth
OK:0.5 V or less
(2) Voltage between 2 and earth
(Ignition switch: ON)
OK:4.8 - 5.2 V
(3) Voltage between terminal 1 and
earth
OK:Acceleratorpedalfully re-
leased
800 - 1,000 mV
Acceleratorpedalfully de-
pressed
3,700 - 4,900 mV
NGAdjust the LPS.
(Refer to GROUP 17 - Emission
Control System)
Check the following connectors:
E-113, E-105
Repair
Check the harness wire between the
LPS and the glow-ECU, and repair if
necessary.
www.WorkshopManuals.co.uk
Purchased from www.WorkshopManuals.co.uk
Page 885 of 1839

MANUAL TRANSMISSION -Troubleshooting
DATA LIST REFERENCE TABLE
Data
list No.Check itemCheck conditionsNormal condition
1Lever positionEngine: StoppedAccelerator pedal: Fully closed800 - 1,000 mV
sensor (LPS)
<4D5>Selector lever position:
PAccelerator pedal: DepressedGradually increases from
the above value.
Accelerator pedal: Fully open3,700 - 4,900 mV
CHECK AT TRANSFER-ECU TERMINAL
Ter-
minal
No.Check itemCheck conditionsStandard value
5Lever position sensorAccelerator pedal: Fully closed (engine stopped)0.8 - 1.0 V
(LPS) <4D5>Accelerator pedal: Fully open (engine stopped)3.7 - 4.9 V
www.WorkshopManuals.co.uk
Purchased from www.WorkshopManuals.co.uk