2000 AUDI ALLROAD wheel
[x] Cancel search: wheelPage 161 of 306
CONT
ROLS AND EQUIPMENT---------------------
Wiper and washer system
The wiper and washer system only works
when the ignition is on.
The heated washer jets do not have a
separate switch. Depending on the outside
temperature, the heated washer jets will
operate when the ignition is on.
To prevent damage to the w1pmg
system. always loosen blades frozen
to glass before operating wipers.
Notes
• Filling washer container, see page 250.
• Replacing wiper blades, see page 251.
� WARNING
Always heed WARNINGS on
page 161.
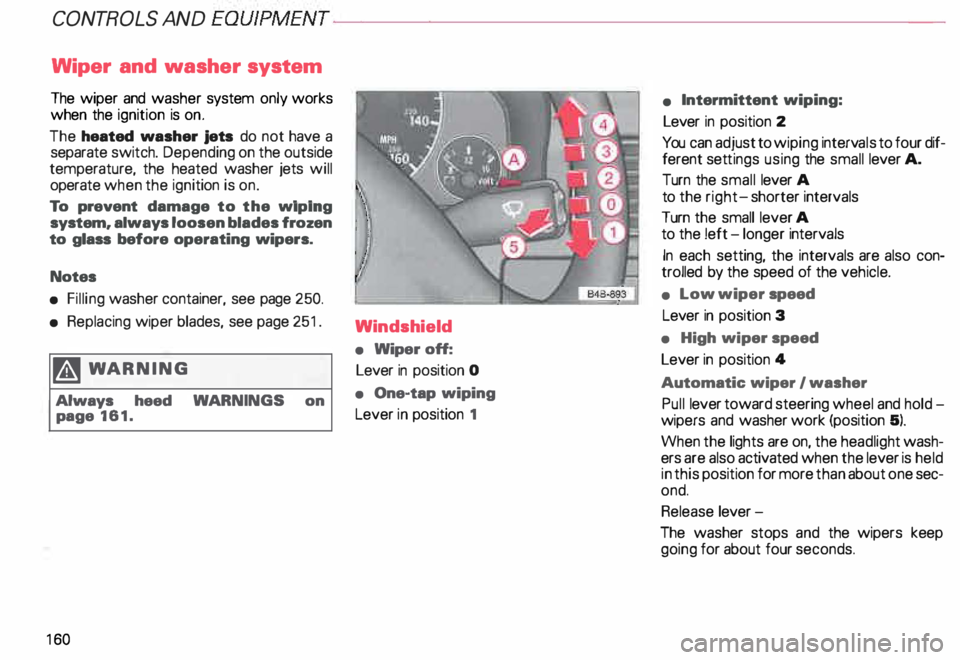
16 0 Windshield
•
Wiper off:
Lever in position 0
• One-tap wiping
Lever in position 1 •
Intermittent wiping:
Lever in position 2
You can adjust to wiping intervals to four dif
ferent settings using the small lever A.
Turn the small lever A
to the right- shorter intervals
Turn the small lever A
to the !eft -longer intervals
In each setting, the intervals are also con
trolled by the speed of the vehicle.
• Low wiper speed
Lever in position 3
• High wiper speed
Lever in position 4
Automatic wiper I washer
Pull lever toward steering wheel and hold
wipers and washer work (position 5).
When the lights are on, the headlight wash
ers are also activated when the lever is held
in this position for more than about one sec
ond.
Release lever-
The washer stops and the wipers keep
going for about four seconds.
Page 162 of 306
---------------------CONTROLS AND
EQUIPMENT
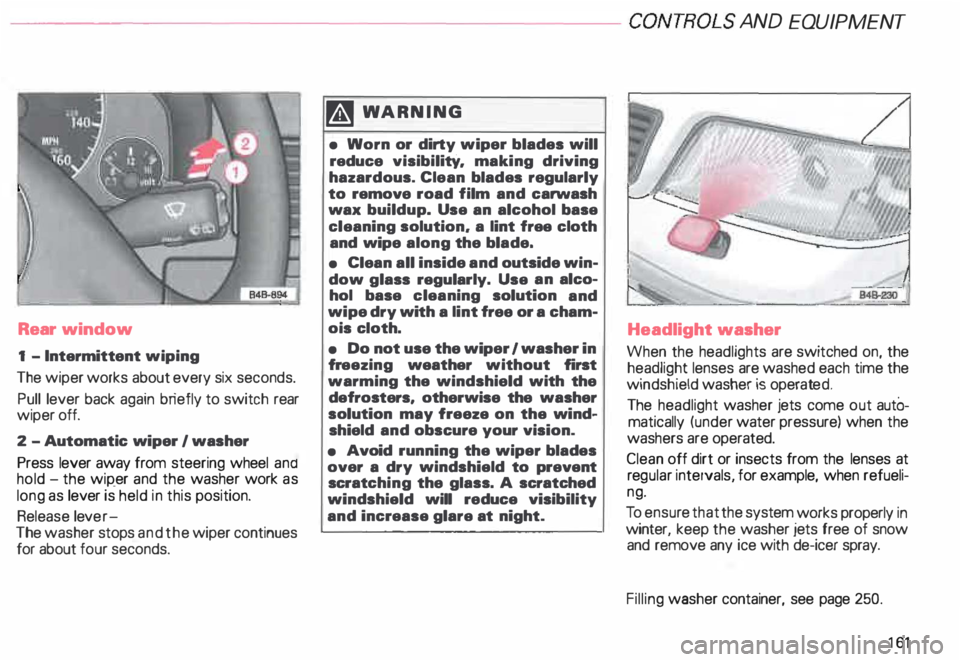
Rear window
1 - Intermittent wiping
The wiper works about every six seconds.
Pull lever back again briefly to switch rear
wiper off.
2 -Automatic wiper I washer
Press lever away from steering wheel and
hold -the wip_er and the washer work as
long as lever is held in this position.
Release lever-
The washer stops and the wiper continues
for about four seconds. �W
ARNING
• Worn or dirty wiper blades will
reduce visibility. making driving
hazardous. Clean blades regularly
to remove road film and carwash
wax buildup. Use an alcohol base
cleaning solution. a lint free cloth
and wipe along the blade.
• Clean all inside and outside win
dow glass regularly. Use an alco
hol base cleaning solution and
wipe dry with a lint free or a cham
ois cloth.
• Do not use the wiper 1 washer in
fr eezing weather without first
warming the windshield with the
defrosters, otherwise the washer
solution may freeze on the wind
shield and obscure your vision.
• Avoid running the wiper blades
over a dry windshield to prevent
scratc hing the glass. A scratched
windshield will reduce visibility
and increase glare at night. Headlight
washer
When the headlights are switched on, the
headlight lenses are washed each time the
windshield washer is operated.
The headlight washer jets come out autO
matically (under water pressure) when the
washers are operated.
Clean off dirt or insects from the lenses at
reg ular intervals, for example, when refueli
ng.
To ensur e that the system works properly in
winter, keep the washer jets free of snow
and remove any ice with de-icer spray.
Filling washer container, see page 250.
161
Page 166 of 306

---------------------CONTROLS
AND EQUIP MENT
Air outlets
Depending on the operating mode se
lected, the air flow to the outlets is con
trolled either automatically or man ually.
The illust ration shows the air outlets in and
around the dashboard.
The outlets deliver either heated or un
heated fresh air, or cooled air. I
848-902
1 - Outlets over full width of windshield
2 - Side window defroster I defogger
nozzles
3 - Side dashboard and rear console vents
4 - Center dashboard vents
5 - Footw all outlets Outlets
2, 3 and 4 can be opened or
closed separately with the respective
thumbwheel next to the outlets.
The direction of air delivery from these
outlets can be adjusted horizontally and
vert ically. The upper outlets (2) are not ad
justable.
Note
When the air conditioner is cooling the ve
hicle interior, the cool air mainly emerges
from outlets 3 and 4. To ensure adequate
cooling, these outlets should therefore nev
er be closed completely.
165
Page 186 of 306
--------------------CONTROLS AND
EQUIPMENT
Steering wheel with Audio controls*
To help make certain that you are not diS
tracted from paying proper attention to the
traffic conditions when you are using the ra
dio, switches have been provided on the
st eering wheel for basic audio functions for
factory installed radios. The radio, cassette
player, or CD player, can, of course, also be
operated without restriction on the unit it
self.
A detailed description of the radio is pro
vided in a separate Sound System manual.
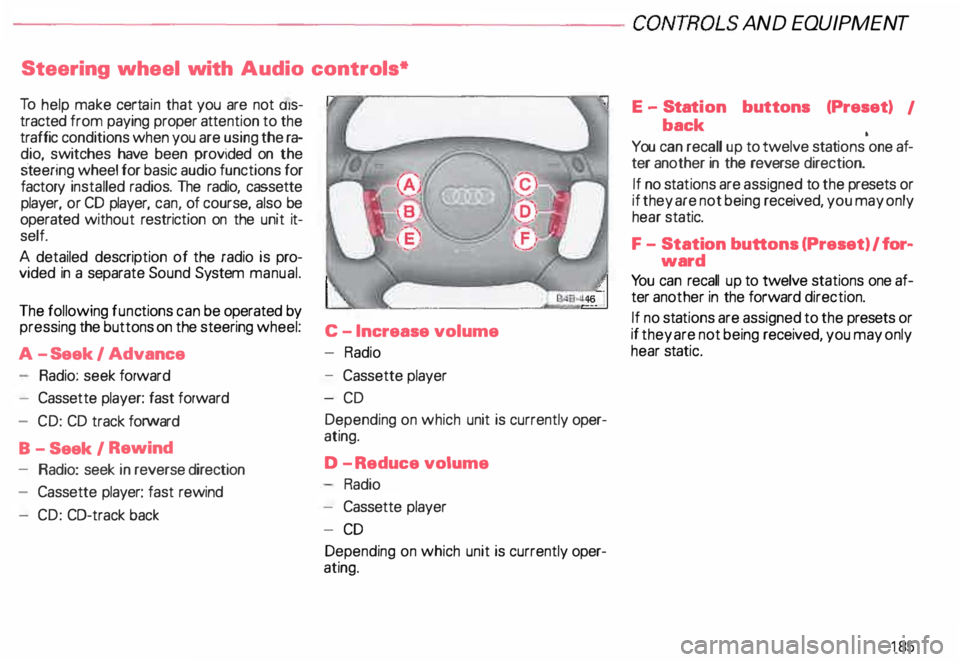
The following functions can be operated by
pressing the buttons on the steering wheel:
C -I ncrease volume
A -S eek I Advance -
Radio
Radio: seek forward
- Cassette player: fast forward
- CD: CD track forward
B - Seek I Rewind
- Radio: seek in reverse direction
- Cassette player: fast rewind
- CD: CO-track back -
Cassette player
-C D
Depending on which unit is currently oper
ating.
D -R educe volume
Radio
- Cassette player
- CD
Depending on which unit is currently oper
ating. E
-Stat ion buttons (Preset) I
back •
You can recall up to twelve stations one af-
ter another in the reverse direction.
If no sta tions are assigned to the presets or
if they are not being received, you may only
hear static.
F - Station buttons (Preset) I for�
ward
Yo u can recall up to twelve stations one af
ter another in the forward direction.
If no stations are assigned to the presets or
if they are not being received, you may only
hear static.
185
Page 187 of 306
CONT
ROLS AND
EQUIPMENT--------------------
Steering wheel with radio and
telephone equipment in the steering wheel*
If your radio or mobile telephone are factory
ins talled, switches for the radio and tele
phone functions are provided in the steering
wheel to help you give your fullest attention
to your driving responsibilities while operat
ing the radio or telephone system. Of
course, all the operating features of your ra
dio, cassette/CO player, or telephone can
still be accessed on this equipment itself.
Detailed description of the radio and Audi
telephone are provided in separate operat
ing manuals.
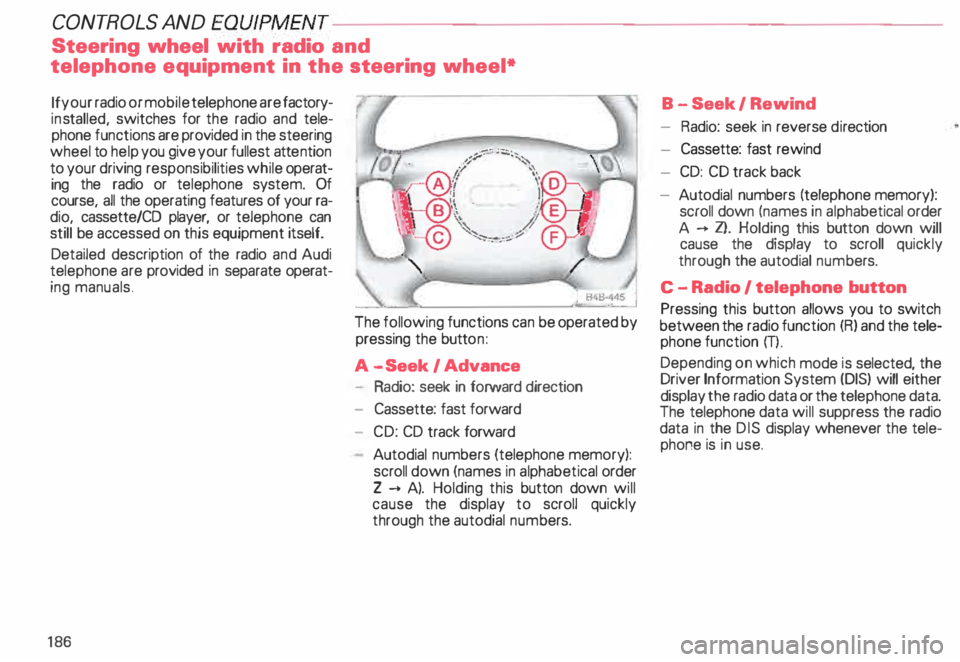
18 6 The following
functions can be operated by
pressing the button:
A -S eek I Advance
- Radio: seek in forward direction
- Cassette: fast forward
- CD: CD track forward
Autodial numbers (telephone memory):
scroll down (names in alphabetical order
Z --+ A). Holding this button down will
cause the display to scroll quickly
through the autodial numbers. B
-Seek I Rewind
- Radio: seek in reverse direction
- Cassette: fast rewind
- CD: CD track back
- Autodial numbers (telephone memory):
scroll down (names in alphab etical order
A --+ Z}. Holding this button down will
cause the display to scroll quickly
through the autodial numbers.
C -Radio I telephone button
Pressing this button allows you to switch
between the radio function (R) and the tele
phone function m.
Depending on which mode is selected, the
Driver Information System (DIS) will either
display the radio data or the telephone data.
The telephone data will suppress the radio
data in the DIS display whenever the tele
phone is in use.
Page 196 of 306

------------------------VEHICLE
OPERATION
Operate your vehicle economically and
• Do not drive if you are tired.
Make frequent rest stops, at least after ev
ery two hours of driving.
• Always adapt vehicle speed to
traffic, weather and road condi
tions.
Remember that especially on smooth, slip
pery roads, vehicle handling and braking de
pend a great deal on tire adhesion. On wet
roads, the front wheels can hydroplane es
pecially at higher speeds. If this happens,
you will then, no longer be able to steer or
brake properly.
• Always observe the posted speed
limits and use common sense. Your
good judgment can mean the differ
ence between arriving safely at your
destination and having an accident.
Additional information regarding safety can
be found in the individual chapters of this
manual. minimize
pollution
Va rious factors influence fuel consumption:
engine wear, brakes and tires, environmen
tal impact.
This chapter addresses some of these
points.
Yo ur personal sty!e of driving
wi II determine the economy of your vehicle,
as well as exhaust and noise levels.
«i? Do not let your vehicle stand and
, warm
up.
When the engine is idling, it takes a very
long time to warm up. Moreover, during
warm-up, both engine wear and exhaust
gas emissions are very high. Therefore, be
ready to drive off immediately after starting
the engine and avoid high engine speeds.
«i? Avoid full throttle.
Accelerating gently reduces fuel consump
tion, engine wear, and does not disturb the
environment. <£'
Avoid driving at high speed.
Fuel consumption, exhaust emissions and
engine noise increase disproportionately at
high speeds. If you drive at approximately
three quarters of top speed, fuel consump
tion will be reduced by one half. Never drive
faster than the posted speed limit and
weather conditions permitting.
r.:Cib Drive as smoothly as possible
W5 and keep a lookout ahead.
Unn ecessary accelerating and braking in
crease fuel consumption and disturb the en
vironment.
r.:Cib Switch off your engine if you are
W5 caught in a traffic jam. This
saves fuel and reduces emissions.
195
Page 200 of 306
-----------------------VEHICLE OPERATION
Driving on rough roads or rugged terrain
For off road use, your Audi allroad is
equipped with a 4-level air suspension ride
height adjustment system, in addition to all
wheel drive.
Yo ur vehicle's ground clearance (ride height)
can be adjusted to changing terrain condi
tions with the push of a butt on.
At the highe st level setting (maximum clear
ing level), ground clearance is 8.2 inches
(20.8 em).
Some general tips
Navar drive on terra in that is too de
manding for the design of your ve
hicle or for your driving abilities.
Navar t�;�ke any unnecessary
chances!
• Before you take your vehicle off-roa d,
make certain that you know how to operate
the ride height adjustment system-see pa
ge 153. •
Make sure that you adjust the ride height
just before you travel on any rough sections
of terra in.
• Always adjust the vehicle's speed
to the trail and terrain conditions.
• Stow any luggage or other items in the
luggage compartment and make certain
that they are properly secured so that they
do not shift.
• Never travel on any roads, trails or terrain
on which motor vehicle travel is prohibited.
r.:Cib Always protect the environW ment. Respect our natural su�
roundings.
• After traveling off-road, remember to re
move any branches or other foreign objects
caught in the grille, underbody or wheels. In
particular, look for foreign objects (stones)
caught in the tire treads.
Check the vehicle for possible damage.
• Clean dirty windows, headlight and tail
light lenses and license plates. •
Check your brakes after traveling off-road
especially after driving through water.
• If need be, clean the underbody, suspen
sion parts, etc. (for example, in an under
body wash).
Some driving tips
Unpaved roads and off-road
• Drive slowly on unfamiliar roads and ter
rain, and stay alert for unexpected hazards
(for example, potholes, rocks and stumps).
• To avoid hanging up the vehicle and dam
aging the undercarriage on extremely un
even terrain, drive over large humps with
the hump in the center of the vehicle.
Instead, always drive over the hump with
the vehicle wheels on one side of the ve
hicle positioned over the crown of the
hump.
199
Page 201 of 306

VE
HICL E OPER ATION
Driving on slopes
• If you find that you cannot climb a grade,
never try to turn. Back down the hill in re
verse gear. If you don't. the vehicle may
tip or roll over!
• To reduce the danger of rolling the ve
hicle, drive the vehicle as close as possible
to the "fall line" (direction of maximum
slope) -not at an angle to the fall line.
If it feels like the vehicle is about to
roll over when you are trav eling at
an angle to the fall line, turn into the
fall line immediately.
• Never park your vehicle on extreme
uphill or down hill slopes.
Deep snow
• You should promptly install wheels
equipped with winter or all-season tires
when you expect winter road conditions -
see page 260.
• Install snow chains before attempting to
drive through deep, unplowed snow - see
page 261.
200 Driving
through water
• Always make certain that the ride level
system is in the highest level before cross
ing streams and similar water obstacles.
• You should always determine how deep
the water is before you drive through it.
• When crossing through water, travel only
at a walking speed. If possible, do not
stop and do not shut off the engine.
• Avo id driving through salt water
(beaches, for example).
After you have traveled through wa
ter, mud or slush, your brakes may
be slow to respond due to wet brake
rotors and pads. To get back the full
braking effectiveness, apply the
brakes cautiously to dry them out
The brakes must be dry before you
can get full brake performance. Sand,
quicksand and similar unsta
ble soils
Cross sandy or other unstable terrain briskly
and, if possible, do not stop.