Page 507 of 4592
AUTOMATIC TRANSAXLEFIRST AND REVERSE BRAKE ±
AX±58
FIRST AND REVERSE BRAKE
COMPONENTS
FIRST AND REVERSE BRAKE
COMPONENTS INSPECTION
INSPECT DISCS, PLATES AND FLANGES
Check if the sliding surfaces of the discs, plates and
flanges are worn or burnt. If necessary, replace them.
HINT:
�If the lining of the disc is peeling off or discolored, or
even if a part of the printed numbers are defaced, re-
place all discs.
�Before assembling new discs, soak them in ATF for
at least 15 minutes.
AX03Q±02
AX03R±03
Page 708 of 4592
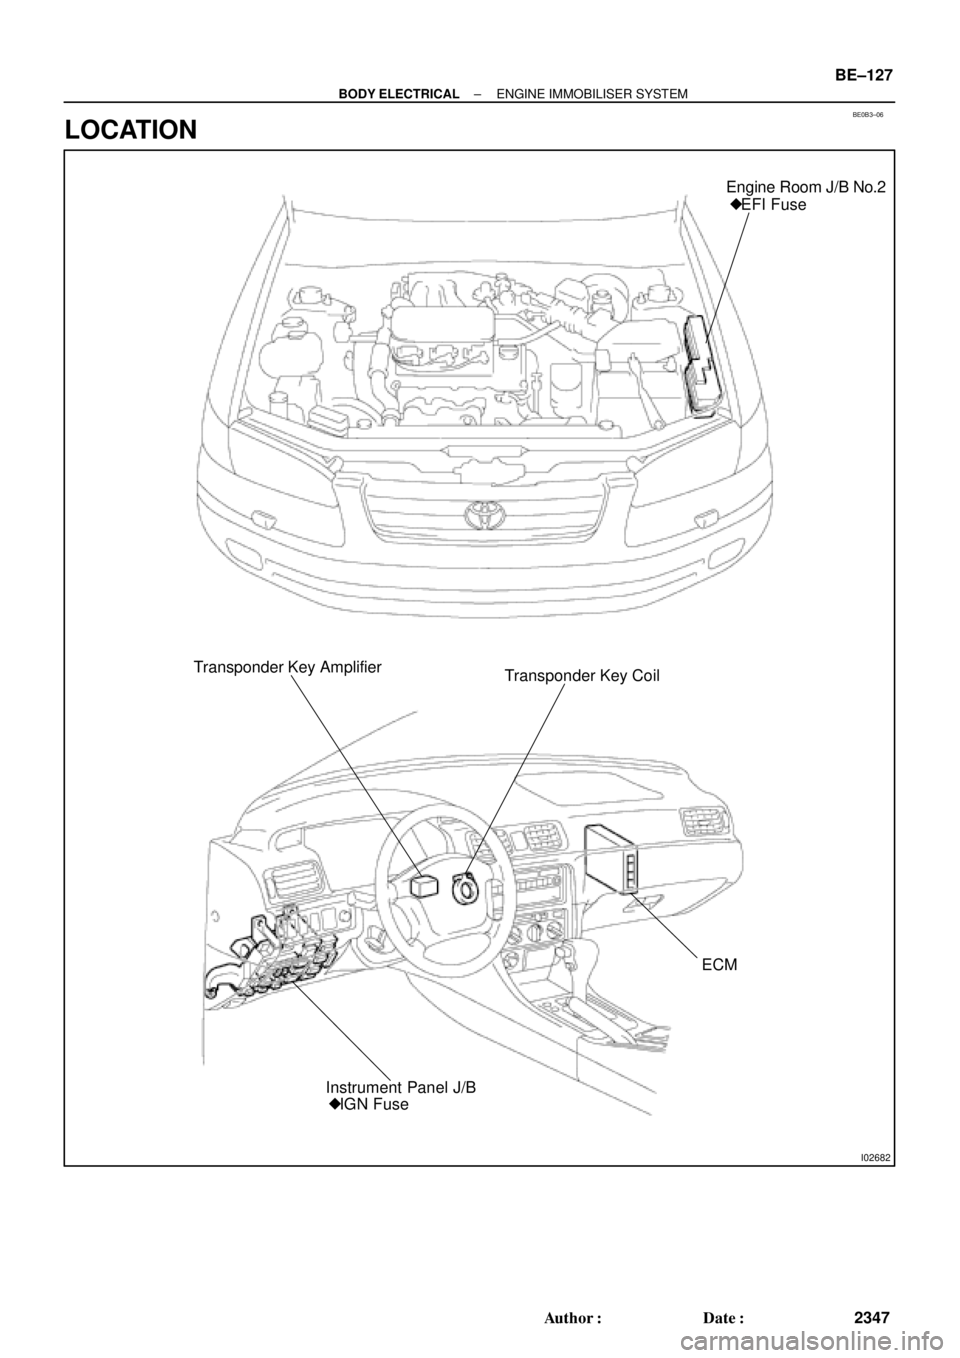
BE0B3±06
I02682
Engine Room J/B No.2
� EFI Fuse
Transponder Key Amplifier
Transponder Key Coil
ECM
� IGN Fuse Instrument Panel J/B
± BODY ELECTRICALENGINE IMMOBILISER SYSTEM
BE±127
2347 Author�: Date�:
LOCATION
Page 843 of 4592
BE0B3±06
I02682
Engine Room J/B No.2
� EFI Fuse
Transponder Key Amplifier
Transponder Key Coil
ECM
� IGN Fuse Instrument Panel J/B
± BODY ELECTRICALENGINE IMMOBILISER SYSTEM
BE±127
2347 Author�: Date�:
LOCATION
Page 974 of 4592

AB0158
SSTBattery
AB0152
SST
AB0158
SSTBattery
H01580
SST
H01346
± BODYSEAT BELT PRETENSIONER
BO±129
2477 Author�: Date�:
1. SEAT BELT PRETENSIONER DEPLOYMENT WHEN
SCRAPPING VEHICLE
HINT:
Have a battery ready as the power source to deploy the airbag.
(a) Check functioning of SST
CAUTION:
When deploying the seat belt pretensioner, always use the
specified SST: SRS Airbag Deployment Tool.
SST 09082±00700, 09082±00740
(1) Connect the SST to battery.
Connect the red clip of the SST to the battery posi-
tive (+) terminal and the black clip to the battery neg-
ative (±) terminal.
HINT:
Do not connect the yellow connector which will be connected
with the seat belt pretensioner.
(2) Check functioning of SST
Press the SST activation switch, and check the LED
of the SST activation switch lights up.
CAUTION:
If the LED lights up when the activation switch is not being
pressed, SST malfunction is probable, so definitely do not
use the SST.
(b) Install the SST.
(1) Remove the front door scuff plate.
(2) Remove the center pillar lower garnish.
(3) Disconnect the pretensioner connector as shown in
the illustration.
(4) Buckle the front seat belt and check that there is no
looseness and slack in the front seat inner belt and
front seat outer belt.
SST 09082±00700, 09082±00740
Page 1142 of 4592
COOLANT
1576 Author�: Date�:
REPLACEMENT
1. DRAIN ENGINE COOLANT
(a) Remove the radiator cap.
CAUTION:
To avoid the dang")
CO067±03
Z18990
Radiator Drain Plug
Engine Drain Plug CO±2
± COOLING (5S±FE)COOLANT
1576 Author�: Date�:
REPLACEMENT
1. DRAIN ENGINE COOLANT
(a) Remove the radiator cap.
CAUTION:
To avoid the danger of being burned, do not remove the ra-
diator cap while the engine and radiator are still hot, as fluid
and steam can be blown out under pressure.
(b) Loosen the radiator drain plug (on the right side of the ra-
diator lower tank) and engine drain plug (on the left rear
of the cylinder block), and drain the coolant.
(c) Close the drain plugs.
Torque: 25 N´m (250 kgf´cm, 18 ft´lbf) for engine
2. FILL ENGINE COOLANT
(a) Slowly fill the system with coolant.
�Use of improper coolants may damage engine cool-
ing system.
�Use ºToyota Long Life Coolantº or equivalent and
mix it with plan water according to the manufactur-
er's directions.
�Using of coolant which includes more than 50 %
(freezing protection down to ±35°C (±31°F) or 60 %
(freezing protection down to ±50°C (±58°F)) of eth-
ylene±glycol is recommended but not more than 70
%.
NOTICE:
�Do not use an alcohol type coolant or plain water
alone.
�The coolant should be mixed with plain water (prefer-
ably demineralized water or distilled water).
Capacity:
w/ Oil cooler6.9 litters (7.3 US qts, 6.1 lmp. qts)
w/o Oil cooler6.2 litters (6.5 US qts, 5.4 lmp. qts)
(b) Install the radiator cap.
(c) Start the engine, and bleed the cooling system.
(d) Refill the radiator reservoir with coolant until it reaches the
ºFULLº line.
3. CHECK FOR COOLANT LEAKS
Page 1171 of 4592
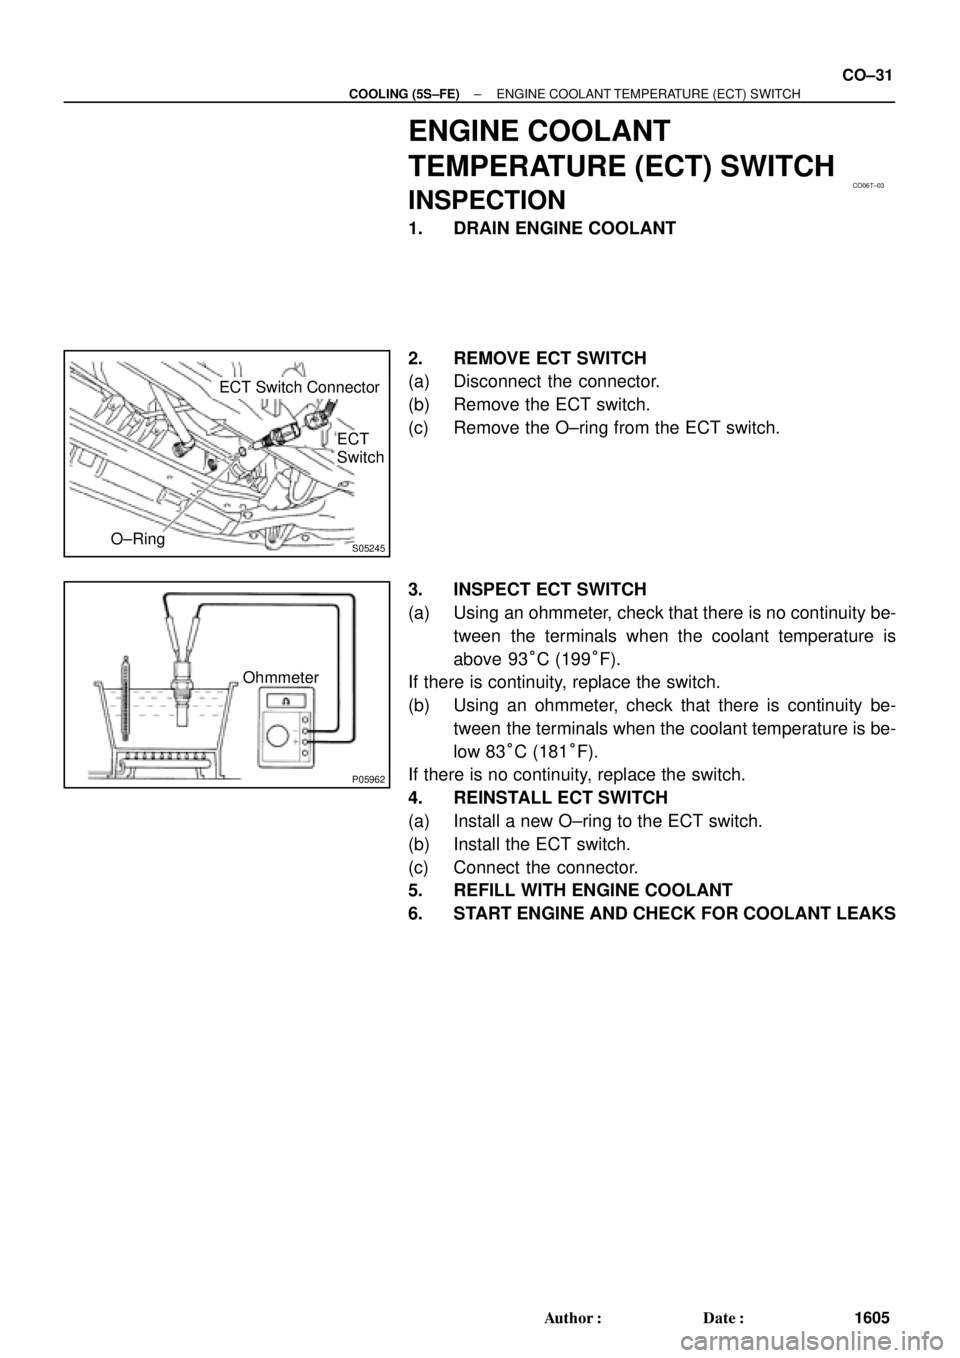
CO06T±03
S05245
ECT Switch Connector
O±RingECT
Switch
P05962
Ohmmeter
± COOLING (5S±FE)ENGINE COOLANT TEMPERATURE (ECT) SWITCH
CO±31
1605 Author�: Date�:
ENGINE COOLANT
TEMPERATURE (ECT) SWITCH
INSPECTION
1. DRAIN ENGINE COOLANT
2. REMOVE ECT SWITCH
(a) Disconnect the connector.
(b) Remove the ECT switch.
(c) Remove the O±ring from the ECT switch.
3. INSPECT ECT SWITCH
(a) Using an ohmmeter, check that there is no continuity be-
tween the terminals when the coolant temperature is
above 93°C (199°F).
If there is continuity, replace the switch.
(b) Using an ohmmeter, check that there is continuity be-
tween the terminals when the coolant temperature is be-
low 83°C (181°F).
If there is no continuity, replace the switch.
4. REINSTALL ECT SWITCH
(a) Install a new O±ring to the ECT switch.
(b) Install the ECT switch.
(c) Connect the connector.
5. REFILL WITH ENGINE COOLANT
6. START ENGINE AND CHECK FOR COOLANT LEAKS
Page 1176 of 4592
COOLANT
1610 Author�: Date�:
REPLACEMENT
1. DRAIN ENGINE COOLANT
(a) Remove the radiator cap from the water outlet.
CAUTION:
To avoid t")
CO03C±04
Z18835
Drain Plug
Drain Plug CO±2
± COOLING (1MZ±FE)COOLANT
1610 Author�: Date�:
REPLACEMENT
1. DRAIN ENGINE COOLANT
(a) Remove the radiator cap from the water outlet.
CAUTION:
To avoid the danger of being burned, do not remove the ra-
diator cap while the engine and radiator are still hot, as fluid
and steam can be blown out under pressure.
(b) Loosen the radiator drain plug and engine drain plugs,
and drain the coolant.
(c) Close the drain plugs.
Torque:
RH engine drain plug on EGR cooler:
7 N´m (70 kgf´cm, 61 in.´lbf)
LH engine drain plug on union:
13 N´m (130 kgf´cm, 9 ft´lbf)
2. FILL ENGINE COOLANT
(a) Slowly fill the system with coolant.
�Use of improper coolants may damage engine cool-
ing system.
�Use ºToyota Long life Coolantº or equivalent and
mix it with plan water according to the manufactur-
er's directions.
�Using of coolant which includes more than 50 %
(freezing protection down to ±35°C (±31°F) or 60 %
(freezing protection down to ±50°C (±58°F)) of eth-
ylene±glycol is recommended but not more than 70
%.
NOTICE:
�Do not use an alcohol type coolant or plain water
alone.
�The coolant should be mixed with plain water (prefer-
ably demineralized water or distilled water).
Capacity: 9.2 liters (9.7 US qts, 8.1 lmp. qts)
(b) Install the radiator cap.
(c) Start the engine, and bleed the cooling system.
(d) If necessary, refill coolant into the reservoir up to the
ºFULLº line.
3. CHECK ENGINE COOLANT FOR LEAKS
4. CHECK ENGINE COOLANT SPECIFIC GRAVITY
CORRECTLY
Page 1209 of 4592
± COOLING (1MZ±FE)ENGINE COOLANT TEMPERATURE (ECT) SWITCH
CO±35
1643 Author�: Date�:
4. REFILL ENGINE COOLANT
5. START ENGINE AND CHECK FOR COOLANT LEAKS