1999 SUBARU LEGACY gas type
[x] Cancel search: gas typePage 55 of 1456
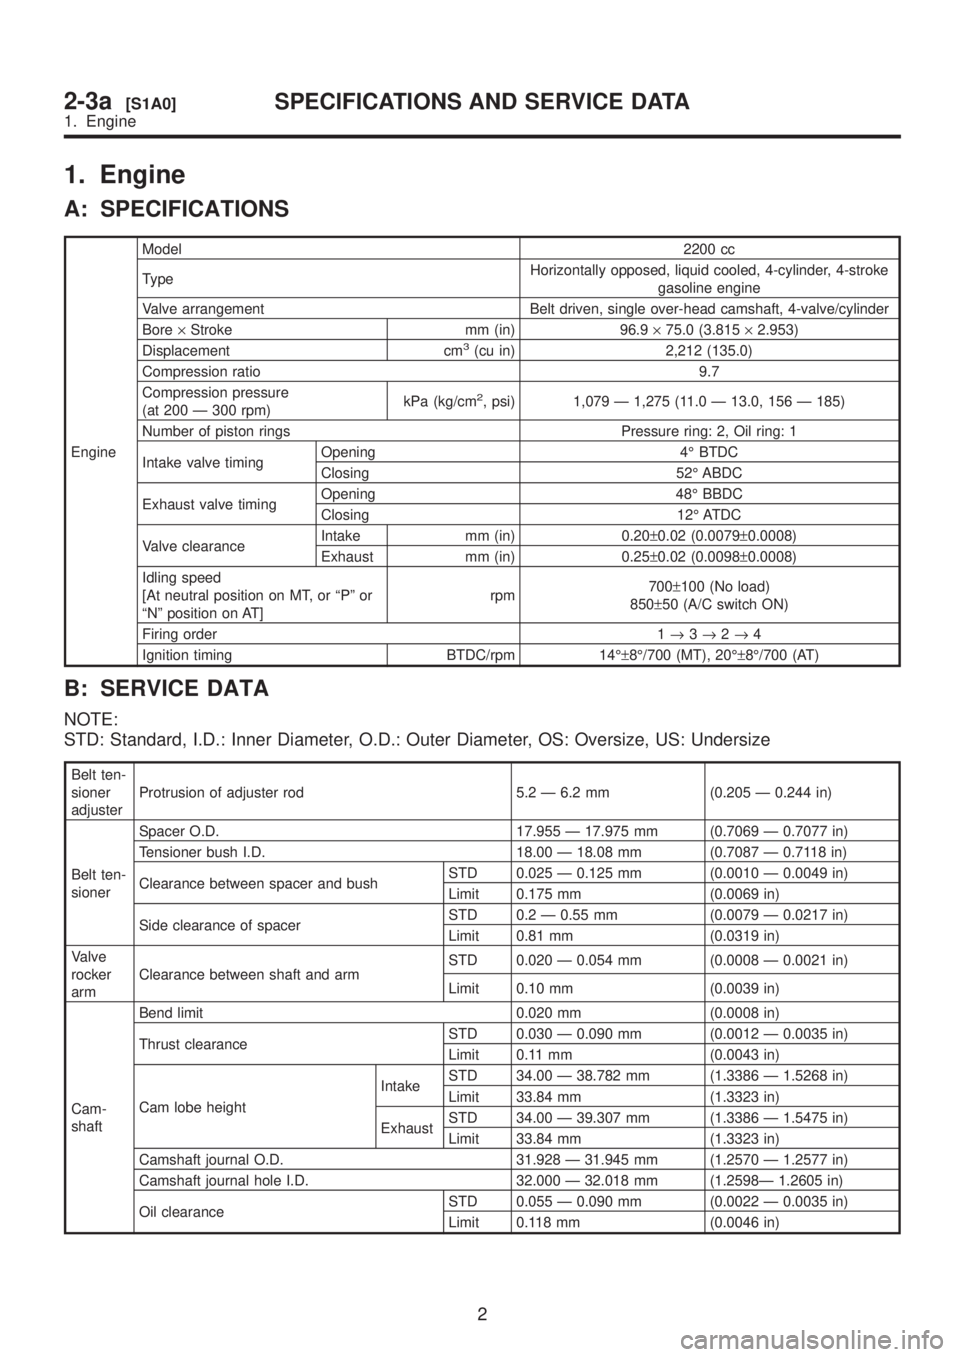
1. Engine
A: SPECIFICATIONS
EngineModel2200 cc
TypeHorizontally opposed, liquid cooled, 4-cylinder, 4-stroke
gasoline engine
Valve arrangement Belt driven, single over-head camshaft, 4-valve/cylinder
Bore´Stroke mm (in) 96.9´75.0 (3.815´2.953)
Displacement cm
3(cu in) 2,212 (135.0)
Compression ratio 9.7
Compression pressure
(at 200 Ð 300 rpm)kPa (kg/cm
2, psi) 1,079 Ð 1,275 (11.0 Ð 13.0, 156 Ð 185)
Number of piston rings Pressure ring: 2, Oil ring: 1
Intake valve timingOpening 4É BTDC
Closing 52É ABDC
Exhaust valve timingOpening 48É BBDC
Closing 12É ATDC
Valve clearanceIntake mm (in) 0.20±0.02 (0.0079±0.0008)
Exhaust mm (in) 0.25±0.02 (0.0098±0.0008)
Idling speed
[At neutral position on MT, or ªPº or
ªNº position on AT]rpm700±100 (No load)
850±50 (A/C switch ON)
Firing order 1®3®2®4
Ignition timing BTDC/rpm 14ɱ8É/700 (MT), 20ɱ8É/700 (AT)
B: SERVICE DATA
NOTE:
STD: Standard, I.D.: Inner Diameter, O.D.: Outer Diameter, OS: Oversize, US: Undersize
Belt ten-
sioner
adjusterProtrusion of adjuster rod 5.2 Ð 6.2 mm (0.205 Ð 0.244 in)
Belt ten-
sionerSpacer O.D. 17.955 Ð 17.975 mm (0.7069 Ð 0.7077 in)
Tensioner bush I.D. 18.00 Ð 18.08 mm (0.7087 Ð 0.7118 in)
Clearance between spacer and bushSTD 0.025 Ð 0.125 mm (0.0010 Ð 0.0049 in)
Limit 0.175 mm (0.0069 in)
Side clearance of spacerSTD 0.2 Ð 0.55 mm (0.0079 Ð 0.0217 in)
Limit 0.81 mm (0.0319 in)
Valve
rocker
armClearance between shaft and armSTD 0.020 Ð 0.054 mm (0.0008 Ð 0.0021 in)
Limit 0.10 mm (0.0039 in)
Cam-
shaftBend limit 0.020 mm (0.0008 in)
Thrust clearanceSTD 0.030 Ð 0.090 mm (0.0012 Ð 0.0035 in)
Limit 0.11 mm (0.0043 in)
Cam lobe heightIntakeSTD 34.00 Ð 38.782 mm (1.3386 Ð 1.5268 in)
Limit 33.84 mm (1.3323 in)
ExhaustSTD 34.00 Ð 39.307 mm (1.3386 Ð 1.5475 in)
Limit 33.84 mm (1.3323 in)
Camshaft journal O.D. 31.928 Ð 31.945 mm (1.2570 Ð 1.2577 in)
Camshaft journal hole I.D. 32.000 Ð 32.018 mm (1.2598Ð 1.2605 in)
Oil clearanceSTD 0.055 Ð 0.090 mm (0.0022 Ð 0.0035 in)
Limit 0.118 mm (0.0046 in)
2
2-3a[S1A0]SPECIFICATIONS AND SERVICE DATA
1. Engine
Page 132 of 1456

2. Engine Noise
Type of sound Condition Possible cause
Regular clicking soundSound increases as engine
speed increases.IValve mechanism is defective.
IIncorrect valve clearance
IWorn valve rocker
IWorn camshaft
IBroken valve spring
Heavy and dull clankOil pressure is low.IWorn crankshaft main bearing
IWorn connecting rod bearing (big end)
Oil pressure is normal.ILoose flywheel mounting bolts
IDamaged engine mounting
High-pitched clank
(Spark knock)Sound is noticeable when
accelerating with an overload.IIgnition timing advanced
IAccumulation of carbon inside combustion chamber
IWrong spark plug
IImproper gasoline
Clank when engine speed is
medium (1,000 to 2,000 rpm)Sound is reduced when fuel
injector connector of noisy cyl-
inder is disconnected.
(NOTE*)IWorn crankshaft main bearing
IWorn bearing at crankshaft end of connecting rod
Knocking sound when engine
is operating under idling speed
and engine is warmSound is reduced when fuel
injector connector of noisy cyl-
inder is disconnected.
(NOTE*)IWorn cylinder liner and piston ring
IBroken or stuck piston ring
IWorn piston pin and hole at piston end of connecting rod
Sound is not reduced if each
fuel injector connector is dis-
connected in turn. (NOTE*)IUnusually worn valve lifter
IWorn cam gear
IWorn camshaft journal bore in crankcase
Squeaky sound ÐIInsufficient generator lubrication
Rubbing sound ÐIDefective generator brush and rotor contact
Gear scream when starting
engineÐIDefective ignition starter switch
IWorn gear and starter pinion
Sound like polishing glass with
a dry clothÐILoose drive belt
IDefective engine coolant pump shaft
Hissing sound ÐILoss of compression
IAir leakage in air intake system, hoses, connections or
manifolds
Timing belt noise ÐILoose timing belt
IBelt contacting case/adjacent part
Valve tappet noise ÐIIncorrect valve clearance
NOTE*:
When disconnecting fuel injector connector, Malfunction Indicator Light (CHECK ENGINE light) illuminates and trouble code is
stored in ECM memory.
Therefore, carry out the CLEAR MEMORY MODE
necting fuel injector connector.
78
2-3a[K200]DIAGNOSTICS
2. Engine Noise
Page 133 of 1456
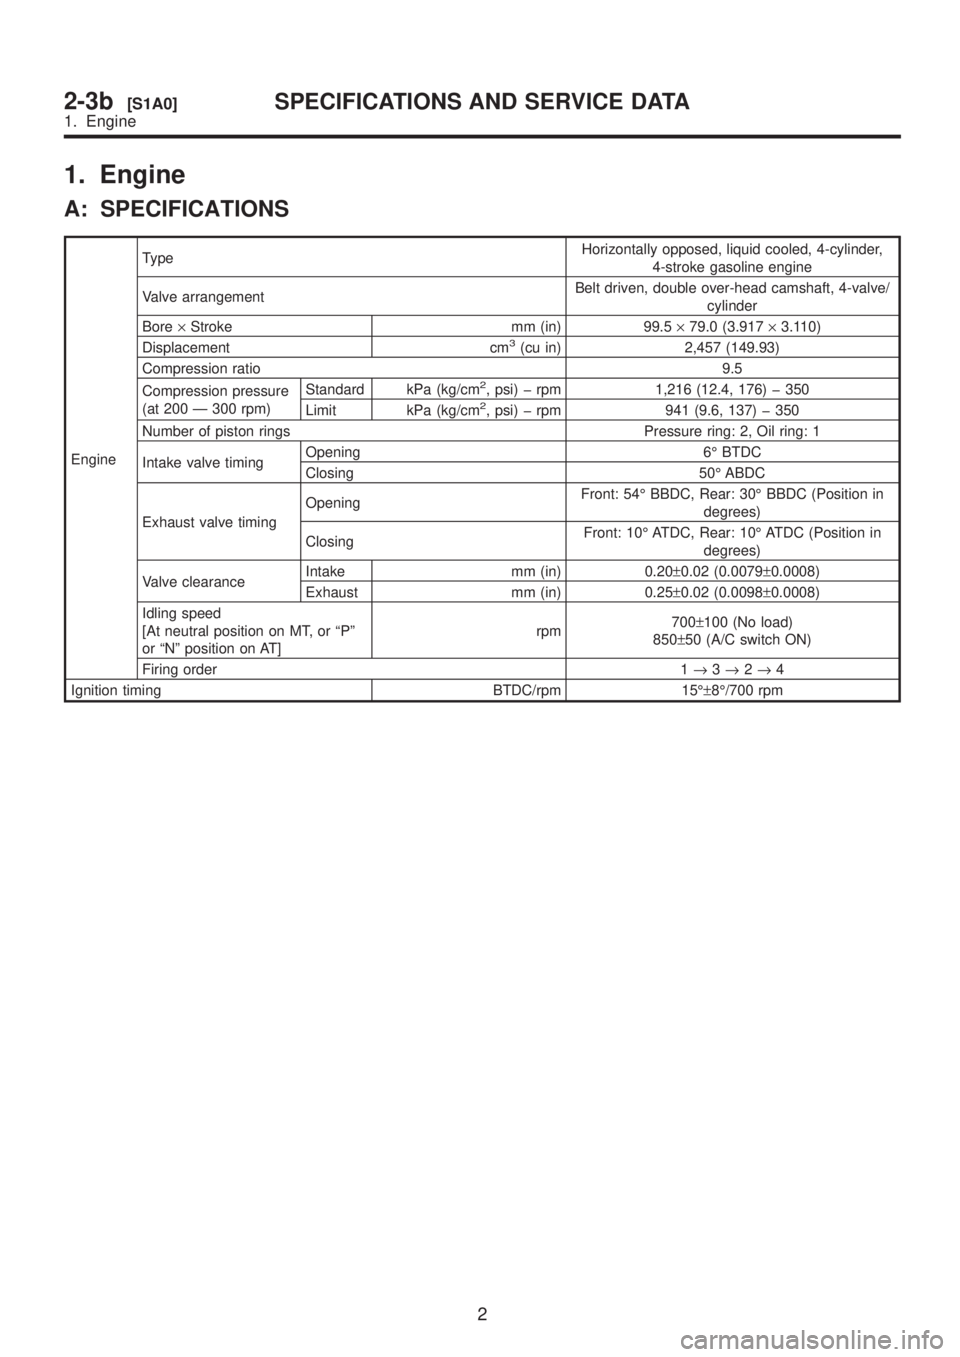
1. Engine
A: SPECIFICATIONS
EngineTypeHorizontally opposed, liquid cooled, 4-cylinder,
4-stroke gasoline engine
Valve arrangementBelt driven, double over-head camshaft, 4-valve/
cylinder
Bore´Stroke mm (in) 99.5´79.0 (3.917´3.110)
Displacement cm
3(cu in) 2,457 (149.93)
Compression ratio 9.5
Compression pressure
(at 200 Ð 300 rpm)Standard kPa (kg/cm
2, psi) þ rpm 1,216 (12.4, 176) þ 350
Limit kPa (kg/cm2, psi) þ rpm 941 (9.6, 137) þ 350
Number of piston rings Pressure ring: 2, Oil ring: 1
Intake valve timingOpening 6É BTDC
Closing 50É ABDC
Exhaust valve timingOpeningFront: 54É BBDC, Rear: 30É BBDC (Position in
degrees)
ClosingFront: 10É ATDC, Rear: 10É ATDC (Position in
degrees)
Valve clearanceIntake mm (in) 0.20±0.02 (0.0079±0.0008)
Exhaust mm (in) 0.25±0.02 (0.0098±0.0008)
Idling speed
[At neutral position on MT, or ªPº
or ªNº position on AT]rpm700±100 (No load)
850±50 (A/C switch ON)
Firing order 1®3®2®4
Ignition timing BTDC/rpm 15ɱ8É/700 rpm
2
2-3b[S1A0]SPECIFICATIONS AND SERVICE DATA
1. Engine
Page 207 of 1456
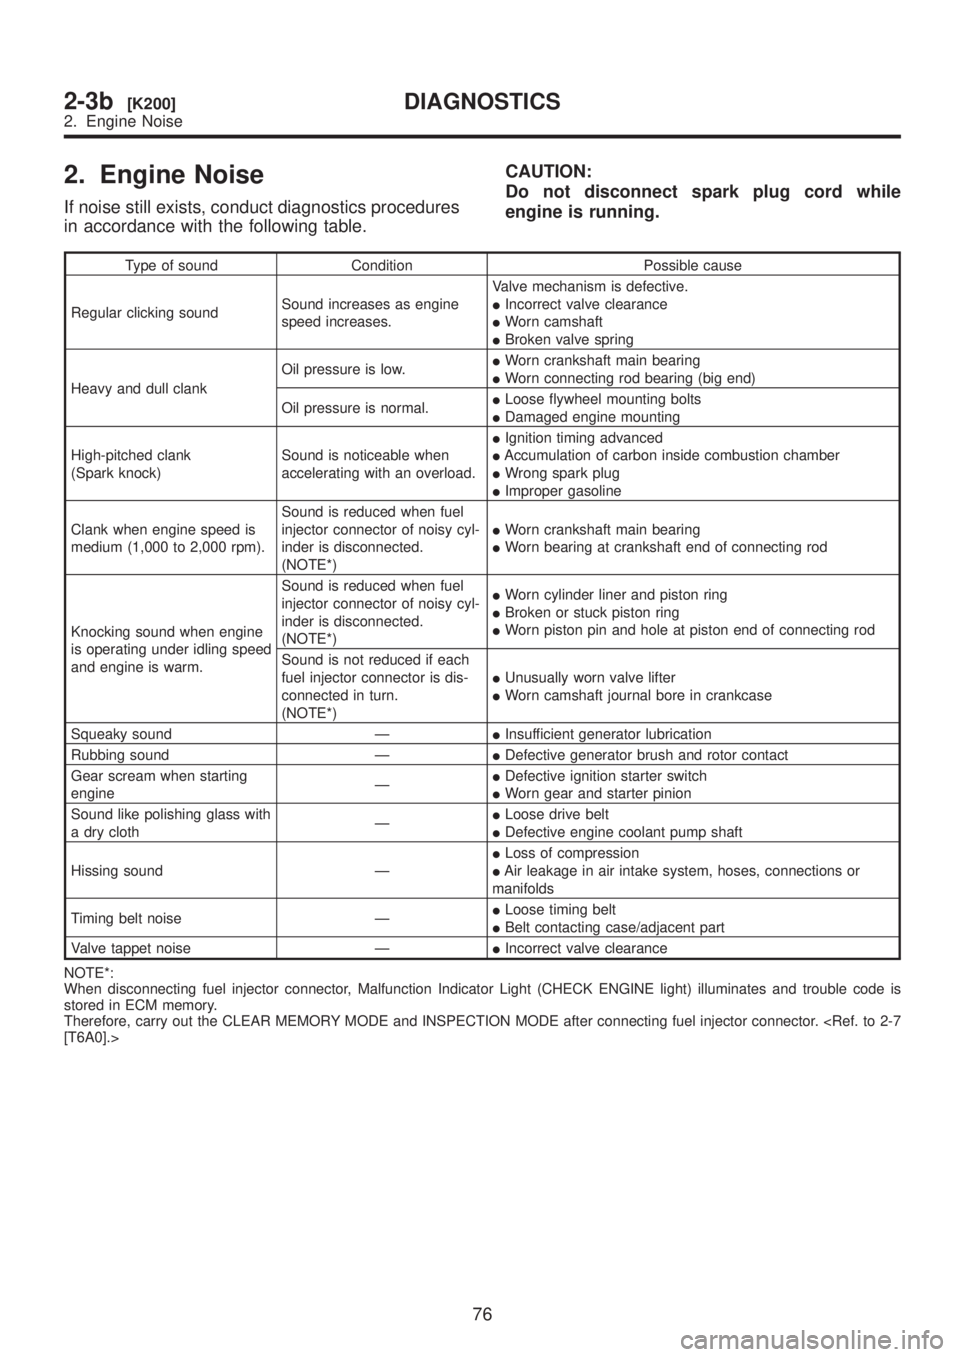
2. Engine Noise
If noise still exists, conduct diagnostics procedures
in accordance with the following table.CAUTION:
Do not disconnect spark plug cord while
engine is running.
Type of sound Condition Possible cause
Regular clicking soundSound increases as engine
speed increases.Valve mechanism is defective.
IIncorrect valve clearance
IWorn camshaft
IBroken valve spring
Heavy and dull clankOil pressure is low.IWorn crankshaft main bearing
IWorn connecting rod bearing (big end)
Oil pressure is normal.ILoose flywheel mounting bolts
IDamaged engine mounting
High-pitched clank
(Spark knock)Sound is noticeable when
accelerating with an overload.IIgnition timing advanced
IAccumulation of carbon inside combustion chamber
IWrong spark plug
IImproper gasoline
Clank when engine speed is
medium (1,000 to 2,000 rpm).Sound is reduced when fuel
injector connector of noisy cyl-
inder is disconnected.
(NOTE*)IWorn crankshaft main bearing
IWorn bearing at crankshaft end of connecting rod
Knocking sound when engine
is operating under idling speed
and engine is warm.Sound is reduced when fuel
injector connector of noisy cyl-
inder is disconnected.
(NOTE*)IWorn cylinder liner and piston ring
IBroken or stuck piston ring
IWorn piston pin and hole at piston end of connecting rod
Sound is not reduced if each
fuel injector connector is dis-
connected in turn.
(NOTE*)IUnusually worn valve lifter
IWorn camshaft journal bore in crankcase
Squeaky sound ÐIInsufficient generator lubrication
Rubbing sound ÐIDefective generator brush and rotor contact
Gear scream when starting
engineÐIDefective ignition starter switch
IWorn gear and starter pinion
Sound like polishing glass with
a dry clothÐILoose drive belt
IDefective engine coolant pump shaft
Hissing sound ÐILoss of compression
IAir leakage in air intake system, hoses, connections or
manifolds
Timing belt noise ÐILoose timing belt
IBelt contacting case/adjacent part
Valve tappet noise ÐIIncorrect valve clearance
NOTE*:
When disconnecting fuel injector connector, Malfunction Indicator Light (CHECK ENGINE light) illuminates and trouble code is
stored in ECM memory.
Therefore, carry out the CLEAR MEMORY MODE and INSPECTION MODE after connecting fuel injector connector.
76
2-3b[K200]DIAGNOSTICS
2. Engine Noise
Page 419 of 1456

5) Remove release lever retainer spring from
release lever pivot with a screwdriver by accessing
it through clutch housing release lever hole. Then
remove release lever.
B2M1258A
B: INSPECTION
1. RELEASE BEARING
CAUTION:
Since this bearing is grease sealed and is of a
nonlubrication type, do not wash with gasoline
or any solvent when servicing the clutch.
1) Check the bearing for smooth movement by
applying force in the radial direction.
Radial direction stroke:
FWD; Approx.
1.0 mm (0.039 in)
AWD; Approx.
1.4 mm (0.055 in)
B2M0173A
2) Check the bearing for smooth rotation by apply-
ing pressure in the thrust direction.
G2M0240
3) Check wear and damage of bearing case sur-
face contacting with lever.
2. RELEASE LEVER
1) Check lever pivot portion and the point of con-
tact with release bearing case for wear.
G2M0241
C: INSTALLATION
CAUTION:
Before or during assembling, lubricate the fol-
lowing points with a light coat of grease.
IInner groove of release bearing
IContact surface of lever and pivot
IContact surface of lever and bearing
ITransmission main shaft spline (Use grease
containing molybdenum disulphide.)
9
[W3C0]2-10SERVICE PROCEDURE
3. Release Bearing and Lever
Page 424 of 1456

3) Damaged or worn disc contact surface of pres-
sure plate.
4) Loose strap plate setting bolt.
5) Worn diaphragm sliding surface.
G2M0249
3. FLYWHEEL
CAUTION:
Since this bearing is grease sealed and is of a
nonlubrication type, do not wash with gasoline
or any solvent.
1) Damage of facing and ring gear
If defective, replace flywheel.
G2M0250
2) Smoothness of rotation
Rotate ball bearing applying pressure in thrust
direction.3) If noise or excessive play is noted, replace ball
bearing as follows:
(1) Drive out ball bearing from flywheel.
(2) Press bearing into flywheel until bearing
end surface is flush with clutch disc contact sur-
face of flywheel. Do not press inner race.
ST 899754112 SNAP RING PRESS
H2M1563A
C: INSTALLATION
1) Install flywheel and ST.
ST 498497100 CRANKSHAFT STOPPER
B2M0332A
2) Tighten the flywheel attaching bolts to the
specified torque.
NOTE:
Tighten flywheel installing bolts gradually. Each
bolt should be tightened to the specified torque in
a crisscross fashion.
Tightening torque:
72
±3 N´m (7.3±0.3 kg-m, 52.8±2.2 ft-lb)
B2M0331B
13
[W4C0]2-10SERVICE PROCEDURE
4. Clutch Disc and Cover
Page 659 of 1456
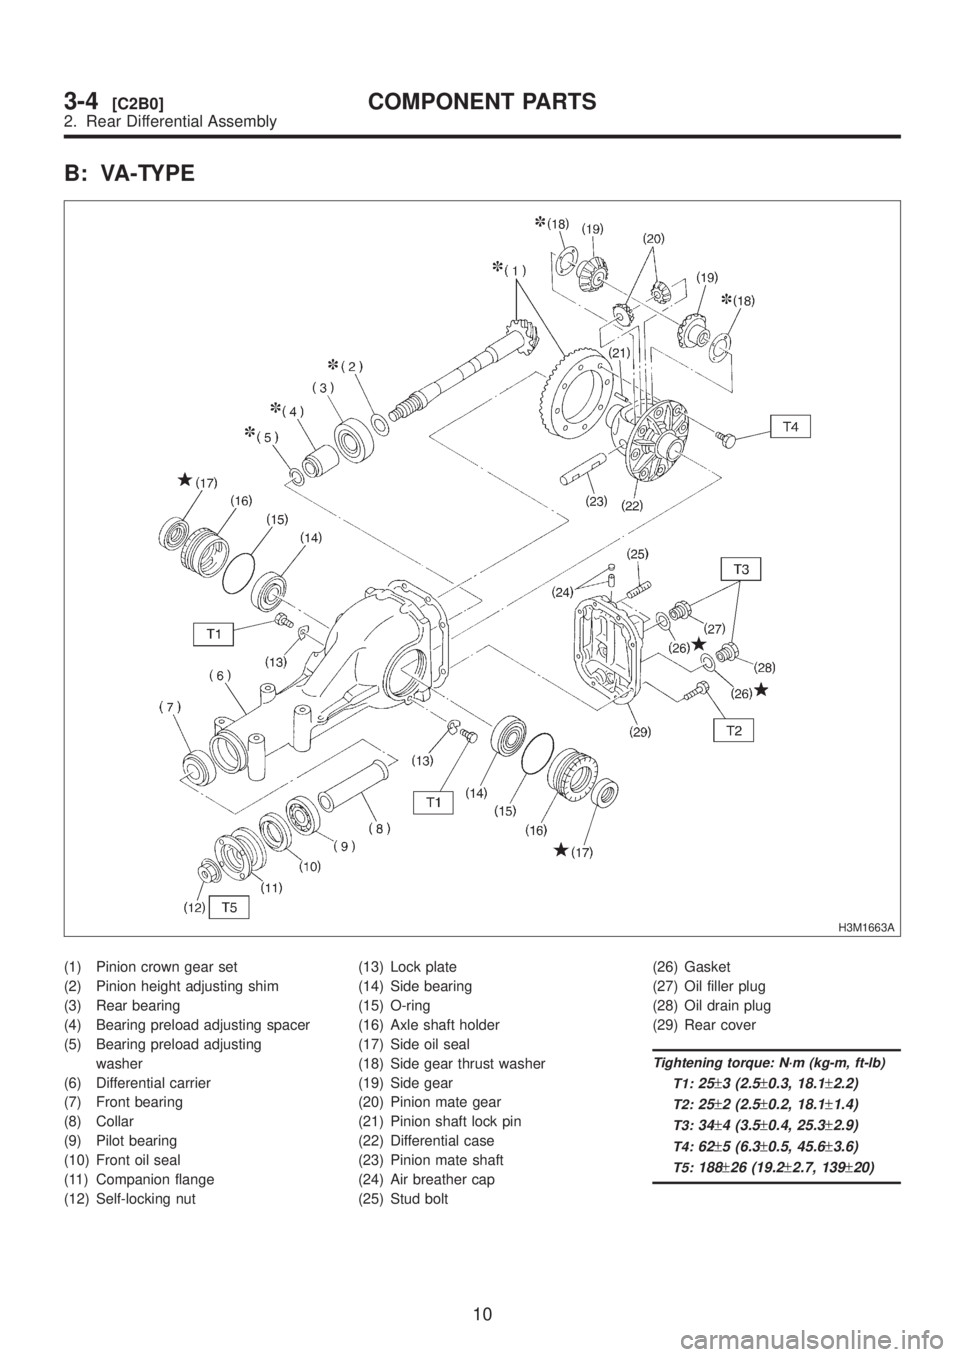
B: VA-TYPE
H3M1663A
(1) Pinion crown gear set
(2) Pinion height adjusting shim
(3) Rear bearing
(4) Bearing preload adjusting spacer
(5) Bearing preload adjusting
washer
(6) Differential carrier
(7) Front bearing
(8) Collar
(9) Pilot bearing
(10) Front oil seal
(11) Companion flange
(12) Self-locking nut(13) Lock plate
(14) Side bearing
(15) O-ring
(16) Axle shaft holder
(17) Side oil seal
(18) Side gear thrust washer
(19) Side gear
(20) Pinion mate gear
(21) Pinion shaft lock pin
(22) Differential case
(23) Pinion mate shaft
(24) Air breather cap
(25) Stud bolt(26) Gasket
(27) Oil filler plug
(28) Oil drain plug
(29) Rear cover
Tightening torque: N´m (kg-m, ft-lb)
T1:
25±3 (2.5±0.3, 18.1±2.2)
T2:25±2 (2.5±0.2, 18.1±1.4)
T3:34±4 (3.5±0.4, 25.3±2.9)
T4:62±5 (6.3±0.5, 45.6±3.6)
T5:188±26 (19.2±2.7, 139±20)
10
3-4[C2B0]COMPONENT PARTS
2. Rear Differential Assembly
Page 698 of 1456
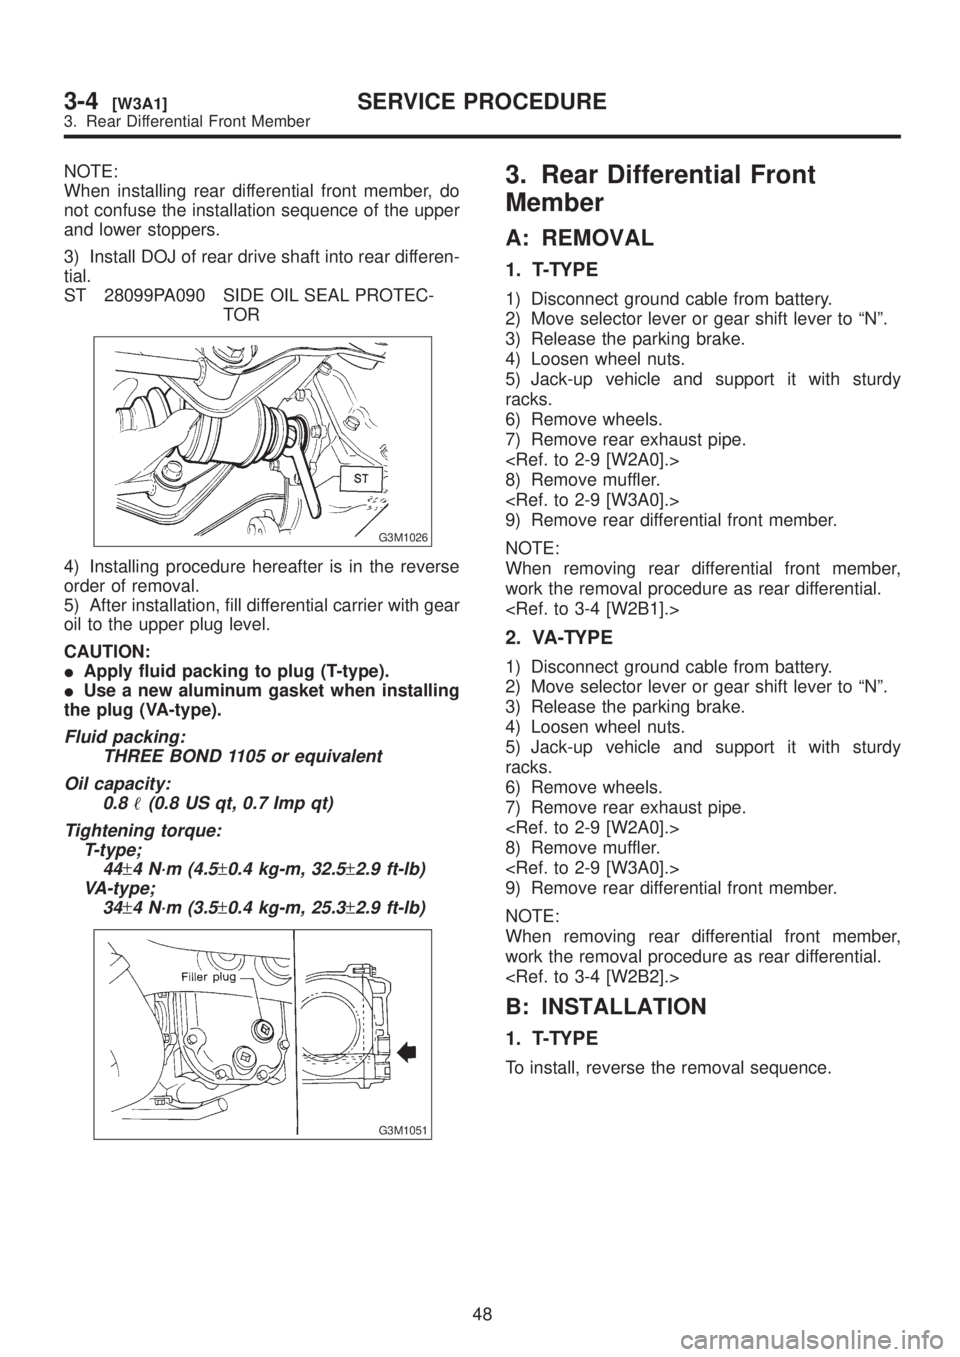
NOTE:
When installing rear differential front member, do
not confuse the installation sequence of the upper
and lower stoppers.
3) Install DOJ of rear drive shaft into rear differen-
tial.
ST 28099PA090 SIDE OIL SEAL PROTEC-
TOR
G3M1026
4) Installing procedure hereafter is in the reverse
order of removal.
5) After installation, fill differential carrier with gear
oil to the upper plug level.
CAUTION:
IApply fluid packing to plug (T-type).
IUse a new aluminum gasket when installing
the plug (VA-type).
Fluid packing:
THREE BOND 1105 or equivalent
Oil capacity:
0.8
(0.8 US qt, 0.7 Imp qt)
Tightening torque:
T-type;
44
±4 N´m (4.5±0.4 kg-m, 32.5±2.9 ft-lb)
VA-type;
34
±4 N´m (3.5±0.4 kg-m, 25.3±2.9 ft-lb)
G3M1051
3. Rear Differential Front
Member
A: REMOVAL
1. T-TYPE
1) Disconnect ground cable from battery.
2) Move selector lever or gear shift lever to ªNº.
3) Release the parking brake.
4) Loosen wheel nuts.
5) Jack-up vehicle and support it with sturdy
racks.
6) Remove wheels.
7) Remove rear exhaust pipe.
8) Remove muffler.
9) Remove rear differential front member.
NOTE:
When removing rear differential front member,
work the removal procedure as rear differential.
2. VA-TYPE
1) Disconnect ground cable from battery.
2) Move selector lever or gear shift lever to ªNº.
3) Release the parking brake.
4) Loosen wheel nuts.
5) Jack-up vehicle and support it with sturdy
racks.
6) Remove wheels.
7) Remove rear exhaust pipe.
8) Remove muffler.
9) Remove rear differential front member.
NOTE:
When removing rear differential front member,
work the removal procedure as rear differential.
B: INSTALLATION
1. T-TYPE
To install, reverse the removal sequence.
48
3-4[W3A1]SERVICE PROCEDURE
3. Rear Differential Front Member