Page 1134 of 1456
(3) Stick them fast by pressing all sides lightly.
10) Installation of molding:
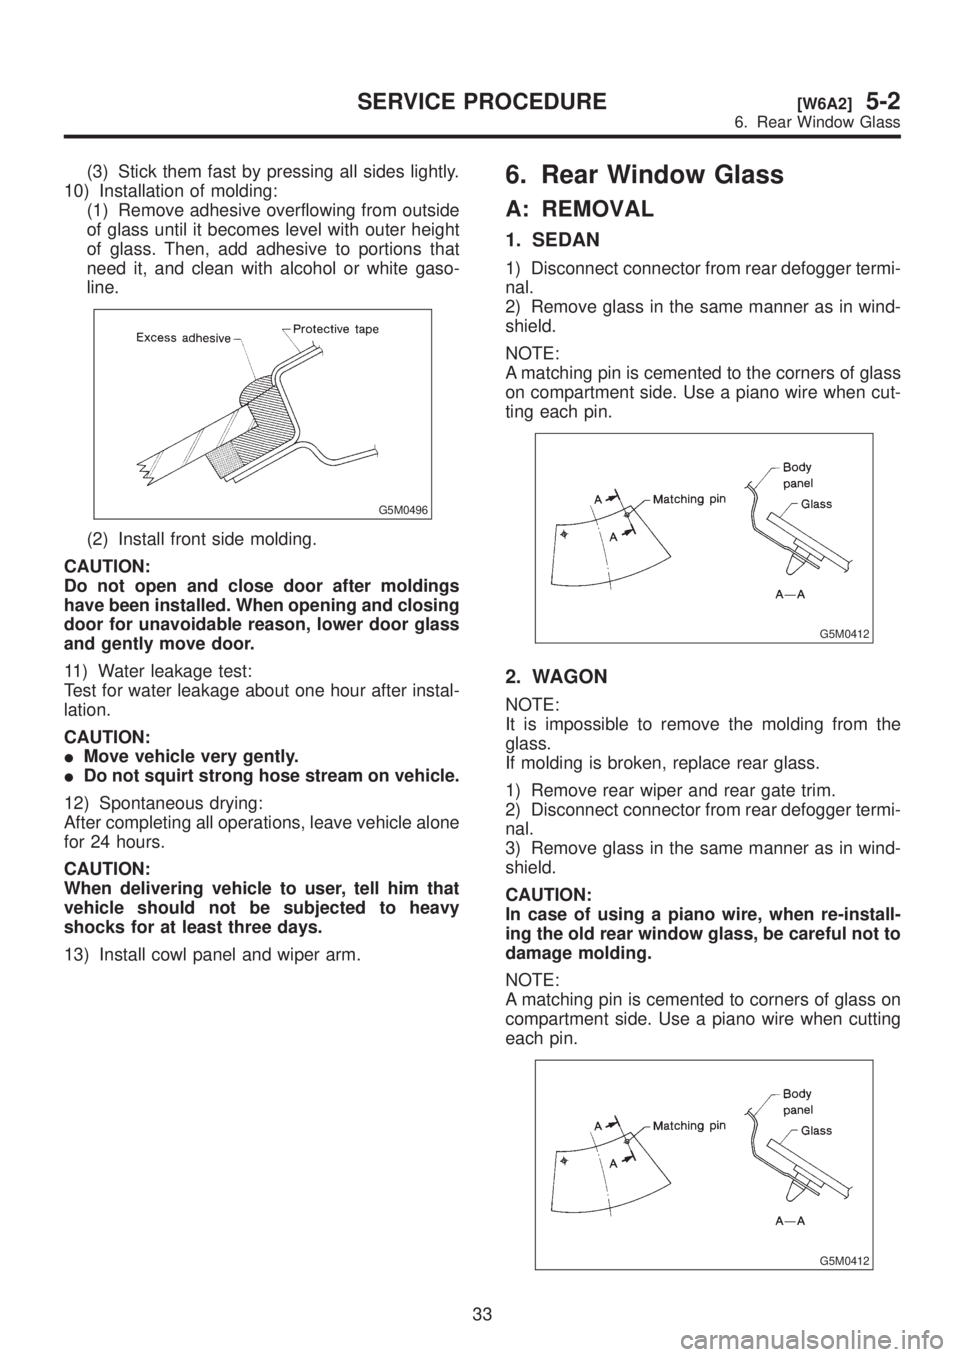
(1) Remove adhesive overflowing from outside
of glass until it becomes level with outer height
of glass. Then, add adhesive to portions that
need it, and clean with alcohol or white gaso-
line.
G5M0496
(2) Install front side molding.
CAUTION:
Do not open and close door after moldings
have been installed. When opening and closing
door for unavoidable reason, lower door glass
and gently move door.
11) Water leakage test:
Test for water leakage about one hour after instal-
lation.
CAUTION:
IMove vehicle very gently.
IDo not squirt strong hose stream on vehicle.
12) Spontaneous drying:
After completing all operations, leave vehicle alone
for 24 hours.
CAUTION:
When delivering vehicle to user, tell him that
vehicle should not be subjected to heavy
shocks for at least three days.
13) Install cowl panel and wiper arm.
6. Rear Window Glass
A: REMOVAL
1. SEDAN
1) Disconnect connector from rear defogger termi-
nal.
2) Remove glass in the same manner as in wind-
shield.
NOTE:
A matching pin is cemented to the corners of glass
on compartment side. Use a piano wire when cut-
ting each pin.
G5M0412
2. WAGON
NOTE:
It is impossible to remove the molding from the
glass.
If molding is broken, replace rear glass.
1) Remove rear wiper and rear gate trim.
2) Disconnect connector from rear defogger termi-
nal.
3) Remove glass in the same manner as in wind-
shield.
CAUTION:
In case of using a piano wire, when re-install-
ing the old rear window glass, be careful not to
damage molding.
NOTE:
A matching pin is cemented to corners of glass on
compartment side. Use a piano wire when cutting
each pin.
G5M0412
33
[W6A2]5-2SERVICE PROCEDURE
6. Rear Window Glass
Page 1135 of 1456
B: INSTALLATION
1. SEDAN
1) Install glass in the same manner as in wind-
shield.
2) Stick dam rubber (A).
3) While aligning ceramic print notch (B) on rear
window glass with marks in the center of upper and
lower moldings, install the two moldings on rear
window glass.
B5M0089C
4) Make rear defogger connections.
5) After installation, test for water leakage after
about one hour, and leave vehicle alone for 24
hours.
2. WAGON
B5M0090A
1) Install rear gate trim.
2) Install glass in the same manner as in wind-
shield.
3) About one hour after installation, test for water
leakage. Leave vehicle for 24 hours before using
it.4) Connect rear defogger connections.
5) Install high-mount stop light and rear wiper.
34
5-2[W6B1]SERVICE PROCEDURE
6. Rear Window Glass
Page 1137 of 1456
B: INSTALLATION
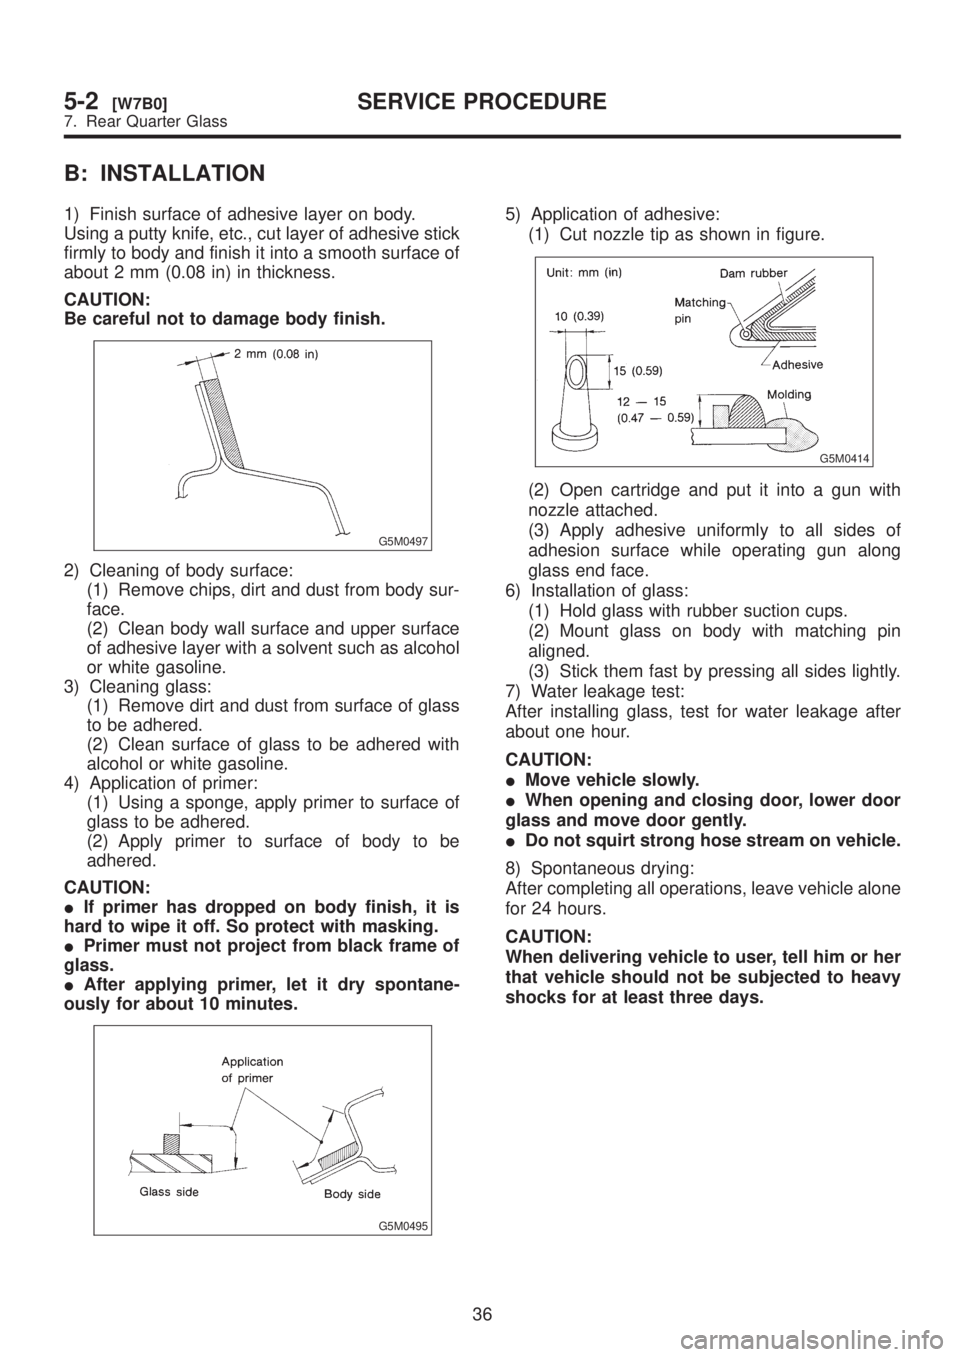
1) Finish surface of adhesive layer on body.
Using a putty knife, etc., cut layer of adhesive stick
firmly to body and finish it into a smooth surface of
about 2 mm (0.08 in) in thickness.
CAUTION:
Be careful not to damage body finish.
G5M0497
2) Cleaning of body surface:
(1) Remove chips, dirt and dust from body sur-
face.
(2) Clean body wall surface and upper surface
of adhesive layer with a solvent such as alcohol
or white gasoline.
3) Cleaning glass:
(1) Remove dirt and dust from surface of glass
to be adhered.
(2) Clean surface of glass to be adhered with
alcohol or white gasoline.
4) Application of primer:
(1) Using a sponge, apply primer to surface of
glass to be adhered.
(2) Apply primer to surface of body to be
adhered.
CAUTION:
IIf primer has dropped on body finish, it is
hard to wipe it off. So protect with masking.
IPrimer must not project from black frame of
glass.
IAfter applying primer, let it dry spontane-
ously for about 10 minutes.
G5M0495
5) Application of adhesive:
(1) Cut nozzle tip as shown in figure.
G5M0414
(2) Open cartridge and put it into a gun with
nozzle attached.
(3) Apply adhesive uniformly to all sides of
adhesion surface while operating gun along
glass end face.
6) Installation of glass:
(1) Hold glass with rubber suction cups.
(2) Mount glass on body with matching pin
aligned.
(3) Stick them fast by pressing all sides lightly.
7) Water leakage test:
After installing glass, test for water leakage after
about one hour.
CAUTION:
IMove vehicle slowly.
IWhen opening and closing door, lower door
glass and move door gently.
IDo not squirt strong hose stream on vehicle.
8) Spontaneous drying:
After completing all operations, leave vehicle alone
for 24 hours.
CAUTION:
When delivering vehicle to user, tell him or her
that vehicle should not be subjected to heavy
shocks for at least three days.
36
5-2[W7B0]SERVICE PROCEDURE
7. Rear Quarter Glass
Page 1138 of 1456
1. Door Glass
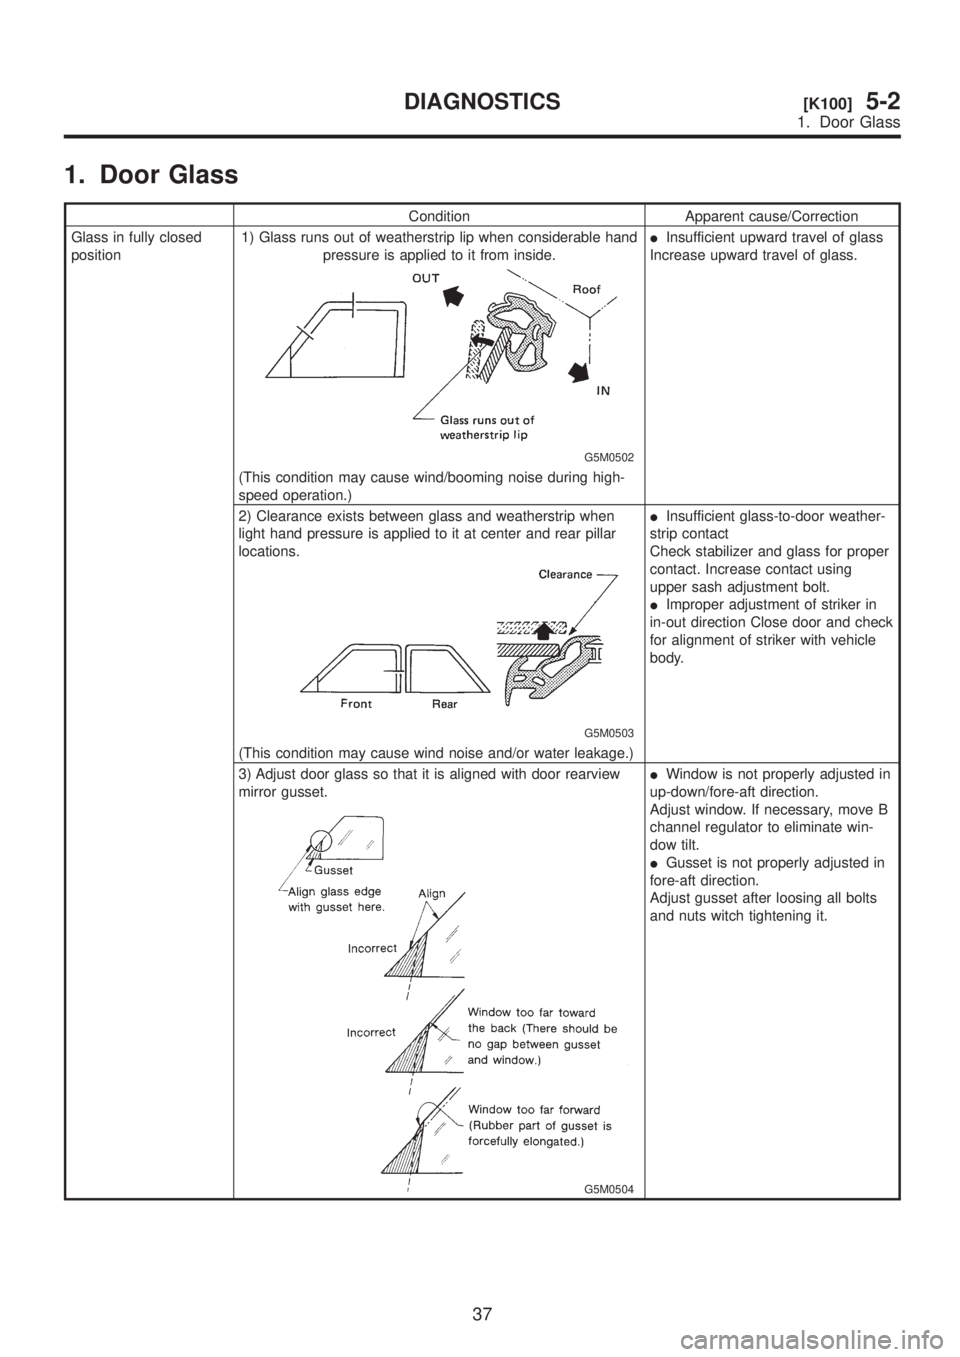
Condition Apparent cause/Correction
Glass in fully closed
position1) Glass runs out of weatherstrip lip when considerable hand
pressure is applied to it from inside.
G5M0502
IInsufficient upward travel of glass
Increase upward travel of glass.
(This condition may cause wind/booming noise during high-
speed operation.)
2) Clearance exists between glass and weatherstrip when
light hand pressure is applied to it at center and rear pillar
locations.
G5M0503
IInsufficient glass-to-door weather-
strip contact
Check stabilizer and glass for proper
contact. Increase contact using
upper sash adjustment bolt.
IImproper adjustment of striker in
in-out direction Close door and check
for alignment of striker with vehicle
body.
(This condition may cause wind noise and/or water leakage.)
3) Adjust door glass so that it is aligned with door rearview
mirror gusset.
G5M0504
IWindow is not properly adjusted in
up-down/fore-aft direction.
Adjust window. If necessary, move B
channel regulator to eliminate win-
dow tilt.
IGusset is not properly adjusted in
fore-aft direction.
Adjust gusset after loosing all bolts
and nuts witch tightening it.
37
[K100]5-2DIAGNOSTICS
1. Door Glass
Page 1149 of 1456
10) After installation, ensure that all mechanisms
operate properly and lock.
11) If any mechanism does not function properly,
loosen bolts (C), (D) and (E), slide seat as
required, insert all lock plate pawls into holes in
slide rail brackets, and tighten bolts (C), (D) and
(E) in that order.
12) Install bolt cover on rear end of slide rail.
13) Install headrest on backrest.
NOTE:
Tighten bolts in the designated order.2. Rear Seat
A: REMOVAL
1. SEDAN
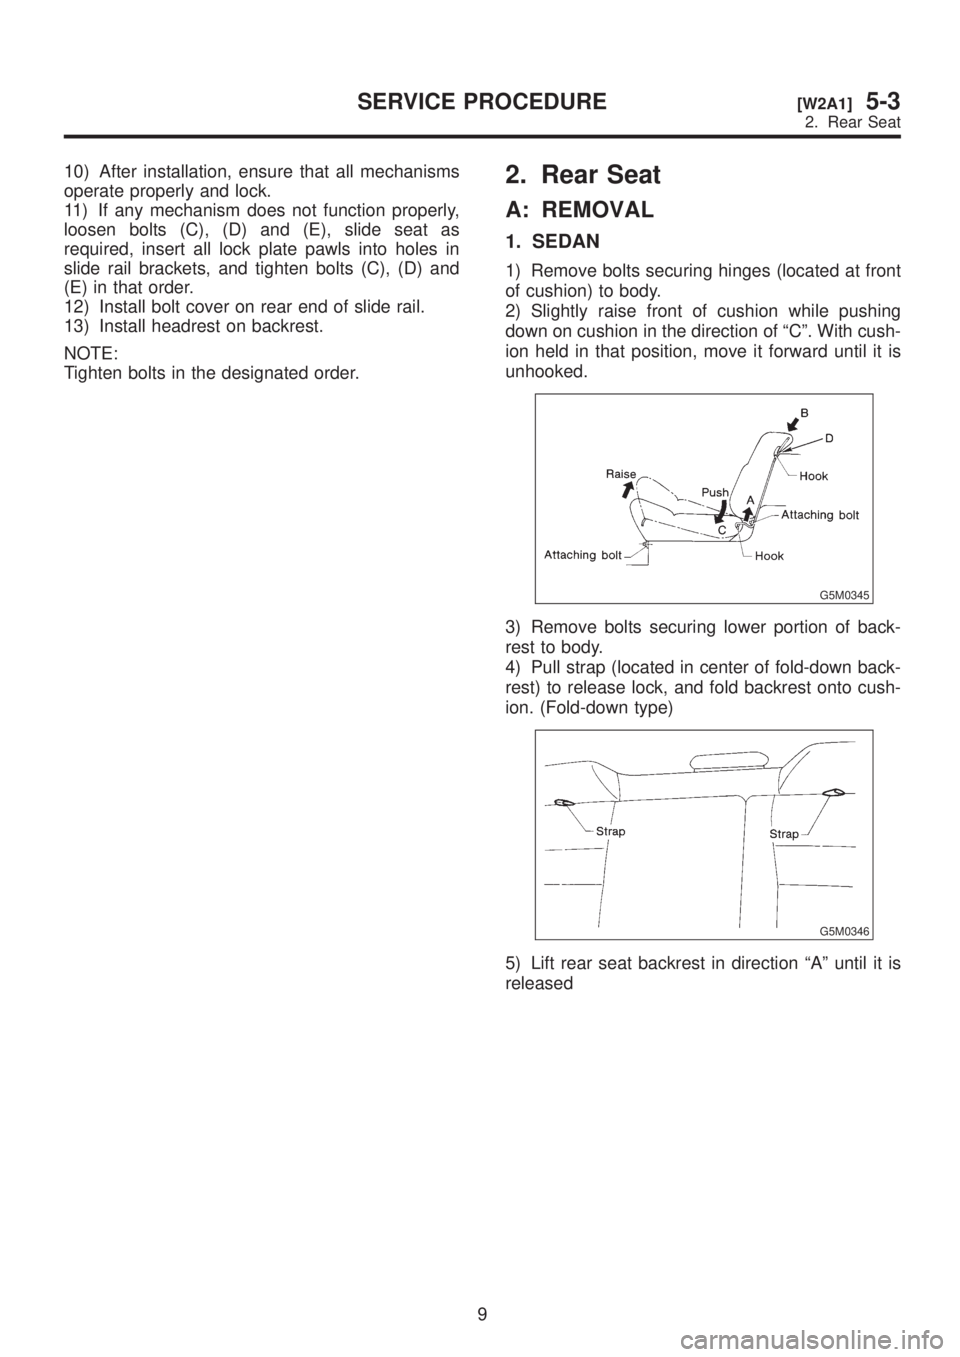
1) Remove bolts securing hinges (located at front
of cushion) to body.
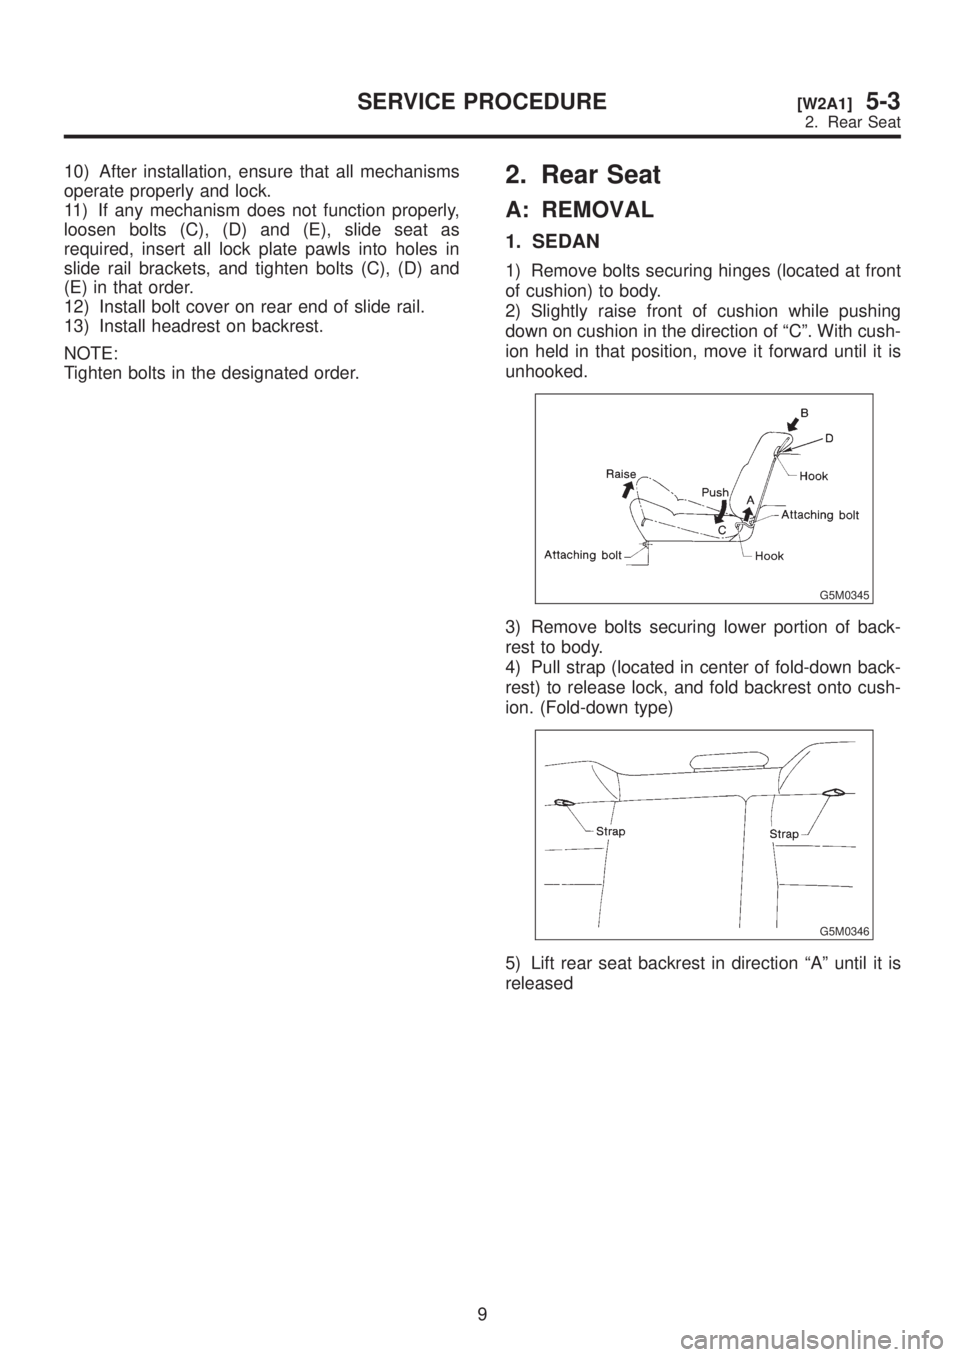
2) Slightly raise front of cushion while pushing
down on cushion in the direction of ªCº. With cush-
ion held in that position, move it forward until it is
unhooked.
G5M0345
3) Remove bolts securing lower portion of back-
rest to body.
4) Pull strap (located in center of fold-down back-
rest) to release lock, and fold backrest onto cush-
ion. (Fold-down type)
G5M0346
5) Lift rear seat backrest in direction ªAº until it is
released
9
[W2A1]5-3SERVICE PROCEDURE
2. Rear Seat
Page 1150 of 1456
10) After installation, ensure that all mechanisms
operate properly and lock.
11) If any mechanism does not function properly,
loosen bolts (C), (D) and (E), slide seat as
required, insert all lock plate pawls into holes in
slide rail brackets, and tighten bolts (C), (D) and
(E) in that order.
12) Install bolt cover on rear end of slide rail.
13) Install headrest on backrest.
NOTE:
Tighten bolts in the designated order.2. Rear Seat
A: REMOVAL
1. SEDAN
1) Remove bolts securing hinges (located at front
of cushion) to body.
2) Slightly raise front of cushion while pushing
down on cushion in the direction of ªCº. With cush-
ion held in that position, move it forward until it is
unhooked.
G5M0345
3) Remove bolts securing lower portion of back-
rest to body.
4) Pull strap (located in center of fold-down back-
rest) to release lock, and fold backrest onto cush-
ion. (Fold-down type)
G5M0346
5) Lift rear seat backrest in direction ªAº until it is
released
9
[W2A1]5-3SERVICE PROCEDURE
2. Rear Seat
Page 1151 of 1456
2. WAGON
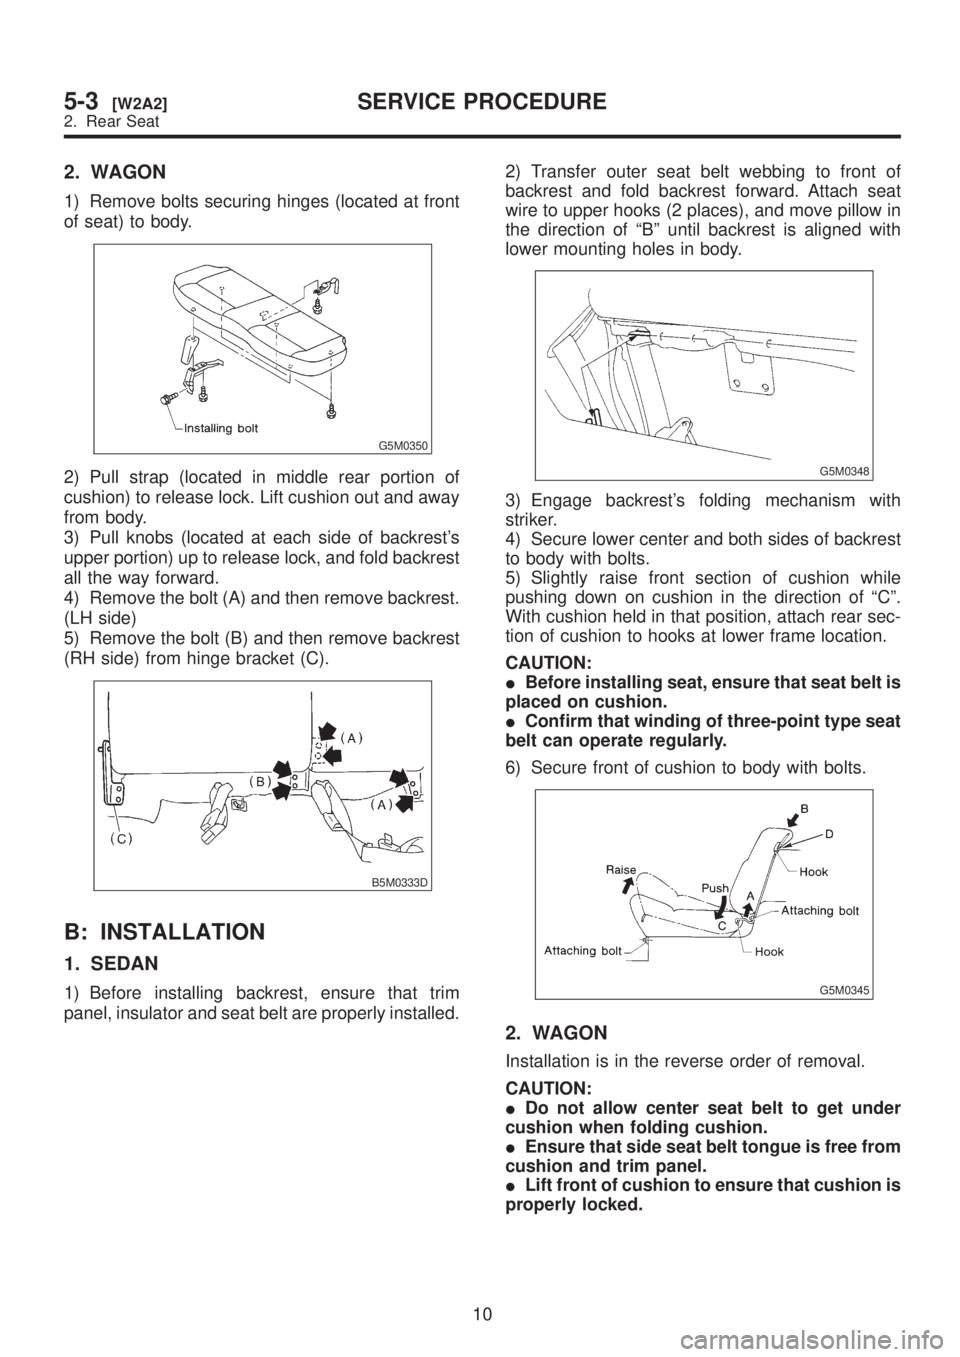
1) Remove bolts securing hinges (located at front
of seat) to body.
G5M0350
2) Pull strap (located in middle rear portion of
cushion) to release lock. Lift cushion out and away
from body.
3) Pull knobs (located at each side of backrest's
upper portion) up to release lock, and fold backrest
all the way forward.
4) Remove the bolt (A) and then remove backrest.
(LH side)
5) Remove the bolt (B) and then remove backrest
(RH side) from hinge bracket (C).
B5M0333D
B: INSTALLATION
1. SEDAN
1) Before installing backrest, ensure that trim
panel, insulator and seat belt are properly installed.2) Transfer outer seat belt webbing to front of
backrest and fold backrest forward. Attach seat
wire to upper hooks (2 places), and move pillow in
the direction of ªBº until backrest is aligned with
lower mounting holes in body.
G5M0348
3) Engage backrest's folding mechanism with
striker.
4) Secure lower center and both sides of backrest
to body with bolts.
5) Slightly raise front section of cushion while
pushing down on cushion in the direction of ªCº.
With cushion held in that position, attach rear sec-
tion of cushion to hooks at lower frame location.
CAUTION:
IBefore installing seat, ensure that seat belt is
placed on cushion.
IConfirm that winding of three-point type seat
belt can operate regularly.
6) Secure front of cushion to body with bolts.
G5M0345
2. WAGON
Installation is in the reverse order of removal.
CAUTION:
IDo not allow center seat belt to get under
cushion when folding cushion.
IEnsure that side seat belt tongue is free from
cushion and trim panel.
ILift front of cushion to ensure that cushion is
properly locked.
10
5-3[W2A2]SERVICE PROCEDURE
2. Rear Seat
Page 1157 of 1456
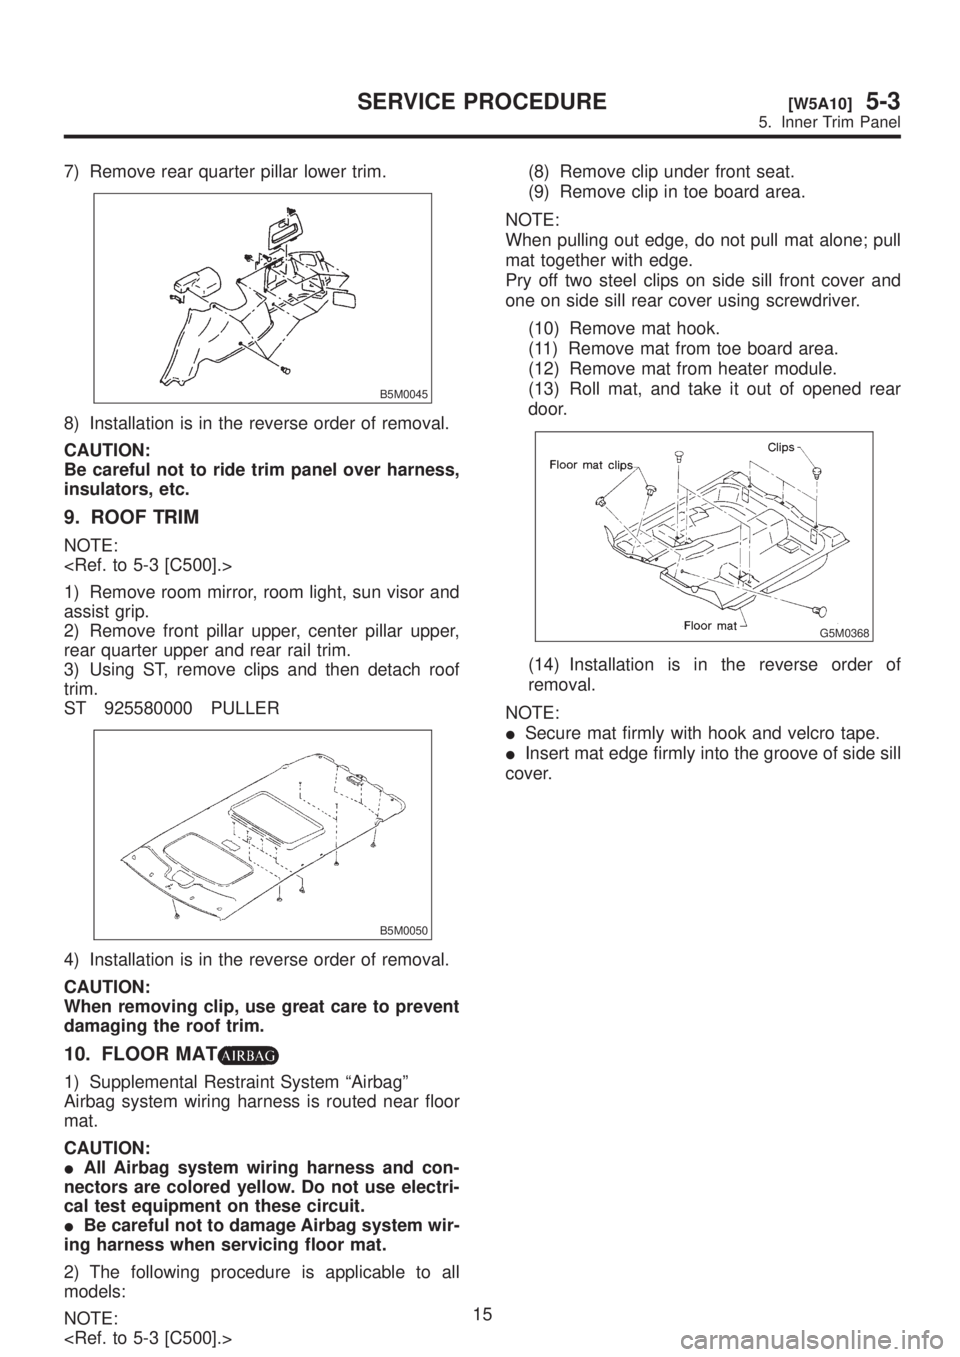
7) Remove rear quarter pillar lower trim.
B5M0045
8) Installation is in the reverse order of removal.
CAUTION:
Be careful not to ride trim panel over harness,
insulators, etc.
9. ROOF TRIM
NOTE:
1) Remove room mirror, room light, sun visor and
assist grip.
2) Remove front pillar upper, center pillar upper,
rear quarter upper and rear rail trim.
3) Using ST, remove clips and then detach roof
trim.
ST 925580000 PULLER
B5M0050
4) Installation is in the reverse order of removal.
CAUTION:
When removing clip, use great care to prevent
damaging the roof trim.
10. FLOOR MAT
1) Supplemental Restraint System ªAirbagº
Airbag system wiring harness is routed near floor
mat.
CAUTION:
IAll Airbag system wiring harness and con-
nectors are colored yellow. Do not use electri-
cal test equipment on these circuit.
IBe careful not to damage Airbag system wir-
ing harness when servicing floor mat.
2) The following procedure is applicable to all
models:
NOTE:
(8) Remove clip under front seat.
(9) Remove clip in toe board area.
NOTE:
When pulling out edge, do not pull mat alone; pull
mat together with edge.
Pry off two steel clips on side sill front cover and
one on side sill rear cover using screwdriver.
(10) Remove mat hook.
(11) Remove mat from toe board area.
(12) Remove mat from heater module.
(13) Roll mat, and take it out of opened rear
door.
G5M0368
(14) Installation is in the reverse order of
removal.
NOTE:
ISecure mat firmly with hook and velcro tape.
IInsert mat edge firmly into the groove of side sill
cover.
15
[W5A10]5-3SERVICE PROCEDURE
5. Inner Trim Panel