Page 559 of 666
SYSTEM DESCRIPTION
Component parts
Intake door control system components are:
1) Auto amp.
2) Intake door motor
3) Mode door motor
4) In-vehicle sensor
5) Ambient sensor
6) Sunload sensor
7) Intake sensor
System operation
The intake door control determines intake door position based on the ambient temperature, the intake air
temperature and the in-vehicle temperature. When the A/C, DEFROSTER, or OFF switches are pushed, the
auto amplifier sets the intake door at the ªFreshº position.
Intake door control specification
COMPONENT DESCRIPTION
The intake door motor is attached to the intake unit. It rotates so
that air is drawn from inlets set by the auto amplifier. Motor rota-
tion is conveyed to a lever which activates the intake door.
RHA484H
RHA383H
TROUBLE DIAGNOSESAUTO
Intake Door Motor (Cont'd)
HA-2059
Page 563 of 666

SYSTEM DESCRIPTION
Component parts
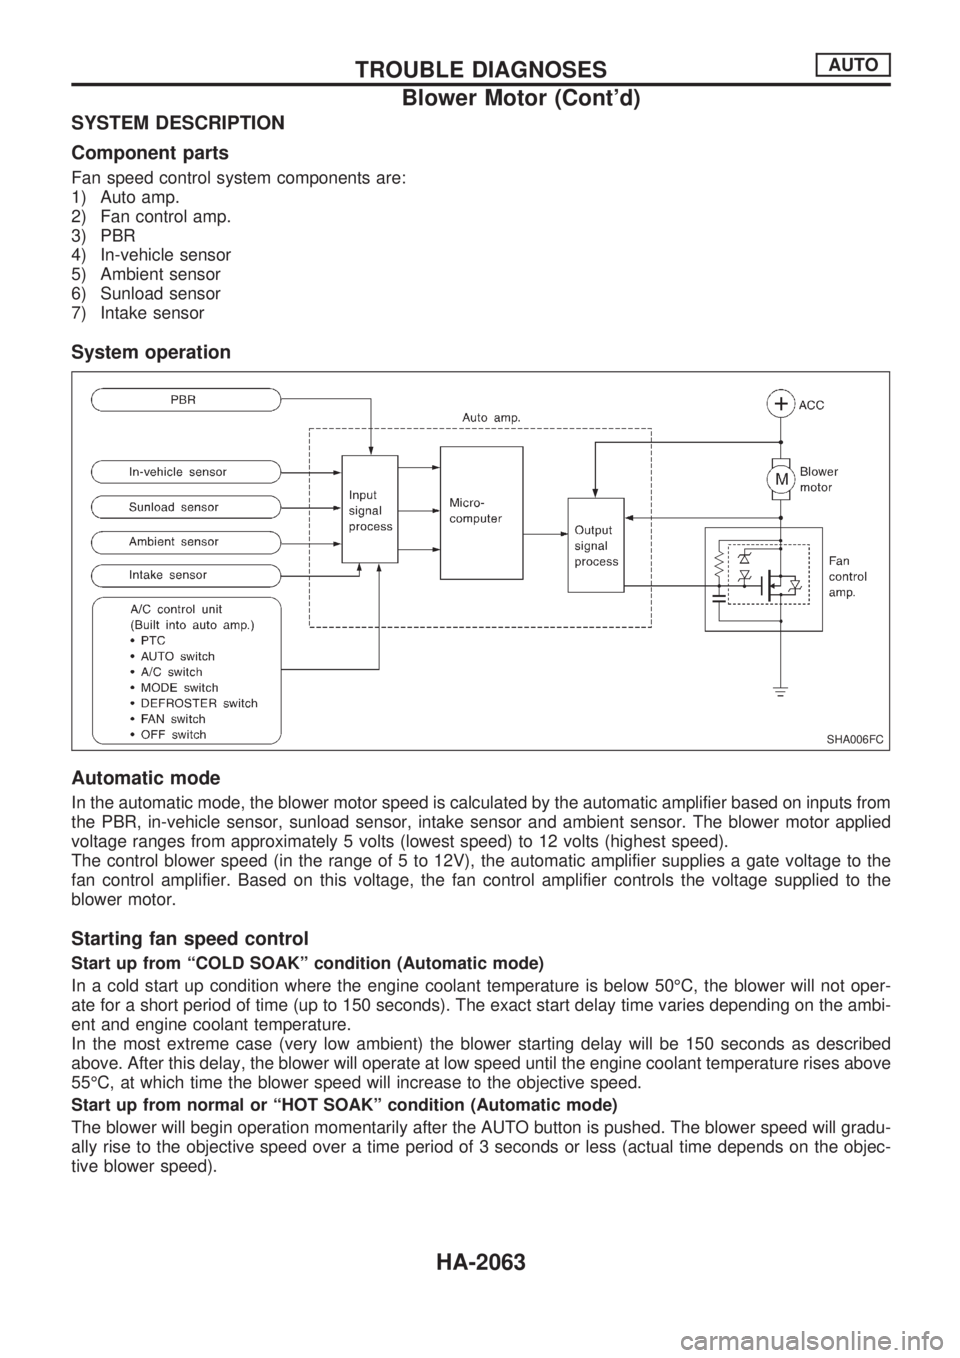
Fan speed control system components are:
1) Auto amp.
2) Fan control amp.
3) PBR
4) In-vehicle sensor
5) Ambient sensor
6) Sunload sensor
7) Intake sensor
System operation
Automatic mode
In the automatic mode, the blower motor speed is calculated by the automatic amplifier based on inputs from
the PBR, in-vehicle sensor, sunload sensor, intake sensor and ambient sensor. The blower motor applied
voltage ranges from approximately 5 volts (lowest speed) to 12 volts (highest speed).
The control blower speed (in the range of 5 to 12V), the automatic amplifier supplies a gate voltage to the
fan control amplifier. Based on this voltage, the fan control amplifier controls the voltage supplied to the
blower motor.
Starting fan speed control
Start up from ªCOLD SOAKº condition (Automatic mode)
In a cold start up condition where the engine coolant temperature is below 50ÉC, the blower will not oper-
ate for a short period of time (up to 150 seconds). The exact start delay time varies depending on the ambi-
ent and engine coolant temperature.
In the most extreme case (very low ambient) the blower starting delay will be 150 seconds as described
above. After this delay, the blower will operate at low speed until the engine coolant temperature rises above
55ÉC, at which time the blower speed will increase to the objective speed.
Start up from normal or ªHOT SOAKº condition (Automatic mode)
The blower will begin operation momentarily after the AUTO button is pushed. The blower speed will gradu-
ally rise to the objective speed over a time period of 3 seconds or less (actual time depends on the objec-
tive blower speed).
SHA006FC
TROUBLE DIAGNOSESAUTO
Blower Motor (Cont'd)
HA-2063
Page 569 of 666
SYSTEM DESCRIPTION
Auto amplifier controls compressor operation by ambient tem-
perature and signal from ECM.
Low temperature protection control
Auto amplifier will turn the compressor ªONº or ªOFFº as deter-
mined by a signal detected by ambient sensor.
When ambient temperatures are greater than 1ÉC, the compres-
sor turns ªONº. The compressor turns ªOFFº when ambient tem-
peratures are less than þ2ÉC.
RHA094GA
TROUBLE DIAGNOSESAUTO
Magnet Clutch (Cont'd)
HA-2069
Page 580 of 666
Ambient Sensor
COMPONENT DESCRIPTION
The ambient sensor is attached in front of the driver's side con-
denser. It detects ambient temperature and converts it into a
resistance value which is then input into the auto amplifier.
AMBIENT TEMPERATURE INPUT PROCESS
The automatic amplifier includes a ªprocessing circuitº for the
ambient sensor input. However, when the temperature detected
by the ambient sensor increases quickly, the processing circuit
retards the auto amp. function. It only allows the auto amp. to
recognize an ambient temperature increase of 0.33ÉC per 100
seconds.
As an example, consider stopping for a cup of coffee after high
speed driving. Although the actual ambient temperature has not
changed, the temperature detected by the ambient sensor will
increase. This is because the heat from the engine compartment
can radiate to the front grille area, location of the ambient sen-
sor.
RHA036H
TROUBLE DIAGNOSESAUTO
HA-2080
Page 581 of 666

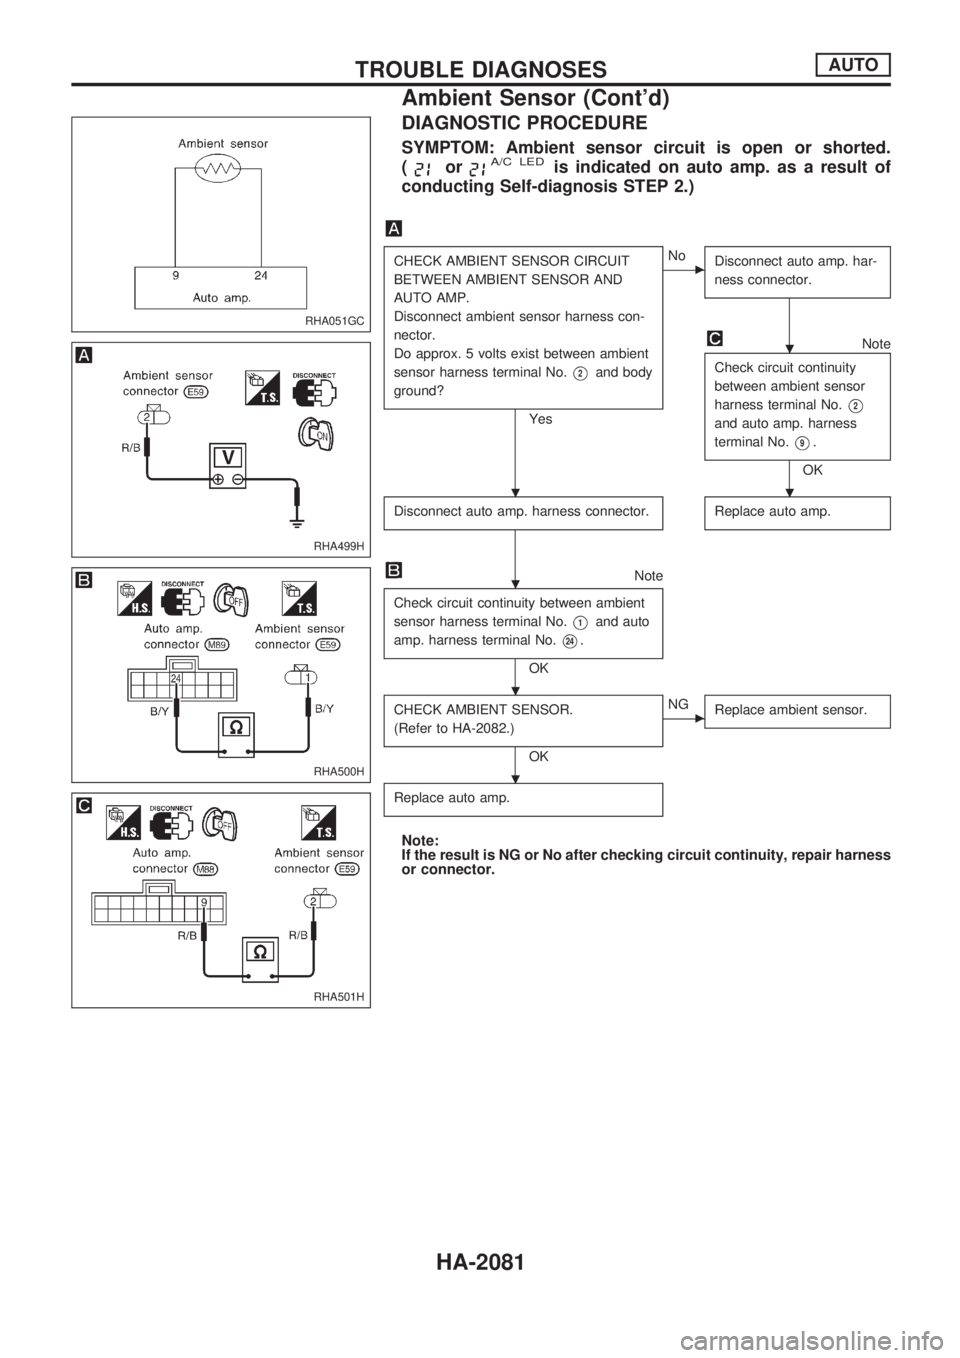
DIAGNOSTIC PROCEDURE
SYMPTOM: Ambient sensor circuit is open or shorted.
(
orA/C LEDis indicated on auto amp. as a result of
conducting Self-diagnosis STEP 2.)
CHECK AMBIENT SENSOR CIRCUIT
BETWEEN AMBIENT SENSOR AND
AUTO AMP.
Disconnect ambient sensor harness con-
nector.
Do approx. 5 volts exist between ambient
sensor harness terminal No.
V2and body
ground?
Yes
cNo
Disconnect auto amp. har-
ness connector.
Note
Check circuit continuity
between ambient sensor
harness terminal No.
V2
and auto amp. harness
terminal No.
V9.
OK
Disconnect auto amp. harness connector.
Replace auto amp.
Note
Check circuit continuity between ambient
sensor harness terminal No.
V1and auto
amp. harness terminal No.
V24.
OK
CHECK AMBIENT SENSOR.
(Refer to HA-2082.)
OK
cNG
Replace ambient sensor.
Replace auto amp.
Note:
If the result is NG or No after checking circuit continuity, repair harness
or connector.
RHA051GC
RHA499H
RHA500H
RHA501H
.
..
.
.
.
TROUBLE DIAGNOSESAUTO
Ambient Sensor (Cont'd)
HA-2081
Page 582 of 666
COMPONENT INSPECTION
Ambient sensor
After disconnecting ambient sensor harness connector, measure
resistance between terminals
V1andV2at sensor harness side,
using the table below.
Temperature ÉC (ÉF) Resistance kW
þ20 (þ4) 9.98
þ10 (14) 5.57
0 (32) 3.26
10 (50) 1.98
20 (68) 1.25
25 (77) 1.00
30 (86) 0.81
40 (104) 0.54
In-vehicle Sensor
COMPONENT DESCRIPTION
The in-vehicle sensor is located on instrument lower panel. It
converts variations in temperature of compartment air drawn
from the aspirator. It is then input into the auto amplifier.
SHA353F
RHA502H
TROUBLE DIAGNOSESAUTO
Ambient Sensor (Cont'd)
HA-2082
Page 583 of 666

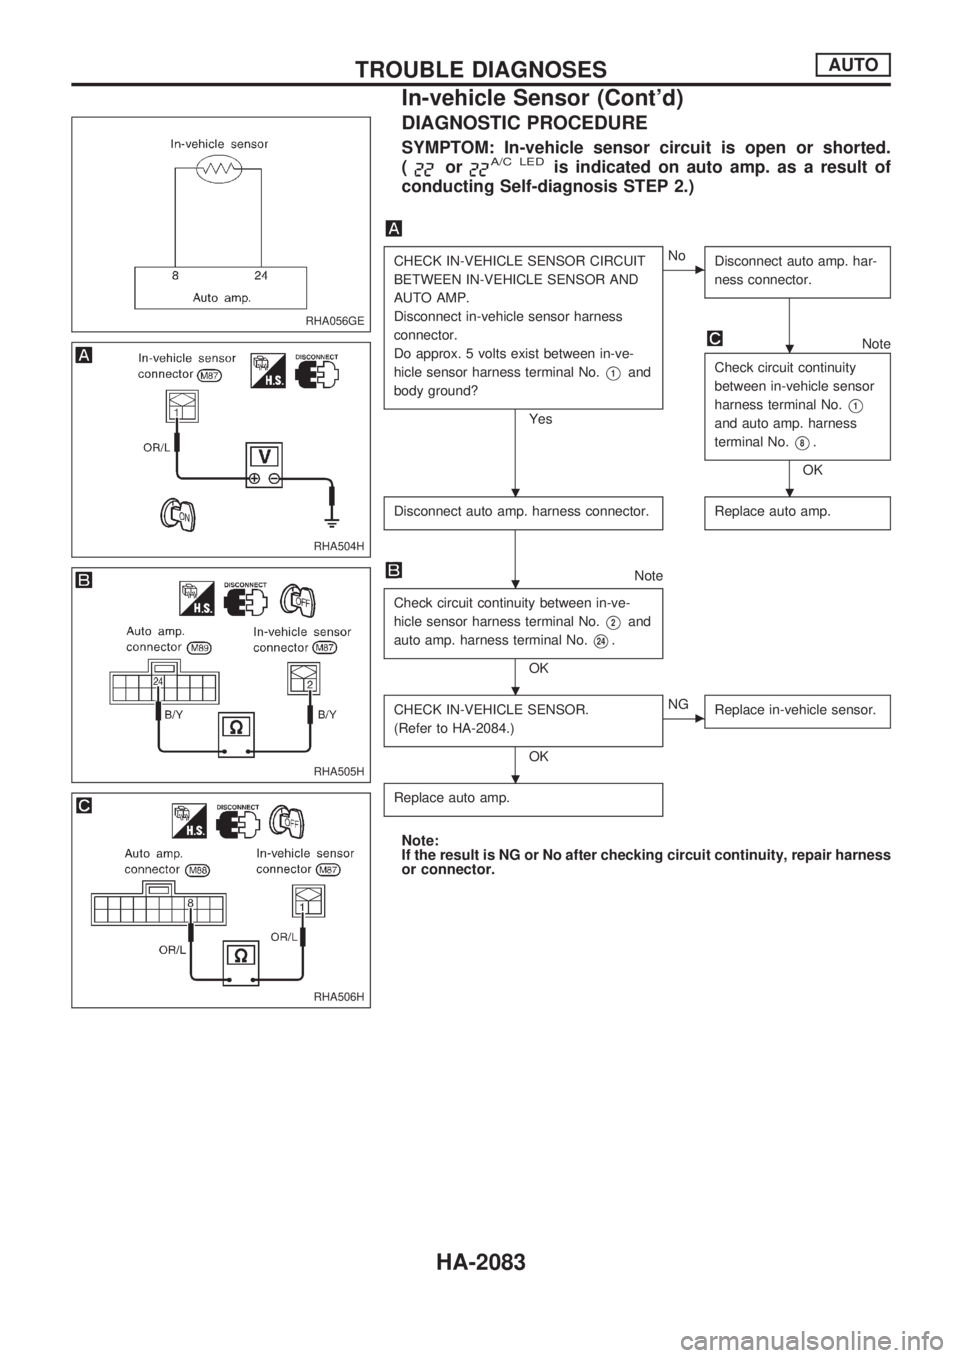
DIAGNOSTIC PROCEDURE
SYMPTOM: In-vehicle sensor circuit is open or shorted.
(
orA/C LEDis indicated on auto amp. as a result of
conducting Self-diagnosis STEP 2.)
CHECK IN-VEHICLE SENSOR CIRCUIT
BETWEEN IN-VEHICLE SENSOR AND
AUTO AMP.
Disconnect in-vehicle sensor harness
connector.
Do approx. 5 volts exist between in-ve-
hicle sensor harness terminal No.
V1and
body ground?
Yes
cNo
Disconnect auto amp. har-
ness connector.
Note
Check circuit continuity
between in-vehicle sensor
harness terminal No.
V1
and auto amp. harness
terminal No.
V8.
OK
Disconnect auto amp. harness connector.
Replace auto amp.
Note
Check circuit continuity between in-ve-
hicle sensor harness terminal No.
V2and
auto amp. harness terminal No.
V24.
OK
CHECK IN-VEHICLE SENSOR.
(Refer to HA-2084.)
OK
cNG
Replace in-vehicle sensor.
Replace auto amp.
Note:
If the result is NG or No after checking circuit continuity, repair harness
or connector.
RHA056GE
RHA504H
RHA505H
RHA506H
.
..
.
.
.
TROUBLE DIAGNOSESAUTO
In-vehicle Sensor (Cont'd)
HA-2083
Page 584 of 666

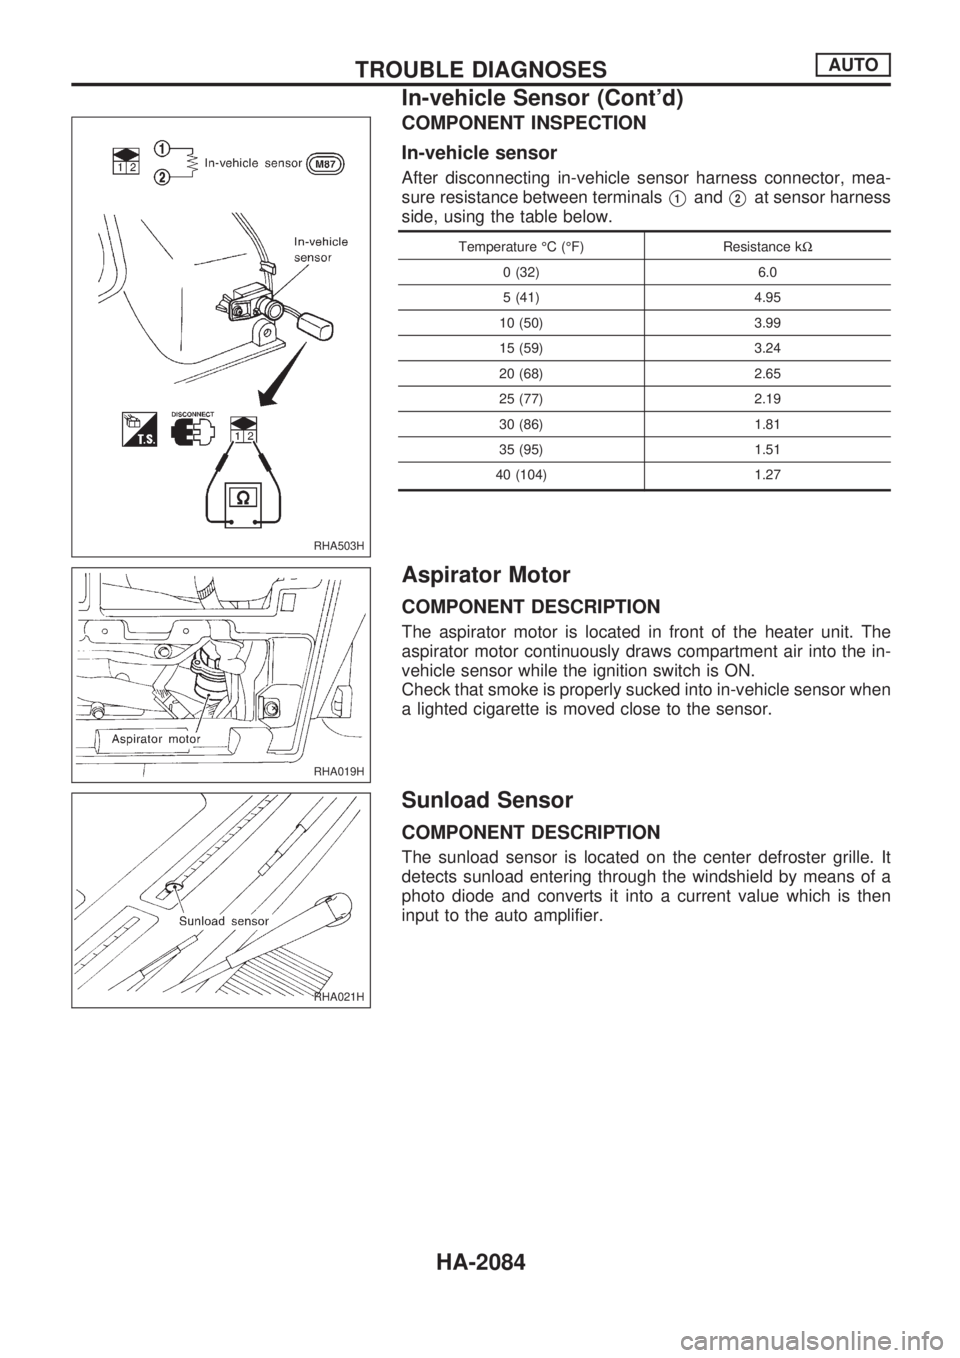
COMPONENT INSPECTION
In-vehicle sensor
After disconnecting in-vehicle sensor harness connector, mea-
sure resistance between terminals
V1andV2at sensor harness
side, using the table below.
Temperature ÉC (ÉF) Resistance kW
0 (32) 6.0
5 (41) 4.95
10 (50) 3.99
15 (59) 3.24
20 (68) 2.65
25 (77) 2.19
30 (86) 1.81
35 (95) 1.51
40 (104) 1.27
Aspirator Motor
COMPONENT DESCRIPTION
The aspirator motor is located in front of the heater unit. The
aspirator motor continuously draws compartment air into the in-
vehicle sensor while the ignition switch is ON.
Check that smoke is properly sucked into in-vehicle sensor when
a lighted cigarette is moved close to the sensor.
Sunload Sensor
COMPONENT DESCRIPTION
The sunload sensor is located on the center defroster grille. It
detects sunload entering through the windshield by means of a
photo diode and converts it into a current value which is then
input to the auto amplifier.
RHA503H
RHA019H
RHA021H
TROUBLE DIAGNOSESAUTO
In-vehicle Sensor (Cont'd)
HA-2084