Page 81 of 558

ENGINE – Front Case, Counterbalance Shaft and Oil Pan11-56
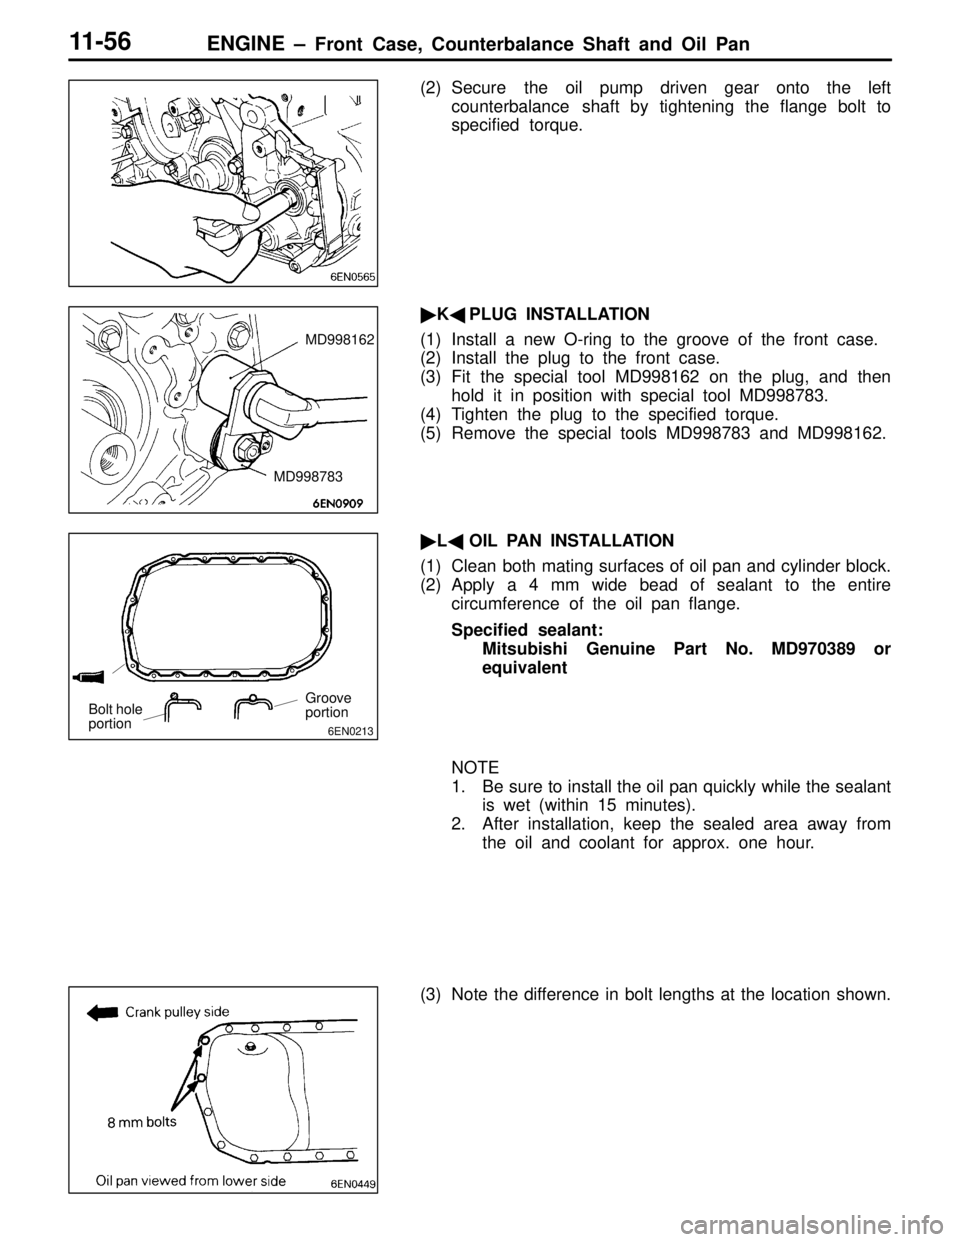
(2) Secure the oil pump driven gear onto the left
counterbalance shaft by tightening the flange bolt to
specified torque.
�K�PLUG INSTALLATION
(1) Install a new O-ring to the groove of the front case.
(2) Install the plug to the front case.
(3) Fit the special tool MD998162 on the plug, and then
hold it in position with special tool MD998783.
(4) Tighten the plug to the specified torque.
(5) Remove the special tools MD998783 and MD998162.
�L�OIL PAN INSTALLATION
(1) Clean both mating surfaces of oil pan and cylinder block.
(2) Apply a 4 mm wide bead of sealant to the entire
circumference of the oil pan flange.
Specified sealant:
Mitsubishi Genuine Part No. MD970389 or
equivalent
NOTE
1. Be sure to install the oil pan quickly while the sealant
is wet (within 15 minutes).
2. After installation, keep the sealed area away from
the oil and coolant for approx. one hour.
(3) Note the difference in bolt lengths at the location shown.
MD998162
MD998783
6EN0213
Bolt hole
portionGroove
portion
Page 88 of 558

ENGINE – Piston and Connecting Rod11-63
�C�PISTON RING NO. 2 / PISTON RING NO. 1
INSTALLATION
(1) Using piston ring expander, fit No. 2 and then No. 1 piston
ring into position.
NOTE
1. The ring end is provided with identification mark.
ItemIdentification mark
No. 1 ring1R
No. 2 ring2R
2. Install piston rings with identification mark facing up,
to the piston crown side.
3. Size marks on position rings are as follows.
SizeSize mark
StandardNone
0.50 mm oversize50
1.00 mm oversize100
�D�PISTON AND CONNECTING ROD ASSEMBLY
INSTALLATION
(1) Liberally coat engine oil on the circumference of the piston,
piston ring, and oil ring.
(2) Arrange the piston ring and oil ring gaps (side rail and
spacer) as shown in the figure.
(3) Rotate the crankshaft so that crank pin is on the center
of cylinder bore.
(4) Use suitable thread protectors on the connecting rod bolts
before inserting piston and connecting rod assembly into
the cylinder block.
Care must be taken not to nick the crank pin.
(5) Using a suitable piston ring compressor tool, install the
piston and connecting rod assembly into the cylinder block.
�E�CONNECTING ROD BEARINGS INSTALLATION
When the bearing needs replacing, select and install a proper
bearing by the following procedure.
(1) Measure the crankshaft pin diameter and confirm its
classification from the following table. In the case of a
crankshaft supplied as a service part, identification colors
of its pins are painted at the positions shown in the
illustration.
9EN0524
Identification mark
Identification mark
Side mark
No. 1
No. 2
Timing belt side
Page 89 of 558

ENGINE – Piston and Connecting Rod11-64
(2) The connecting rod bearing identification mark is stamped
at the position shown in the illustration.
Crankshaft pinConnecting rod bearing
Classi-
ficationIdentifica-
tion markIdentifi-
cation
colorO. D. mmIdenti-
fication
markThickness mm
Produc-
tion partService
part
1NoneYellow44.995 – 45.00001.483 – 1.487
2NoneNone44.985 – 44.99511.487 – 1.491
3NoneWhite44.980 – 44.98521.491 – 1.495
Connecting rod I.D.: 48.000 – 48.015 mm
(3) Select a proper bearing from the above table on the basic
of the identification data confirmed under items (1) and
(2).
[Example]
If the measured value of a crankshaft pin outer diameter
is 44.996 mm, the pin is classified as “1” in the table.
In case the crankshaft is also replaced by a spare part,
check the identification colors of the pins painted on the
new crankshaft. If the color is yellow, for example, the
pin is classified as “1”. In the above cases, select the
connection rod bearing having identification mark “0”.
�F�CONNECTING ROD CAP INSTALLATION
(1) Verifying the mark made during disassembly, install the
bearing cap to the connecting rod. If the connecting rod
is new with no index mark, make sure that the bearing
locking notches come on the same side as shown.
(2) Make sure that the connecting rod big end side clearance
meets the specification.
Standard value: 0.10 – 0.25 mm
Limit: 0.4 mm
Identification mark
Page 92 of 558
ENGINE – Crankshaft and Flywheel11-67
CRANKSHAFT AND FLYWHEEL
REMOVAL AND INSTALLATION
Apply engine oil to all
moving parts before
installation.
1 2
3
4 56
78 910 11 12
13 1415
25 Nm + 90�11 Nm132 Nm
9 Nm
11 Nm
32 Nm11 Nm
Removal steps
1. Flywheel bolt
2. Flywheel
3. Rear plate
4. Bell housing cover
�E�5. Oil seal case
�D�6. Oil seal
�C�7. Beam bearing cap bolt
�C�8. Beam bearing cap�B�9. Crankshaft bearing lower
10. Crankshaft
�B�11. Crankshaft bearing upper
�A�12. Crankshaft thrust bearing
13. Check valve
14. Oil jet
15. Cylinder block
Page 93 of 558
ENGINE – Crankshaft and Flywheel11-68
INSTALLATION SERVICE POINTS
�A�CRANKSHAFT THRUST BEARING INSTALLATION
(1) Install the two thrust bearing in the number 3 bearing
bore in the cylinder block. For easier installation, apply
engine oil to the bearings; this will help hold them in
position.
(2) The thrust bearings must be installed with their groove
side toward the crankshaft web.
�B�CRANKSHAFT BEARING INSTALLATION
(1) From the following table, select a bearing whose size
is appropriate for the crankshaft journal outside diameter.
Groove
Identification color of crankshaft journal
Bearing bore size
identification mark
Bearing bore
identification
mark
Cylinder inner
diameter size
mark
Rear face of
cylinder block Bottom of
cylinder block No. 1 No. 2No. 3
No. 4No. 5
Page 94 of 558

ENGINE – Crankshaft and Flywheel11-69
Crankshaft journal outside diameterCylinder block bearing boreCrankshaft bearing
Identification colorSize mmIdentification markIdentification mark or color
Yellow56.994 – 57.00000 or Black
11 or Green
22 or Yellow
None56.988 – 56.99401 or Green
12 or Yellow
23 or None
White56.982 – 56.98802 or Yellow
13 or None
24 or Blue
For example, if the crankshaft journal outside diameter
ID color is “yellow” and cylinder block bearing bore ID
mark is “1”, select a bearing whose ID mark is “1”.
If there is no ID color paint on the crankshaft, measure
the journal outside diameter and select a bearing
appropriate for the measured value.
(2) Install the bearings having an oil groove to the cylinder
block.
(3) Install the bearings having no oil groove to the bearing
cap.
�C�BEARING CAP / BEARING CAP BOLT
INSTALLATION
(1) Install the bearing caps so the arrow points to the timing
belt side.
(2) Before installing the bearing cap bolts, check that the
shank length of each bolt meets the limit. If the limit is
exceeded, replace the bolt.
Limit: Max. 71.1 mm
(3) Apply engine oil to the threaded portion and bearing
surface of the bolt.Crankshaft bearing size
identification mark or color
Identification
mark or color
UpperGroove
Lower
9EN0477
Shank length
Page 96 of 558

ENGINE – Crankshaft and Flywheel11-71
�E�SEALANT APPLICATION TO OIL SEAL CASE
Specified sealant:
Mitsubishi Genuine Part No. MD970389 or equivalent
NOTE
(1) Be sure to install the case quickly while the sealant is
wet (within 15 minutes).
(2) After installation, keep the sealed area away from the
oil and coolant for approx. one hour.
INSPECTION
CRANKSHAFT OIL CLEARANCE (PLASTIGAGE
METHOD)
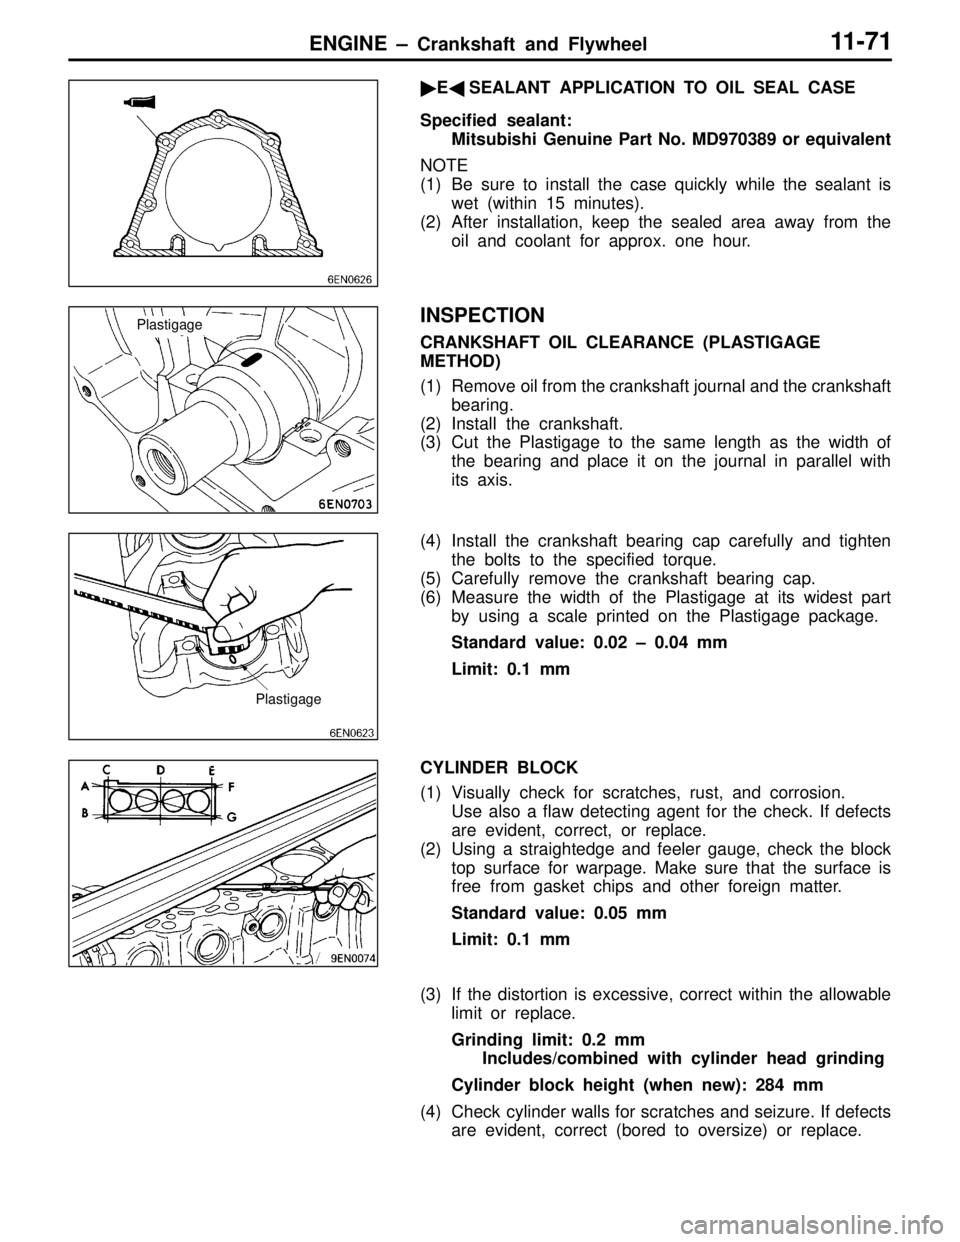
(1) Remove oil from the crankshaft journal and the crankshaft
bearing.
(2) Install the crankshaft.
(3) Cut the Plastigage to the same length as the width of
the bearing and place it on the journal in parallel with
its axis.
(4) Install the crankshaft bearing cap carefully and tighten
the bolts to the specified torque.
(5) Carefully remove the crankshaft bearing cap.
(6) Measure the width of the Plastigage at its widest part
by using a scale printed on the Plastigage package.
Standard value: 0.02 – 0.04 mm
Limit: 0.1 mm
CYLINDER BLOCK
(1) Visually check for scratches, rust, and corrosion.
Use also a flaw detecting agent for the check. If defects
are evident, correct, or replace.
(2) Using a straightedge and feeler gauge, check the block
top surface for warpage. Make sure that the surface is
free from gasket chips and other foreign matter.
Standard value: 0.05 mm
Limit: 0.1 mm
(3) If the distortion is excessive, correct within the allowable
limit or replace.
Grinding limit: 0.2 mm
Includes/combined with cylinder head grinding
Cylinder block height (when new): 284 mm
(4) Check cylinder walls for scratches and seizure. If defects
are evident, correct (bored to oversize) or replace.
Plastigage
Plastigage
Page 99 of 558

ENGINE – Throttle Body11-74
DISASSEMBLY SERVICE POINTS
�A�THROTTLE POSITION SENSOR AND IDLE AIR
CONTROL MOTOR REMOVAL
(1) Do not disassemble the sensor and motor.
(2) Do not immerse solvent to clean the sensor and motor.
Clean then with shop towel.
�B�THROTTLE BODY REMOVAL
(1) Do not remove the throttle body.
(2) Check if the vacuum port or passage is clogged. Use
compressed air to clean the vacuum passage.
REASSEMBLY SERVICE POINT
�A�THROTTLE POSITION SENSOR INSTALLATION
(1) Install the throttle position sensor to the throttle body
as shown in the diagram.
(2) Turn throttle position sensor 90° clockwise to set it, and
tighten screws.
(3) Check the continuity between terminal No. 3 (Idle throttle
position switch) and No. 4 (Earth).
Throttle valve conditionContinuity
Fully closedConductive
Fully openNo conductive
If there is no continuity with the throttle valve fully closed,
turn the throttle position sensor counterclockwise, and
then check again.
Throttle position sensor
Earth TPS power supply
TPS outputIdle position switch