Page 57 of 122
Trunk Lid Release Switch
The switch is located on the center console. A minimum height clearance of 5.9 ft (1.8 m) is required to open
the trunk lid. To open the trunk, the vehi cle must be parked and unlocked. Pull up on switch until trunk lid is open.
The indicator lamp remains on with trunk lid open.
Notes:
With vehicle centrally locked, the trunk can also be opened by using the remote control. Press button. The trunk lid
cannot
be released by the switch when previously locked separat ely with the mechanical key. To open, refer to Trunk,
separately
locked (in Index).
ProCarManuals.com
Page 58 of 122

Garage Door Opener
1. Remote control transmitter located on driver side sun visor
2. Portable remote control transmitter
Warning !
When programming a garage door opener, the door moves up or down. When programming or operating
the remote control make sure there is no possib ility of anyone being harmed by the moving door.
The visor remote control is capable of operati ng up to three separately controlled objects.
Notes:
Certain types of garage door openers are incompatible wi th the integrated opener. If you should experience
difficulties
with programming the transmitter, contact your authoriz ed Mercedes-Benz dealer or call Mercedes-Benz Customer
Assistance Center (in the U.S.A. only) at 1-800-FOR- MERCedes. For operation in the USA only: This devise
complies
with Part 15 of the FCC Rules. Operation is subject to the following two conditions:
(1) This device may not cause harmful interference, and (2) this device must accept any interference received,
including interference that may cause undesired operation. Any unauthorized modification to this device could void
the user's
authority to operate the equipment.
Programming or reprogramming the remote control:
1. Turn electronic key in steering lock to position 1 or 2.
2. Press and hold one button of the remote control located on the sun visor until its control light begins to flash at a
rate of about once a second. Continue holding down the button.
Note:
The light blinks immediately if the remote control is being programmed for the first time, or if its memory was
previously erased. If you are re programming a previously used button, the light will flash afte r about 20 seconds.
3. Hold end opposite to battery of portable remote contro l against the sun visor transmitter to be programmed. While
still holding down the button on the transmitter on the sun visor, press down the button on your portable remote
control, until the sun visor remote control light starts to flash rapidly. This means that the integrated remote control
has accepted the frequency and code of the portable transmitter.
4. If you wish, repeat the procedure for each remaining button.
Operation of remote control:
1. Turn electronic key in steering lock to position 1 or 2.
2. Select and press the appropriate button (1, 2 or 3) to ac tivate the remote controlled device. The remote control
transmitter continues to send the signal as long as the button is pressed - up to 20 seconds.
Erasing the remote control memory:
1. Turn electronic key in steering lock to position 1 or 2.
2. Simultaneously holding down buttons 1 and 3 for approximatel y 20 seconds, or until the control light blinks rapidly,
will erase the code s of all three channels.
ProCarManuals.com
Page 59 of 122

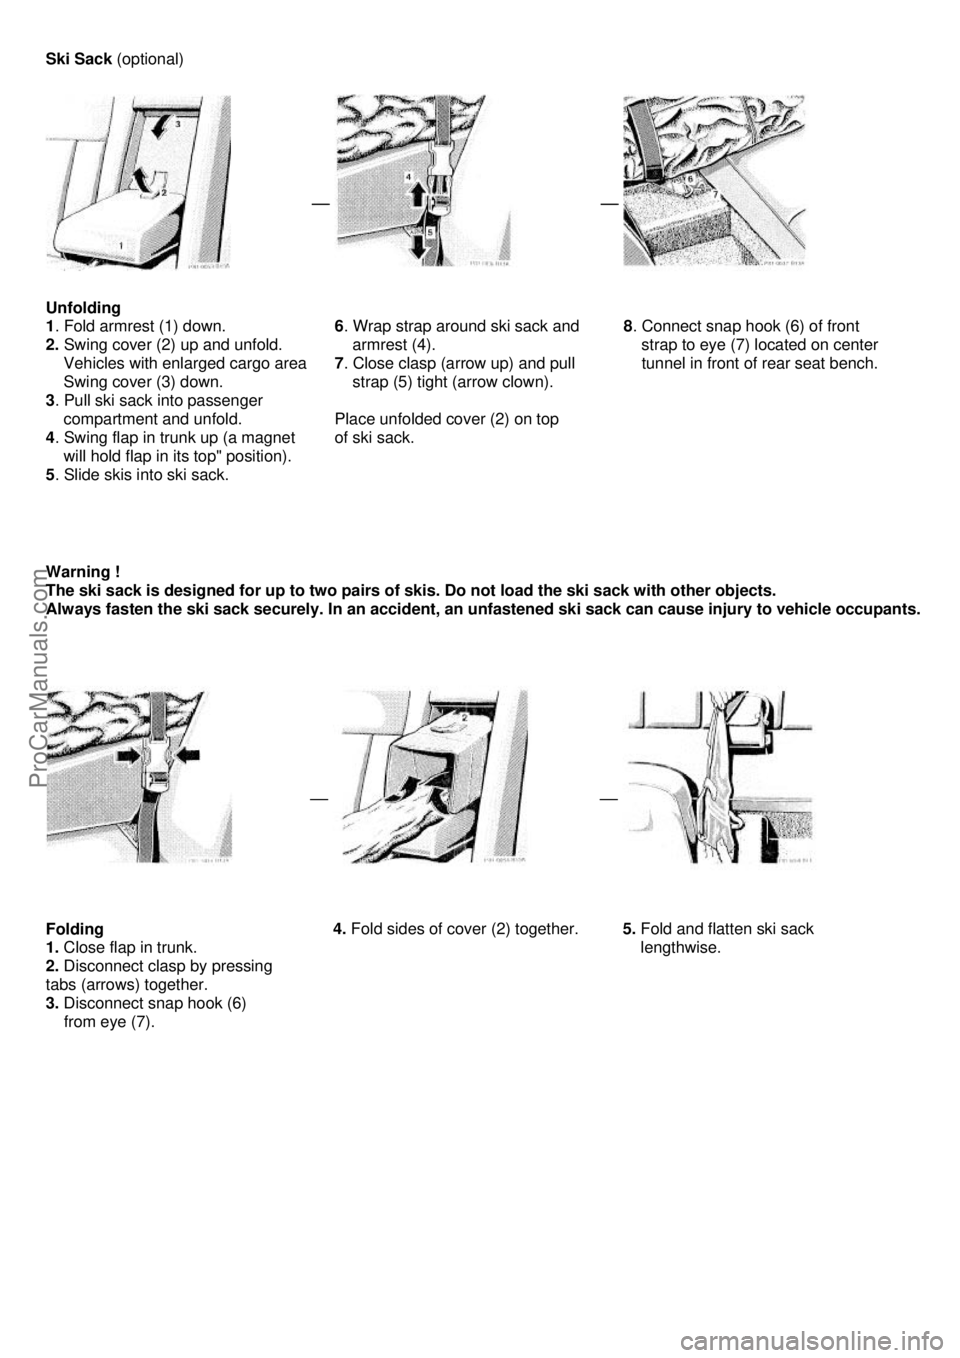
Ski Sack (optional)
Unfolding
1 . Fold armrest (1) down.
2. Swing cover (2) up and unfold.
Vehicles with enlarged cargo area
Swing cover (3) down.
3 . Pull ski sack into passenger
compartment and unfold.
4 . Swing flap in trunk up (a magnet
will hold flap in its top" position).
5 . Slide skis into ski sack.
6
. Wrap strap around ski sack and
armrest (4).
7 . Close clasp (arrow up) and pull
strap (5) tight (arrow clown).
Place unfolded cover (2) on top
of ski sack.
8
. Connect snap hook (6) of front
strap to eye (7) located on center
tunnel in front of rear seat bench.
Warning !
The ski sack is designed for up to two pairs of skis. Do not load the ski sack with other objects.
Always fasten the ski sack securely. In an accident, an unfastened ski sack can cause injury to vehicle occupants.
Folding
1. Close flap in trunk.
2. Disconnect clasp by pressing
tabs (arrows) together.
3. Disconnect snap hook (6)
from eye (7).
4.
Fold sides of cover (2) together.
5.
Fold and flatten ski sack
lengthwise.
ProCarManuals.com
Page 60 of 122
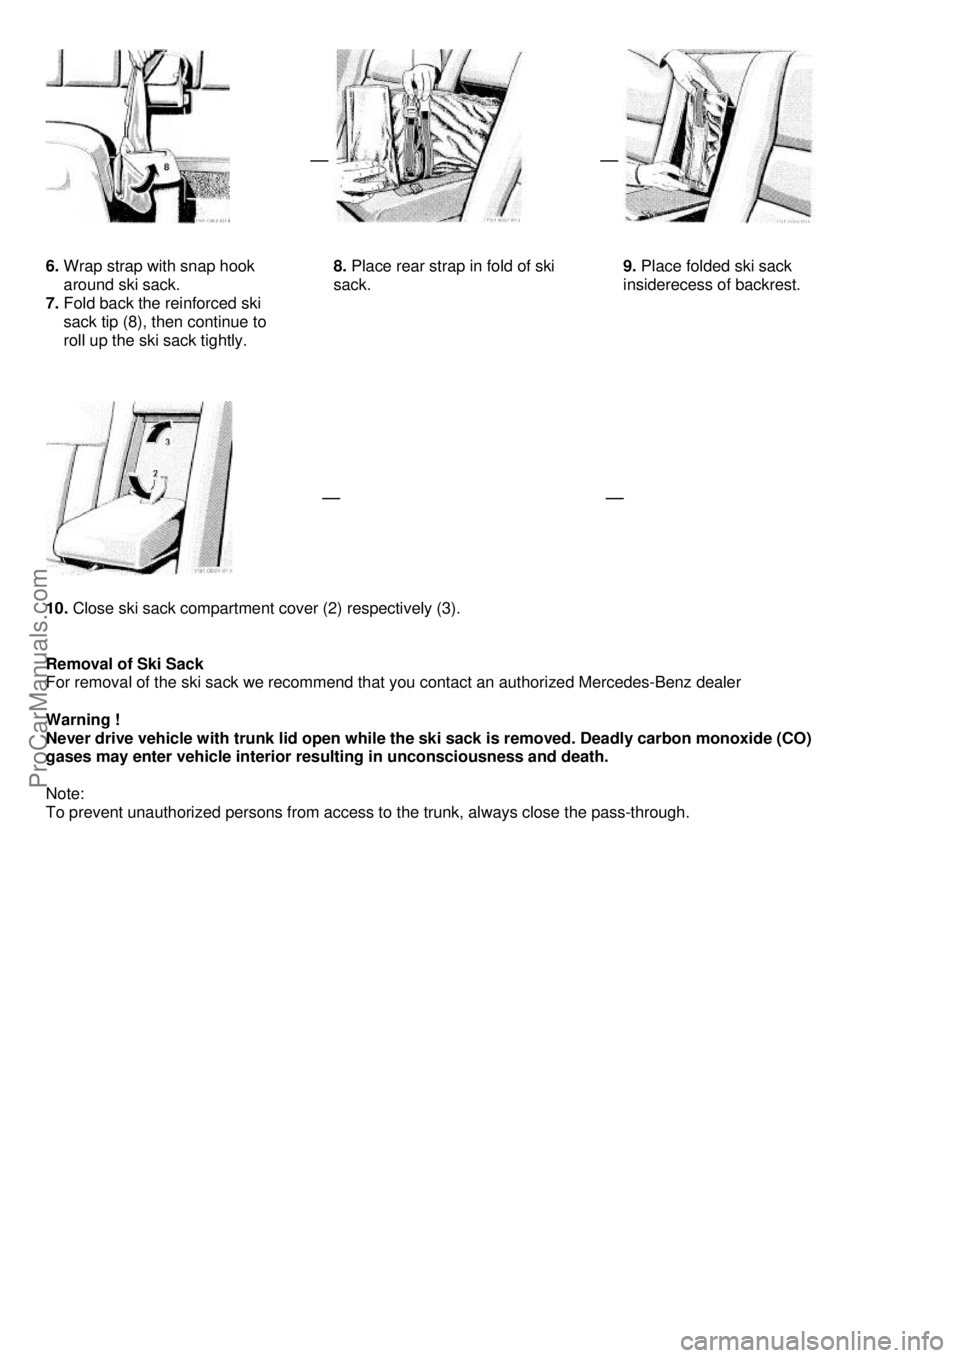
6. Wrap strap with snap hook
around ski sack.
7. Fold back the reinforced ski
sack tip (8), then continue to
roll up the ski sack tightly.
8.
Place rear strap in fold of ski
sack.
9. Place folded ski sack
insiderecess of backrest.
10.
Close ski sack compartment cover (2) respectively (3).
Removal of Ski Sack
For removal of the ski sack we recommend that you contact an authorized Mercedes-Benz dealer
Warning !
Never drive vehicle with trunk lid open while the ski sack is removed. Deadly carbon monoxide (CO)
gases may enter vehicle interior resulting in unconsciousness and death.
Note:
To prevent unauthorized persons from access to the trunk, always close the pass-through.
ProCarManuals.com
Page 61 of 122
Cellular Telephone
The vehicle is prepared for the installation of a cellular telephone. For further information and
installation contact your authorized Mercedes-Benz dealer.
Warning !
Some jurisdictions prohibit the driver from using a cellular telephone while driving a vehicle.
Whether or not prohibited by law, for safety reasons, the driver should not use the cellular
telephone while the vehicle is in motion. Stop the vehicle in a safe location before answering
or placing a call.
ProCarManuals.com
Page 62 of 122

Drinking and Driving
Warning !
Drinking and driving can be a very dangerous combination. Even a small amount of alcohol or drugs can
affect your reflexes, perceptions and judgement. The possibility of a serious or even fatal accident is
sharply increased when you drink and drive. Please don't drink and drive or allow anyone to drive after
drinking.
Parking Brake
To engage, firmly depress parking brake pedal. When the electronic key is in steering lock position 2, the brake
warning lamp in the instrument cluster should come on brightly. To release the parking brake, pull handle on
instrument panel. The brake warning lamp in the instrument cluster should go out. A warning sounds, if you start
to drive without having released the parking brake. Also see Brake Warning Lamp Test in Index.
Driving Off
Apply the service brakes to test them briefly after driving off. Perform this procedure only when the road is clear
of other traffic. Warm up the engine smoothly. Do not plac e full load on the engine until the operating temperature has
been reached. When starting off on a slippery surface, do not allow one drive wheel to spin for an extended period.
Warning !
Keep driver's foot area clear at all times. Object s stored in this area may impair pedal movement.
ProCarManuals.com
Page 63 of 122

Automatic Transmission
The automatic transmission selects individual gears automatically, dependent upon
• Selector lever position
• Program mode selector
• Accelerator position
• Vehicle speed
Important !
When parking the car or before working on the vehicle with the engine running, firmly depress the parking brake
pedal and shift the selector lever into "P".
Driving
The selector lever is automatically locked while in position "P". To move the selector lever out of position "P", the
service brake pedal must be firmly depressed before the shift lock will release. Shift selector lever to the desired
position only when the engine is idling normally and the service brake is applied. Do not release the brake until
ready to drive. The vehicle may otherwise start creeping when the selector lever is in drive or reverse position.
Warning !
It is dangerous to shift the selector lever out of "P" or "N" if the engine speed is higher than idle speed. If
your foot is not firmly on the brake pedal, the car could accelerate quickly forward or in reverse. You
could lose control of the car and hit someone or something. Only shift into gear when the engine is idling
normally and when your right foot is firmly on the brake pedal.
Important !
After selecting any driving position from "N" or "P", wait a moment to allow the gear to fully engage before
accelerating, especially when the engine is cold.
Accelerator Position
Partial throttle = early upshifting = normal acceleration
Full throttle = later upshifting = rapid acceleration
Kickdown (depressing the accelerator beyond full throttle) = downshifting to a lower gear = maximum acceleration.
Once the desired speed is attained, ease up on t he accelerator - the transmission shifts up again.
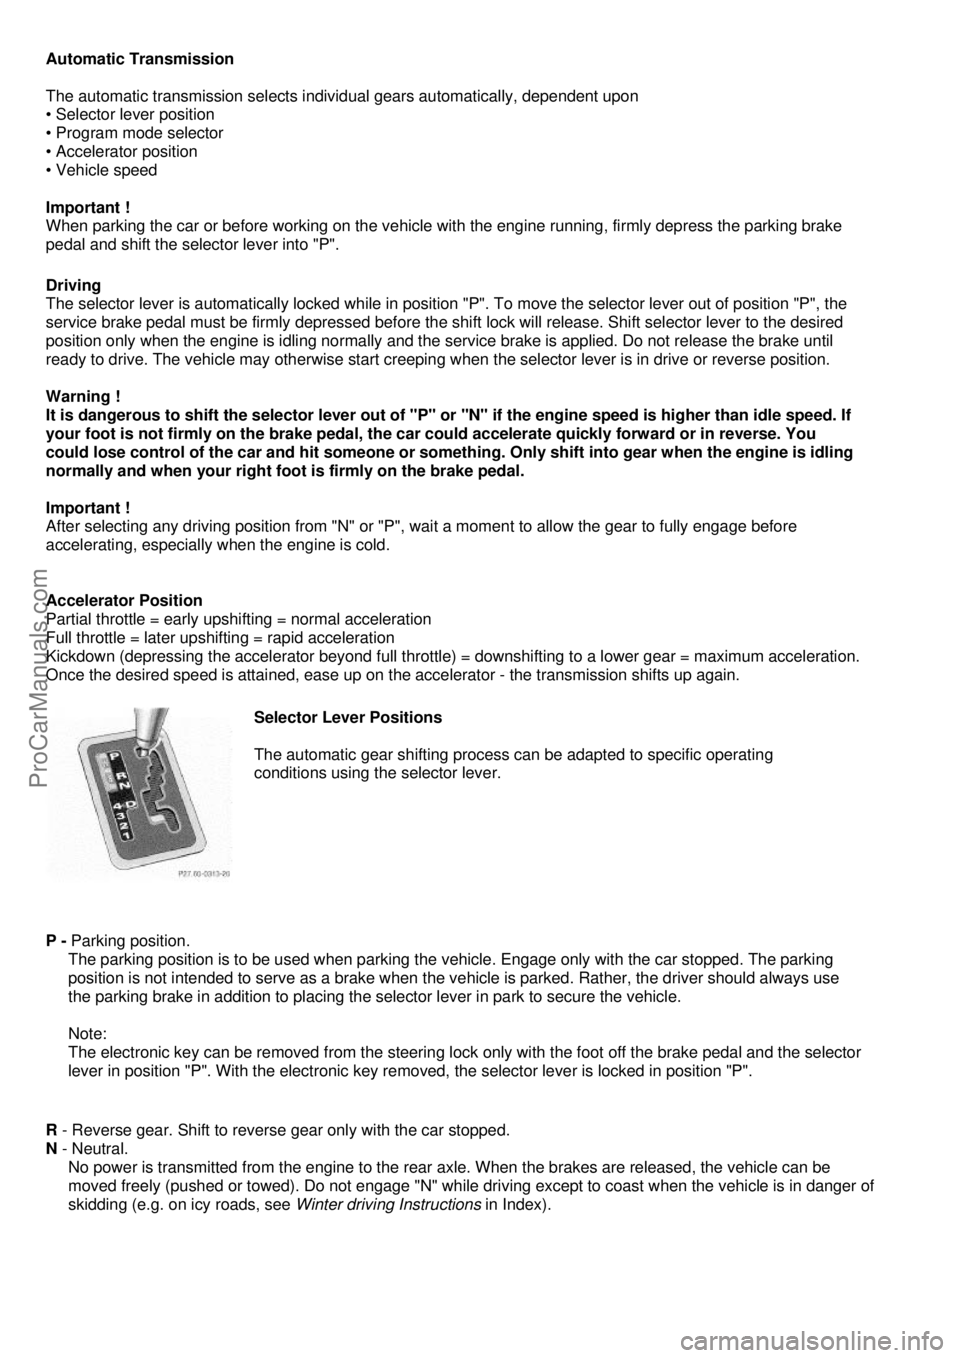
Selector Lever Positions
The automatic gear shifting process can be adapted to specific operating
conditions using the selector lever.
P - Parking position.
The parking position is to be used when parking t he vehicle. Engage only with the car stopped. The parking
position is not intended to serve as a brake when the vehicle is parked. Rather, the driver should always use
the parking brake in addition to placing the selector lever in park to secure the vehicle.
Note:
The electronic key can be removed from the steering lo ck only with the foot off the brake pedal and the selector
lever in position "P". With the electronic key removed, the selector lever is locked in position "P".
R - Reverse gear. Shift to reverse gear only with the car stopped.
N - Neutral.
No power is transmitted from the engine to the rear axle. When the brakes are released, the vehicle can be
moved freely (pushed or towed). Do not engage "N" while driving except to coast when the vehicle is in danger of
skidding (e.g. on icy roads, see Winter driving Instructions in Index).
ProCarManuals.com
Page 64 of 122

Important !
Coasting the vehicle, or driving for any other reason with selector lever in "N" can result in transmission damage
that is not covered by the Mercedes-Benz Limited Warranty.
D - The transmission automatically upshifts through 5th gear . Position "D" provides optimum driving characteristics
under all normal operating conditions.
4 - Upshift through 4th gear only.
Suitable for performance driving. To shift from position "D" to "4", push selector lever to the left.
3 - Upshift through 3rd gear only.
Suitable for moderately steep hill s. Since the transmission does not shift hi gher than 3rd gear, this gear selection
will allow use of the engine's braking power downhill.
2 - Upshift through 2nd gear only.
For driving in mountainous regions or under extreme operating conditions. This gear selection will allow use of the
engine's braking power when descending steep grades.
1 - In this position, the engine's
braking effect is utilized by shifting into 1 st gea r. Use this position while descending very steep or lengthy
downgrades and only at speeds below 40 mph (60 km/h).
Important !
With selector lever in position "D", "4" or "3", upshifting from 1st to 2nd to 3rd gear is delayed depending on vehicle
speed and engine temperature. This allows the catalytic converter to heat up more quickly to operating temperatures.
During the brief warm-up period this delayed upshift and increased engine noise might be perceived as a malfunction.
However, neither the engine nor transmission are negatively affected by this mode of operation.
The delayed upshift is effective with vehicle speeds below 31 mph (50 km/h) at partial throttle and engine
temperatures below 95°F (35°C). To avoid overrevving the engi ne when the selector lever is moved to a lower driving
range, the transmission will not shift to a lower gear as l ong as the vehicle speed exceeds the speed limit of that gear.
To prevent the engine from laboring at low RPMs, do not allow the engine speed to drop too low on uphill gradients.
Depending on the degree of the incline, shift selector feve r to a lower gear range early enough to maintain engine
RPM within the best torque range.
Warning!
On slippery road surfaces, never downshift in order to obtain braking action. This could result in rear wheel
slip and reduced vehicle control. Your vehicle's AB S will not prevent this type of loss of control.
Maneuvering
To maneuver in tight areas, e.g. when pulling into a parki ng space, control the car speed by gradually releasing the
brakes. Accelerate gently and never abr uptly step on the accelerator. To rock a car out of soft ground (mud or snow),
alternately shift from forward to reverse, while applying slight partial throttle. Rocking a car free in this manner may
cause the ABS malfunction indicator lamp to come on. Turn off and restart the engine to clear the malfunction
indication.
Stopping
For brief stops, e.g. at traffic lights, leave the transmission in gear and hold vehicle with the service brake. For longer
stops with the engine idling, shift into "N" or "P" and hold t he vehicle with the service brake. When stopping the car on
an uphill incline, do not hold it with the accelerator, use the brake. This avoids unnecessary transmission heat build
up.
Warning !
Getting out of your car with the selector lever not fully engaged in position "P" is dangerous. Also, when
parked on an incline, position "P" alone may not pr event your vehicle from moving, possibly hitting people
or objects. Always set the parking brake in addition to sh ifting to position "P". When parked on an incline,
also turn front wheel against curb.
ProCarManuals.com
 1
1 2
2 3
3 4
4 5
5 6
6 7
7 8
8 9
9 10
10 11
11 12
12 13
13 14
14 15
15 16
16 17
17 18
18 19
19 20
20 21
21 22
22 23
23 24
24 25
25 26
26 27
27 28
28 29
29 30
30 31
31 32
32 33
33 34
34 35
35 36
36 37
37 38
38 39
39 40
40 41
41 42
42 43
43 44
44 45
45 46
46 47
47 48
48 49
49 50
50 51
51 52
52 53
53 54
54 55
55 56
56 57
57 58
58 59
59 60
60 61
61 62
62 63
63 64
64 65
65 66
66 67
67 68
68 69
69 70
70 71
71 72
72 73
73 74
74 75
75 76
76 77
77 78
78 79
79 80
80 81
81 82
82 83
83 84
84 85
85 86
86 87
87 88
88 89
89 90
90 91
91 92
92 93
93 94
94 95
95 96
96 97
97 98
98 99
99 100
100 101
101 102
102 103
103 104
104 105
105 106
106 107
107 108
108 109
109 110
110 111
111 112
112 113
113 114
114 115
115 116
116 117
117 118
118 119
119 120
120 121
121


