Page 1294 of 2189

Headliner
Replacement
CAUTION: When prying with a flat-tip screwdriver,
wrap it with proioctiva tap€ to prevsnt damage.
NOTE:
. Take care not to bend and scratch the headliner.
. Be careful not to damage the dashboard and other
interior trim.
'1. Remove:
4D:
. Front pillar trim (both sides. see page 20-59)
. Center pillar lower trim panel (both sides, see page
20 59)
Upper anchor bolt from the front seat belt (both
sides, see page 20-85)
Center pillar outer trim and center pillar upper trim
(both sides, see page 20-59)
Ceiling light (see section 23)
Rearview mirror (see page 20-25)
a
a
a
a
a
3D:
. Front pillar trim (both sides, see page 20-60)
. Right rear seat-back and rear seat cushion (see
page 20-80)
. Rear center shelf (see page 20-60)
. Rear side shelf and side trim panel (right side,
see page 20-60)
. Upper anchor bolts from the front and rear seat
belts (right side. see pages 20-86, 89)
. Ouarter trim panel (right side, see page 20-60)
. Ceiling light (see section 23)
. Rearview mirror (see page 20-25)
2Dl
. Front pillar trim (both sides, see page 20-51)
. Right rear seat-back and rear seat cushion (see
page 20-81)
Side trim panel (right side, see page 20-61)
Upper anchor bolt from the front seat belt (right
side, see page 20-86)
Ouarter trim panel (right side, see page 20-6'l)
Ceiling light (see section 23)
Rearview mirror (see page 20-25)
20-64
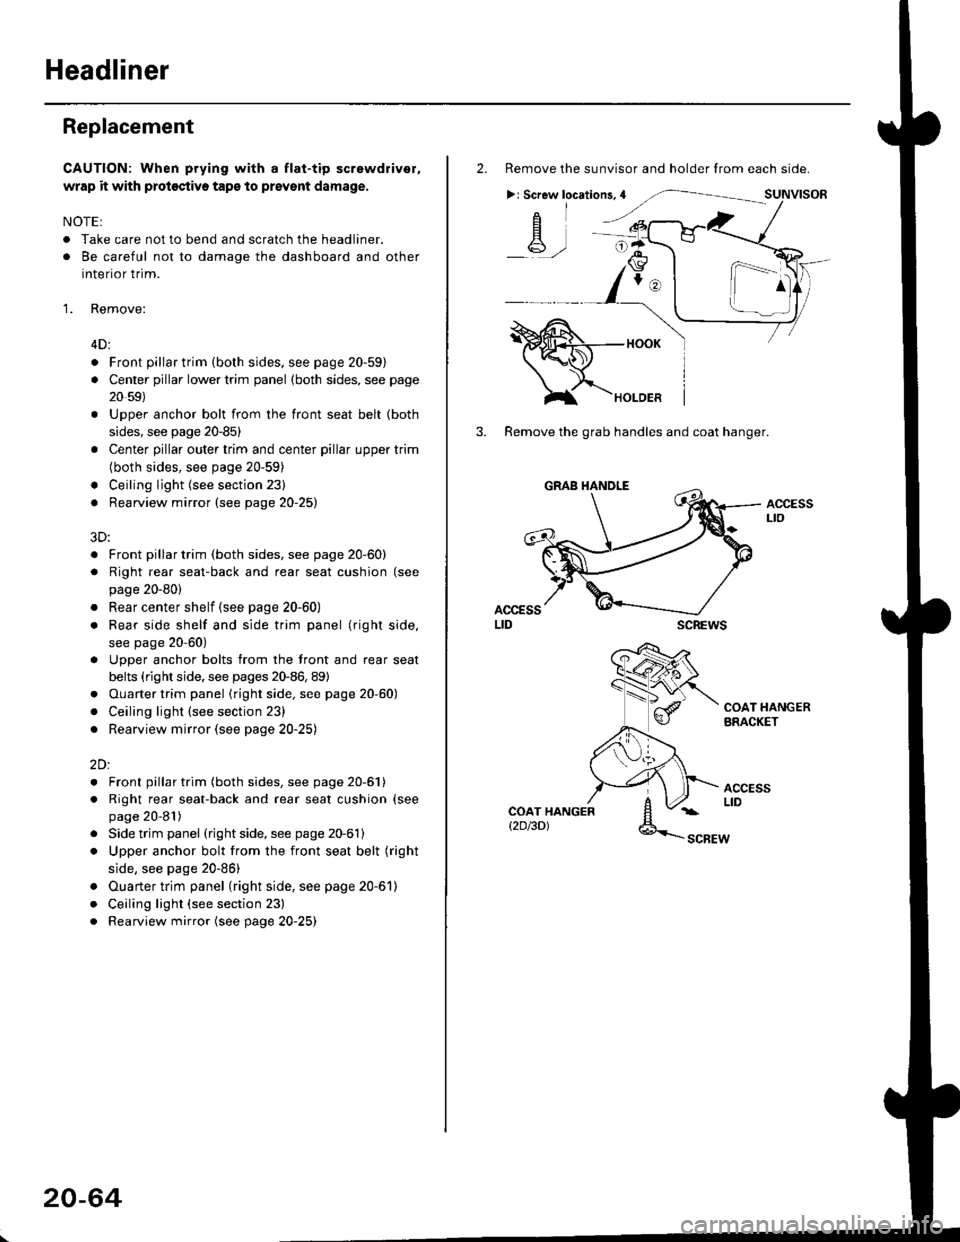
2. Remove the sunvisor and holder from each side.
>: Screw locations,4
-A-,-
3. Remove the grab handles and coat hanger.
scREws
ACCESSLto
COAT HANGERBRACKET
ACCESSLIDCOAT HANGERt2D/3DlSCBEW
1^
Page 1302 of 2189
Dashboard
Removal (cont'd)
7. lf necessary, remove the dashboard frame from the dashboard.
>: Screw localionsa>,21 B>,4a: Nut locations, 3
>: Clip locations
l^1./'\
I Shl:' Olb'tvY/l\-]1
ra 6 x '1.0 mm
Yi.!i[11"-"'".
DASHBOARD BRACKETSIDE COVER
Installation is the reverse of the removal orocedure.
NOTE:
. Before tightening the bolts, make sure the dashboard wire harnesses are not pinched.a Make sure the connectors, antenna lead and air mix control cable are connected properly.
FRONT PASSENGER'S
OASHBOARD
20-72
Page 1309 of 2189
Rear Seat
Removal
NOTE: Take care not to scratch the seat covers and body.
4D:
>: Bolt locationsl_):Hook locations,2
b,,***-,,.1*
D>'
] >mr
;iffiP-"*'piii::#r-,'-, @t,V . se-ri-cusxo" [-6*
v-
2u
2u
SEAT CUSHION
SEAT-BACK
Pivot boll conslruction:
SLITS
lnstallation is the reverse of the removal procedure
PIVOT BOLT ERACKET8 x 1.25 mm22 N m (2.2 kgf m, 16lbtftl
Apply liquid thread lock
NOTE:
. Before attaching the seat-back and seat cushion, make sure there are no twists or kinks in the rear seat belts and
center belt.
. When installing the seat cushion, slip the seat belt buckles through the slits in the seat cushron'
. Make sure the seat-back locks securely.
. lf necessary, adiusr the seat-back latch (see page 20-82) and seat-back (cont'd)
c>,1
6x1.omm l1Q- e "r.o--s.a ru.- tr.o rer-. I s.i N.- ir.o lgr.,i7.2 lbf.ft) ) E 7.2 'tJrftl
:- '/
>: Clip locations, 14
"@rz, \
EEES/
_ _ot /
RIGHT SEATSIDE EOLSTER
CENTEBPIVOTBRACKET
20-79
Page 1310 of 2189
Rear Seat
Removal (cont'dl
3D:
>: Bolt locationsA>,6
':^2
STRIKERRemove the side t.impanel (see page 20-60).
c>,1
STBIKER
,.:) : Hook locations, 2 >: Clip locations, 14
SEAT CUSHION
STRIKER
6x1.0mm9.8 N.m (1.0 kgI.m,7.2 tbf.ft)
V
RIGHTSEAT-BACK
Pivot bolt constiuction:
TOOTHEOLOCKWASHER
BUSHING
PIVOT
Installation is the reverse of the removal procedure.
NOTE:
Ptvor BoLT BRACKETI x 1.25 mm22 N.m {2.2 kgl.m. 16 lbf.ft)Apply liquid thread lock.
. Beiore anaching the seat-back and seat cushion, make sure there are no twists or kinks in the rear seat belts andcenter belt.
. When installing the seat cushion, slip the seat belt buckles through the slits in the seat cushion.. Make sure the seat-back locks securely.
. lf necessary, adjust the striker and seat-back.
20-ao
6xr.omm I9.8 N.m (1.0 ksf.h,i
@,
EE)qr ,/
6x1omm I22 N.m {2.2 kgf.m,l,"rrr,n2
PIVOTBRACKET
LEFTSEAT.BACK
tt
A
CENTERPIVOT
\---.---
6x1.0mm
BRACKET
B>, 1
e
I
tr
-l:/*- -"HOOK
Page 1311 of 2189
2Dt
>: Bolt locationsa>,6
O : Hook locations. 2 >: Clip location3, 14
SEAT CUSHION
,r@.''----EF-|
EH)w,/
PIVOTBRACKET
BUSXING
PIVOT
PIVOT BOLT BRACKET
I x 1 .25 mm22 N.m (2.2 kgt m. 16lblft)
Apply liquid thread lock.
lnstallation is the reverse of the removal procedure'
NOTE;
.Beforeattachingtheseat-backandseatcushion,makesuretherearenotwistsorkinksintherearseatbe|tsand
center belt.
.wheninsta||ingtheseatcushion,sliptheseatbe|tbucklesthroughthes|itsintheseatcushion.
. Make sure the seat-back locks securely
. lf necessary, adjust the seat-back latch (see page 20-82) and seat-back'
6xr.omm ]9.8 N.m l1.O kgf.m,i,:r:2
B>, 1
ffi
IgIt
c>, 1
6xr.omm I 8r.'r.o-- r22 N.m {2.2 kgtm,' \ffz s.e N.m tr.o *gf.m,'
,r:r",
_) E
7.2rbf.ftl
)
vv
PIVOT BRACKET
RIGHT SEAT.BACK
PIVOT BRACKET
Pivot bolt constauctaon:
TOOTHEDLOCKWASHER
SEAT.BACK MAT
,^
20-41
Page 1317 of 2189

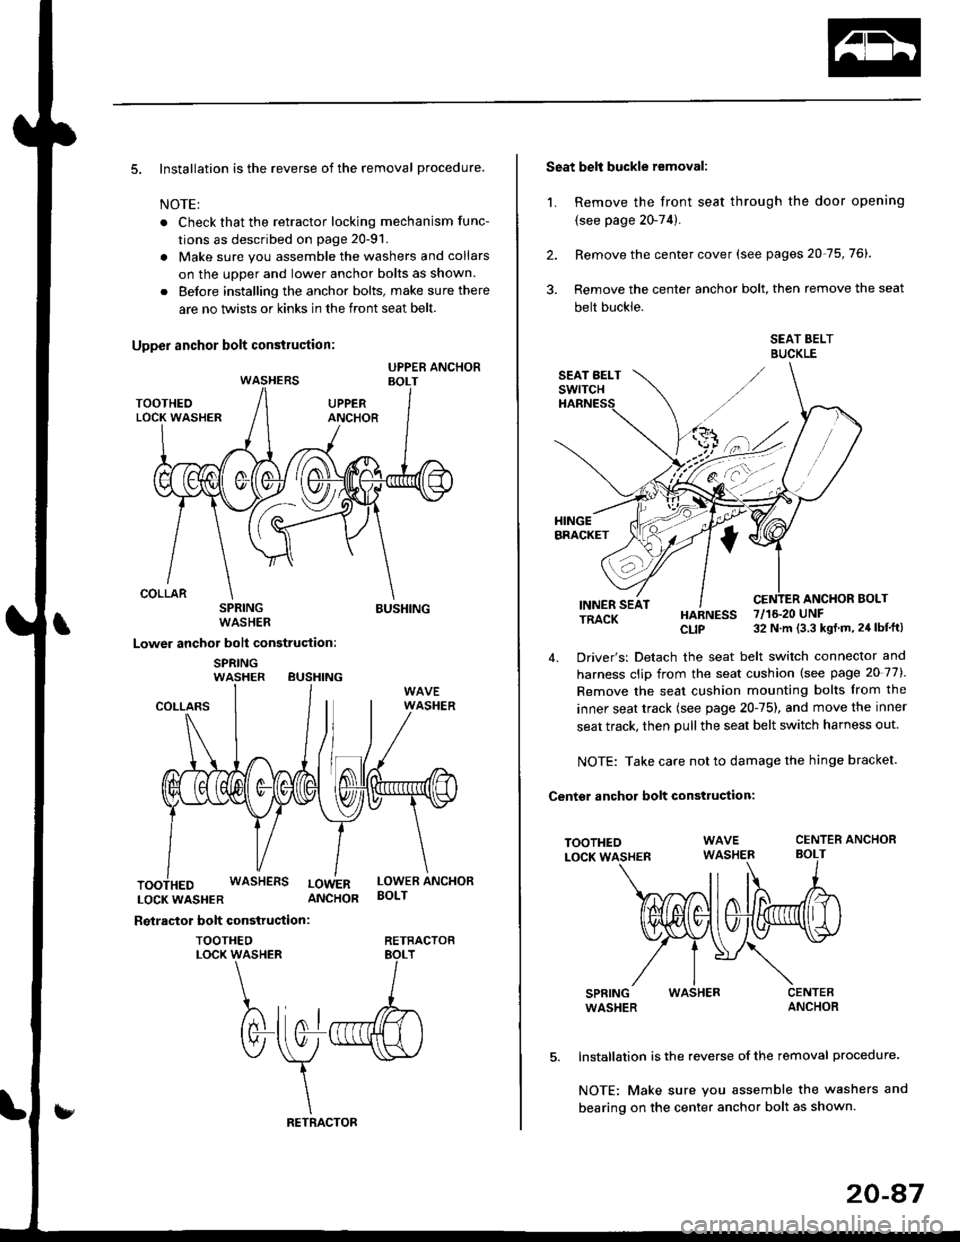
5. Installation is the reverse of the removal procedure.
NOTE:
. Check that the retractor locking mechanism func-
tions as described on page 20-91.
. Make sure you assemble the washers and collars
on the uoDer and lower anchor bolts as shown.
. Before installing the anchor bolts, make sure there
are no twists or kinks in the front seat belt.
SPRINGWASHER
Lower anchor bolt construction:
SPRINGWASHER BUSHING
BUSHING
COLLARS
LOCKWASHER ANCHOR
Reiractor bolt construction:
TOOTHEOLOCK WASHER
WASHERS LowERLOWER ANCHORBOLT
RETRACTOB
Seat belt buckle removal:
1. Remove the front seat through the door opening
{see page 20-74).
2. Remove the center cover (see pages 20-75,76).
3. Remove the center anchor bolt, then remove the seat
belt buckle.
SEAT BELTBUCKLE
ANCHOR BOLTINNER SEATTRACK
TOOTHEOLOCK WASHER
SPRINGWASHER
HARNESS 7/16.20 UNF
CLIP 32 N m (3.3 kgt m, 24 lbf'ft)
4. Driver's: Detach the seat belt switch connector and
harness clip from the seat cushion (see page 20 77).
Remove the seat cushion mounting bolts from the
inner seat track {see page 20-75), and move the inner
seat track, then pull the seat belt switch harness out.
NOTE: Take care not to damage the hinge bracket.
Centsr anchor bolt construction:
CENTER ANCHORBOLT
WASHER
Installation is the reverse of the removal procedure.
NOTE: Make sure you assemble the washers and
bearing on the center anchor bolt as shown.
20-47
Page 1355 of 2189
Rear Seat
RemovaUlnstallation
3D:
>: Bolt locationsa>,6
i_): Hook locations4i.,,2
c>, 1
Bt-;,1
T=ttJX,.)MIOOLE FLOORCENTER GUSSET
6x1.Omm9.8 N.m {1.07.2 tbt.trl
STRIKERRemove the side trimpanel (see page 20 60).
.2 tb,f.ft)
--::.........VV
STNIKER
>: Clip locations, 14
l@nIFF(EE
\qt
;*... 1PIVOTBRACKET
SEAT CUSHION
HOOK
A
c
Pivot boft con3truction:
TOOTXEDLOCKWASHERSEAT.BACK
A
Instailation is the reverse of the removal procedure.
NOTE:
. Before attaching the seat-back and seat cushion, make sure there are
center belt.
. When installing the seat cushion, slip the seat belt buckles through the
. Make sure the seat-back locks securely.
. lf necessary, adjust the striker and seat-back.
20-126
PIVOT BOLT BRACKET8 x 1.25 mm22 N.m 12,2 kgf,m, 16 lbl.ftlApply liquid thread lock.
no twists or kinks in the rear seat belts and
slits in the seat cushion.
iI
*nt.]
j
6x1.0mm9.8 N.m {1.0
B>,'t
I
-@e ' t.o.- |S=222 N.m 12.2 kg{.m,Ig 16 tbf.ft) j
:,/
I
I
Ifgf..,i
l
)
l---
Page 1356 of 2189
,-. ): Hook locations^(:).zB() ' t2D:
>: Bolt locationsA>,6c>,1B>. 1
6le
9rJ*'Ll-",-, i VH 16 rbr'frl ) g
,/v
6x1.omm i9.8 N.m 11.0 ksf.m,l7.2 rbf.ft) i
>: Clio locations, 14
PIVOT BRACKET
V
CENTER
RIGHT SEAT-BACK
LEFTSEAT-BACK
SEAT CUSHION
lnstallation is the reverse of the removal procedure.
NOTE:
. Before attaching the seat-back and seat cushion, make sure there are
center belt.
. When installing the seat cushion, slip the seat belt buckles through the
. Make sure the seat-back locks securely
. lf necessary, adjust the seat-back latch and seat-back
BUSHING
PIVOT BOLTBRACKET8 x 1.25 mm22 N.m {2.2 kgf.m, 16 lbIft)Apply liquid thread lock.
no twists or kinks in the rear seat belts and
slits in the seat cushion.
SEAT-AACK MAT
VV
TOOIHEDLOCKWASHER
PIVOT BRACKET
20-127