1999 DODGE NEON window
[x] Cancel search: windowPage 1083 of 1200
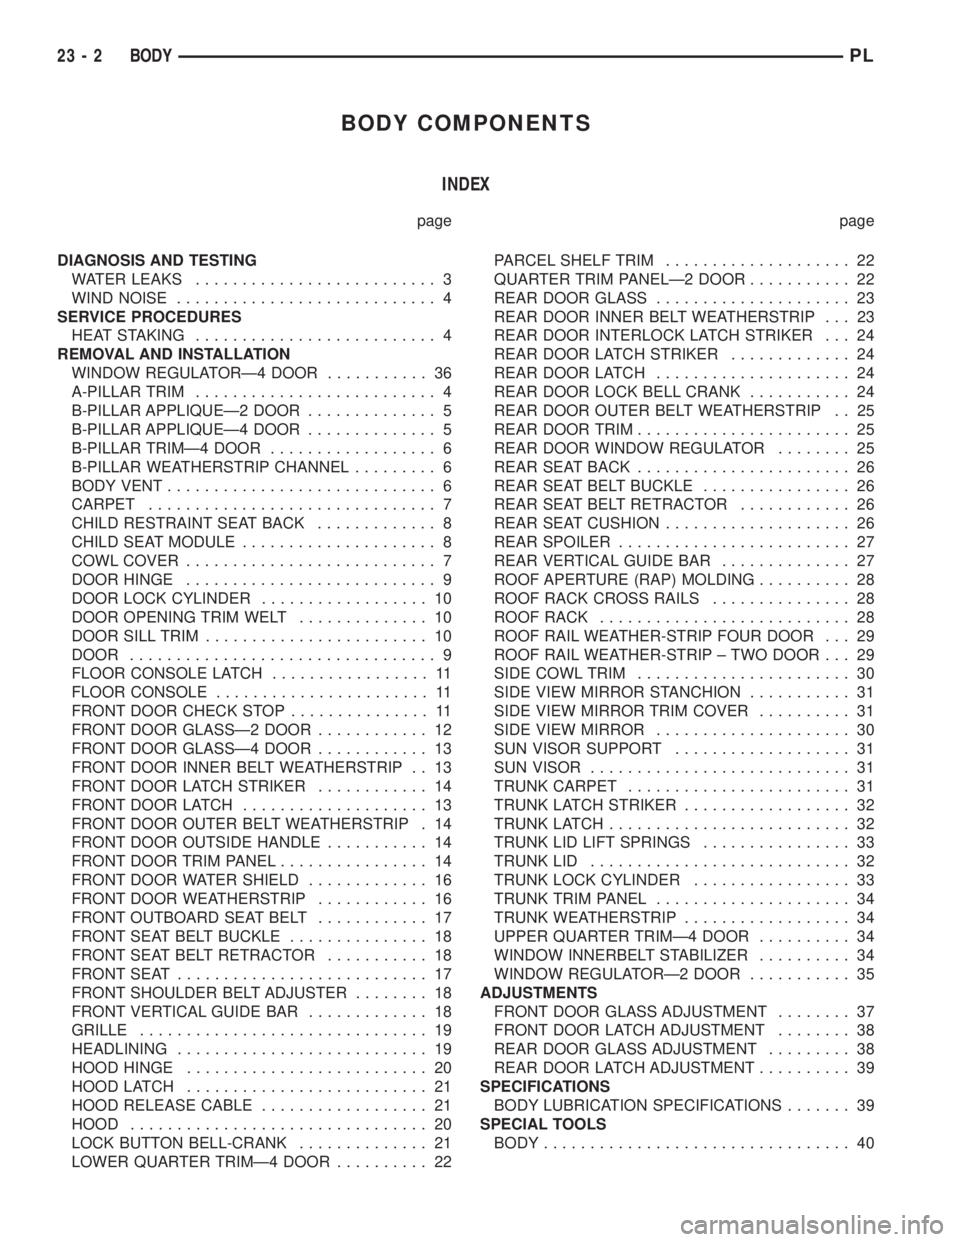
BODY COMPONENTS
INDEX
page page
DIAGNOSIS AND TESTING
WATER LEAKS.......................... 3
WIND NOISE............................ 4
SERVICE PROCEDURES
HEAT STAKING.......................... 4
REMOVAL AND INSTALLATION
WINDOW REGULATORÐ4 DOOR........... 36
A-PILLAR TRIM.......................... 4
B-PILLAR APPLIQUEÐ2 DOOR.............. 5
B-PILLAR APPLIQUEÐ4 DOOR.............. 5
B-PILLAR TRIMÐ4 DOOR.................. 6
B-PILLAR WEATHERSTRIP CHANNEL......... 6
BODY VENT............................. 6
CARPET............................... 7
CHILD RESTRAINT SEAT BACK............. 8
CHILD SEAT MODULE..................... 8
COWL COVER........................... 7
DOOR HINGE........................... 9
DOOR LOCK CYLINDER.................. 10
DOOR OPENING TRIM WELT.............. 10
DOOR SILL TRIM........................ 10
DOOR................................. 9
FLOOR CONSOLE LATCH................. 11
FLOOR CONSOLE....................... 11
FRONT DOOR CHECK STOP............... 11
FRONT DOOR GLASSÐ2 DOOR............ 12
FRONT DOOR GLASSÐ4 DOOR............ 13
FRONT DOOR INNER BELT WEATHERSTRIP . . 13
FRONT DOOR LATCH STRIKER............ 14
FRONT DOOR LATCH.................... 13
FRONT DOOR OUTER BELT WEATHERSTRIP . 14
FRONT DOOR OUTSIDE HANDLE........... 14
FRONT DOOR TRIM PANEL................ 14
FRONT DOOR WATER SHIELD............. 16
FRONT DOOR WEATHERSTRIP............ 16
FRONT OUTBOARD SEAT BELT............ 17
FRONT SEAT BELT BUCKLE............... 18
FRONT SEAT BELT RETRACTOR........... 18
FRONT SEAT........................... 17
FRONT SHOULDER BELT ADJUSTER........ 18
FRONT VERTICAL GUIDE BAR............. 18
GRILLE............................... 19
HEADLINING........................... 19
HOOD HINGE.......................... 20
HOOD LATCH.......................... 21
HOOD RELEASE CABLE.................. 21
HOOD................................ 20
LOCK BUTTON BELL-CRANK.............. 21
LOWER QUARTER TRIMÐ4 DOOR.......... 22PARCEL SHELF TRIM.................... 22
QUARTER TRIM PANELÐ2 DOOR........... 22
REAR DOOR GLASS..................... 23
REAR DOOR INNER BELT WEATHERSTRIP . . . 23
REAR DOOR INTERLOCK LATCH STRIKER . . . 24
REAR DOOR LATCH STRIKER............. 24
REAR DOOR LATCH..................... 24
REAR DOOR LOCK BELL CRANK........... 24
REAR DOOR OUTER BELT WEATHERSTRIP . . 25
REAR DOOR TRIM....................... 25
REAR DOOR WINDOW REGULATOR........ 25
REAR SEAT BACK....................... 26
REAR SEAT BELT BUCKLE................ 26
REAR SEAT BELT RETRACTOR............ 26
REAR SEAT CUSHION.................... 26
REAR SPOILER......................... 27
REAR VERTICAL GUIDE BAR.............. 27
ROOF APERTURE (RAP) MOLDING.......... 28
ROOF RACK CROSS RAILS............... 28
ROOF RACK........................... 28
ROOF RAIL WEATHER-STRIP FOUR DOOR . . . 29
ROOF RAIL WEATHER-STRIP ± TWO DOOR . . . 29
SIDE COWL TRIM....................... 30
SIDE VIEW MIRROR STANCHION........... 31
SIDE VIEW MIRROR TRIM COVER.......... 31
SIDE VIEW MIRROR..................... 30
SUN VISOR SUPPORT................... 31
SUN VISOR............................ 31
TRUNK CARPET........................ 31
TRUNK LATCH STRIKER.................. 32
TRUNK LATCH.......................... 32
TRUNK LID LIFT SPRINGS................ 33
TRUNK LID............................ 32
TRUNK LOCK CYLINDER................. 33
TRUNK TRIM PANEL..................... 34
TRUNK WEATHERSTRIP.................. 34
UPPER QUARTER TRIMÐ4 DOOR.......... 34
WINDOW INNERBELT STABILIZER.......... 34
WINDOW REGULATORÐ2 DOOR........... 35
ADJUSTMENTS
FRONT DOOR GLASS ADJUSTMENT........ 37
FRONT DOOR LATCH ADJUSTMENT........ 38
REAR DOOR GLASS ADJUSTMENT......... 38
REAR DOOR LATCH ADJUSTMENT.......... 39
SPECIFICATIONS
BODY LUBRICATION SPECIFICATIONS....... 39
SPECIAL TOOLS
BODY................................. 40
23 - 2 BODYPL
Page 1084 of 1200
DIAGNOSIS AND TESTING
WATER LEAKS
Water leaks can be caused by poor sealing,
improper body component alignment, body seam
porosity, missing plugs, or blocked drain holes. Cen-
trifugal and gravitational force can cause water to
drip from a location away from the actual leak point,
making leak detection difficult. All body sealing
points should be water tight in normal wet-driving
conditions. Water flowing downward from the front of
the vehicle should not enter the passenger or luggage
compartment. Moving sealing surfaces will not
always seal water tight under all conditions. At
times, side glass or door seals will allow water to
enter the passenger compartment during high pres-
sure washing or hard driving rain (severe) condi-
tions. Overcompensating on door or glass
adjustments to stop a water leak that occurs under
severe conditions can cause premature seal wear and
excessive closing or latching effort. After completing
a repair, water-test vehicle to verify leak has stopped
before returning vehicle to use.
VISUAL INSPECTION BEFORE WATER LEAK
TESTS
Verify that floor and body plugs are in place, body
drains are clear, and body components are properly
aligned and sealed. If component alignment or seal-
ing is necessary, refer to the appropriate section of
this group for proper procedures.
WATER LEAK TESTS
WARNING: DO NOT USE ELECTRIC SHOP LIGHTS
OR TOOLS IN WATER TEST AREA. PERSONAL
INJURY CAN RESULT.
When the conditions causing a water leak have
been determined, simulate the conditions as closely
as possible.
²If a leak occurs with the vehicle parked in a
steady light rain, flood the leak area with an open-
ended garden hose.
²If a leak occurs while driving at highway speeds
in a steady rain, test the leak area with a reasonable
velocity stream or fan spray of water. Direct the
spray in a direction comparable to actual conditions.
²If a leak occurs when the vehicle is parked on an
incline, hoist the end or side of the vehicle to simu-
late this condition. This method can be used when
the leak occurs when the vehicle accelerates, stops or
turns. If the leak occurs on acceleration, hoist the
front of the vehicle. If the leak occurs when braking,
hoist the back of the vehicle. If the leak occurs on left
turns, hoist the left side of the vehicle. If the leak
occurs on right turns, hoist the right side of the vehi-cle. For hoisting recommendations refer to Group 0,
Lubrication and Maintenance, General Information
section.
WATER LEAK DETECTION
To detect a water leak point-of-entry, do a water
test and watch for water tracks or droplets forming
on the inside of the vehicle. If necessary, remove inte-
rior trim covers or panels to gain visual access to the
leak area. If the hose cannot be positioned without
being held, have someone help do the water test.
Some water leaks must be tested for a considerable
length of time to become apparent. When a leak
appears, find the highest point of the water track or
drop. The highest point usually will show the point of
entry. After leak point has been found, repair the
leak and water test to verify that the leak has
stopped.
Locating the entry point of water that is leaking
into a cavity between panels can be difficult. The
trapped water may splash or run from the cavity,
often at a distance from the entry point. Most water
leaks of this type become apparent after accelerating,
stopping, turning, or when on an incline.
MIRROR INSPECTION METHOD
When a leak point area is visually obstructed, use
a suitable mirror to gain visual access. A mirror can
also be used to deflect light to a limited-access area
to assist in locating a leak point.
BRIGHT LIGHT LEAK TEST METHOD
Some water leaks in the luggage compartment can
be detected without water testing. Position the vehi-
cle in a brightly lit area. From inside the darkened
luggage compartment inspect around seals and body
seams. If necessary, have a helper direct a drop light
over the suspected leak areas around the luggage
compartment. If light is visible through a normally
sealed location, water could enter through the open-
ing.
PRESSURIZED LEAK TEST METHOD
When a water leak into the passenger compart-
ment cannot be detected by water testing, pressurize
the passenger compartment and soap test exterior of
the vehicle. To pressurize the passenger compart-
ment, close all doors and windows, start engine, and
set heater control to high blower in HEAT position. If
engine can not be started, connect a charger to the
battery to ensure adequate voltage to the blower.
With interior pressurized, apply dish detergent solu-
tion to suspected leak area on the exterior of the
vehicle. Apply detergent solution with spray device or
soft bristle brush. If soap bubbles occur at a body
seam, joint, seal or gasket, the leak entry point could
be at that location.
PLBODY 23 - 3
Page 1093 of 1200
INSTALLATION
(1) Position door check on vehicle and install bolts
attaching stop to door end frame.
(2) Install door speaker, if so equipped.
(3) Install bolt holding door check stop to hinge
pillar.
(4) Install door trim panel and water shield.
FRONT DOOR GLASSÐ2 DOOR
REMOVAL
(1) Remove door trim panel and water shield.
(2) Remove inner and outer door belt weather-
strips.
(3) Loosen inner belt stabilizer.
(4) Lower door glass to bottom of travel to access
glass attachment bolts.
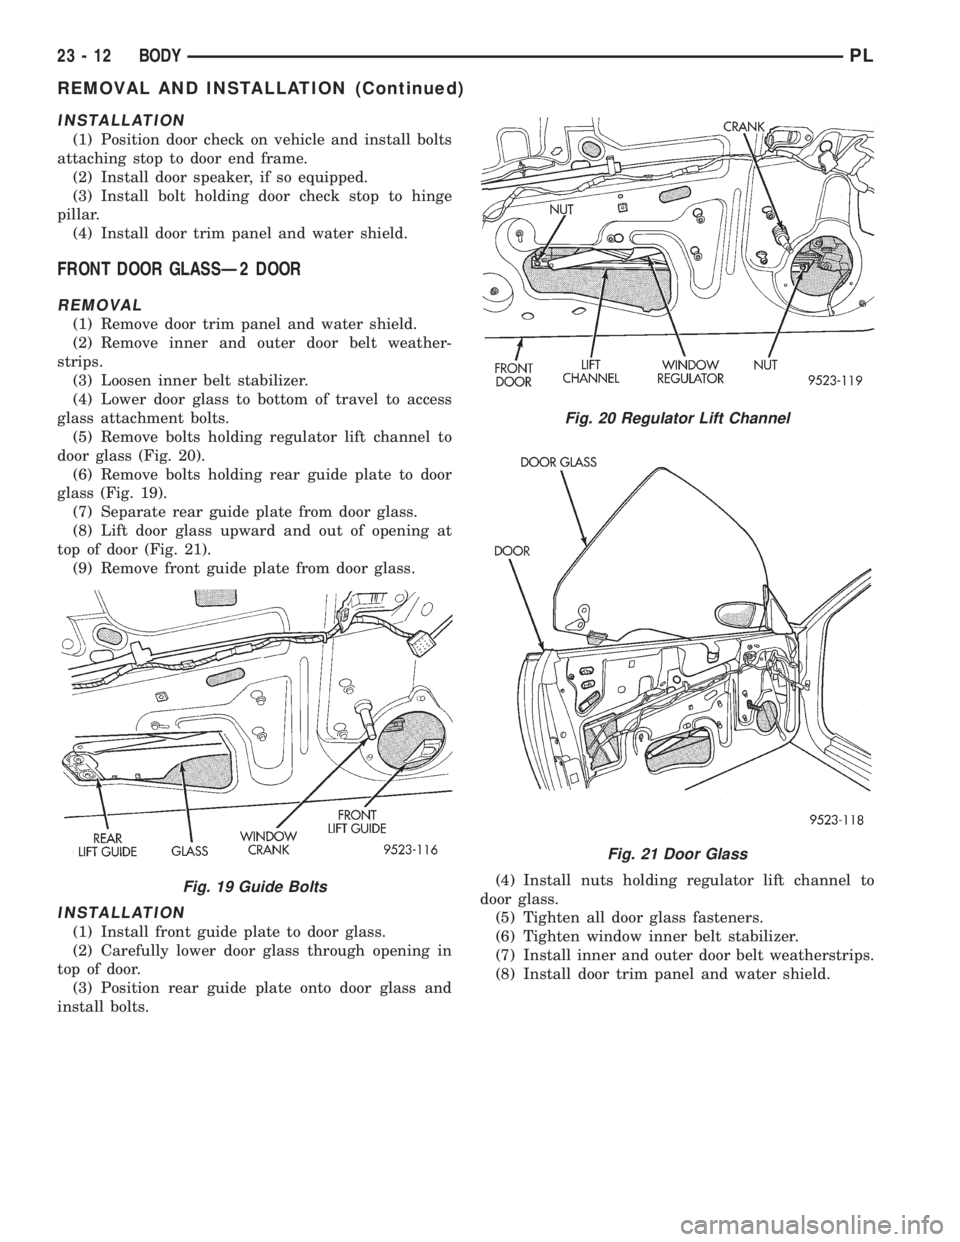
(5) Remove bolts holding regulator lift channel to
door glass (Fig. 20).
(6) Remove bolts holding rear guide plate to door
glass (Fig. 19).
(7) Separate rear guide plate from door glass.
(8) Lift door glass upward and out of opening at
top of door (Fig. 21).
(9) Remove front guide plate from door glass.
INSTALLATION
(1) Install front guide plate to door glass.
(2) Carefully lower door glass through opening in
top of door.
(3) Position rear guide plate onto door glass and
install bolts.(4) Install nuts holding regulator lift channel to
door glass.
(5) Tighten all door glass fasteners.
(6) Tighten window inner belt stabilizer.
(7) Install inner and outer door belt weatherstrips.
(8) Install door trim panel and water shield.
Fig. 19 Guide Bolts
Fig. 20 Regulator Lift Channel
Fig. 21 Door Glass
23 - 12 BODYPL
REMOVAL AND INSTALLATION (Continued)
Page 1094 of 1200
FRONT DOOR GLASSÐ4 DOOR
REMOVAL
(1) Remove door trim panel and water shield.
(2) Remove inner door belt weatherstrip.
(3) Loosen window inner belt stabilizer.
(4) Lower door glass to bottom of door to gain
access to attaching bolts.
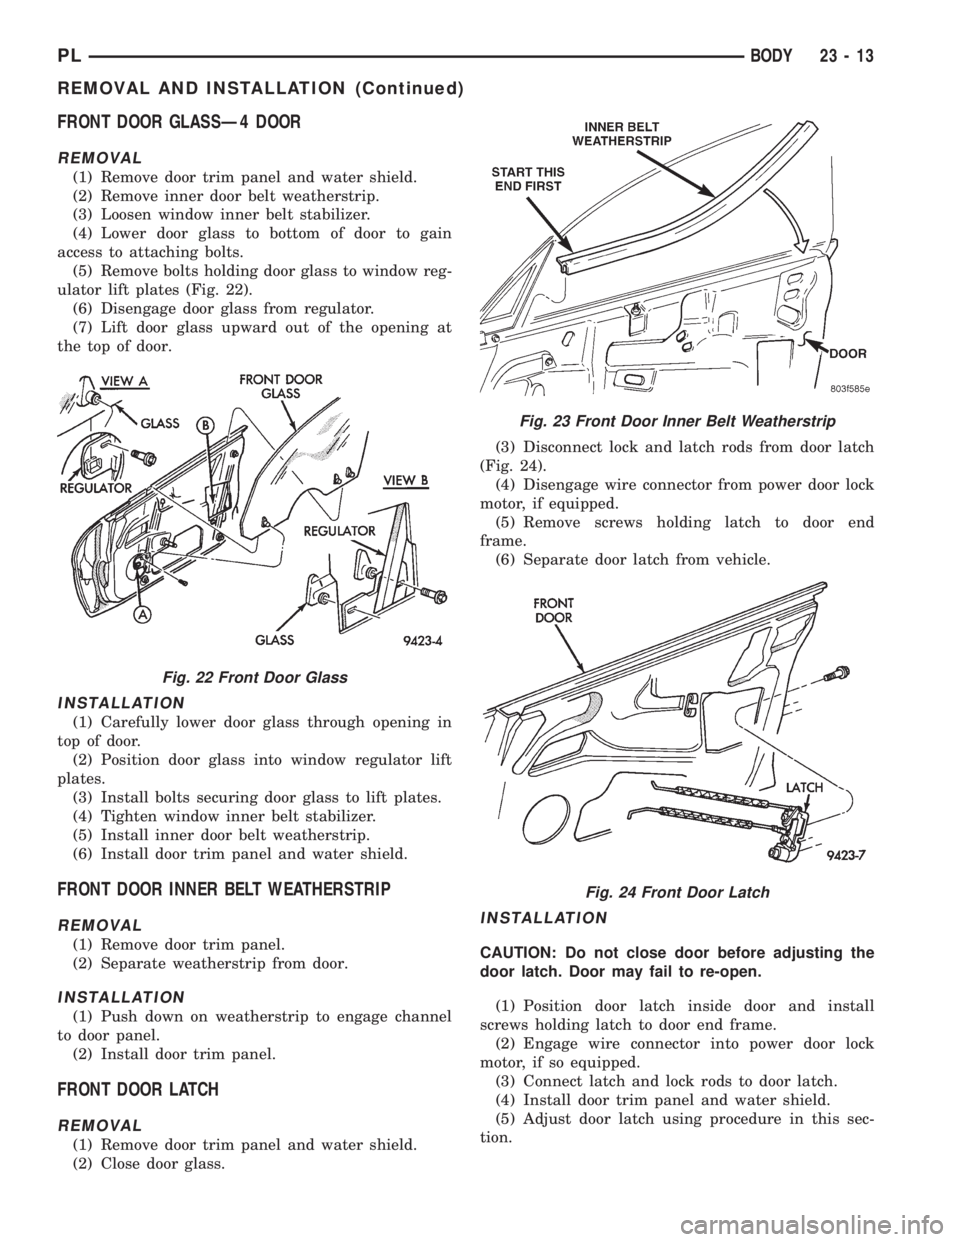
(5) Remove bolts holding door glass to window reg-
ulator lift plates (Fig. 22).
(6) Disengage door glass from regulator.
(7) Lift door glass upward out of the opening at
the top of door.
INSTALLATION
(1) Carefully lower door glass through opening in
top of door.
(2) Position door glass into window regulator lift
plates.
(3) Install bolts securing door glass to lift plates.
(4) Tighten window inner belt stabilizer.
(5) Install inner door belt weatherstrip.
(6) Install door trim panel and water shield.
FRONT DOOR INNER BELT WEATHERSTRIP
REMOVAL
(1) Remove door trim panel.
(2) Separate weatherstrip from door.
INSTALLATION
(1) Push down on weatherstrip to engage channel
to door panel.
(2) Install door trim panel.
FRONT DOOR LATCH
REMOVAL
(1) Remove door trim panel and water shield.
(2) Close door glass.(3) Disconnect lock and latch rods from door latch
(Fig. 24).
(4) Disengage wire connector from power door lock
motor, if equipped.
(5) Remove screws holding latch to door end
frame.
(6) Separate door latch from vehicle.
INSTALLATION
CAUTION: Do not close door before adjusting the
door latch. Door may fail to re-open.
(1) Position door latch inside door and install
screws holding latch to door end frame.
(2) Engage wire connector into power door lock
motor, if so equipped.
(3) Connect latch and lock rods to door latch.
(4) Install door trim panel and water shield.
(5) Adjust door latch using procedure in this sec-
tion.
Fig. 22 Front Door Glass
Fig. 23 Front Door Inner Belt Weatherstrip
Fig. 24 Front Door Latch
PLBODY 23 - 13
REMOVAL AND INSTALLATION (Continued)
Page 1095 of 1200
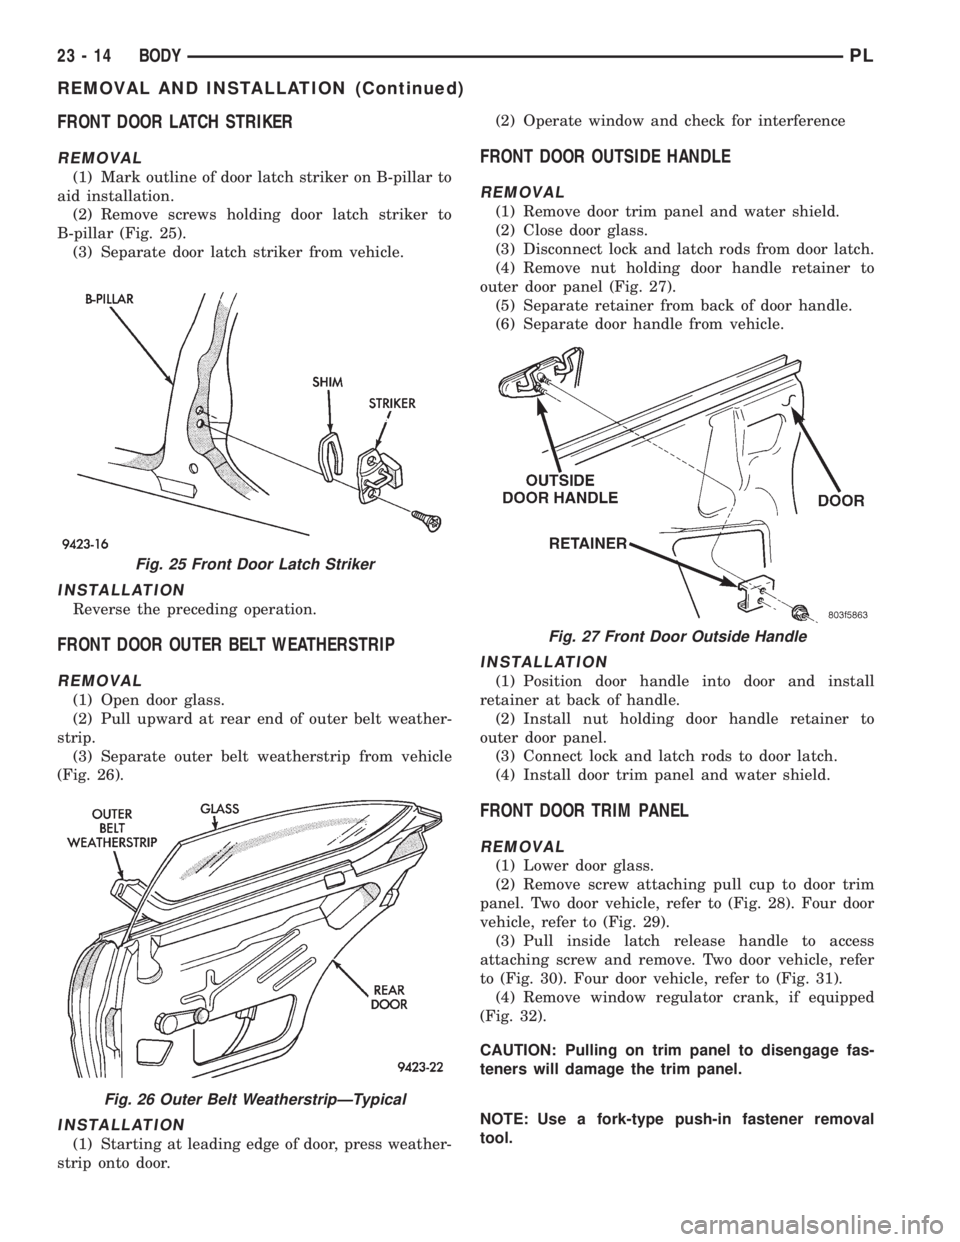
FRONT DOOR LATCH STRIKER
REMOVAL
(1) Mark outline of door latch striker on B-pillar to
aid installation.
(2) Remove screws holding door latch striker to
B-pillar (Fig. 25).
(3) Separate door latch striker from vehicle.
INSTALLATION
Reverse the preceding operation.
FRONT DOOR OUTER BELT WEATHERSTRIP
REMOVAL
(1) Open door glass.
(2) Pull upward at rear end of outer belt weather-
strip.
(3) Separate outer belt weatherstrip from vehicle
(Fig. 26).
INSTALLATION
(1) Starting at leading edge of door, press weather-
strip onto door.(2) Operate window and check for interference
FRONT DOOR OUTSIDE HANDLE
REMOVAL
(1) Remove door trim panel and water shield.
(2) Close door glass.
(3) Disconnect lock and latch rods from door latch.
(4) Remove nut holding door handle retainer to
outer door panel (Fig. 27).
(5) Separate retainer from back of door handle.
(6) Separate door handle from vehicle.
INSTALLATION
(1) Position door handle into door and install
retainer at back of handle.
(2) Install nut holding door handle retainer to
outer door panel.
(3) Connect lock and latch rods to door latch.
(4) Install door trim panel and water shield.
FRONT DOOR TRIM PANEL
REMOVAL
(1) Lower door glass.
(2) Remove screw attaching pull cup to door trim
panel. Two door vehicle, refer to (Fig. 28). Four door
vehicle, refer to (Fig. 29).
(3) Pull inside latch release handle to access
attaching screw and remove. Two door vehicle, refer
to (Fig. 30). Four door vehicle, refer to (Fig. 31).
(4) Remove window regulator crank, if equipped
(Fig. 32).
CAUTION: Pulling on trim panel to disengage fas-
teners will damage the trim panel.
NOTE: Use a fork-type push-in fastener removal
tool.
Fig. 25 Front Door Latch Striker
Fig. 26 Outer Belt WeatherstripÐTypical
Fig. 27 Front Door Outside Handle
23 - 14 BODYPL
REMOVAL AND INSTALLATION (Continued)
Page 1096 of 1200
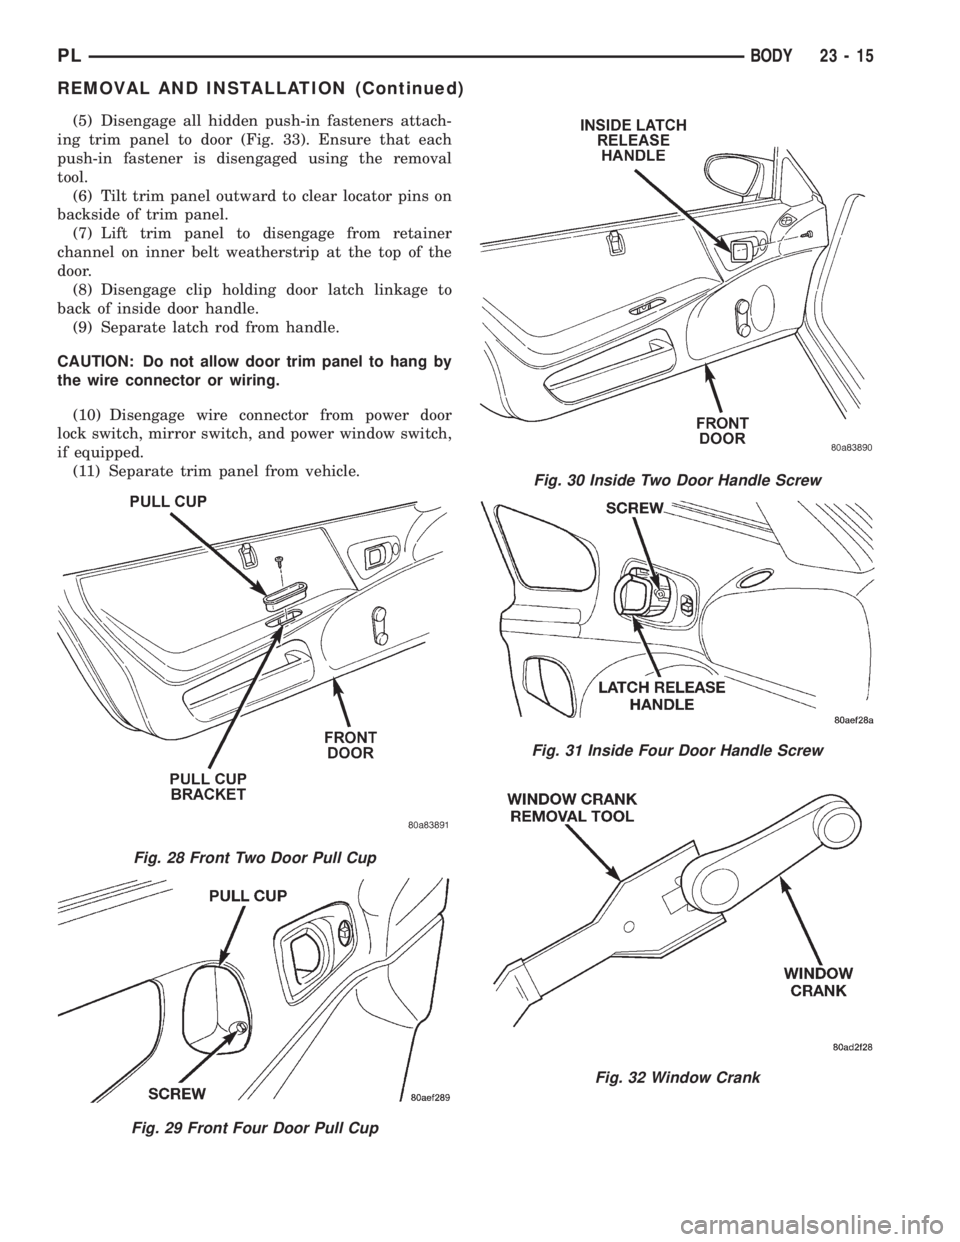
(5) Disengage all hidden push-in fasteners attach-
ing trim panel to door (Fig. 33). Ensure that each
push-in fastener is disengaged using the removal
tool.
(6) Tilt trim panel outward to clear locator pins on
backside of trim panel.
(7) Lift trim panel to disengage from retainer
channel on inner belt weatherstrip at the top of the
door.
(8) Disengage clip holding door latch linkage to
back of inside door handle.
(9) Separate latch rod from handle.
CAUTION: Do not allow door trim panel to hang by
the wire connector or wiring.
(10) Disengage wire connector from power door
lock switch, mirror switch, and power window switch,
if equipped.
(11) Separate trim panel from vehicle.
Fig. 28 Front Two Door Pull Cup
Fig. 29 Front Four Door Pull Cup
Fig. 30 Inside Two Door Handle Screw
Fig. 31 Inside Four Door Handle Screw
Fig. 32 Window Crank
PLBODY 23 - 15
REMOVAL AND INSTALLATION (Continued)
Page 1097 of 1200
INSTALLATION
(1) Replace any damaged or missing push±in fas-
teners with original equipment push-in fasteners.
(2) Place trim panel near door.
(3) Engage wire connectors to power lock switch,
mirror switch, and power window switch, if equipped.
(4) Insert latch rod into inside latch release.
(5) Engage clip holding door latch linkage to back
of inside door handle.
(6) Engage trim panel into retainer channel at top
of door and push down to seat.
(7) Locate door trim panel to inner door panel by
aligning locating pins on backside of trim panel to
mating holes in inner door panel. Gently shift panel
forward or rearward if necessary.
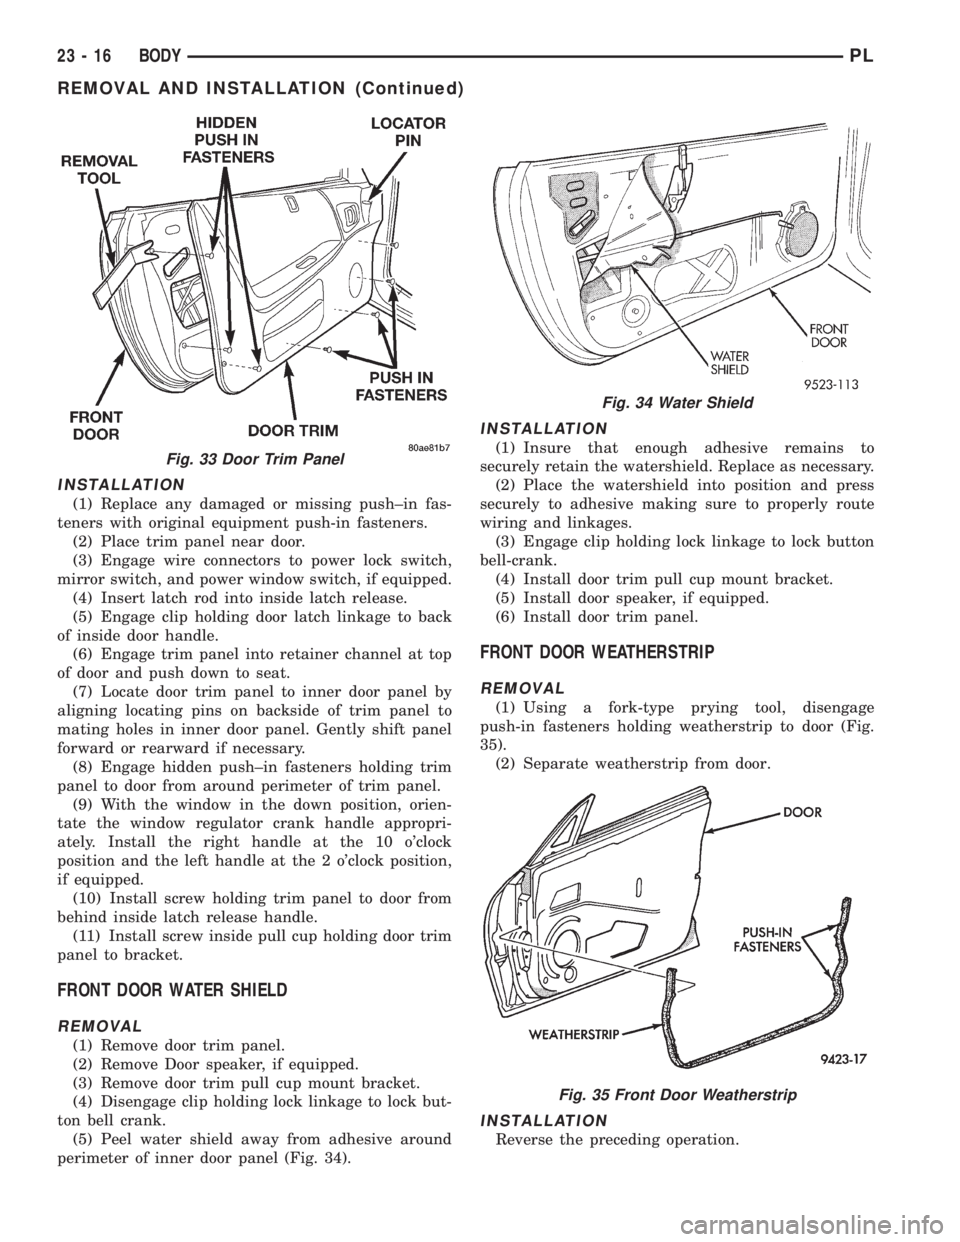
(8) Engage hidden push±in fasteners holding trim
panel to door from around perimeter of trim panel.
(9) With the window in the down position, orien-
tate the window regulator crank handle appropri-
ately. Install the right handle at the 10 o'clock
position and the left handle at the 2 o'clock position,
if equipped.
(10) Install screw holding trim panel to door from
behind inside latch release handle.
(11) Install screw inside pull cup holding door trim
panel to bracket.
FRONT DOOR WATER SHIELD
REMOVAL
(1) Remove door trim panel.
(2) Remove Door speaker, if equipped.
(3) Remove door trim pull cup mount bracket.
(4) Disengage clip holding lock linkage to lock but-
ton bell crank.
(5) Peel water shield away from adhesive around
perimeter of inner door panel (Fig. 34).
INSTALLATION
(1) Insure that enough adhesive remains to
securely retain the watershield. Replace as necessary.
(2) Place the watershield into position and press
securely to adhesive making sure to properly route
wiring and linkages.
(3) Engage clip holding lock linkage to lock button
bell-crank.
(4) Install door trim pull cup mount bracket.
(5) Install door speaker, if equipped.
(6) Install door trim panel.
FRONT DOOR WEATHERSTRIP
REMOVAL
(1) Using a fork-type prying tool, disengage
push-in fasteners holding weatherstrip to door (Fig.
35).
(2) Separate weatherstrip from door.
INSTALLATION
Reverse the preceding operation.
Fig. 33 Door Trim Panel
Fig. 34 Water Shield
Fig. 35 Front Door Weatherstrip
23 - 16 BODYPL
REMOVAL AND INSTALLATION (Continued)
Page 1104 of 1200
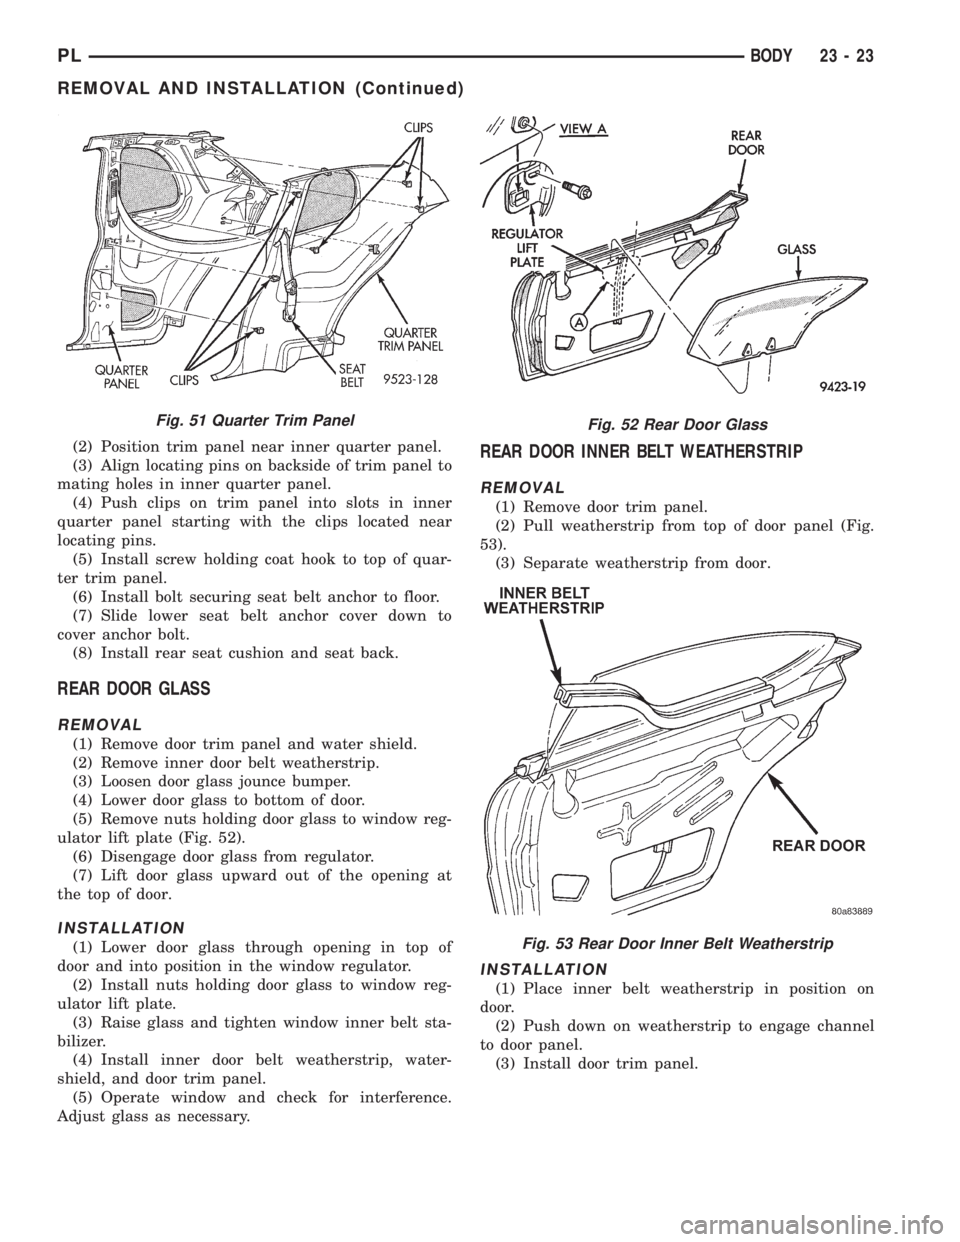
(2) Position trim panel near inner quarter panel.
(3) Align locating pins on backside of trim panel to
mating holes in inner quarter panel.
(4) Push clips on trim panel into slots in inner
quarter panel starting with the clips located near
locating pins.
(5) Install screw holding coat hook to top of quar-
ter trim panel.
(6) Install bolt securing seat belt anchor to floor.
(7) Slide lower seat belt anchor cover down to
cover anchor bolt.
(8) Install rear seat cushion and seat back.
REAR DOOR GLASS
REMOVAL
(1) Remove door trim panel and water shield.
(2) Remove inner door belt weatherstrip.
(3) Loosen door glass jounce bumper.
(4) Lower door glass to bottom of door.
(5) Remove nuts holding door glass to window reg-
ulator lift plate (Fig. 52).
(6) Disengage door glass from regulator.
(7) Lift door glass upward out of the opening at
the top of door.
INSTALLATION
(1) Lower door glass through opening in top of
door and into position in the window regulator.
(2) Install nuts holding door glass to window reg-
ulator lift plate.
(3) Raise glass and tighten window inner belt sta-
bilizer.
(4) Install inner door belt weatherstrip, water-
shield, and door trim panel.
(5) Operate window and check for interference.
Adjust glass as necessary.
REAR DOOR INNER BELT WEATHERSTRIP
REMOVAL
(1) Remove door trim panel.
(2) Pull weatherstrip from top of door panel (Fig.
53).
(3) Separate weatherstrip from door.
INSTALLATION
(1) Place inner belt weatherstrip in position on
door.
(2) Push down on weatherstrip to engage channel
to door panel.
(3) Install door trim panel.
Fig. 51 Quarter Trim PanelFig. 52 Rear Door Glass
Fig. 53 Rear Door Inner Belt Weatherstrip
PLBODY 23 - 23
REMOVAL AND INSTALLATION (Continued)