1998 OPEL FRONTERA display
[x] Cancel search: displayPage 2262 of 6000
TRANSMISSION CONTROL SYSTEM (4L30–E)7A1–17
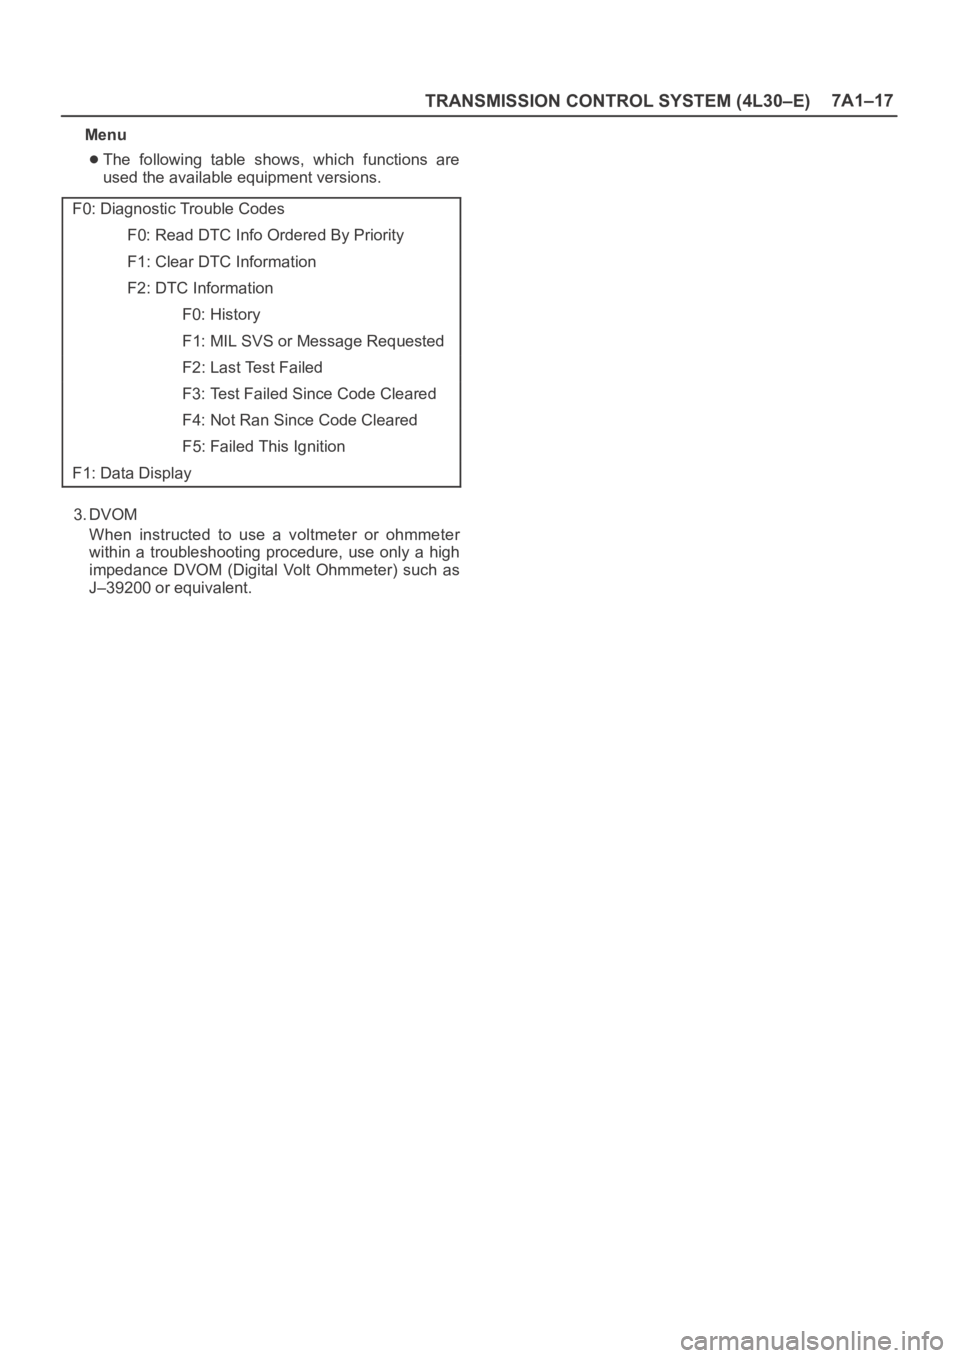
Menu
The following table shows, which functions are
used the available equipment versions.
F0: Diagnostic Trouble Codes
F0: Read DTC Info Ordered By Priority
F1: Clear DTC Information
F2: DTC Information
F0: History
F1: MIL SVS or Message Requested
F2: Last Test Failed
F3: Test Failed Since Code Cleared
F4: Not Ran Since Code Cleared
F5: Failed This Ignition
F1: Data Display
3. DVOM
When instructed to use a voltmeter or ohmmeter
within a troubleshooting procedure, use only a high
impedance DVOM (Digital Volt Ohmmeter) such as
J–39200 or equivalent.
Page 2266 of 6000
TRANSMISSION CONTROL SYSTEM (4L30–E)7A1–21
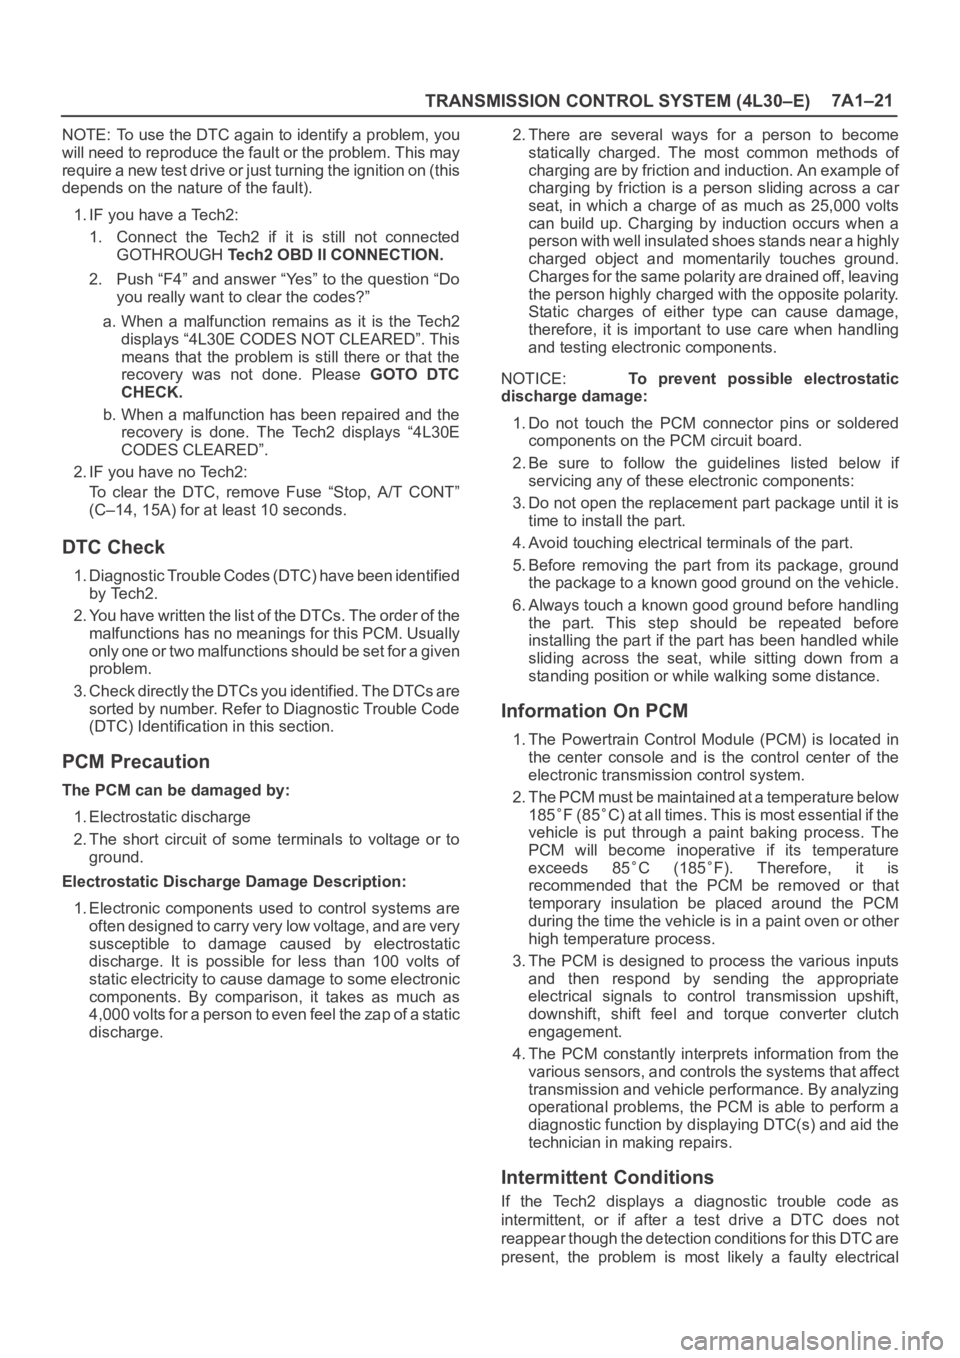
NOTE: To use the DTC again to identify a problem, you
will need to reproduce the fault or the problem. This may
require a new test drive or just turning the ignition on (this
depends on the nature of the fault).
1. IF you have a Tech2:
1. Connect the Tech2 if it is still not connected
GOTHROUGH Tech2 OBD II CONNECTION.
2. Push “F4” and answer “Yes” to the question “Do
you really want to clear the codes?”
a. When a malfunction remains as it is the Tech2
displays “4L30E CODES NOT CLEARED”. This
means that the problem is still there or that the
recovery was not done. Please GOTO DTC
CHECK.
b. When a malfunction has been repaired and the
recovery is done. The Tech2 displays “4L30E
CODES CLEARED”.
2. IF you have no Tech2:
To clear the DTC, remove Fuse “Stop, A/T CONT”
(C–14, 15A) for at least 10 seconds.
DTC Check
1. Diagnostic Trouble Codes (DTC) have been identified
by Tech2.
2. You have written the list of the DTCs. The order of the
malfunctions has no meanings for this PCM. Usually
only one or two malfunctions should be set for a given
problem.
3. Check directly the DTCs you identified. The DTCs are
sorted by number. Refer to Diagnostic Trouble Code
(DTC) Identification in this section.
PCM Precaution
The PCM can be damaged by:
1. Electrostatic discharge
2. The short circuit of some terminals to voltage or to
ground.
Electrostatic Discharge Damage Description:
1. Electronic components used to control systems are
often designed to carry very low voltage, and are very
susceptible to damage caused by electrostatic
discharge. It is possible for less than 100 volts of
static electricity to cause damage to some electronic
components. By comparison, it takes as much as
4,000 volts for a person to even feel the zap of a static
discharge.2. There are several ways for a person to become
statically charged. The most common methods of
charging are by friction and induction. An example of
charging by friction is a person sliding across a car
seat, in which a charge of as much as 25,000 volts
can build up. Charging by induction occurs when a
person with well insulated shoes stands near a highly
charged object and momentarily touches ground.
Charges for the same polarity are drained off, leaving
the person highly charged with the opposite polarity.
Static charges of either type can cause damage,
therefore, it is important to use care when handling
and testing electronic components.
NOTICE: To prevent possible electrostatic
discharge damage:
1. Do not touch the PCM connector pins or soldered
components on the PCM circuit board.
2. Be sure to follow the guidelines listed below if
servicing any of these electronic components:
3. Do not open the replacement part package until it is
time to install the part.
4. Avoid touching electrical terminals of the part.
5. Before removing the part from its package, ground
the package to a known good ground on the vehicle.
6. Always touch a known good ground before handling
the part. This step should be repeated before
installing the part if the part has been handled while
sliding across the seat, while sitting down from a
standing position or while walking some distance.
Information On PCM
1. The Powertrain Control Module (PCM) is located in
the center console and is the control center of the
electronic transmission control system.
2. The PCM must be maintained at a temperature below
185
F (85C) at all times. This is most essential if the
vehicle is put through a paint baking process. The
PCM will become inoperative if its temperature
exceeds 85
C (185F). Therefore, it is
recommended that the PCM be removed or that
temporary insulation be placed around the PCM
during the time the vehicle is in a paint oven or other
high temperature process.
3. The PCM is designed to process the various inputs
and then respond by sending the appropriate
electrical signals to control transmission upshift,
downshift, shift feel and torque converter clutch
engagement.
4. The PCM constantly interprets information from the
various sensors, and controls the systems that affect
transmission and vehicle performance. By analyzing
operational problems, the PCM is able to perform a
diagnostic function by displaying DTC(s) and aid the
technician in making repairs.
Intermittent Conditions
If the Tech2 displays a diagnostic trouble code as
intermittent, or if after a test drive a DTC does not
reappear though the detection conditions for this DTC are
present, the problem is most likely a faulty electrical
Page 2271 of 6000
7A1–26
TRANSMISSION CONTROL SYSTEM (4L30–E)
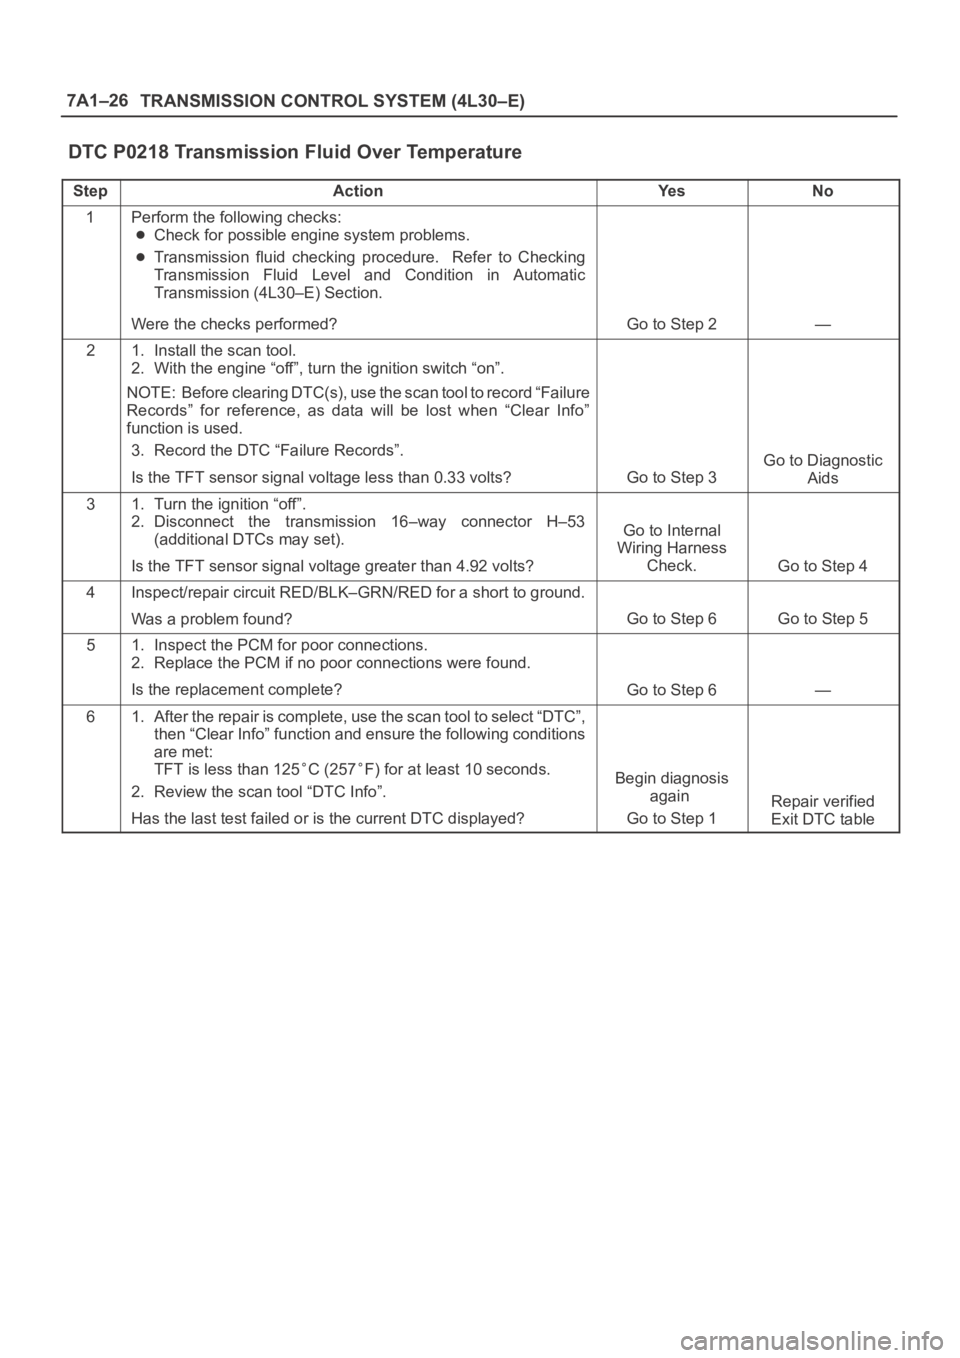
DTC P0218 Transmission Fluid Over Temperature
StepActionYe sNo
1Perform the following checks:
Check for possible engine system problems.
Transmission fluid checking procedure. Refer to Checking
Transmission Fluid Level and Condition in Automatic
Transmission (4L30–E) Section.
Were the checks performed?
Go to Step 2—
21. Install the scan tool.
2. With the engine “off”, turn the ignition switch “on”.
NOTE: Before clearing DTC(s), use the scan tool to record “Failure
Records” for reference, as data will be lost when “Clear Info”
function is used.
3. Record the DTC “Failure Records”.
Is the TFT sensor signal voltage less than 0.33 volts?
Go to Step 3
Go to Diagnostic
Aids
31. Turn the ignition “off”.
2. Disconnect the transmission 16–way connector H–53
(additional DTCs may set).
Is the TFT sensor signal voltage greater than 4.92 volts?
Go to Internal
Wiring Harness
Check.
Go to Step 4
4Inspect/repair circuit RED/BLK–GRN/RED for a short to ground.
Was a problem found?
Go to Step 6Go to Step 5
51. Inspect the PCM for poor connections.
2. Replace the PCM if no poor connections were found.
Is the replacement complete?
Go to Step 6—
61. After the repair is complete, use the scan tool to select “DTC”,
then “Clear Info” function and ensure the following conditions
are met:
TFT is less than 125
C (257F) for at least 10 seconds.
2. Review the scan tool “DTC Info”.
Has the last test failed or is the current DTC displayed?Begin diagnosis
again
Go to Step 1
Repair verified
Exit DTC table
Page 2274 of 6000
TRANSMISSION CONTROL SYSTEM (4L30–E)7A1–29
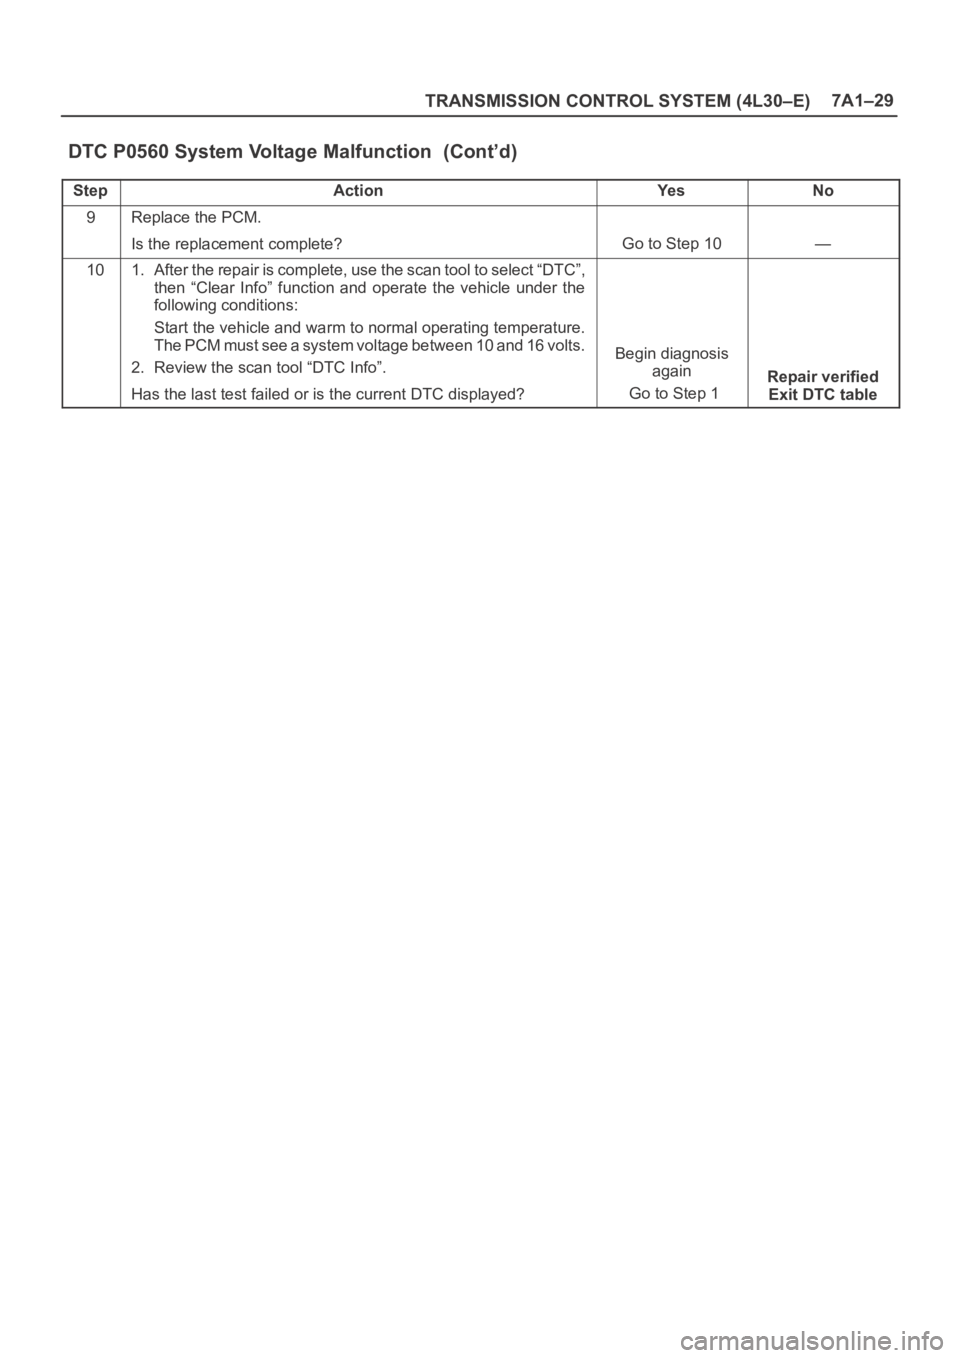
DTC P0560 System Voltage Malfunction (Cont’d)
StepNo Ye s Action
9Replace the PCM.
Is the replacement complete?
Go to Step 10—
101. After the repair is complete, use the scan tool to select “DTC”,
then “Clear Info” function and operate the vehicle under the
following conditions:
Start the vehicle and warm to normal operating temperature.
The PCM must see a system voltage between 10 and 16 volts.
2. Review the scan tool “DTC Info”.
Has the last test failed or is the current DTC displayed?
Begin diagnosis
again
Go to Step 1
Repair verified
Exit DTC table
Page 2276 of 6000
TRANSMISSION CONTROL SYSTEM (4L30–E)7A1–31
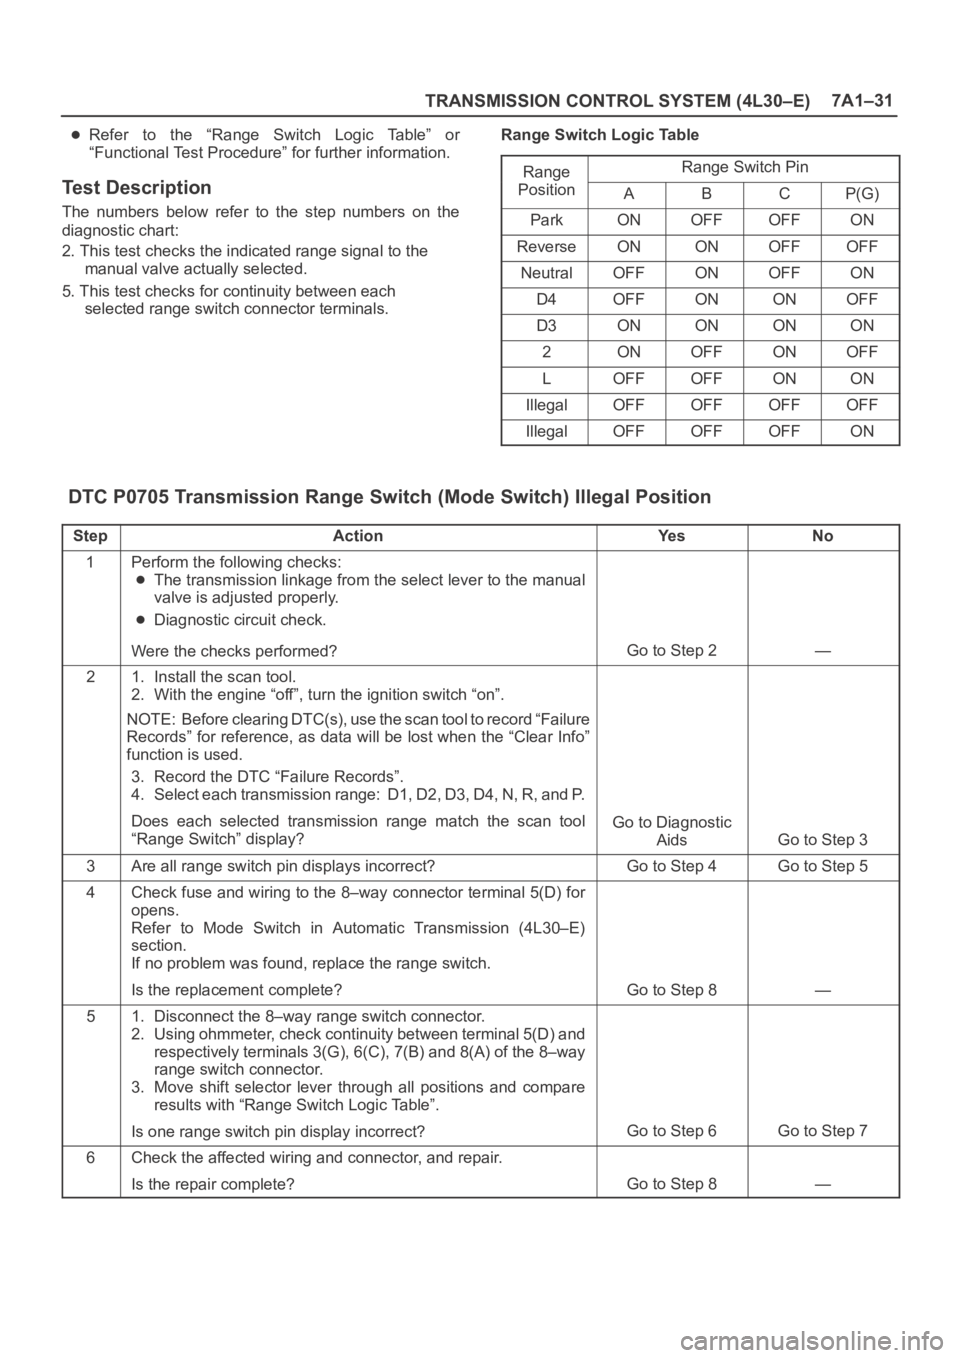
Refer to the “Range Switch Logic Table” or
“Functional Test Procedure” for further information.
Test Description
The numbers below refer to the step numbers on the
diagnostic chart:
2. This test checks the indicated range signal to the
manual valve actually selected.
5. This test checks for continuity between each
selected range switch connector terminals.Range Switch Logic Table
Range
Range Switch Ping
PositionABCP(G)
ParkONOFFOFFON
ReverseONONOFFOFF
NeutralOFFONOFFON
D4OFFONONOFF
D3ONONONON
2ONOFFONOFF
LOFFOFFONON
IllegalOFFOFFOFFOFF
IllegalOFFOFFOFFON
DTC P0705 Transmission Range Switch (Mode Switch) Illegal Position
StepActionYe sNo
1Perform the following checks:
The transmission linkage from the select lever to the manual
valve is adjusted properly.
Diagnostic circuit check.
Were the checks performed?
Go to Step 2—
21. Install the scan tool.
2. With the engine “off”, turn the ignition switch “on”.
NOTE: Before clearing DTC(s), use the scan tool to record “Failure
Records” for reference, as data will be lost when the “Clear Info”
function is used.
3. Record the DTC “Failure Records”.
4. Select each transmission range: D1, D2, D3, D4, N, R, and P.
Does each selected transmission range match the scan tool
“Range Switch” display?
Go to Diagnostic
Aids
Go to Step 3
3Are all range switch pin displays incorrect?Go to Step 4Go to Step 5
4Check fuse and wiring to the 8–way connector terminal 5(D) for
opens.
Refer to Mode Switch in Automatic Transmission (4L30–E)
section.
If no problem was found, replace the range switch.
Is the replacement complete?
Go to Step 8—
51. Disconnect the 8–way range switch connector.
2. Using ohmmeter, check continuity between terminal 5(D) and
respectively terminals 3(G), 6(C), 7(B) and 8(A) of the 8–way
range switch connector.
3. Move shift selector lever through all positions and compare
results with “Range Switch Logic Table”.
Is one range switch pin display incorrect?
Go to Step 6Go to Step 7
6Check the affected wiring and connector, and repair.
Is the repair complete?
Go to Step 8—
Page 2277 of 6000

7A1–32
TRANSMISSION CONTROL SYSTEM (4L30–E)
DTC P0705 Transmission Range Switch (Mode Switch) Illegal Position (Cont’d)
StepNo Ye s Action
7Check the Powertrain Control Module (PCM) connectors for poor
connection.
If no problem was found, replace the PCM.
Is the replacement complete?
Go to Step 8—
81. After the repair is complete, use the scan tool to select “DTC”,
then “Clear Info” function and road test the vehicle.
2. Review the scan tool “DTC Info”.
Has the last test failed or is the current DTC displayed?
Begin diagnosis
again
Go to Step 1
Repair verified
Exit DTC table
Page 2279 of 6000
7A1–34
TRANSMISSION CONTROL SYSTEM (4L30–E)
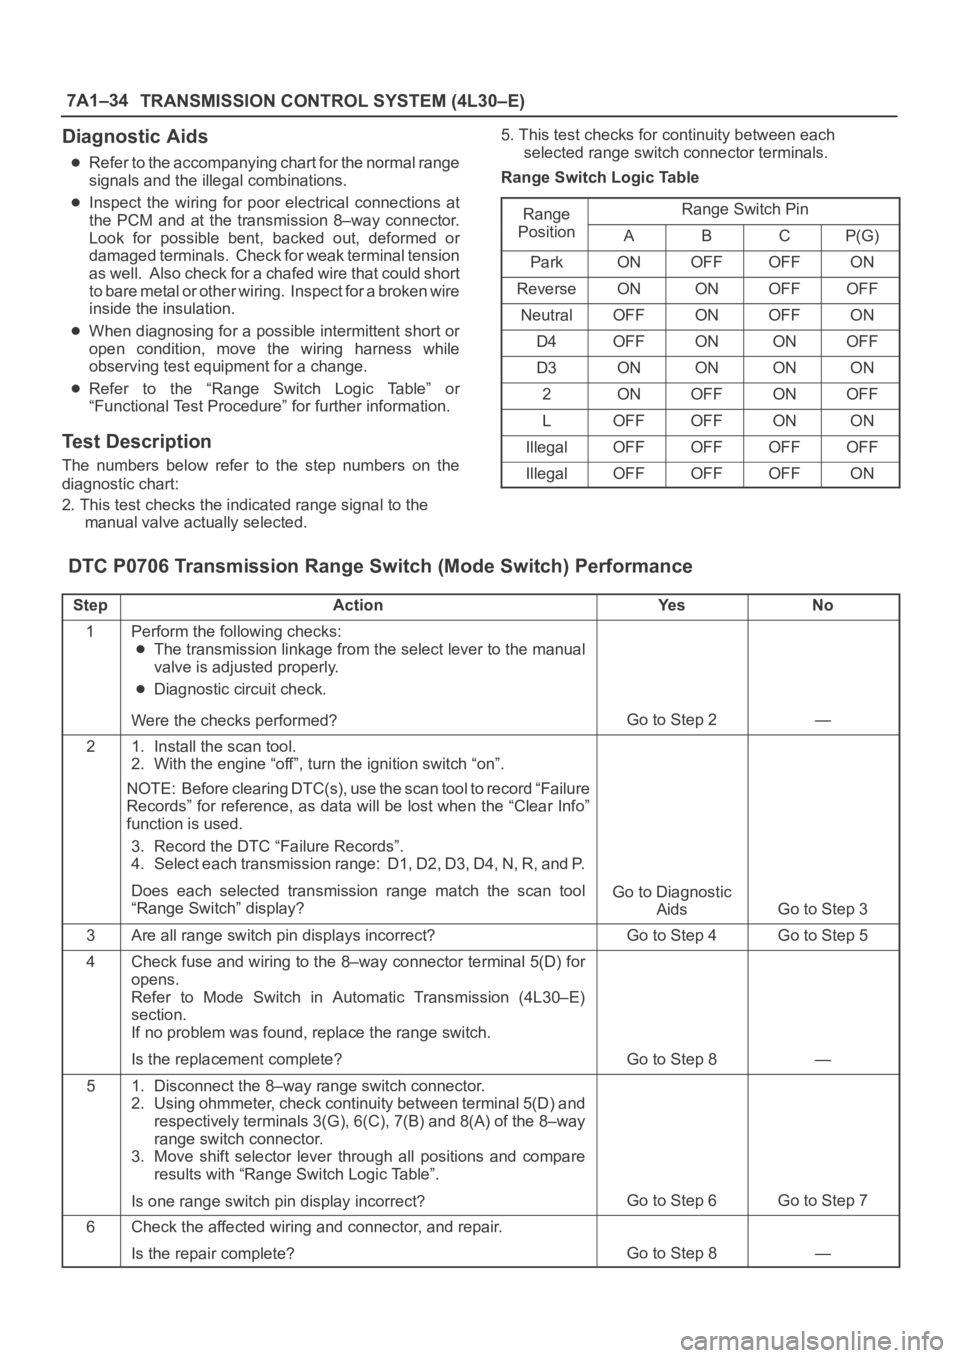
Diagnostic Aids
Refer to the accompanying chart for the normal range
signals and the illegal combinations.
Inspect the wiring for poor electrical connections at
the PCM and at the transmission 8–way connector.
Look for possible bent, backed out, deformed or
damaged terminals. Check for weak terminal tension
as well. Also check for a chafed wire that could short
to bare metal or other wiring. Inspect for a broken wire
inside the insulation.
When diagnosing for a possible intermittent short or
open condition, move the wiring harness while
observing test equipment for a change.
Refer to the “Range Switch Logic Table” or
“Functional Test Procedure” for further information.
Test Description
The numbers below refer to the step numbers on the
diagnostic chart:
2. This test checks the indicated range signal to the
manual valve actually selected.5. This test checks for continuity between each
selected range switch connector terminals.
Range Switch Logic Table
Range
Range Switch Ping
PositionABCP(G)
ParkONOFFOFFON
ReverseONONOFFOFF
NeutralOFFONOFFON
D4OFFONONOFF
D3ONONONON
2ONOFFONOFF
LOFFOFFONON
IllegalOFFOFFOFFOFF
IllegalOFFOFFOFFON
DTC P0706 Transmission Range Switch (Mode Switch) Performance
StepActionYe sNo
1Perform the following checks:
The transmission linkage from the select lever to the manual
valve is adjusted properly.
Diagnostic circuit check.
Were the checks performed?
Go to Step 2—
21. Install the scan tool.
2. With the engine “off”, turn the ignition switch “on”.
NOTE: Before clearing DTC(s), use the scan tool to record “Failure
Records” for reference, as data will be lost when the “Clear Info”
function is used.
3. Record the DTC “Failure Records”.
4. Select each transmission range: D1, D2, D3, D4, N, R, and P.
Does each selected transmission range match the scan tool
“Range Switch” display?
Go to Diagnostic
Aids
Go to Step 3
3Are all range switch pin displays incorrect?Go to Step 4Go to Step 5
4Check fuse and wiring to the 8–way connector terminal 5(D) for
opens.
Refer to Mode Switch in Automatic Transmission (4L30–E)
section.
If no problem was found, replace the range switch.
Is the replacement complete?
Go to Step 8—
51. Disconnect the 8–way range switch connector.
2. Using ohmmeter, check continuity between terminal 5(D) and
respectively terminals 3(G), 6(C), 7(B) and 8(A) of the 8–way
range switch connector.
3. Move shift selector lever through all positions and compare
results with “Range Switch Logic Table”.
Is one range switch pin display incorrect?
Go to Step 6Go to Step 7
6Check the affected wiring and connector, and repair.
Is the repair complete?
Go to Step 8—
Page 2280 of 6000

TRANSMISSION CONTROL SYSTEM (4L30–E)7A1–35
DTC P0706 Transmission Range Switch (Mode Switch) Performance (Cont’d)
StepNo Ye s Action
7Check the Powertrain Control Module (PCM) connectors for poor
connection.
If no problem was found, replace the PCM.
Is the replacement complete?
Go to Step 8—
81. After the repair is complete, use the scan tool to select “DTC”,
then “Clear Info” function and road test the vehicle.
2. Review the scan tool “DTC Info”.
Has the last test failed or is the current DTC displayed?
Begin diagnosis
again
Go to Step 1
Repair verified
Exit DTC table