1998 OPEL FRONTERA glove box
[x] Cancel search: glove boxPage 1173 of 6000
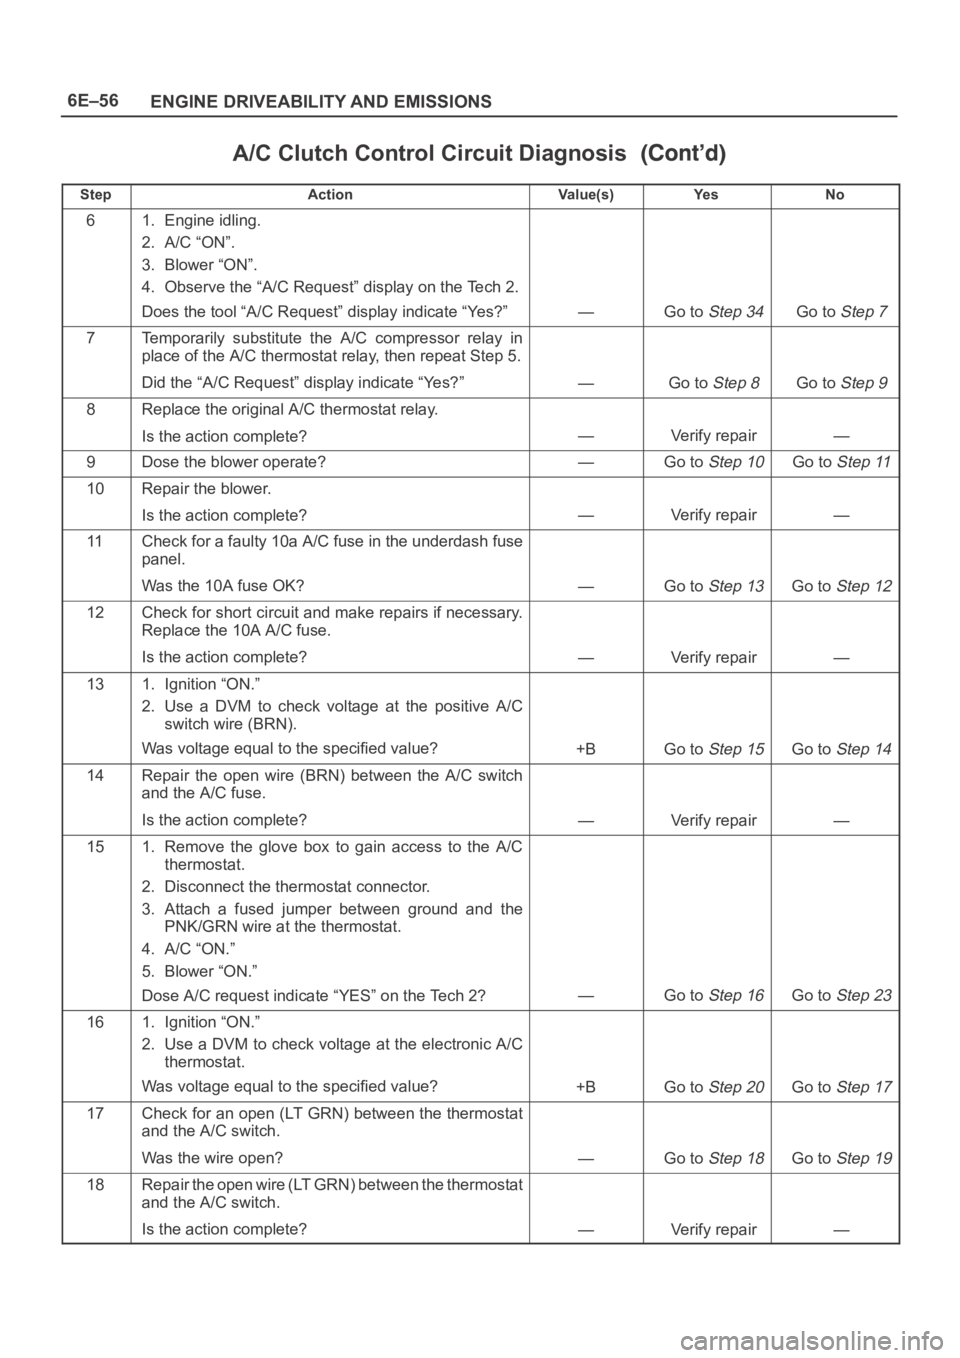
6E–56
ENGINE DRIVEABILITY AND EMISSIONS
A/C Clutch Control Circuit Diagnosis
StepNo Ye s Va l u e ( s ) Action
61. Engine idling.
2. A/C “ON”.
3. Blower “ON”.
4. Observe the “A/C Request” display on the Tech 2.
Does the tool “A/C Request” display indicate “Yes?”
—Go to Step 34Go to Step 7
7Temporarily substitute the A/C compressor relay in
place of the A/C thermostat relay, then repeat Step 5.
Did the “A/C Request” display indicate “Yes?”
—Go to Step 8Go to Step 9
8Replace the original A/C thermostat relay.
Is the action complete?
—Verify repair—
9Dose the blower operate?—Go to Step 10Go to Step 11
10Repair the blower.
Is the action complete?
—Verify repair—
11Check for a faulty 10a A/C fuse in the underdash fuse
panel.
Was the 10A fuse OK?
—Go to Step 13Go to Step 12
12Check for short circuit and make repairs if necessary.
Replace the 10A A/C fuse.
Is the action complete?
—Verify repair—
131. Ignition “ON.”
2. Use a DVM to check voltage at the positive A/C
switch wire (BRN).
Was voltage equal to the specified value?
+BGo to Step 15Go to Step 14
14Repair the open wire (BRN) between the A/C switch
and the A/C fuse.
Is the action complete?
—Verify repair—
151. Remove the glove box to gain access to the A/C
thermostat.
2. Disconnect the thermostat connector.
3. Attach a fused jumper between ground and the
PNK/GRN wire at the thermostat.
4. A/C “ON.”
5. Blower “ON.”
Dose A/C request indicate “YES” on the Tech 2?
—Go to Step 16Go to Step 23
161. Ignition “ON.”
2. Use a DVM to check voltage at the electronic A/C
thermostat.
Was voltage equal to the specified value?
+BGo to Step 20Go to Step 17
17Check for an open (LT GRN) between the thermostat
and the A/C switch.
Was the wire open?
—Go to Step 18Go to Step 19
18Repair the open wire (LT GRN) between the thermostat
and the A/C switch.
Is the action complete?
—Verify repair—
Page 2540 of 6000
LIGHTING SYSTEM8A–1
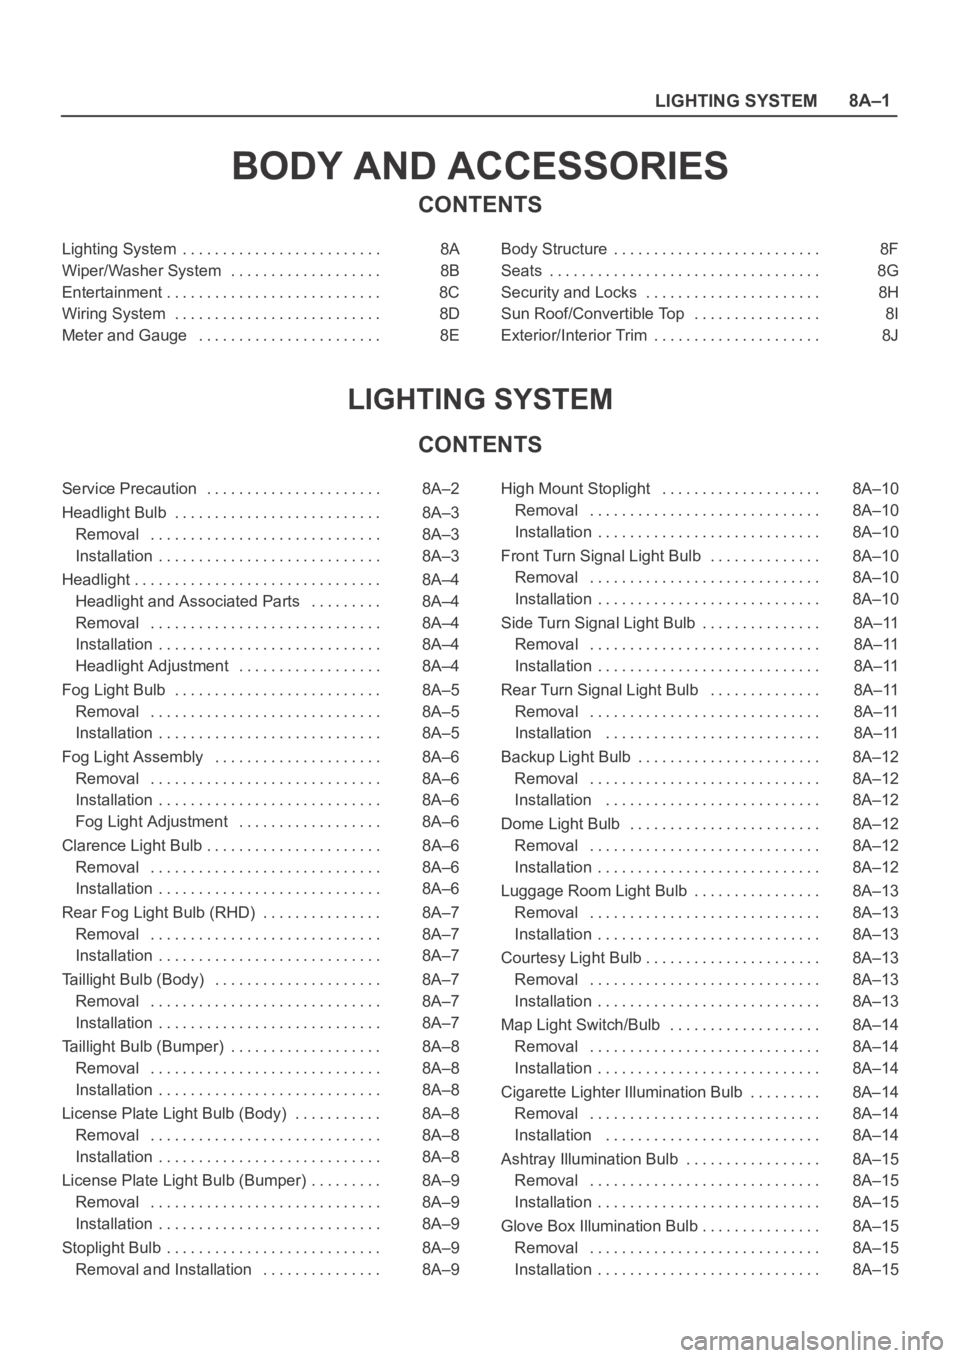
BODY AND ACCESSORIES
CONTENTS
Lighting System 8A. . . . . . . . . . . . . . . . . . . . . . . . .
Wiper/Washer System 8B. . . . . . . . . . . . . . . . . . .
Entertainment 8C. . . . . . . . . . . . . . . . . . . . . . . . . . .
Wiring System 8D. . . . . . . . . . . . . . . . . . . . . . . . . .
Meter and Gauge 8E. . . . . . . . . . . . . . . . . . . . . . . Body Structure 8F. . . . . . . . . . . . . . . . . . . . . . . . . .
Seats 8G. . . . . . . . . . . . . . . . . . . . . . . . . . . . . . . . . .
Security and Locks 8H. . . . . . . . . . . . . . . . . . . . . .
Sun Roof/Convertible Top 8I. . . . . . . . . . . . . . . .
Exterior/Interior Trim 8J. . . . . . . . . . . . . . . . . . . . .
LIGHTING SYSTEM
CONTENTS
Service Precaution 8A–2. . . . . . . . . . . . . . . . . . . . . .
Headlight Bulb 8A–3. . . . . . . . . . . . . . . . . . . . . . . . . .
Removal 8A–3. . . . . . . . . . . . . . . . . . . . . . . . . . . . .
Installation 8A–3. . . . . . . . . . . . . . . . . . . . . . . . . . . .
Headlight 8A–4. . . . . . . . . . . . . . . . . . . . . . . . . . . . . . .
Headlight and Associated Parts 8A–4. . . . . . . . .
Removal 8A–4. . . . . . . . . . . . . . . . . . . . . . . . . . . . .
Installation 8A–4. . . . . . . . . . . . . . . . . . . . . . . . . . . .
Headlight Adjustment 8A–4. . . . . . . . . . . . . . . . . .
Fog Light Bulb 8A–5. . . . . . . . . . . . . . . . . . . . . . . . . .
Removal 8A–5. . . . . . . . . . . . . . . . . . . . . . . . . . . . .
Installation 8A–5. . . . . . . . . . . . . . . . . . . . . . . . . . . .
Fog Light Assembly 8A–6. . . . . . . . . . . . . . . . . . . . .
Removal 8A–6. . . . . . . . . . . . . . . . . . . . . . . . . . . . .
Installation 8A–6. . . . . . . . . . . . . . . . . . . . . . . . . . . .
Fog Light Adjustment 8A–6. . . . . . . . . . . . . . . . . .
Clarence Light Bulb 8A–6. . . . . . . . . . . . . . . . . . . . . .
Removal 8A–6. . . . . . . . . . . . . . . . . . . . . . . . . . . . .
Installation 8A–6. . . . . . . . . . . . . . . . . . . . . . . . . . . .
Rear Fog Light Bulb (RHD) 8A–7. . . . . . . . . . . . . . .
Removal 8A–7. . . . . . . . . . . . . . . . . . . . . . . . . . . . .
Installation 8A–7. . . . . . . . . . . . . . . . . . . . . . . . . . . .
Taillight Bulb (Body) 8A–7. . . . . . . . . . . . . . . . . . . . .
Removal 8A–7. . . . . . . . . . . . . . . . . . . . . . . . . . . . .
Installation 8A–7. . . . . . . . . . . . . . . . . . . . . . . . . . . .
Taillight Bulb (Bumper) 8A–8. . . . . . . . . . . . . . . . . . .
Removal 8A–8. . . . . . . . . . . . . . . . . . . . . . . . . . . . .
Installation 8A–8. . . . . . . . . . . . . . . . . . . . . . . . . . . .
License Plate Light Bulb (Body) 8A–8. . . . . . . . . . .
Removal 8A–8. . . . . . . . . . . . . . . . . . . . . . . . . . . . .
Installation 8A–8. . . . . . . . . . . . . . . . . . . . . . . . . . . .
License Plate Light Bulb (Bumper) 8A–9. . . . . . . . .
Removal 8A–9. . . . . . . . . . . . . . . . . . . . . . . . . . . . .
Installation 8A–9. . . . . . . . . . . . . . . . . . . . . . . . . . . .
Stoplight Bulb 8A–9. . . . . . . . . . . . . . . . . . . . . . . . . . .
Removal and Installation 8A–9. . . . . . . . . . . . . . . High Mount Stoplight 8A–10. . . . . . . . . . . . . . . . . . . .
Removal 8A–10. . . . . . . . . . . . . . . . . . . . . . . . . . . . .
Installation 8A–10. . . . . . . . . . . . . . . . . . . . . . . . . . . .
Front Turn Signal Light Bulb 8A–10. . . . . . . . . . . . . .
Removal 8A–10. . . . . . . . . . . . . . . . . . . . . . . . . . . . .
Installation 8A–10. . . . . . . . . . . . . . . . . . . . . . . . . . . .
Side Turn Signal Light Bulb 8A–11. . . . . . . . . . . . . . .
Removal 8A–11. . . . . . . . . . . . . . . . . . . . . . . . . . . . .
Installation 8A–11. . . . . . . . . . . . . . . . . . . . . . . . . . . .
Rear Turn Signal Light Bulb 8A–11. . . . . . . . . . . . . .
Removal 8A–11. . . . . . . . . . . . . . . . . . . . . . . . . . . . .
Installation 8A–11. . . . . . . . . . . . . . . . . . . . . . . . . . .
Backup Light Bulb 8A–12. . . . . . . . . . . . . . . . . . . . . . .
Removal 8A–12. . . . . . . . . . . . . . . . . . . . . . . . . . . . .
Installation 8A–12
. . . . . . . . . . . . . . . . . . . . . . . . . . .
Dome Light Bulb 8A–12. . . . . . . . . . . . . . . . . . . . . . . .
Removal 8A–12. . . . . . . . . . . . . . . . . . . . . . . . . . . . .
Installation 8A–12. . . . . . . . . . . . . . . . . . . . . . . . . . . .
Luggage Room Light Bulb 8A–13. . . . . . . . . . . . . . . .
Removal 8A–13. . . . . . . . . . . . . . . . . . . . . . . . . . . . .
Installation 8A–13. . . . . . . . . . . . . . . . . . . . . . . . . . . .
Courtesy Light Bulb 8A–13. . . . . . . . . . . . . . . . . . . . . .
Removal 8A–13. . . . . . . . . . . . . . . . . . . . . . . . . . . . .
Installation 8A–13. . . . . . . . . . . . . . . . . . . . . . . . . . . .
Map Light Switch/Bulb 8A–14. . . . . . . . . . . . . . . . . . .
Removal 8A–14. . . . . . . . . . . . . . . . . . . . . . . . . . . . .
Installation 8A–14. . . . . . . . . . . . . . . . . . . . . . . . . . . .
Cigarette Lighter Illumination Bulb 8A–14. . . . . . . . .
Removal 8A–14. . . . . . . . . . . . . . . . . . . . . . . . . . . . .
Installation 8A–14. . . . . . . . . . . . . . . . . . . . . . . . . . .
Ashtray Illumination Bulb 8A–15. . . . . . . . . . . . . . . . .
Removal 8A–15. . . . . . . . . . . . . . . . . . . . . . . . . . . . .
Installation 8A–15. . . . . . . . . . . . . . . . . . . . . . . . . . . .
Glove Box Illumination Bulb 8A–15. . . . . . . . . . . . . . .
Removal 8A–15. . . . . . . . . . . . . . . . . . . . . . . . . . . . .
Installation 8A–15. . . . . . . . . . . . . . . . . . . . . . . . . . . .
Page 2554 of 6000
LIGHTING SYSTEM8A–15
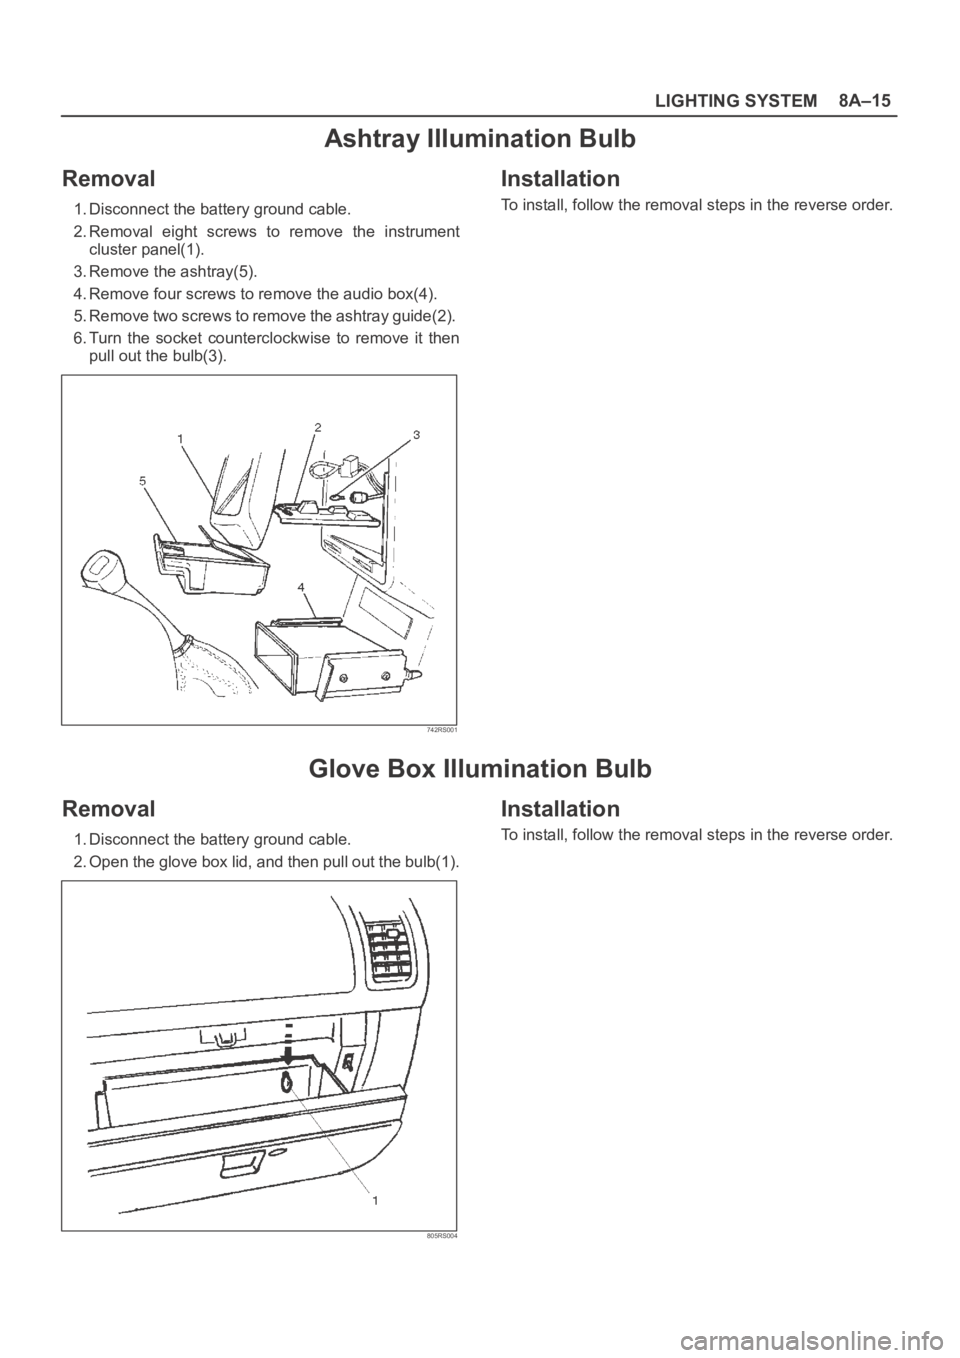
Ashtray Illumination Bulb
Removal
1. Disconnect the battery ground cable.
2. Removal eight screws to remove the instrument
cluster panel(1).
3. Remove the ashtray(5).
4. Remove four screws to remove the audio box(4).
5. Remove two screws to remove the ashtray guide(2).
6. Turn the socket counterclockwise to remove it then
pull out the bulb(3).
742RS001
Installation
To install, follow the removal steps in the reverse order.
Glove Box Illumination Bulb
Removal
1. Disconnect the battery ground cable.
2. Open the glove box lid, and then pull out the bulb(1).
805RS004
Installation
To install, follow the removal steps in the reverse order.
Page 2569 of 6000
8A–30LIGHTING SYSTEM
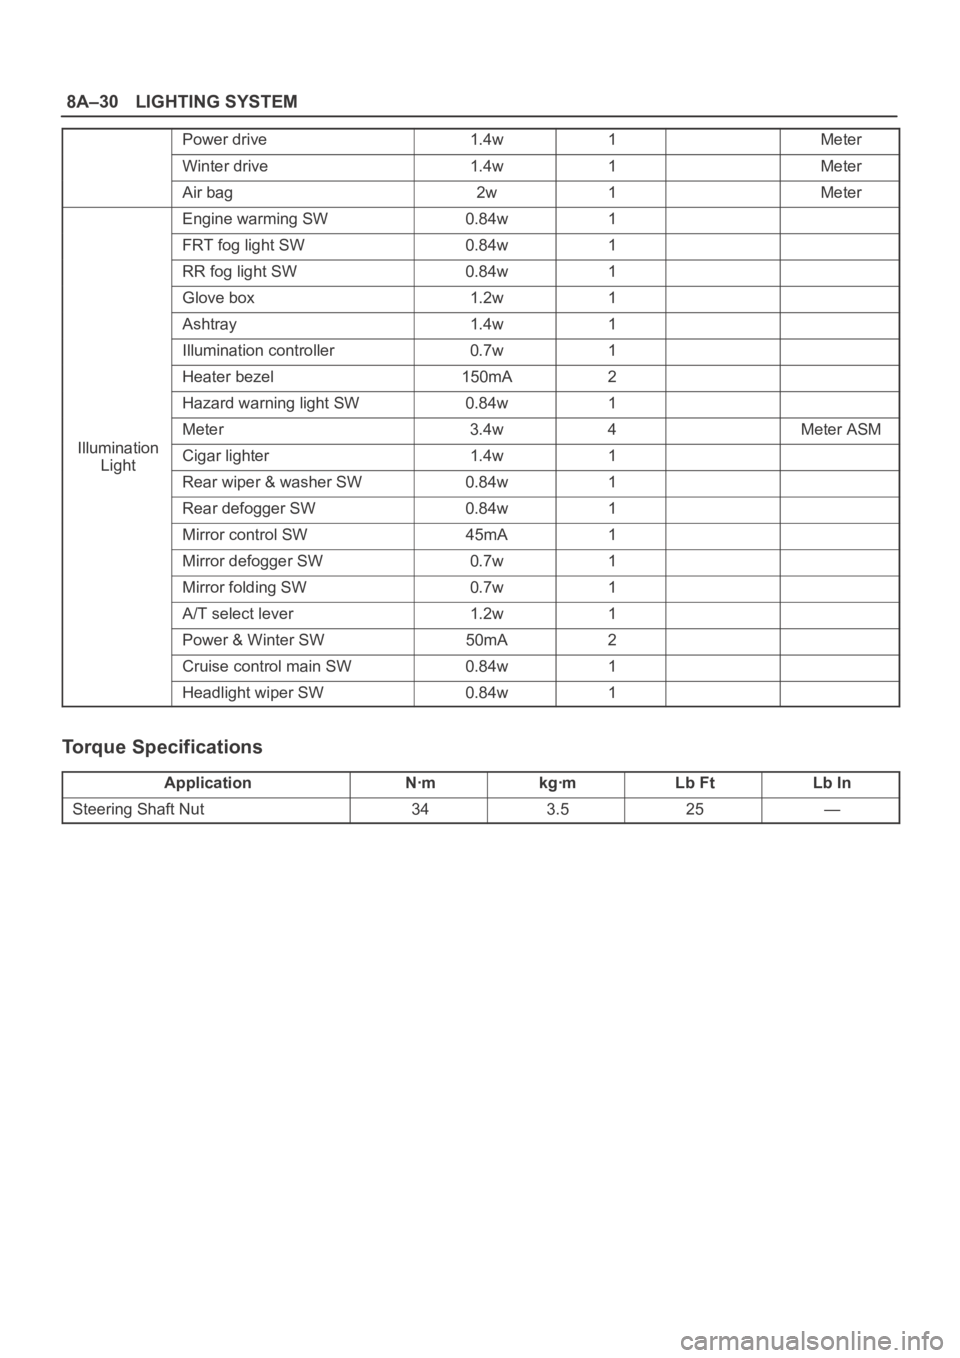
Power drive1.4w1Meter
Winter drive1.4w1Meter
Air bag2w1Meter
Engine warming SW0.84w1
FRT fog light SW0.84w1
RR fog light SW0.84w1
Glove box1.2w1
Ashtray1.4w1
Illumination controller0.7w1
Heater bezel150mA2
Hazard warning light SW0.84w1
Meter3.4w4Meter ASM
IlluminationCigar lighter1.4w1Light
Rear wiper & washer SW0.84w1
Rear defogger SW0.84w1
Mirror control SW45mA1
Mirror defogger SW0.7w1
Mirror folding SW0.7w1
A/T select lever1.2w1
Power & Winter SW50mA2
Cruise control main SW0.84w1
Headlight wiper SW0.84w1
Torque Specifications
ApplicationNꞏmkgꞏmLb FtLb In
Steering Shaft Nut343.525—
Page 2578 of 6000
WIPER/WASHER SYSTEM8B–9
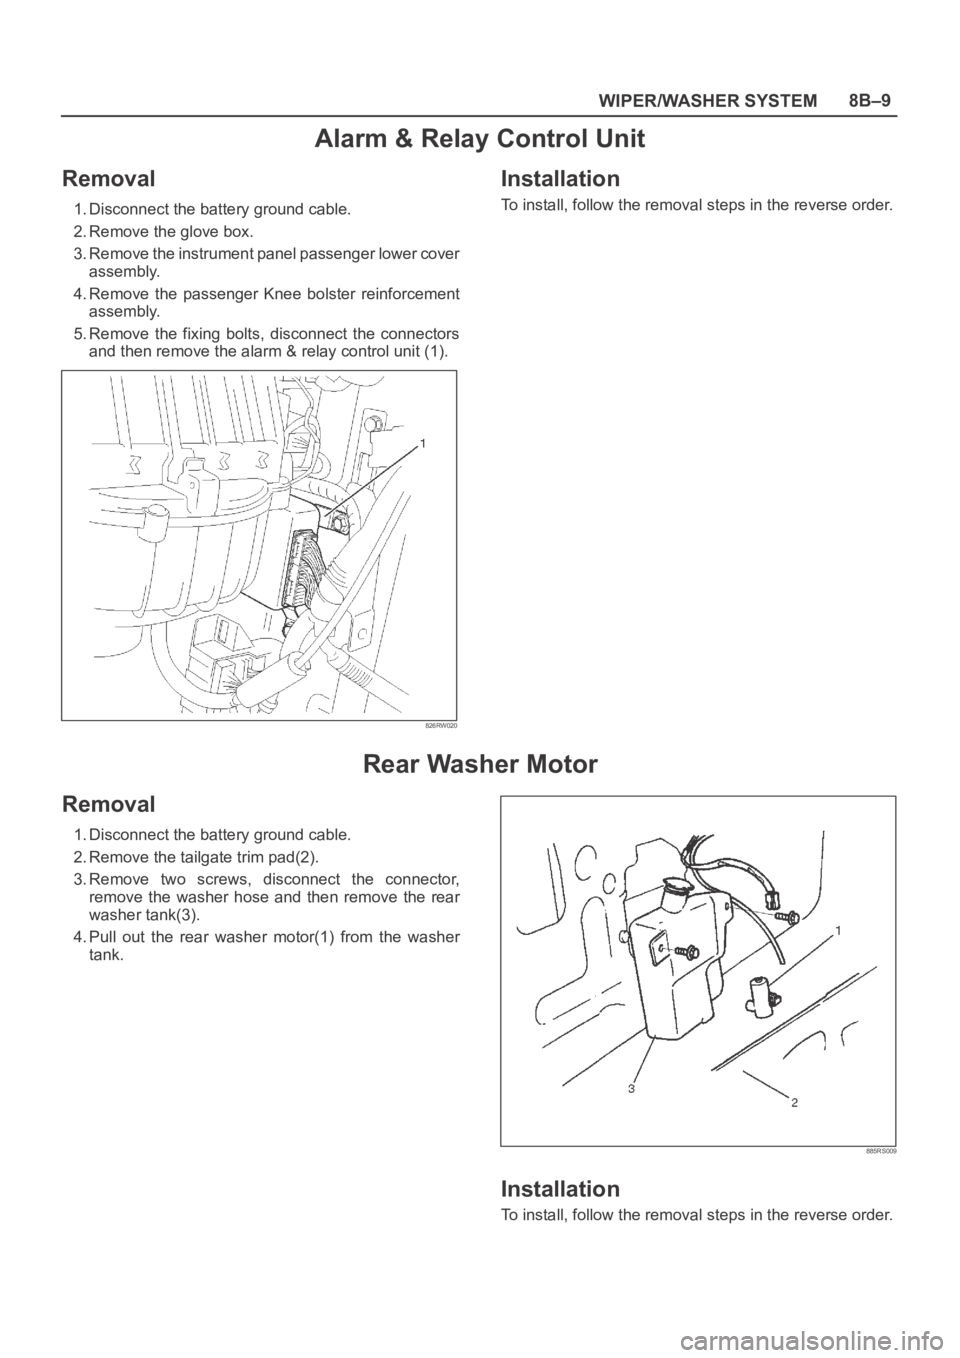
Alarm & Relay Control Unit
Removal
1. Disconnect the battery ground cable.
2. Remove the glove box.
3. Remove the instrument panel passenger lower cover
assembly.
4. Remove the passenger Knee bolster reinforcement
assembly.
5. Remove the fixing bolts, disconnect the connectors
and then remove the alarm & relay control unit (1).
826RW020
Installation
To install, follow the removal steps in the reverse order.
Rear Washer Motor
Removal
1. Disconnect the battery ground cable.
2. Remove the tailgate trim pad(2).
3. Remove two screws, disconnect the connector,
remove the washer hose and then remove the rear
washer tank(3).
4. Pull out the rear washer motor(1) from the washer
tank.
885RS009
Installation
To install, follow the removal steps in the reverse order.
Page 2777 of 6000
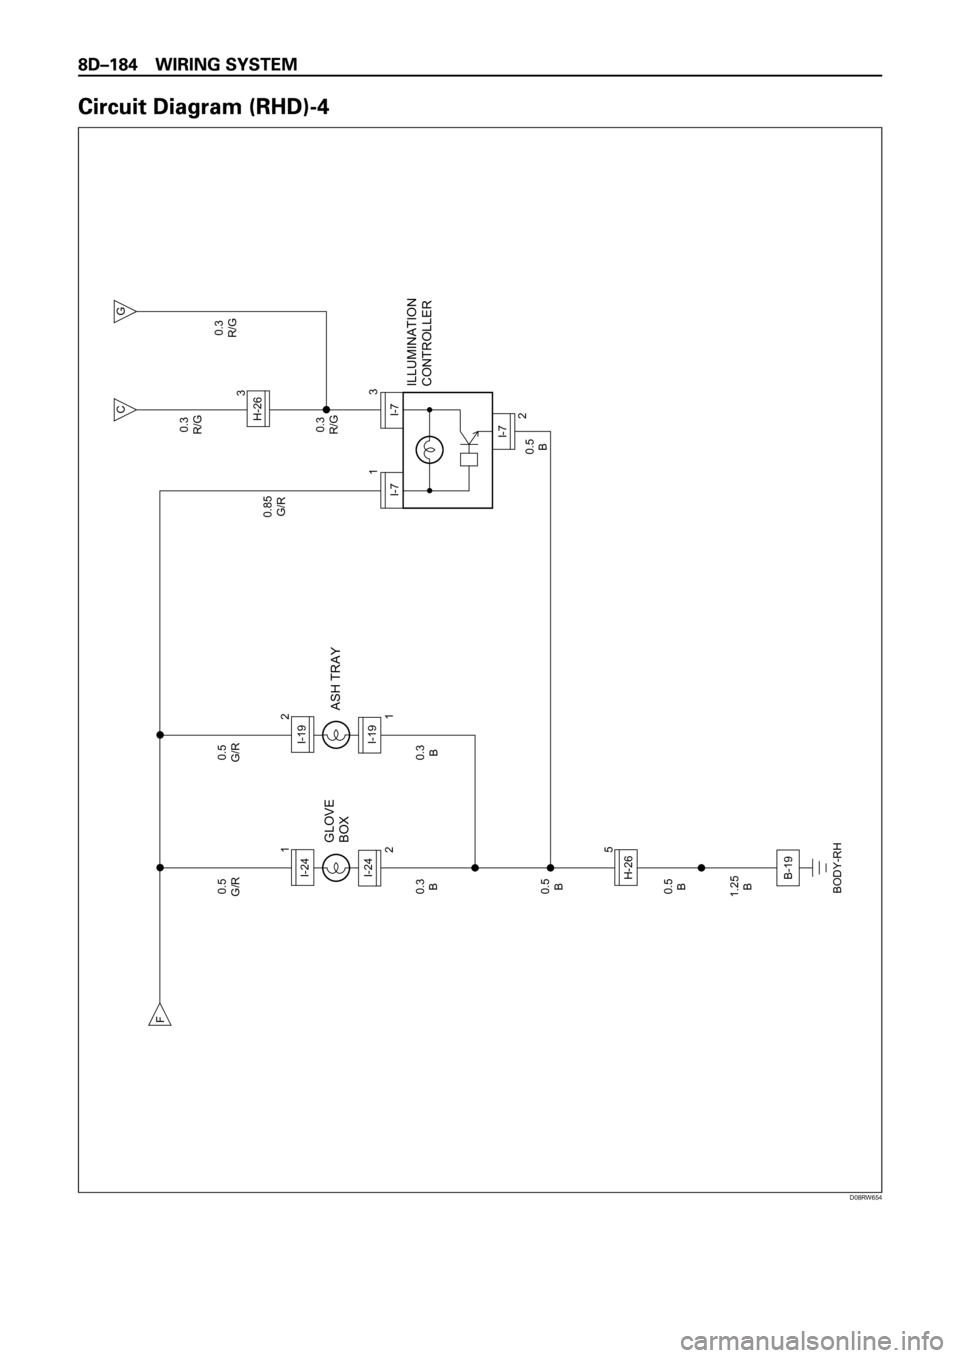
F
C
G
0.85
G/R0.3
R/G
0.3
R/G0.3
R/G 0.5
G/R
0.3
B 0.5
G/R
GLOVE
BOX1
2
I-24
0.5
B
0.5
B
1.25
B0.5
B 0.3
B
5H-26I-24
ASH TRAY
ILLUMINATION
CONTROLLER2
1
I-19
I-19
1
I-7
3
H-263
I-7
B-19
BODY-RH
I-7
2
D08RW654
Page 2783 of 6000
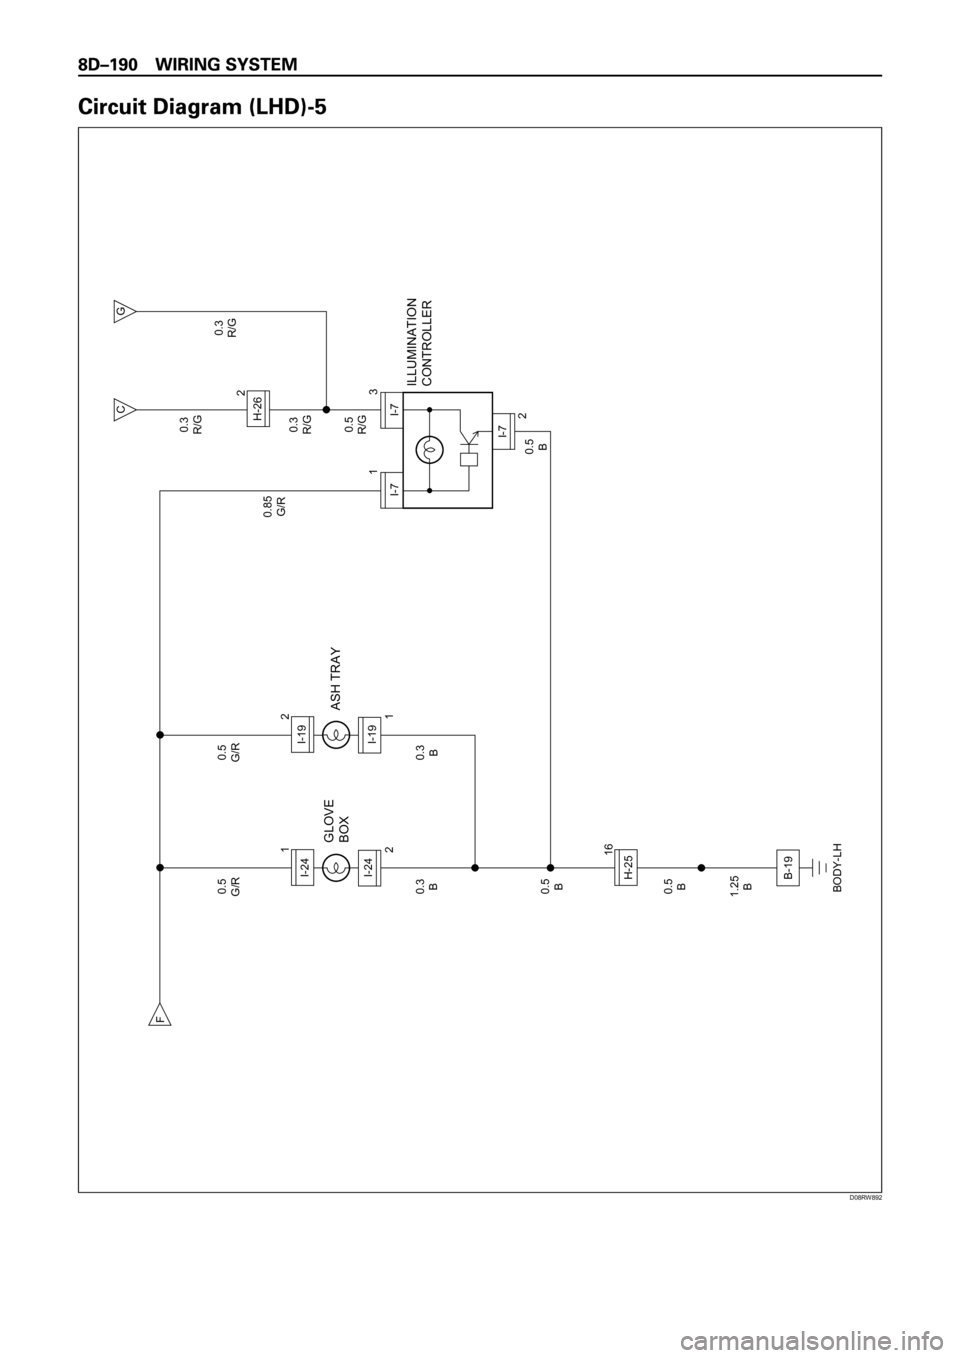
F
C
G
0.85
G/R0.3
R/G
0.5
R/G0.3
R/G0.3
R/G 0.5
G/R
0.3
B 0.5
G/R
GLOVE
BOX1
2
I-24
0.5
B
0.5
B
1.25
B0.5
B 0.3
B
16H-25I-24
ASH TRAY
ILLUMINATION
CONTROLLER2
1
I-19
I-19
1
I-7
3
H-262
I-7
B-19
BODY-LH
I-7
2
D08RW892
Page 3243 of 6000
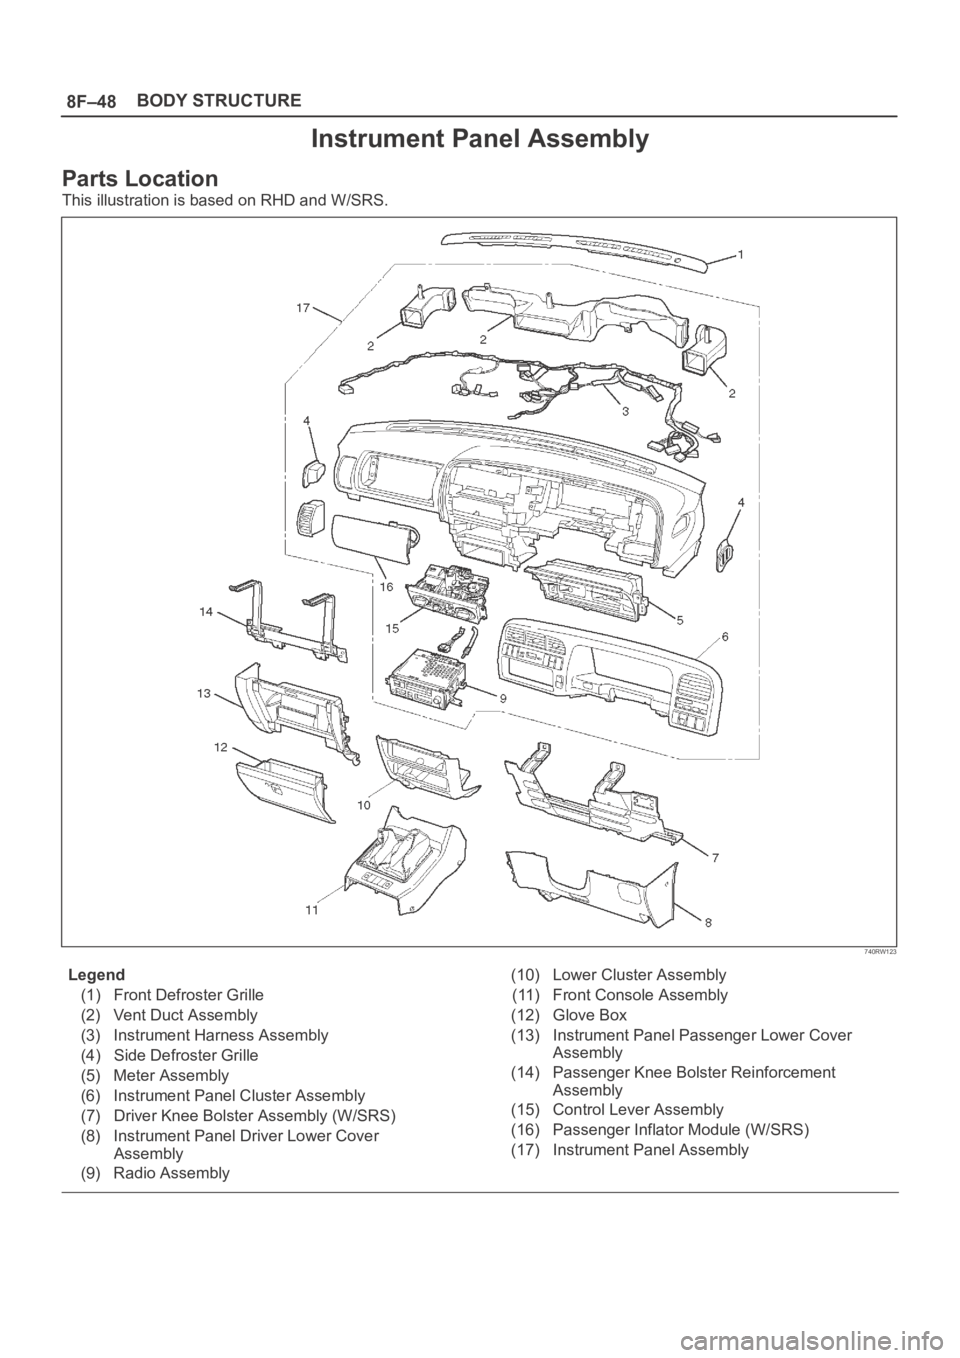
8F–48BODY STRUCTURE
Instrument Panel Assembly
Parts Location
This illustration is based on RHD and W/SRS.
740RW123
Legend
(1) Front Defroster Grille
(2) Vent Duct Assembly
(3) Instrument Harness Assembly
(4) Side Defroster Grille
(5) Meter Assembly
(6) Instrument Panel Cluster Assembly
(7) Driver Knee Bolster Assembly (W/SRS)
(8) Instrument Panel Driver Lower Cover
Assembly
(9) Radio Assembly(10) Lower Cluster Assembly
(11) Front Console Assembly
(12) Glove Box
(13) Instrument Panel Passenger Lower Cover
Assembly
(14) Passenger Knee Bolster Reinforcement
Assembly
(15) Control Lever Assembly
(16) Passenger Inflator Module (W/SRS)
(17) Instrument Panel Assembly