Page 2860 of 6000

STEP ACTION VALUE(S) YES NO
Is B–18 grounded securely?
Is there continuity between harness side connector D–5
terminal 1 and the ground B–18?
Repair an open circuit between connector D–5 terminal 1
and the ground B–18.
Is the action complete?
Turn the starter switch on.
Is the battery voltage applied between harness side
connector D–5 terminal 7 and the ground?
Repair an open circuit between connector B–37 terminal 4
and connector D–5 terminal 7.
Is the action complete?
Connect the battery positive terminal with harness side
connector D–5 terminal 5 or 6, and the negative terminal with
harness side connector D–5 terminal 6 or 5.
Does the motor operate?
1. Disconnect the front power window motor–RH connector
D–2.
2. Connect the battery positive terminal with the motor side
connector D–2 terminal 1 or 2, and connect the battery
negative terminal with the motor side connector D–2
terminal 2 or 1.
Does the motor operate?
Repair an open circuit between the front power window &
door lock switch–RH and the front power window motor–RH.
Is the action complete?–
–
–
Approx. 12V
–
–
–
–Go to
step 2
Go to
step 4
Go to
step 2
Go to
step 6
Go to
step 4
Replace
the front
power
window &
door lock
switch–RH
Go to
step 8
Verify
repairGround it
securely
Go to
step 3
–
Go to
step 5
–
Go to
step 7
Replace
the motor
– 1
2
3
4
5
6
7
8
Page 2861 of 6000

STEP ACTION VALUE(S) YES NO
Is B–1 grounded securely?
Disconnect the front power window & door lock switch–LH
connector D–14.
Is there continuity between harness side connector D–14
terminal 7 and the ground B–1?
Repair an open circuit between connector D–14 terminal 7
and the ground B–1.
Is the action complete?
Turn the starter switch on.
Is the battery voltage applied between harness side
connector D–14 terminal 5 and the ground?
Repair an open circuit between connector B–37 terminal 4
and connector D–14 terminal 5.
Is the action complete?
Connect the battery positive terminal with harness side
connector D–14 terminal 10 or 1, and connect the battery
negative terminal with harness side connector D–14 terminal
1 or 10.
Does the motor operate?
1. Disconnect the front power window motor–LH connector
D–11.
2. Connect the battery positive terminal with the motor side
connector D–11 terminal 1 or 2, and connect the battery
negative terminal with the motor side connector D–11
terminal 2 or 1.
Does the motor operate?
Repair an open circuit between the front power window &
door lock switch–LH and the front power window motor–LH.
Is the action complete?–
–
–
Approx. 12V
–
–
–
–Go to
step 2
Go to
step 4
Go to
step 2
Go to
step 6
Go to
step 4
Replace
the front
power
window &
door lock
switch–LH
Go to
step 8
Verify
repairGround it
securely
Go to
step 3
–
Go to
step 5
–
Go to
step 7
Replace
the motor
– 1
2
3
4
5
6
7
8
Page 2992 of 6000

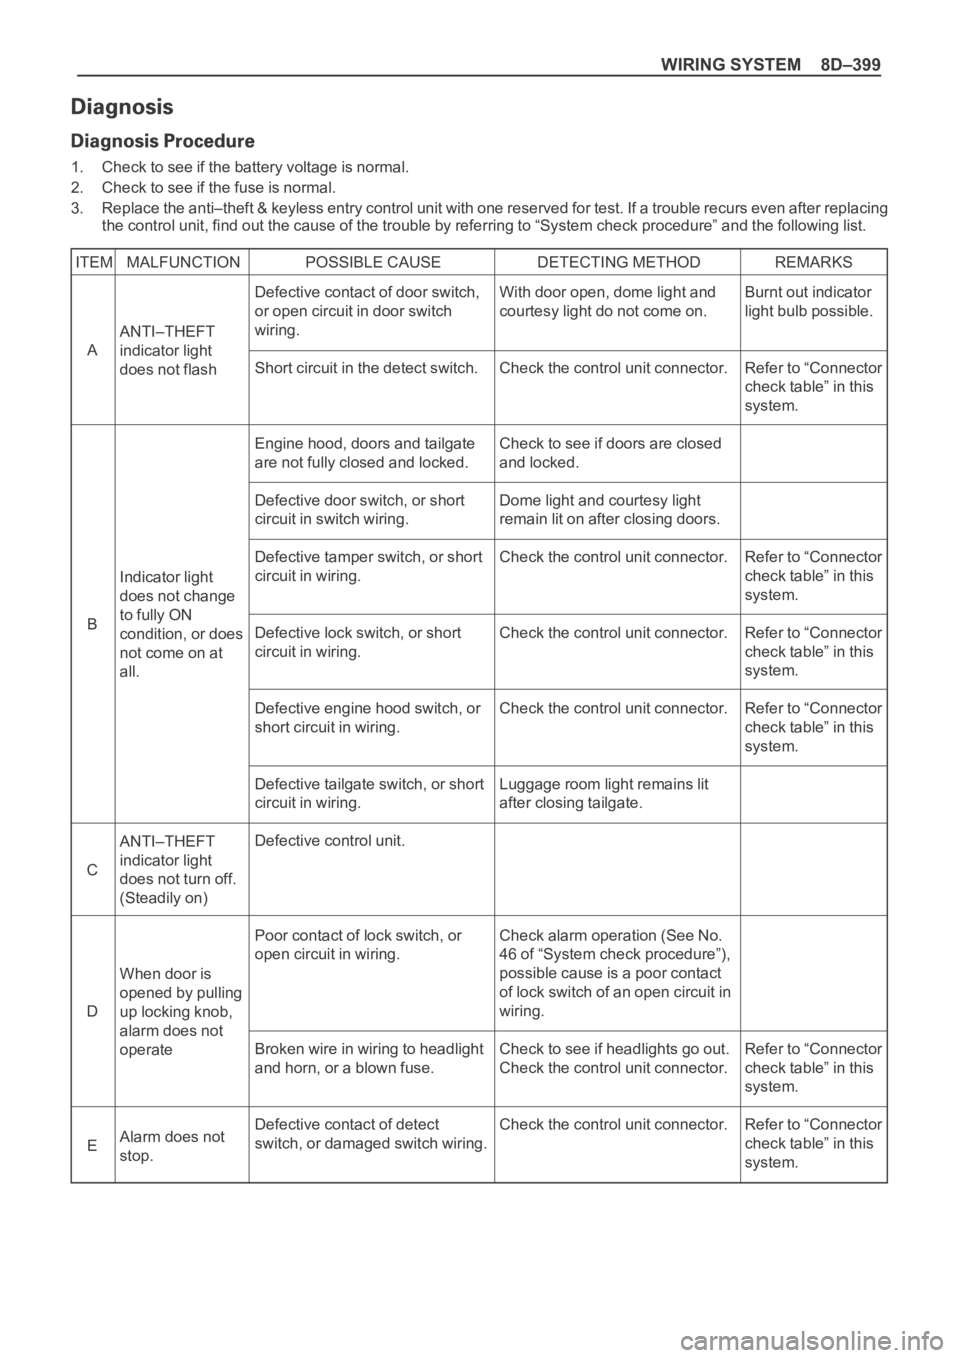
WIRING SYSTEM 8D–399
1. Check to see if the battery voltage is normal.
2. Check to see if the fuse is normal.
3. Replace the anti–theft & keyless entry control unit with one reserved for test. If a trouble recurs even after replacing
the control unit, find out the cause of the trouble by referring to “System check procedure” and the following list.
ITEM MALFUNCTION POSSIBLE CAUSE DETECTING METHOD REMARKS
ANTI–THEFT
indicator light
does not flash
ANTI–THEFT
indicator light
does not turn off.
(Steadily on)
When door is
opened by pulling
up locking knob,
alarm does not
operate
Alarm does not
stop. Indicator light
does not change
to fully ON
condition, or does
not come on at
all.Burnt out indicator
light bulb possible.
Refer to “Connector
check table” in this
system.
Refer to “Connector
check table” in this
system.
Refer to “Connector
check table” in this
system.
Refer to “Connector
check table” in this
system.
Refer to “Connector
check table” in this
system.
Refer to “Connector
check table” in this
system. Defective contact of door switch,
or open circuit in door switch
wiring.
Short circuit in the detect switch.
Engine hood, doors and tailgate
are not fully closed and locked.
Defective door switch, or short
circuit in switch wiring.
Defective tamper switch, or short
circuit in wiring.
Defective lock switch, or short
circuit in wiring.
Defective engine hood switch, or
short circuit in wiring.
Defective tailgate switch, or short
circuit in wiring.
Defective control unit.
Poor contact of lock switch, or
open circuit in wiring.
Broken wire in wiring to headlight
and horn, or a blown fuse.
Defective contact of detect
switch, or damaged switch wiring.With door open, dome light and
courtesy light do not come on.
Check the control unit connector.
Check to see if doors are closed
and locked.
Dome light and courtesy light
remain lit on after closing doors.
Check the control unit connector.
Check the control unit connector.
Check the control unit connector.
Luggage room light remains lit
after closing tailgate.
Check alarm operation (See No.
46 of “System check procedure”),
possible cause is a poor contact
of lock switch of an open circuit in
wiring.
Check to see if headlights go out.
Check the control unit connector.
Check the control unit connector. A
C
D
E B
Page 3280 of 6000
8F–85 BODY STRUCTURE
Tailgate Sash Trim Cover
Parts Location
684RS012
Legend
(1) Tailgate Sash Trim Cover
Removal
1. Remove tailgate sash trim cover (1).
Pry the tailgate trim cover retainers free from the
tailgate panel.
684RS013
Installation
1. Install the tailgate sash trim cover (1).
Insert the trim cover retainers into the tailgate hole
securely so that there are no gaps between them.
Page 3281 of 6000
8F–86BODY STRUCTURE
Tailgate Outer Weatherstrip
Parts Location
682RW001
Legend
(1) Tailgate Outer Weatherstrip
Removal
1. Disconnect the battery ground cable.
2. Remove tailgate outer weatherstrip (1).
Pry the tailgate outer weatherstrip clips (2) free from
the body panel.
682RS002
Installation
1. Install the tailgate weatherstrip.
Insert the tailgate outer weatherstrip clip into the
body panel hole securely in order to install the
tailgate outer weatherstrip with the gap between the
body panel and the weatherstrip.
Page 3290 of 6000
8F–95 BODY STRUCTURE
Installation
1. Install the moulding roof clips (1).
Install the clips on roof panel flange (2) to refer the
illustration.
645RW003
2. Install the roof end moulding (3).
Clean the body panel where the roof end moulding
is installed.
Install the roof end moulding and the rear air
deflector (2) so that the installation clearance
between them is within the specified values.
Securely fix it with the adhesive tape (4) and sealing
adhesive (5).
645RW001
3. Install the roof moulding (9).
Assemble the windshield side moulding upper clip
(8) to the roof panel with the clip positioning rib (6)
(oblique lines portion) attached to the roof panel
flange (7). Assemble the roof moulding (9) while
you attach the front edge portion of the roof molding
to the windshield side moulding (10).
645RW005
Page 3292 of 6000

8F–97 BODY STRUCTURE
Use a pair of needle nose pliers to insert the other end
of the piano wire through the adhesive caulking
material at the edge of the windshield glass.
Secure the other end of the piano wire to another
piece of wood.
With the aid of an assistant, carefully move the piano
wire with a sawing motion to cut through the adhesive
caulking material around the entire circumference of
the windshield glass.
Clean the remaining adhesive caulking material from
the area of the body which holds the windshield.
8. Remove windshield upper moulding.
Taking notice of the adhesive tape, and peel the
moulding off the windshield upper portion.
9. Remove moulding clip.
10. Remove spacer.
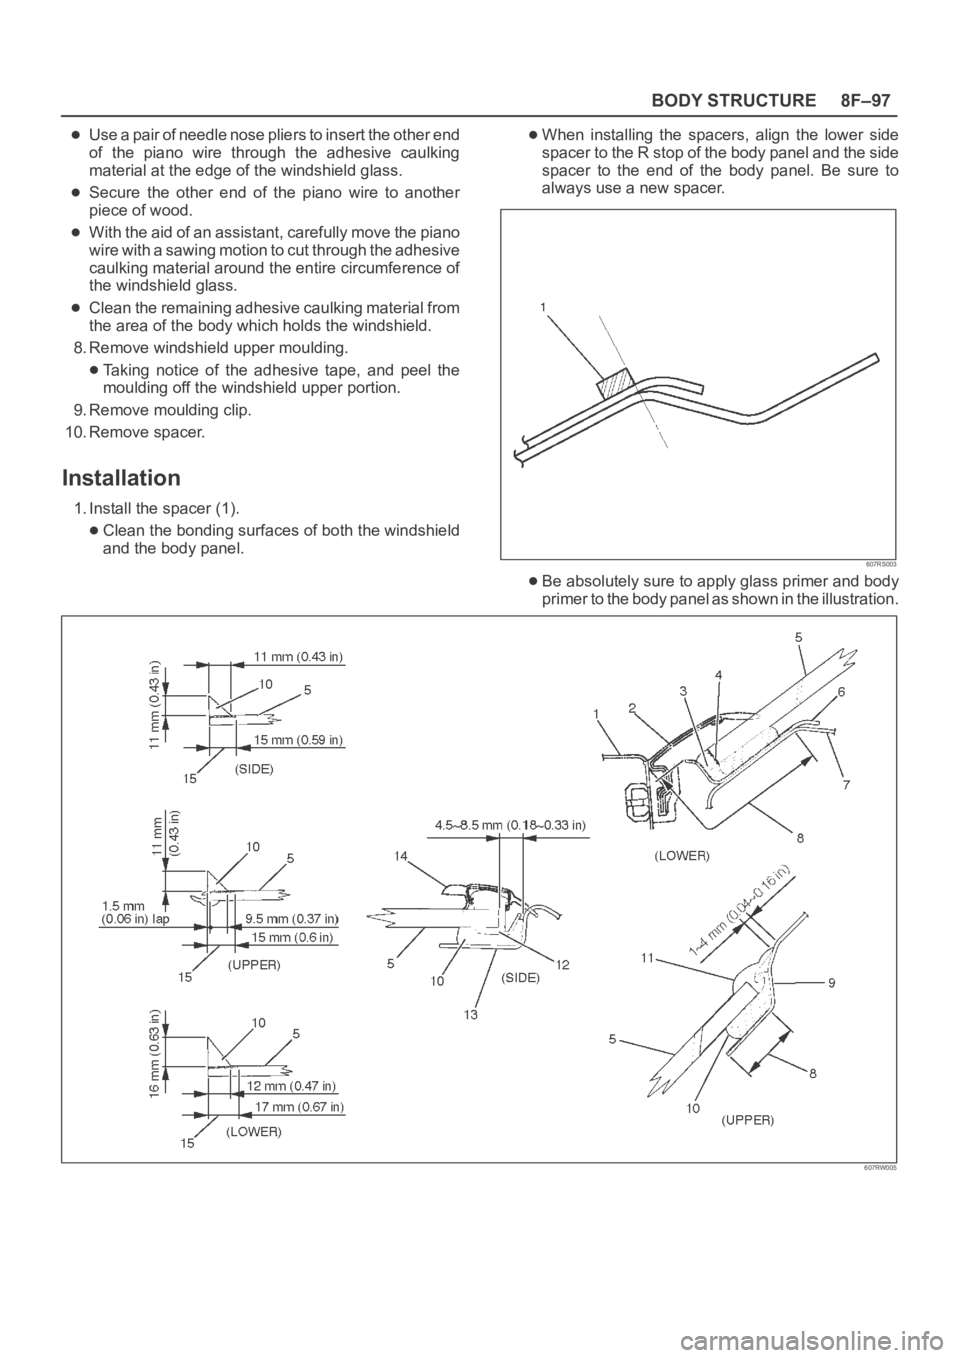
Installation
1. Install the spacer (1).
Clean the bonding surfaces of both the windshield
and the body panel.
When installing the spacers, align the lower side
spacer to the R stop of the body panel and the side
spacer to the end of the body panel. Be sure to
always use a new spacer.
607RS003
Be absolutely sure to apply glass primer and body
primer to the body panel as shown in the illustration.
607RW005
Page 3330 of 6000
8G–18SEATS
Reassembly (Split Type)
To reassemble, follow the disassembly steps in the
reverse order, noting the following point.
1. Tighten the reclining device fixing bolts to the
specified torque.
Torque: 27 Nꞏm (2.8kgꞏm/20 lb ft)
2. Loosen the rubber stopper lock nut(1). Adjust the
stopper(3) so there is no clearance between the
bottom of the stopper and the carpet(2) while you
make sure the rear seat is firmly locked.
Then tighten the lock nut securely.
755RS005