1998 OPEL FRONTERA diagnostic menu
[x] Cancel search: diagnostic menuPage 850 of 6000

5A–40
BRAKE CONTROL SYSTEM
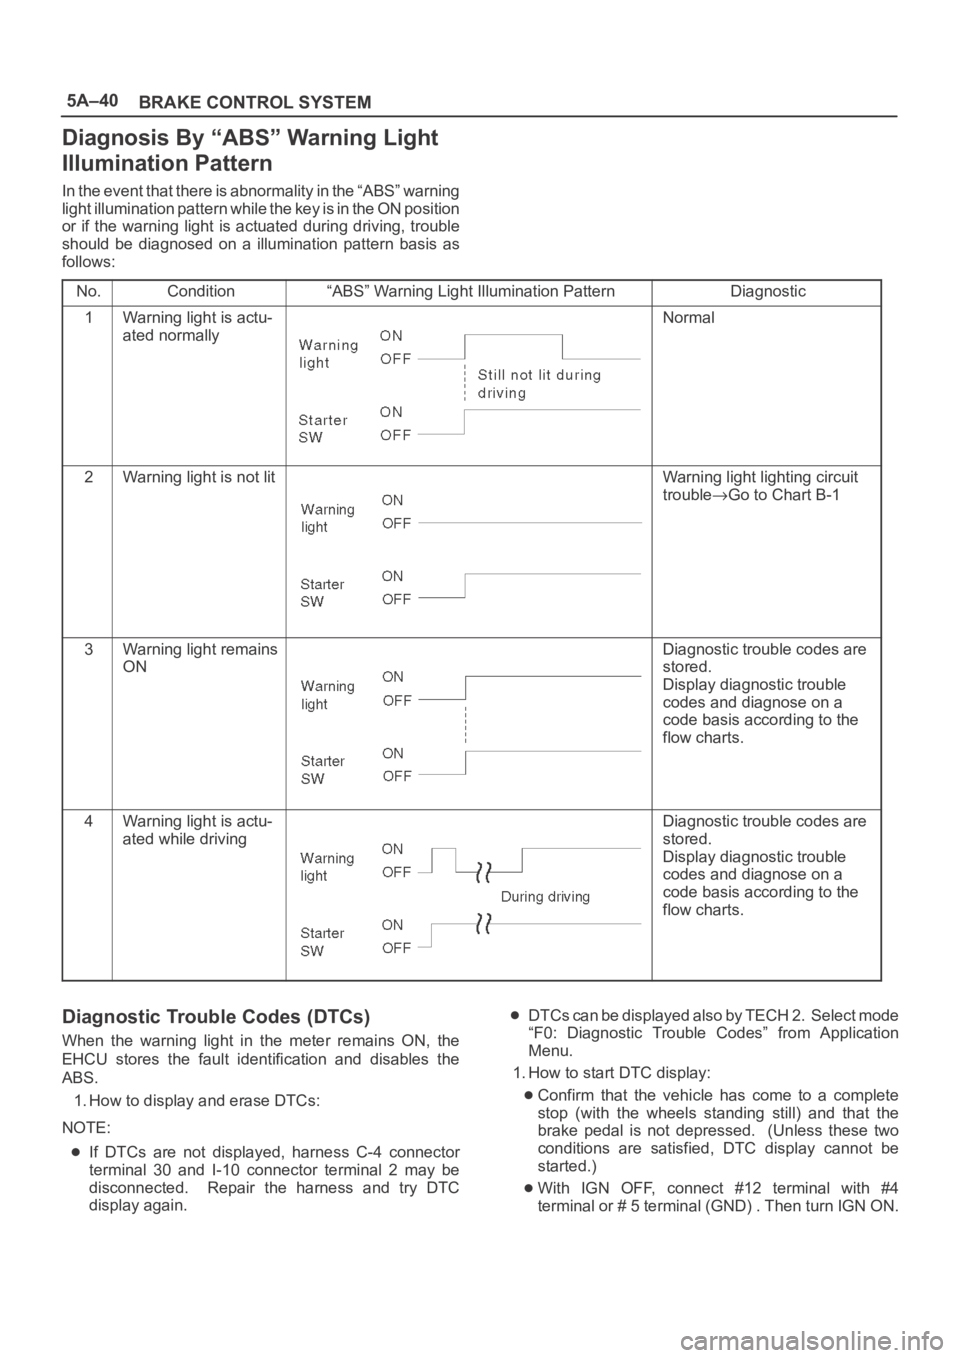
Diagnosis By “ABS” Warning Light
Illumination Pattern
In the event that there is abnormality in the “ABS” warning
light illumination pattern while the key is in the ON position
or if the warning light is actuated during driving, trouble
should be diagnosed on a illumination pattern basis as
follows:
No.
Condition“ABS” Warning Light Illumination PatternDiagnostic
1Warning light is actu-
ated normallyNormal
2Warning light is not litWarning light lighting circuit
trouble
Go to Chart B-1
3Warning light remains
ONDiagnostic trouble codes are
stored.
Display diagnostic trouble
codes and diagnose on a
code basis according to the
flow charts.
4Warning light is actu-
ated while drivingDiagnostic trouble codes are
stored.
Display diagnostic trouble
codes and diagnose on a
code basis according to the
flow charts.
Diagnostic Trouble Codes (DTCs)
When the warning light in the meter remains ON, the
EHCU stores the fault identification and disables the
ABS.
1. How to display and erase DTCs:
NOTE:
If DTCs are not displayed, harness C-4 connector
terminal 30 and I-10 connector terminal 2 may be
disconnected. Repair the harness and try DTC
display again.
DTCs can be displayed also by TECH 2. Select mode
“F0: Diagnostic Trouble Codes” from Application
Menu.
1. How to start DTC display:
Confirm that the vehicle has come to a complete
stop (with the wheels standing still) and that the
brake pedal is not depressed. (Unless these two
conditions are satisfied, DTC display cannot be
started.)
With IGN OFF, connect #12 terminal with #4
terminal or # 5 terminal (GND) . Then turn IGN ON.
Page 1160 of 6000
6E–43 ENGINE DRIVEABILITY AND EMISSIONS
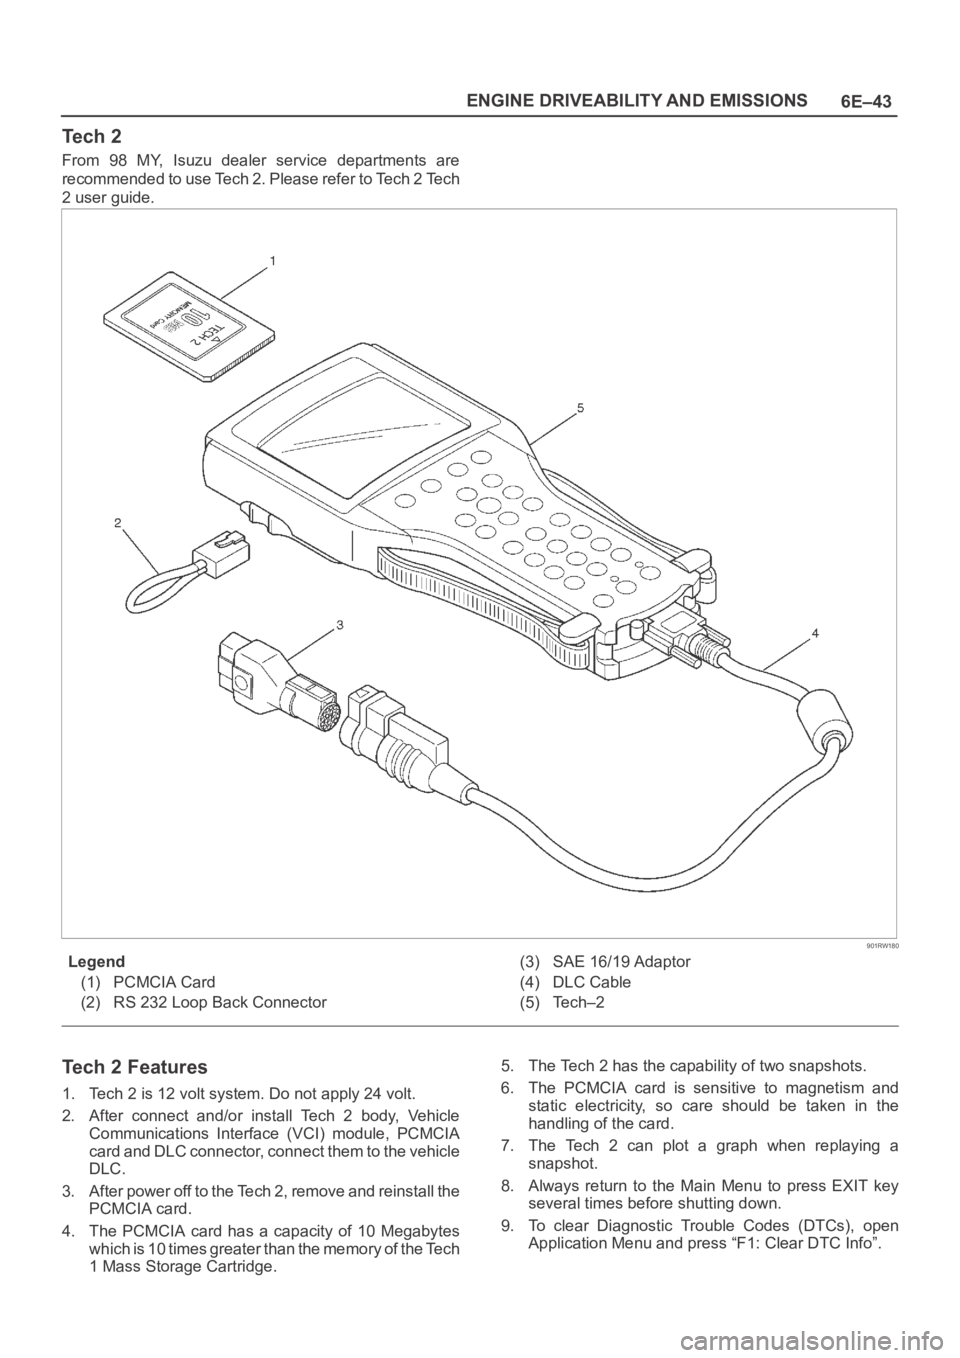
Te c h 2
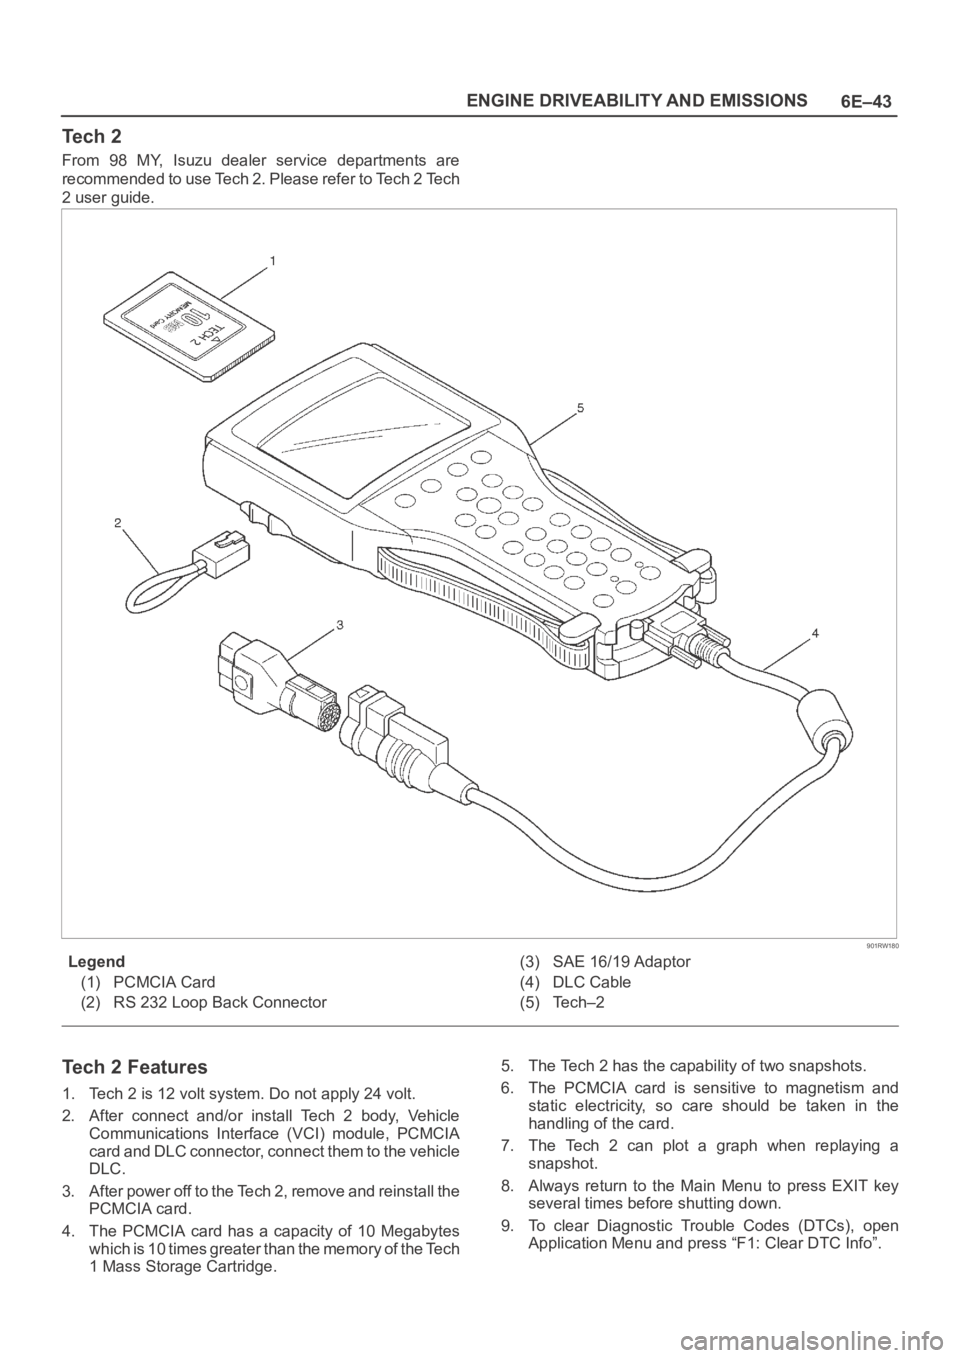
From 98 MY, Isuzu dealer service departments are
recommended to use Tech 2. Please refer to Tech 2 Tech
2 user guide.
901RW180
Legend
(1) PCMCIA Card
(2) RS 232 Loop Back Connector(3) SAE 16/19 Adaptor
(4) DLC Cable
(5) Tech–2
Tech 2 Features
1. Tech 2 is 12 volt system. Do not apply 24 volt.
2. After connect and/or install Tech 2 body, Vehicle
Communications Interface (VCI) module, PCMCIA
card and DLC connector, connect them to the vehicle
DLC.
3. After power off to the Tech 2, remove and reinstall the
PCMCIA card.
4. The PCMCIA card has a capacity of 10 Megabytes
which is 10 times greater than the memory of the Tech
1 Mass Storage Cartridge.5. The Tech 2 has the capability of two snapshots.
6. The PCMCIA card is sensitive to magnetism and
static electricity, so care should be taken in the
handling of the card.
7. The Tech 2 can plot a graph when replaying a
snapshot.
8. Always return to the Main Menu to press EXIT key
several times before shutting down.
9. To clear Diagnostic Trouble Codes (DTCs), open
Application Menu and press “F1: Clear DTC Info”.
Page 1856 of 6000
ENGINE FUEL 6C – 11
8. Install injector harness assembly, reconnect
harness connecter to injector.
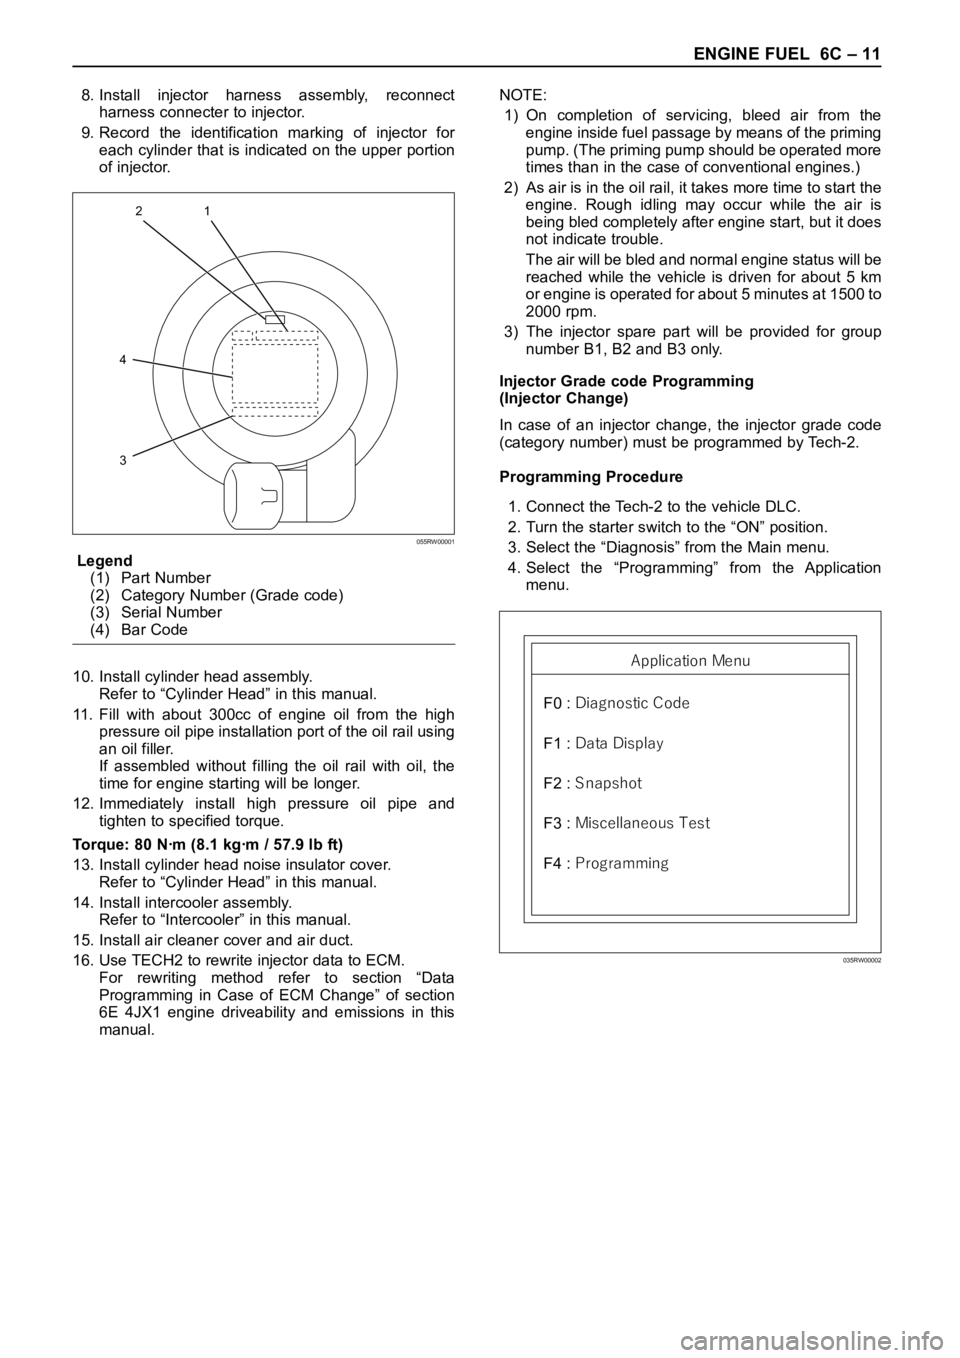
9. Record the identification marking of injector for
each cylinder that is indicated on the upper portion
of injector.
Legend
(1) Part Number
(2) Category Number (Grade code)
(3) Serial Number
(4) Bar Code
10. Install cylinder head assembly.
Refer to “Cylinder Head” in this manual.
11. Fill with about 300cc of engine oil from the high
pressure oil pipe installation port of the oil rail using
an oil filler.
If assembled without filling the oil rail with oil, the
time for engine starting will be longer.
12. Immediately install high pressure oil pipe and
tighten to specified torque.
Torque: 80 Nꞏm (8.1 kgꞏm / 57.9 lb ft)
13. Install cylinder head noise insulator cover.
Refer to “Cylinder Head” in this manual.
14. Install intercooler assembly.
Refer to “Intercooler” in this manual.
15. Install air cleaner cover and air duct.
16. Use TECH2 to rewrite injector data to ECM.
For rewriting method refer to section “Data
Programming in Case of ECM Change” of section
6E 4JX1 engine driveability and emissions in this
manual.NOTE:
1) On completion of servicing, bleed air from the
engine inside fuel passage by means of the priming
pump. (The priming pump should be operated more
times than in the case of conventional engines.)
2) As air is in the oil rail, it takes more time to start the
engine. Rough idling may occur while the air is
being bled completely after engine start, but it does
not indicate trouble.
The air will be bled and normal engine status will be
reached while the vehicle is driven for about 5 km
or engine is operated for about 5 minutes at 1500 to
2000 rpm.
3) The injector spare part will be provided for group
number B1, B2 and B3 only.
Injector Grade code Programming
(Injector Change)
In case of an injector change, the injector grade code
(category number) must be programmed by Tech-2.
Programming Procedure
1. Connect the Tech-2 to the vehicle DLC.
2. Turn the starter switch to the “ON” position.
3. Select the “Diagnosis” from the Main menu.
4. Select the “Programming” from the Application
menu.
1
4
32
055RW00001
F0 : Diagnostic C ode
F1 : Data Display
F2 : Snapshot
F3 : Miscellaneous Test
F4 : ProgrammingA pplication Menu
035RW00002
Page 1924 of 6000
6E–31 4JX1–TC ENGINE DRIVEABILITY AND EMISSIONS
060RW120
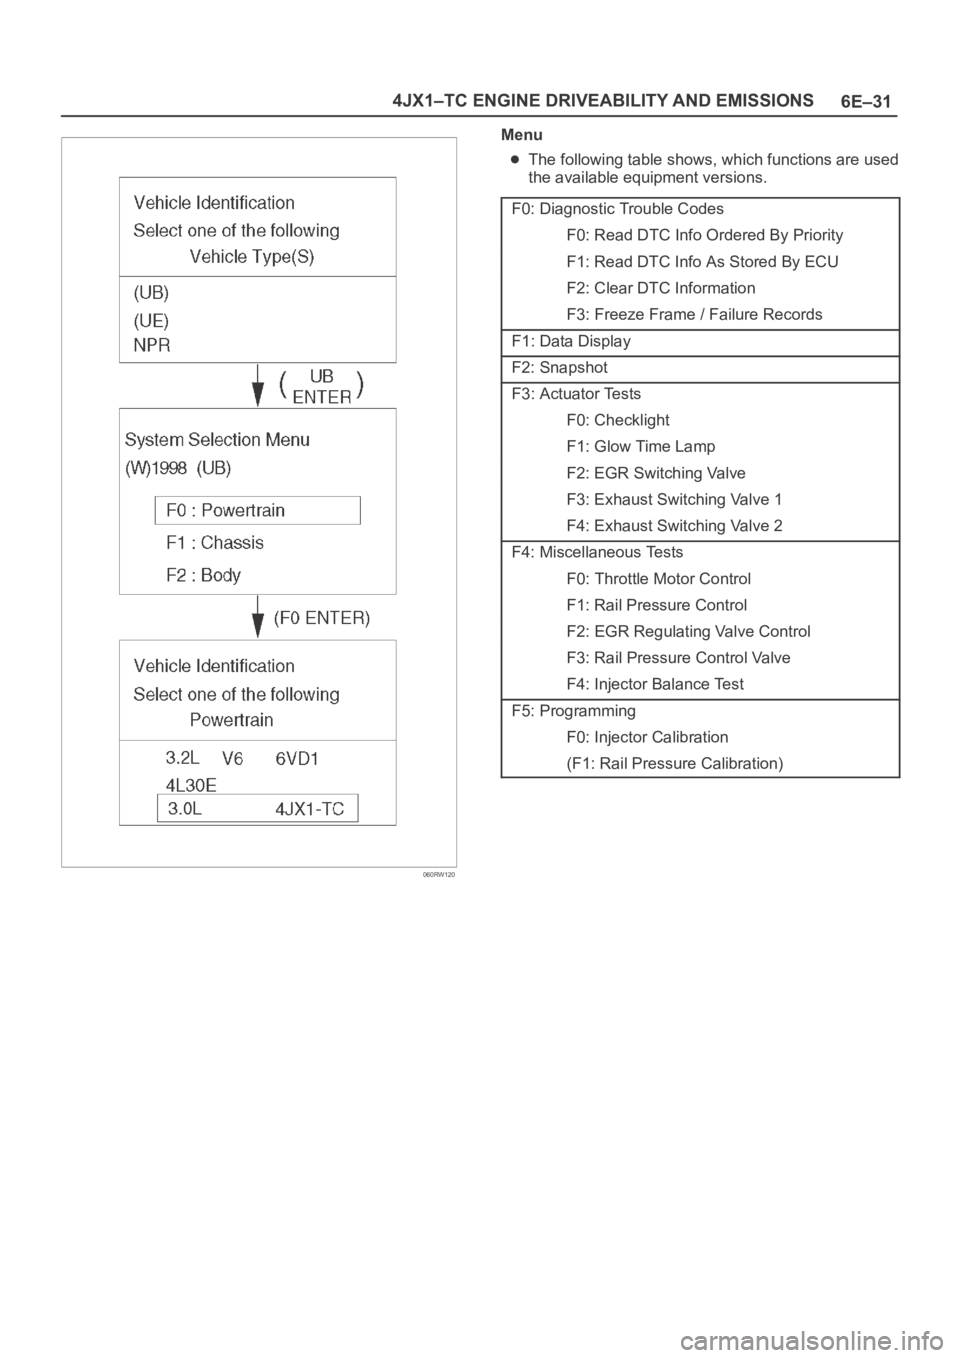
Menu
The following table shows, which functions are used
the available equipment versions.
F0: Diagnostic Trouble Codes
F0: Read DTC Info Ordered By Priority
F1: Read DTC Info As Stored By ECU
F2: Clear DTC Information
F3: Freeze Frame / Failure Records
F1: Data Display
F2: Snapshot
F3: Actuator Tests
F0: Checklight
F1: Glow Time Lamp
F2: EGR Switching Valve
F3: Exhaust Switching Valve 1
F4: Exhaust Switching Valve 2
F4: Miscellaneous Tests
F0: Throttle Motor Control
F1: Rail Pressure Control
F2: EGR Regulating Valve Control
F3: Rail Pressure Control Valve
F4: Injector Balance Test
F5: Programming
F0: Injector Calibration
(F1: Rail Pressure Calibration)
Page 2262 of 6000
TRANSMISSION CONTROL SYSTEM (4L30–E)7A1–17
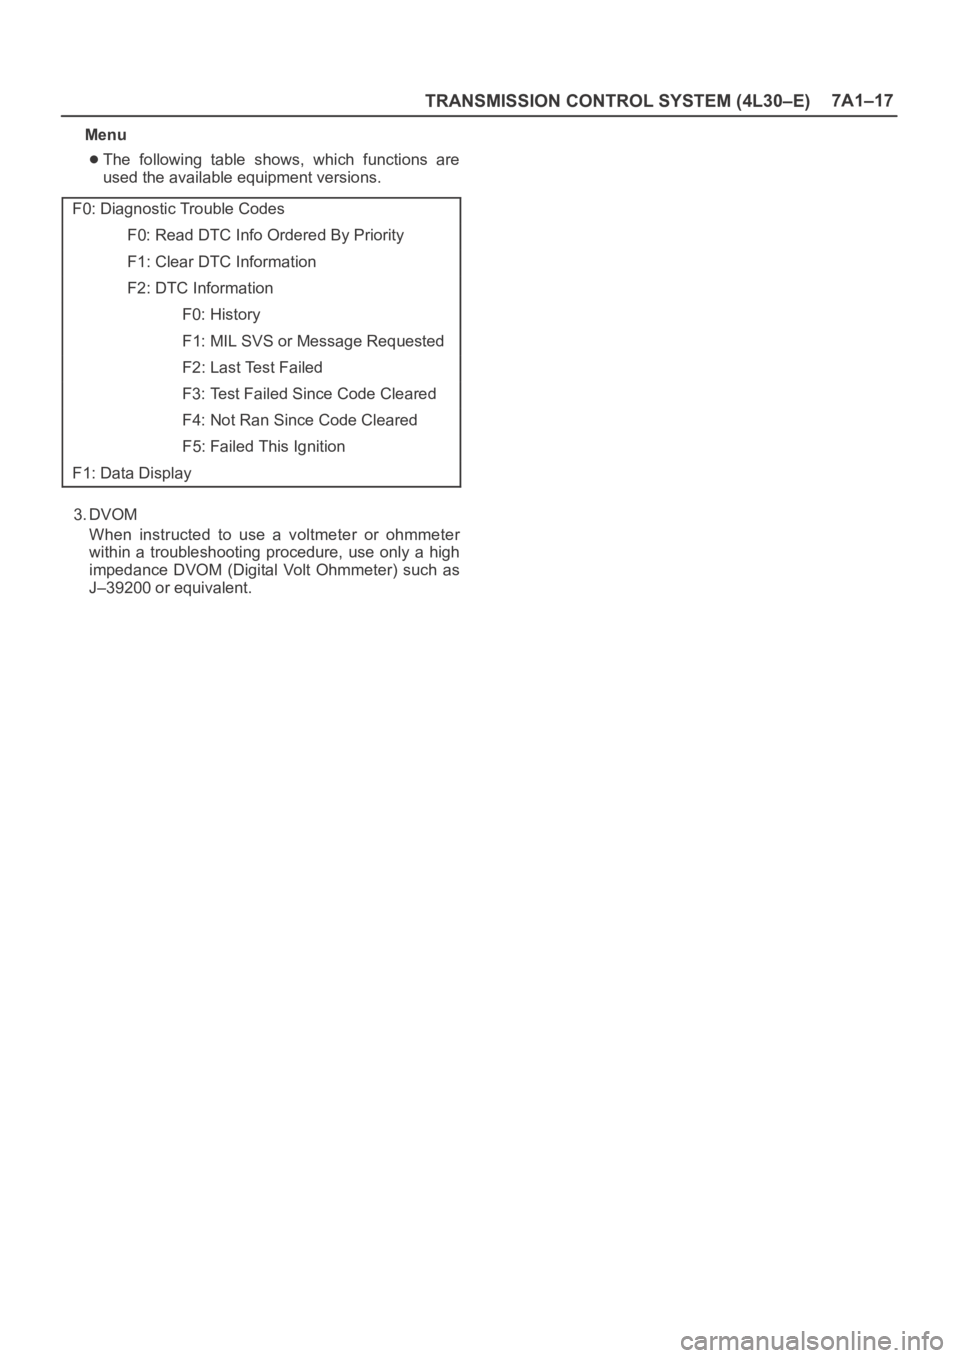
Menu
The following table shows, which functions are
used the available equipment versions.
F0: Diagnostic Trouble Codes
F0: Read DTC Info Ordered By Priority
F1: Clear DTC Information
F2: DTC Information
F0: History
F1: MIL SVS or Message Requested
F2: Last Test Failed
F3: Test Failed Since Code Cleared
F4: Not Ran Since Code Cleared
F5: Failed This Ignition
F1: Data Display
3. DVOM
When instructed to use a voltmeter or ohmmeter
within a troubleshooting procedure, use only a high
impedance DVOM (Digital Volt Ohmmeter) such as
J–39200 or equivalent.
Page 4390 of 6000
5A–40
BRAKE CONTROL SYSTEM
Diagnosis By “ABS” Warning Light
Illumination Pattern
In the event that there is abnormality in the “ABS” warning
light illumination pattern while the key is in the ON position
or if the warning light is actuated during driving, trouble
should be diagnosed on a illumination pattern basis as
follows:
No.
Condition“ABS” Warning Light Illumination PatternDiagnostic
1Warning light is actu-
ated normallyNormal
2Warning light is not litWarning light lighting circuit
trouble
Go to Chart B-1
3Warning light remains
ONDiagnostic trouble codes are
stored.
Display diagnostic trouble
codes and diagnose on a
code basis according to the
flow charts.
4Warning light is actu-
ated while drivingDiagnostic trouble codes are
stored.
Display diagnostic trouble
codes and diagnose on a
code basis according to the
flow charts.
Diagnostic Trouble Codes (DTCs)
When the warning light in the meter remains ON, the
EHCU stores the fault identification and disables the
ABS.
1. How to display and erase DTCs:
NOTE:
If DTCs are not displayed, harness C-4 connector
terminal 30 and I-10 connector terminal 2 may be
disconnected. Repair the harness and try DTC
display again.
DTCs can be displayed also by TECH 2. Select mode
“F0: Diagnostic Trouble Codes” from Application
Menu.
1. How to start DTC display:
Confirm that the vehicle has come to a complete
stop (with the wheels standing still) and that the
brake pedal is not depressed. (Unless these two
conditions are satisfied, DTC display cannot be
started.)
With IGN OFF, connect #12 terminal with #4
terminal or # 5 terminal (GND) . Then turn IGN ON.
Page 4700 of 6000
6E–43 ENGINE DRIVEABILITY AND EMISSIONS
Te c h 2
From 98 MY, Isuzu dealer service departments are
recommended to use Tech 2. Please refer to Tech 2 Tech
2 user guide.
901RW180
Legend
(1) PCMCIA Card
(2) RS 232 Loop Back Connector(3) SAE 16/19 Adaptor
(4) DLC Cable
(5) Tech–2
Tech 2 Features
1. Tech 2 is 12 volt system. Do not apply 24 volt.
2. After connect and/or install Tech 2 body, Vehicle
Communications Interface (VCI) module, PCMCIA
card and DLC connector, connect them to the vehicle
DLC.
3. After power off to the Tech 2, remove and reinstall the
PCMCIA card.
4. The PCMCIA card has a capacity of 10 Megabytes
which is 10 times greater than the memory of the Tech
1 Mass Storage Cartridge.5. The Tech 2 has the capability of two snapshots.
6. The PCMCIA card is sensitive to magnetism and
static electricity, so care should be taken in the
handling of the card.
7. The Tech 2 can plot a graph when replaying a
snapshot.
8. Always return to the Main Menu to press EXIT key
several times before shutting down.
9. To clear Diagnostic Trouble Codes (DTCs), open
Application Menu and press “F1: Clear DTC Info”.
Page 5393 of 6000
6C – 12 ENGINE FUEL
8. Install injector harness assembly, reconnect
harness connecter to injector.
9. Record the identification marking of injector for
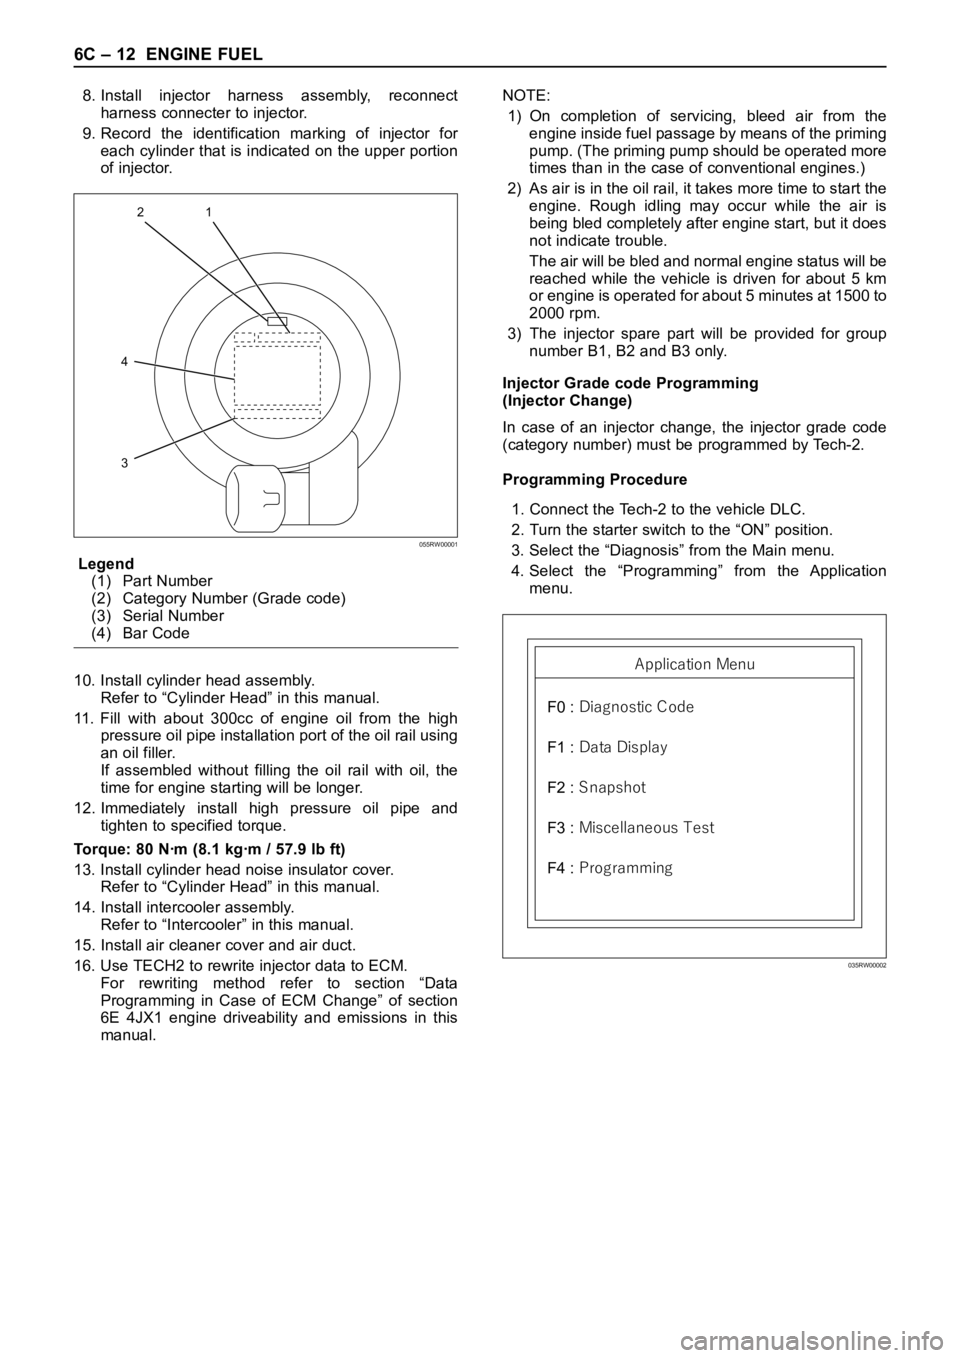
each cylinder that is indicated on the upper portion
of injector.
Legend
(1) Part Number
(2) Category Number (Grade code)
(3) Serial Number
(4) Bar Code
10. Install cylinder head assembly.
Refer to “Cylinder Head” in this manual.
11. Fill with about 300cc of engine oil from the high
pressure oil pipe installation port of the oil rail using
an oil filler.
If assembled without filling the oil rail with oil, the
time for engine starting will be longer.
12. Immediately install high pressure oil pipe and
tighten to specified torque.
Torque: 80 Nꞏm (8.1 kgꞏm / 57.9 lb ft)
13. Install cylinder head noise insulator cover.
Refer to “Cylinder Head” in this manual.
14. Install intercooler assembly.
Refer to “Intercooler” in this manual.
15. Install air cleaner cover and air duct.
16. Use TECH2 to rewrite injector data to ECM.
For rewriting method refer to section “Data
Programming in Case of ECM Change” of section
6E 4JX1 engine driveability and emissions in this
manual.NOTE:
1) On completion of servicing, bleed air from the
engine inside fuel passage by means of the priming
pump. (The priming pump should be operated more
times than in the case of conventional engines.)
2) As air is in the oil rail, it takes more time to start the
engine. Rough idling may occur while the air is
being bled completely after engine start, but it does
not indicate trouble.
The air will be bled and normal engine status will be
reached while the vehicle is driven for about 5 km
or engine is operated for about 5 minutes at 1500 to
2000 rpm.
3) The injector spare part will be provided for group
number B1, B2 and B3 only.
Injector Grade code Programming
(Injector Change)
In case of an injector change, the injector grade code
(category number) must be programmed by Tech-2.
Programming Procedure
1. Connect the Tech-2 to the vehicle DLC.
2. Turn the starter switch to the “ON” position.
3. Select the “Diagnosis” from the Main menu.
4. Select the “Programming” from the Application
menu.
1
4
32
055RW00001
F0 : Diagnostic C ode
F1 : Data Display
F2 : Snapshot
F3 : Miscellaneous Test
F4 : ProgrammingA pplication Menu
035RW00002