1998 OPEL FRONTERA motor
[x] Cancel search: motorPage 2251 of 6000
7A1–6
TRANSMISSION CONTROL SYSTEM (4L30–E)
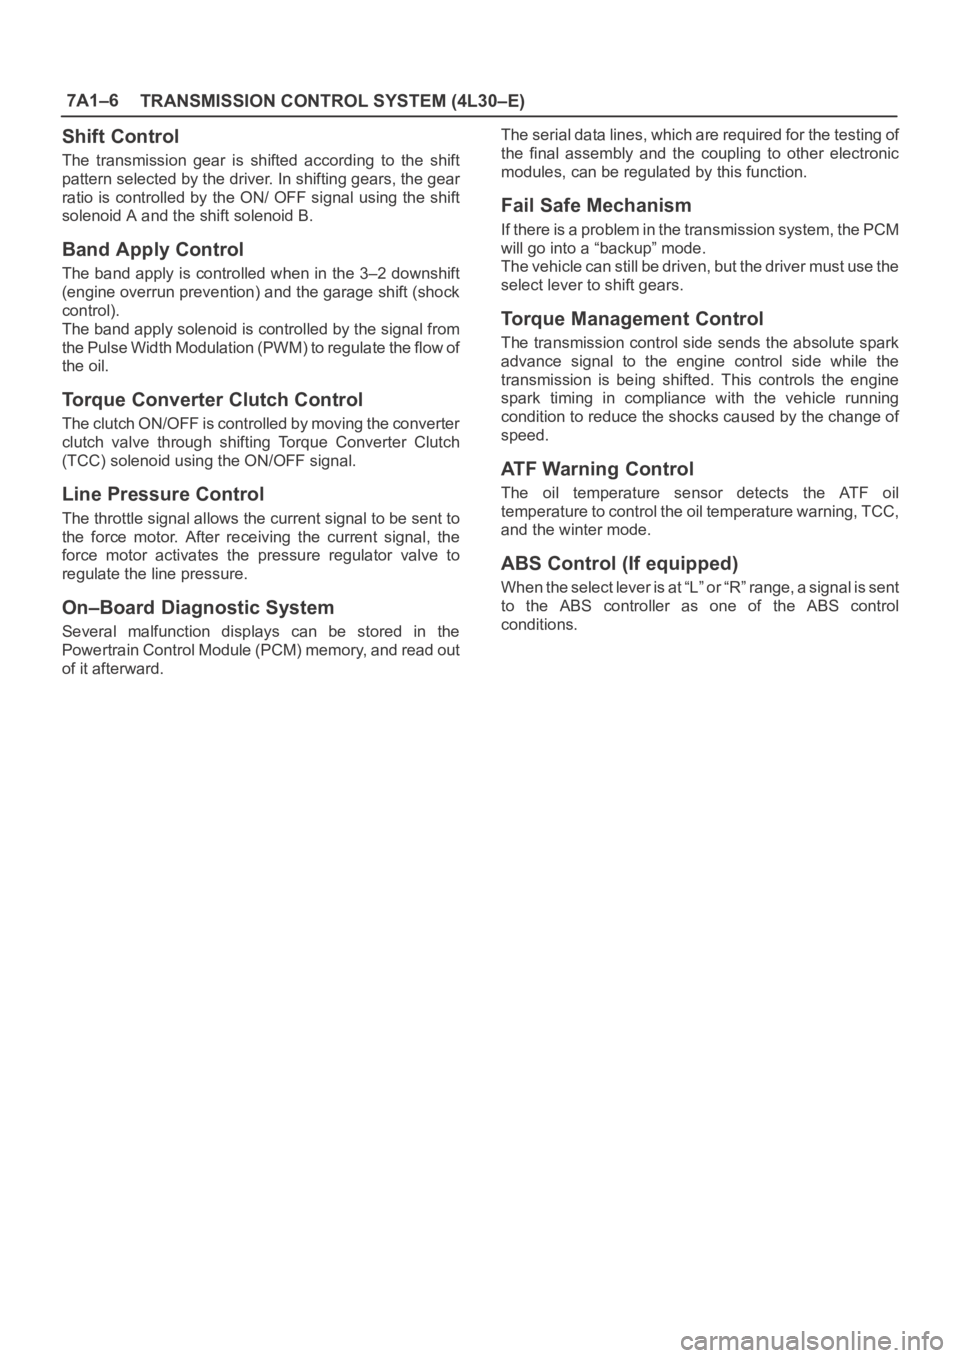
Shift Control
The transmission gear is shifted according to the shift
pattern selected by the driver. In shifting gears, the gear
ratio is controlled by the ON/ OFF signal using the shift
solenoid A and the shift solenoid B.
Band Apply Control
The band apply is controlled when in the 3–2 downshift
(engine overrun prevention) and the garage shift (shock
control).
The band apply solenoid is controlled by the signal from
the Pulse Width Modulation (PWM) to regulate the flow of
the oil.
Torque Converter Clutch Control
The clutch ON/OFF is controlled by moving the converter
clutch valve through shifting Torque Converter Clutch
(TCC) solenoid using the ON/OFF signal.
Line Pressure Control
The throttle signal allows the current signal to be sent to
the force motor. After receiving the current signal, the
force motor activates the pressure regulator valve to
regulate the line pressure.
On–Board Diagnostic System
Several malfunction displays can be stored in the
Powertrain Control Module (PCM) memory, and read out
of it afterward.The serial data lines, which are required for the testing of
the final assembly and the coupling to other electronic
modules, can be regulated by this function.
Fail Safe Mechanism
If there is a problem in the transmission system, the PCM
will go into a “backup” mode.
The vehicle can still be driven, but the driver must use the
select lever to shift gears.
Torque Management Control
The transmission control side sends the absolute spark
advance signal to the engine control side while the
transmission is being shifted. This controls the engine
spark timing in compliance with the vehicle running
condition to reduce the shocks caused by the change of
speed.
ATF Warning Control
The oil temperature sensor detects the ATF oil
temperature to control the oil temperature warning, TCC,
and the winter mode.
ABS Control (If equipped)
When the select lever is at “L” or “R” range, a signal is sent
to the ABS controller as one of the ABS control
conditions.
Page 2255 of 6000
7A1–10
TRANSMISSION CONTROL SYSTEM (4L30–E)
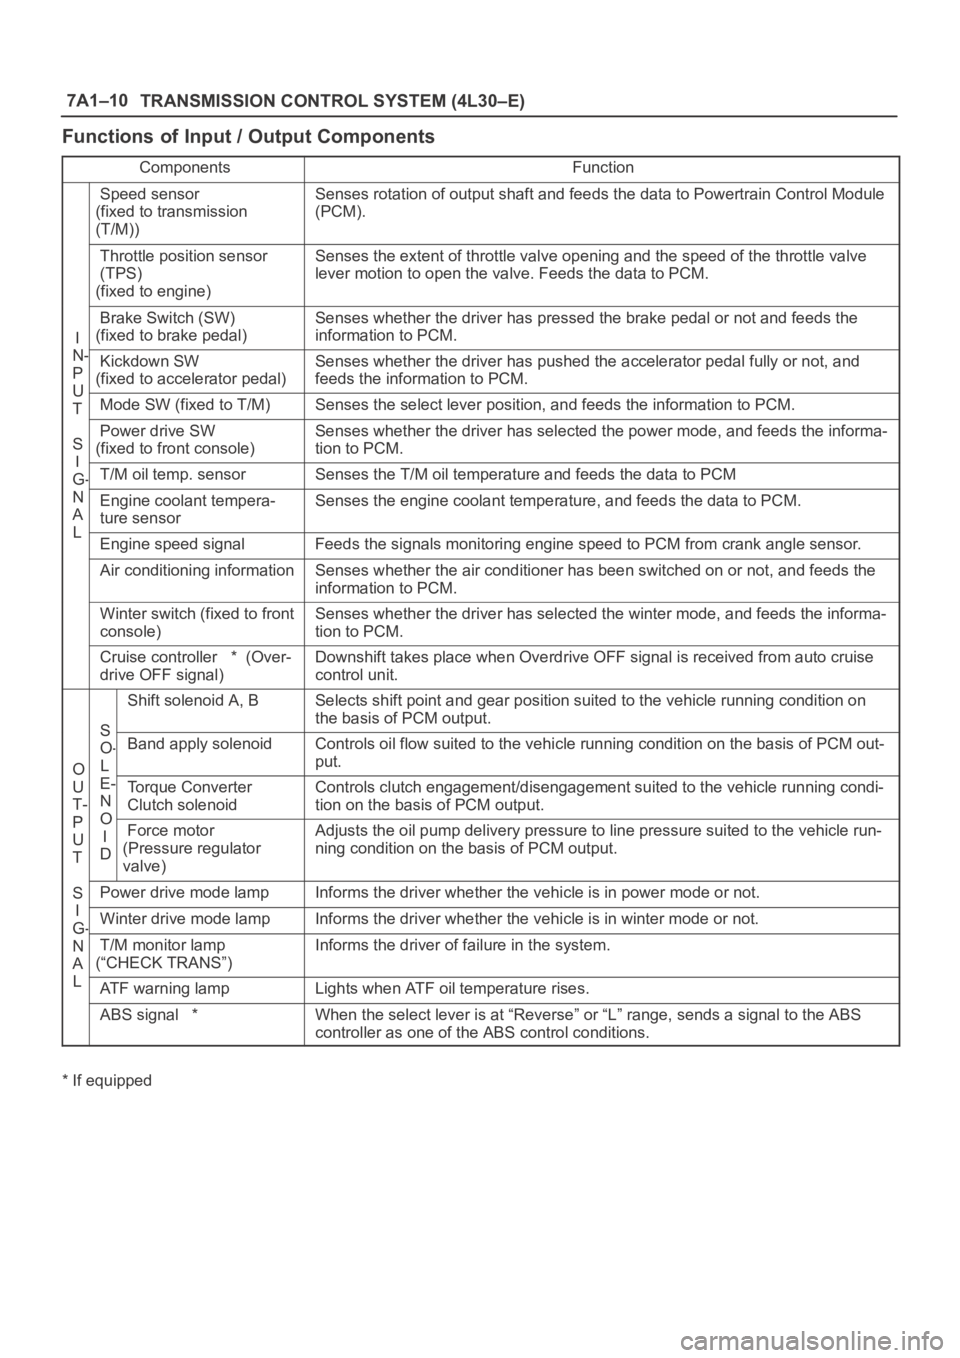
Functions of Input / Output Components
ComponentsFunction
Speed sensor
(fixed to transmission
(T/M))Senses rotation of output shaft and feeds the data to Powertrain Control Module
(PCM).
Throttle position sensor
(TPS)
(fixed to engine)Senses the extent of throttle valve opening and the speed of the throttle valve
lever motion to open the valve. Feeds the data to PCM.
I
N
Brake Switch (SW)
(fixed to brake pedal)Senses whether the driver has pressed the brake pedal or not and feeds the
information to PCM.
N-
P
U
Kickdown SW
(fixed to accelerator pedal)Senses whether the driver has pushed the accelerator pedal fully or not, and
feeds the information to PCM.
U
TMode SW (fixed to T/M)Senses the select lever position, and feeds the information to PCM.
S
I
Power drive SW
(fixed to front console)Senses whether the driver has selected the power mode, and feeds the informa-
tion to PCM.
I
G-T/M oil temp. sensorSenses the T/M oil temperature and feeds the data to PCM
N
A
L
Engine coolant tempera-
ture sensorSenses the engine coolant temperature, and feeds the data to PCM.
LEngine speed signalFeeds the signals monitoring engine speed to PCM from crank angle sensor.
Air conditioning informationSenses whether the air conditioner has been switched on or not, and feeds the
information to PCM.
Winter switch (fixed to front
console)Senses whether the driver has selected the winter mode, and feeds the informa-
tion to PCM.
Cruise controller * (Over-
drive OFF signal)Downshift takes place when Overdrive OFF signal is received from auto cruise
control unit.
S
Shift solenoid A, BSelects shift point and gear position suited to the vehicle running condition on
the basis of PCM output.
O
S
O-
L
Band apply solenoidControls oil flow suited to the vehicle running condition on the basis of PCM out-
put.
O
U
T-
P
E-
N
O
Torque Converter
Clutch solenoidControls clutch engagement/disengagement suited to the vehicle running condi-
tion on the basis of PCM output.
P
U
T
O
I
DForce motor
(Pressure regulator
valve)Adjusts the oil pump delivery pressure to line pressure suited to the vehicle run-
ning condition on the basis of PCM output.
S
I
Power drive mode lampInforms the driver whether the vehicle is in power mode or not.
I
G-Winter drive mode lampInforms the driver whether the vehicle is in winter mode or not.G
N
A
L
T/M monitor lamp
(“CHECK TRANS”)Informs the driver of failure in the system.
LATF warning lampLights when ATF oil temperature rises.
ABS signal *When the select lever is at “Reverse” or “L” range, sends a signal to the ABS
controller as one of the ABS control conditions.
* If equipped
Page 2269 of 6000
7A1–24
TRANSMISSION CONTROL SYSTEM (4L30–E)
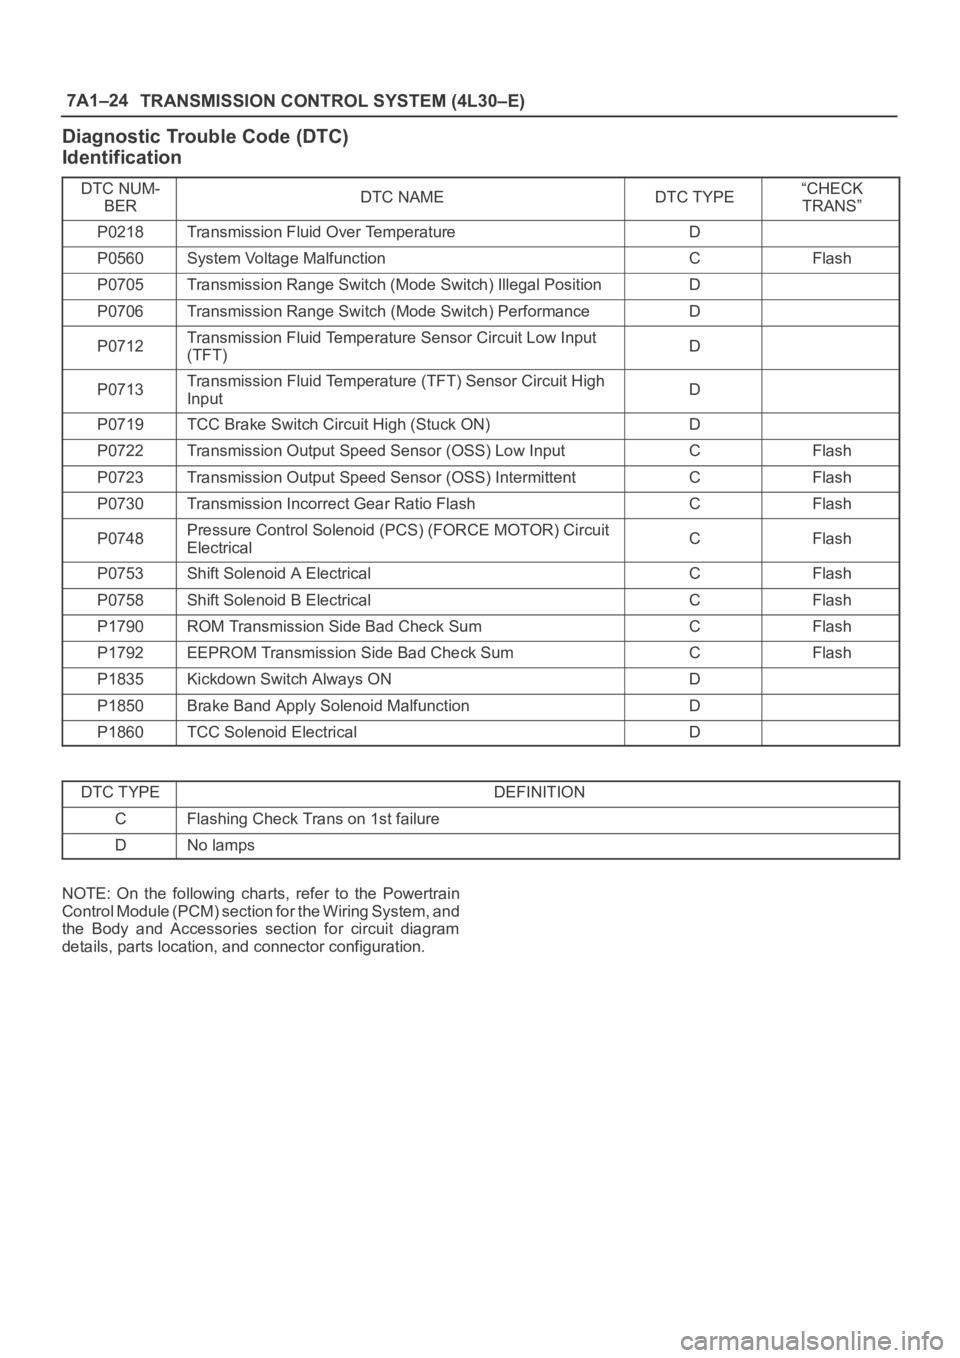
Diagnostic Trouble Code (DTC)
Identification
DTC NUM-
BERDTC NAMEDTC TYPE“CHECK
TRANS”
P0218Transmission Fluid Over TemperatureD
P0560System Voltage MalfunctionCFlash
P0705Transmission Range Switch (Mode Switch) Illegal PositionD
P0706Transmission Range Switch (Mode Switch) PerformanceD
P0712Transmission Fluid Temperature Sensor Circuit Low Input
(TFT)D
P0713Transmission Fluid Temperature (TFT) Sensor Circuit High
InputD
P0719TCC Brake Switch Circuit High (Stuck ON)D
P0722Transmission Output Speed Sensor (OSS) Low InputCFlash
P0723Transmission Output Speed Sensor (OSS) IntermittentCFlash
P0730Transmission Incorrect Gear Ratio FlashCFlash
P0748Pressure Control Solenoid (PCS) (FORCE MOTOR) Circuit
ElectricalCFlash
P0753Shift Solenoid A ElectricalCFlash
P0758Shift Solenoid B ElectricalCFlash
P1790ROM Transmission Side Bad Check SumCFlash
P1792EEPROM Transmission Side Bad Check SumCFlash
P1835Kickdown Switch Always OND
P1850Brake Band Apply Solenoid MalfunctionD
P1860TCC Solenoid ElectricalD
DTC TYPEDEFINITION
CFlashing Check Trans on 1st failure
DNo lamps
NOTE: On the following charts, refer to the Powertrain
Control Module (PCM) section for the Wiring System, and
the Body and Accessories section for circuit diagram
details, parts location, and connector configuration.
Page 2299 of 6000
7A1–54
TRANSMISSION CONTROL SYSTEM (4L30–E)
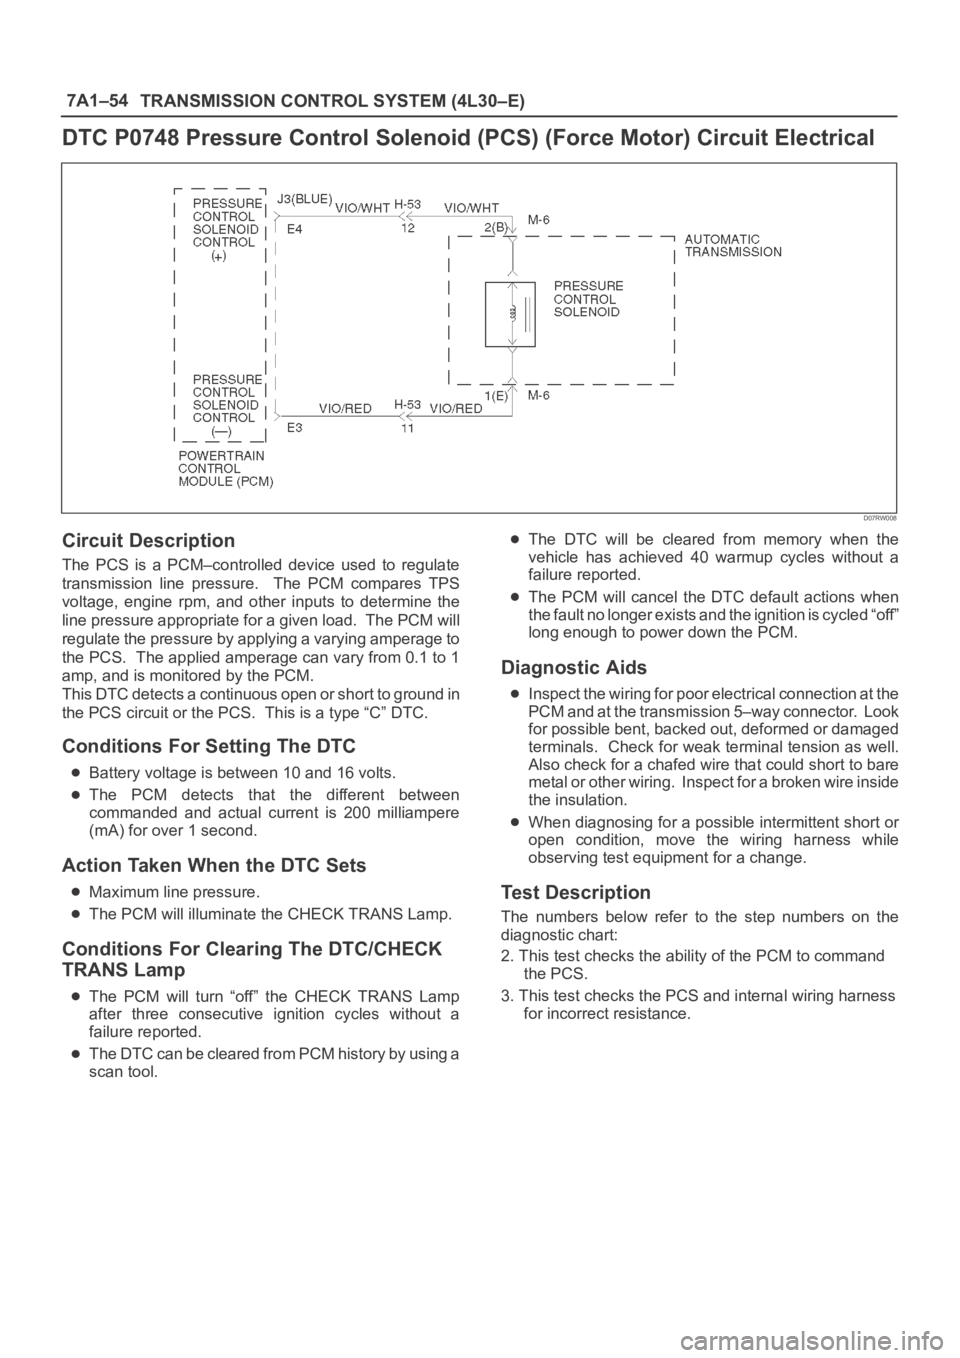
DTC P0748 Pressure Control Solenoid (PCS) (Force Motor) Circuit Electrical
D07RW008
Circuit Description
The PCS is a PCM–controlled device used to regulate
transmission line pressure. The PCM compares TPS
voltage, engine rpm, and other inputs to determine the
line pressure appropriate for a given load. The PCM will
regulate the pressure by applying a varying amperage to
the PCS. The applied amperage can vary from 0.1 to 1
amp, and is monitored by the PCM.
This DTC detects a continuous open or short to ground in
the PCS circuit or the PCS. This is a type “C” DTC.
Conditions For Setting The DTC
Battery voltage is between 10 and 16 volts.
The PCM detects that the different between
commanded and actual current is 200 milliampere
(mA) for over 1 second.
Action Taken When the DTC Sets
Maximum line pressure.
The PCM will illuminate the CHECK TRANS Lamp.
Conditions For Clearing The DTC/CHECK
TRANS Lamp
The PCM will turn “off” the CHECK TRANS Lamp
after three consecutive ignition cycles without a
failure reported.
The DTC can be cleared from PCM history by using a
scan tool.
The DTC will be cleared from memory when the
vehicle has achieved 40 warmup cycles without a
failure reported.
The PCM will cancel the DTC default actions when
the fault no longer exists and the ignition is cycled “off”
long enough to power down the PCM.
Diagnostic Aids
Inspect the wiring for poor electrical connection at the
PCM and at the transmission 5–way connector. Look
for possible bent, backed out, deformed or damaged
terminals. Check for weak terminal tension as well.
Also check for a chafed wire that could short to bare
m e t a l o r o t h e r w i r i n g . I n s p e c t f o r a b r o k e n w i r e i n s i d e
the insulation.
When diagnosing for a possible intermittent short or
open condition, move the wiring harness while
observing test equipment for a change.
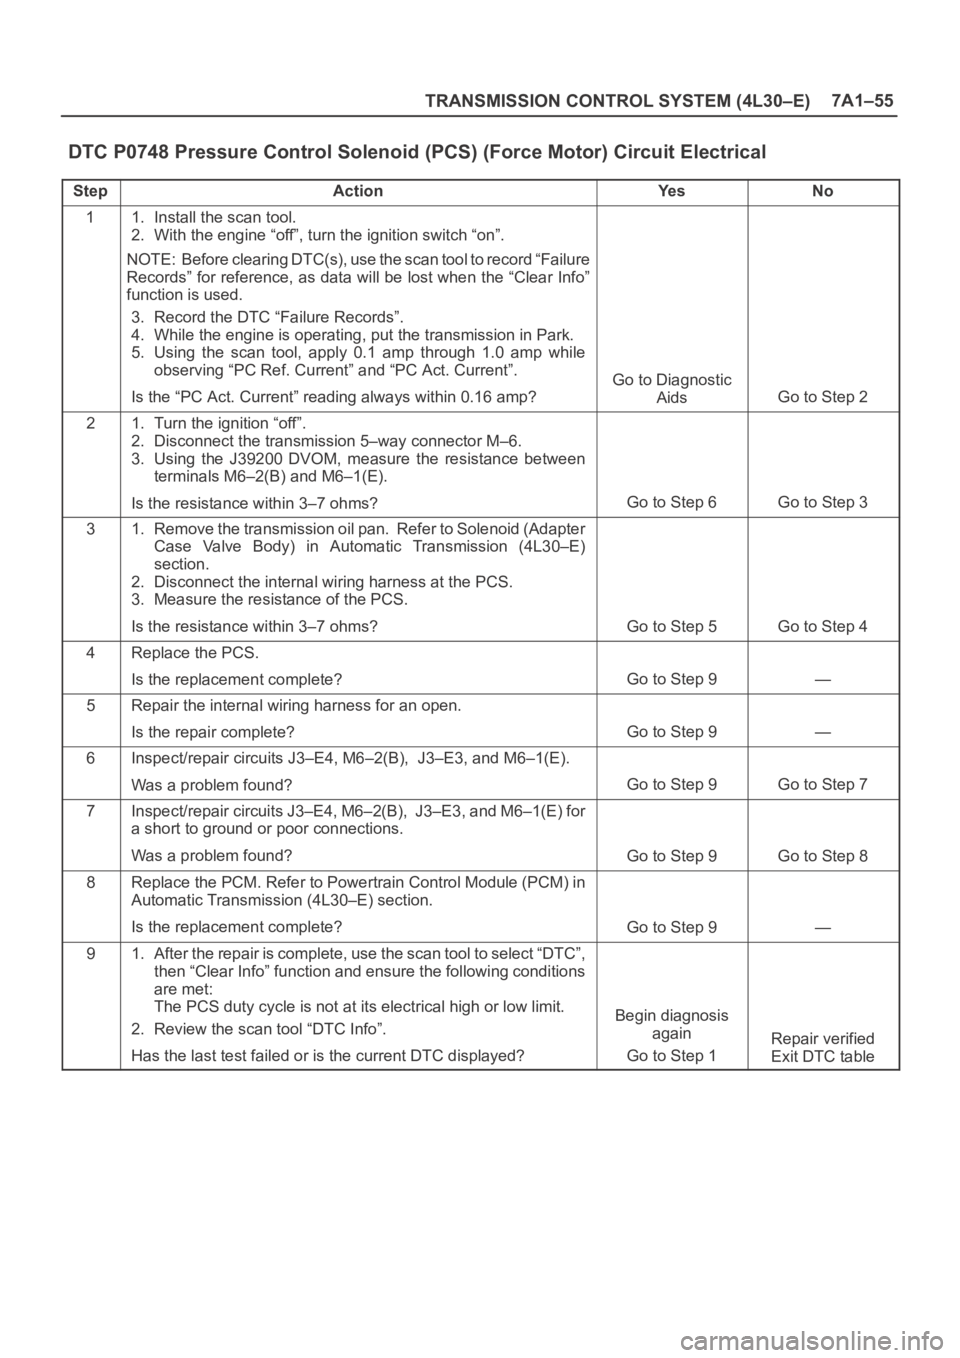
Test Description
The numbers below refer to the step numbers on the
diagnostic chart:
2. This test checks the ability of the PCM to command
the PCS.
3. This test checks the PCS and internal wiring harness
for incorrect resistance.
Page 2300 of 6000
TRANSMISSION CONTROL SYSTEM (4L30–E)7A1–55
DTC P0748 Pressure Control Solenoid (PCS) (Force Motor) Circuit Electrical
StepActionYe sNo
11. Install the scan tool.
2. With the engine “off”, turn the ignition switch “on”.
NOTE: Before clearing DTC(s), use the scan tool to record “Failure
Records” for reference, as data will be lost when the “Clear Info”
function is used.
3. Record the DTC “Failure Records”.
4. While the engine is operating, put the transmission in Park.
5. Using the scan tool, apply 0.1 amp through 1.0 amp while
observing “PC Ref. Current” and “PC Act. Current”.
Is the “PC Act. Current” reading always within 0.16 amp?
Go to Diagnostic
Aids
Go to Step 2
21. Turn the ignition “off”.
2. Disconnect the transmission 5–way connector M–6.
3. Using the J39200 DVOM, measure the resistance between
terminals M6–2(B) and M6–1(E).
Is the resistance within 3–7 ohms?
Go to Step 6Go to Step 3
31. Remove the transmission oil pan. Refer to Solenoid (Adapter
Case Valve Body) in Automatic Transmission (4L30–E)
section.
2. Disconnect the internal wiring harness at the PCS.
3. Measure the resistance of the PCS.
Is the resistance within 3–7 ohms?
Go to Step 5Go to Step 4
4Replace the PCS.
Is the replacement complete?
Go to Step 9—
5Repair the internal wiring harness for an open.
Is the repair complete?
Go to Step 9—
6Inspect/repair circuits J3–E4, M6–2(B), J3–E3, and M6–1(E).
Was a problem found?
Go to Step 9Go to Step 7
7Inspect/repair circuits J3–E4, M6–2(B), J3–E3, and M6–1(E) for
a short to ground or poor connections.
Was a problem found?
Go to Step 9Go to Step 8
8Replace the PCM. Refer to Powertrain Control Module (PCM) in
Automatic Transmission (4L30–E) section.
Is the replacement complete?
Go to Step 9—
91. After the repair is complete, use the scan tool to select “DTC”,
then “Clear Info” function and ensure the following conditions
are met:
The PCS duty cycle is not at its electrical high or low limit.
2. Review the scan tool “DTC Info”.
Has the last test failed or is the current DTC displayed?
Begin diagnosis
again
Go to Step 1
Repair verified
Exit DTC table
Page 2570 of 6000
WIPER/WASHER SYSTEM8B–1
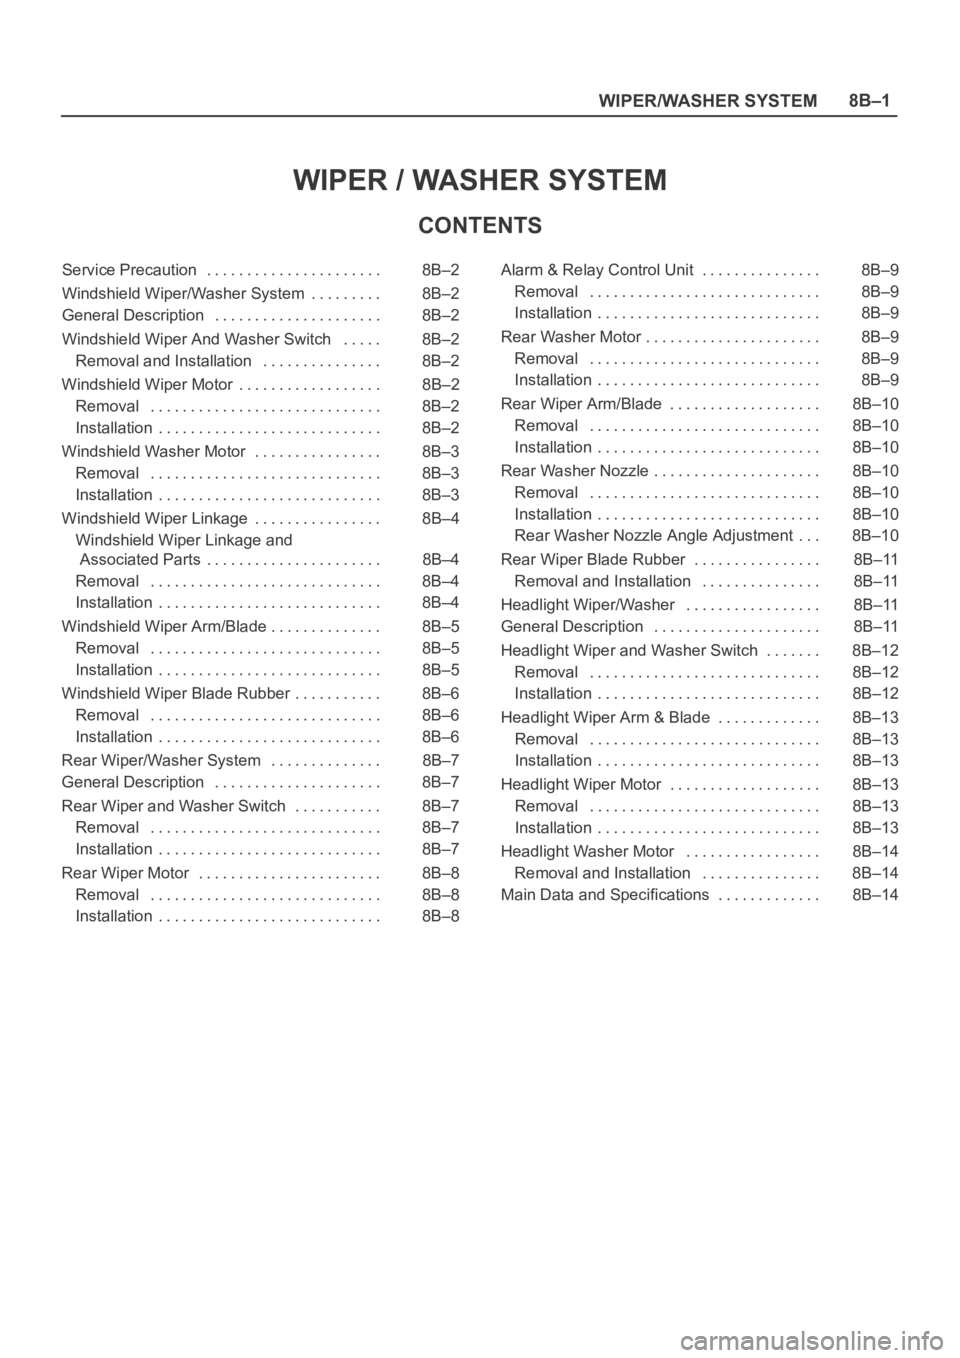
WIPER / WASHER SYSTEM
CONTENTS
Service Precaution 8B–2. . . . . . . . . . . . . . . . . . . . . .
Windshield Wiper/Washer System 8B–2. . . . . . . . .
General Description 8B–2. . . . . . . . . . . . . . . . . . . . .
Windshield Wiper And Washer Switch 8B–2. . . . .
Removal and Installation 8B–2. . . . . . . . . . . . . . .
Windshield Wiper Motor 8B–2. . . . . . . . . . . . . . . . . .
Removal 8B–2. . . . . . . . . . . . . . . . . . . . . . . . . . . . .
Installation 8B–2. . . . . . . . . . . . . . . . . . . . . . . . . . . .
Windshield Washer Motor 8B–3. . . . . . . . . . . . . . . .
Removal 8B–3. . . . . . . . . . . . . . . . . . . . . . . . . . . . .
Installation 8B–3. . . . . . . . . . . . . . . . . . . . . . . . . . . .
Windshield Wiper Linkage 8B–4. . . . . . . . . . . . . . . .
Windshield Wiper Linkage and
Associated Parts 8B–4. . . . . . . . . . . . . . . . . . . . . .
Removal 8B–4. . . . . . . . . . . . . . . . . . . . . . . . . . . . .
Installation 8B–4. . . . . . . . . . . . . . . . . . . . . . . . . . . .
Windshield Wiper Arm/Blade 8B–5. . . . . . . . . . . . . .
Removal 8B–5. . . . . . . . . . . . . . . . . . . . . . . . . . . . .
Installation 8B–5. . . . . . . . . . . . . . . . . . . . . . . . . . . .
Windshield Wiper Blade Rubber 8B–6. . . . . . . . . . .
Removal 8B–6. . . . . . . . . . . . . . . . . . . . . . . . . . . . .
Installation 8B–6. . . . . . . . . . . . . . . . . . . . . . . . . . . .
Rear Wiper/Washer System 8B–7. . . . . . . . . . . . . .
General Description 8B–7. . . . . . . . . . . . . . . . . . . . .
Rear Wiper and Washer Switch 8B–7. . . . . . . . . . .
Removal 8B–7. . . . . . . . . . . . . . . . . . . . . . . . . . . . .
Installation 8B–7. . . . . . . . . . . . . . . . . . . . . . . . . . . .
Rear Wiper Motor 8B–8. . . . . . . . . . . . . . . . . . . . . . .
Removal 8B–8. . . . . . . . . . . . . . . . . . . . . . . . . . . . .
Installation 8B–8. . . . . . . . . . . . . . . . . . . . . . . . . . . . Alarm & Relay Control Unit 8B–9. . . . . . . . . . . . . . .
Removal 8B–9. . . . . . . . . . . . . . . . . . . . . . . . . . . . .
Installation 8B–9. . . . . . . . . . . . . . . . . . . . . . . . . . . .
Rear Washer Motor 8B–9. . . . . . . . . . . . . . . . . . . . . .
Removal 8B–9. . . . . . . . . . . . . . . . . . . . . . . . . . . . .
Installation 8B–9. . . . . . . . . . . . . . . . . . . . . . . . . . . .
Rear Wiper Arm/Blade 8B–10. . . . . . . . . . . . . . . . . . .
Removal 8B–10. . . . . . . . . . . . . . . . . . . . . . . . . . . . .
Installation 8B–10. . . . . . . . . . . . . . . . . . . . . . . . . . . .
Rear Washer Nozzle 8B–10. . . . . . . . . . . . . . . . . . . . .
Removal 8B–10. . . . . . . . . . . . . . . . . . . . . . . . . . . . .
Installation 8B–10. . . . . . . . . . . . . . . . . . . . . . . . . . . .
Rear Washer Nozzle Angle Adjustment 8B–10. . .
Rear Wiper Blade Rubber 8B–11. . . . . . . . . . . . . . . .
Removal and Installation 8B–11. . . . . . . . . . . . . . .
Headlight Wiper/Washer 8B–11. . . . . . . . . . . . . . . . .
General Description 8B–11. . . . . . . . . . . . . . . . . . . . .
Headlight Wiper and Washer Switch 8B–12. . . . . . .
Removal 8B–12. . . . . . . . . . . . . . . . . . . . . . . . . . . . .
Installation 8B–12. . . . . . . . . . . . . . . . . . . . . . . . . . . .
Headlight Wiper Arm & Blade 8B–13. . . . . . . . . . . . .
Removal 8B–13. . . . . . . . . . . . . . . . . . . . . . . . . . . . .
Installation 8B–13. . . . . . . . . . . . . . . . . . . . . . . . . . . .
Headlight Wiper Motor 8B–13. . . . . . . . . . . . . . . . . . .
Removal 8B–13. . . . . . . . . . . . . . . . . . . . . . . . . . . . .
Installation 8B–13. . . . . . . . . . . . . . . . . . . . . . . . . . . .
Headlight Washer Motor 8B–14. . . . . . . . . . . . . . . . .
Removal and Installation 8B–14. . . . . . . . . . . . . . .
Main Data and Specifications 8B–14. . . . . . . . . . . . .
Page 2571 of 6000
8B–2WIPER/WASHER SYSTEM
Service Precaution
WARNING: IF SO EQUIPPED WITH A
SUPPLEMENTAL RESTRAINT SYSTEM (SRS),
REFER TO THE SRS COMPONENT AND WIRING
LOCATION VIEW IN ORDER TO DETERMINE
WHETHER YOU ARE PERFORMING SERVICE ON OR
NEAR THE SRS COMPONENTS OR THE SRS
WIRING. WHEN YOU ARE PERFORMING SERVICE
ON OR NEAR THE SRS COMPONENTS OR THE SRS
WIRING, REFER TO THE SRS SERVICE
INFORMATION. FAILURE TO FOLLOW WARNINGS
COULD RESULT IN POSSIBLE AIR BAG
DEPLOYMENT, PERSONAL INJURY, OR
OTHERWISE UNNEEDED SRS SYSTEM REPAIRS.CAUTION: Always use the correct fastener in the
proper location. When you replace a fastener, use
ONLY the exact part number for that application.
ISUZU will call out those fasteners that require a
replacement after removal. ISUZU will also call out
the fasteners that require thread lockers or thread
sealant. UNLESS OTHERWISE SPECIFIED, do not
use supplemental coatings (Paints, greases, or other
corrosion inhibitors) on threaded fasteners or
fastener joint interfaces. Generally, such coatings
adversely affect the fastener torque and the joint
clamping force, and may damage the fastener. When
you install fasteners, use the correct tightening
sequence and specifications. Following these
instructions can help you avoid damage to parts and
systems.
Windshield Wiper/Washer System
General Description
The circuit consists of the starter switch, windshield wiper
& washer switch, windshield wiper motor, windshield
washer motor and windshield intermittent relay.When the wiper & washer switch is turned on with the
starter switch on, the battery voltage is applied to the
wiper motor to activate the wiper.
The washer motor squirts glass cleaning fluid while the
washer switch is being pushed. The intermittent relay is
used to control motion of the wiper.
Windshield Wiper And Washer Switch
Removal and Installation
Refer to the Lighting Switch (Combination Switch) in
Lighting System section.
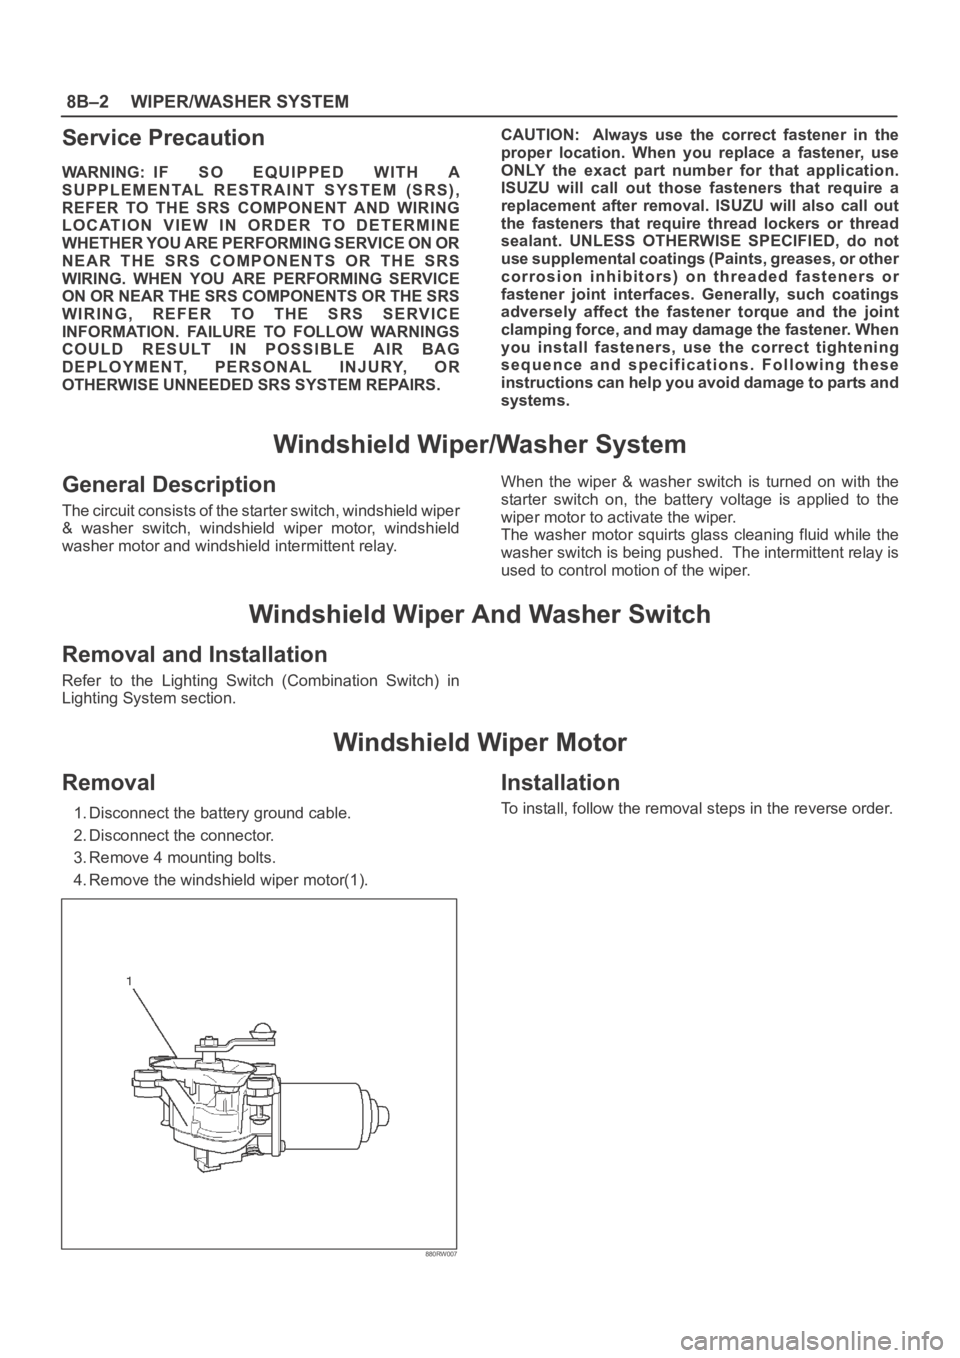
Windshield Wiper Motor
Removal
1. Disconnect the battery ground cable.
2. Disconnect the connector.
3. Remove 4 mounting bolts.
4. Remove the windshield wiper motor(1).
880RW007
Installation
To install, follow the removal steps in the reverse order.
Page 2572 of 6000
WIPER/WASHER SYSTEM8B–3
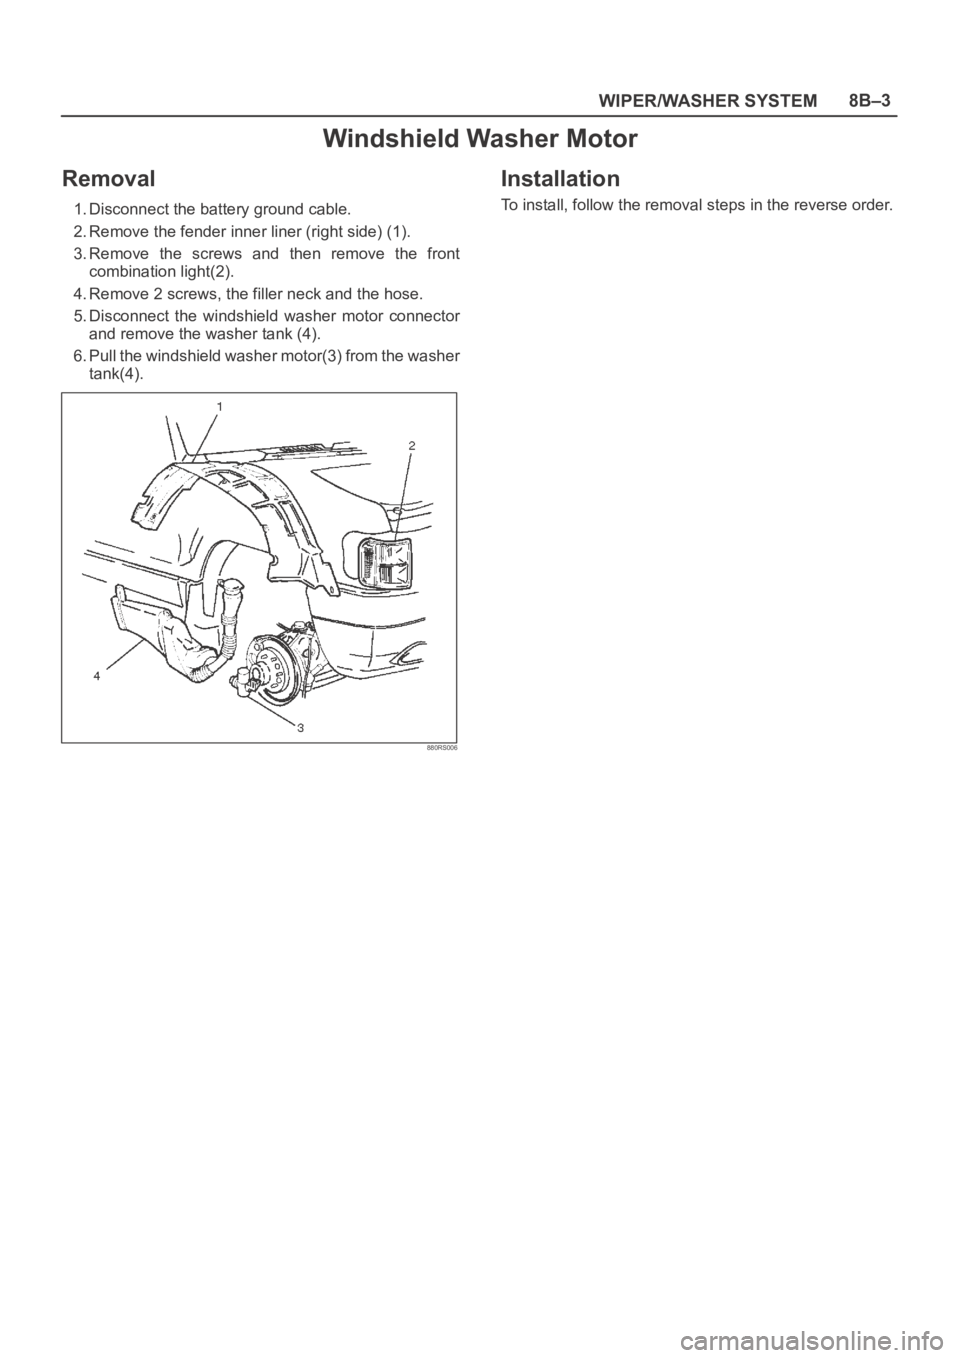
Windshield Washer Motor
Removal
1. Disconnect the battery ground cable.
2. Remove the fender inner liner (right side) (1).
3. Remove the screws and then remove the front
combination light(2).
4. Remove 2 screws, the filler neck and the hose.
5. Disconnect the windshield washer motor connector
and remove the washer tank (4).
6. Pull the windshield washer motor(3) from the washer
tank(4).
880RS006
Installation
To install, follow the removal steps in the reverse order.