1998 NISSAN PICK-UP fuel pressure
[x] Cancel search: fuel pressurePage 977 of 1659
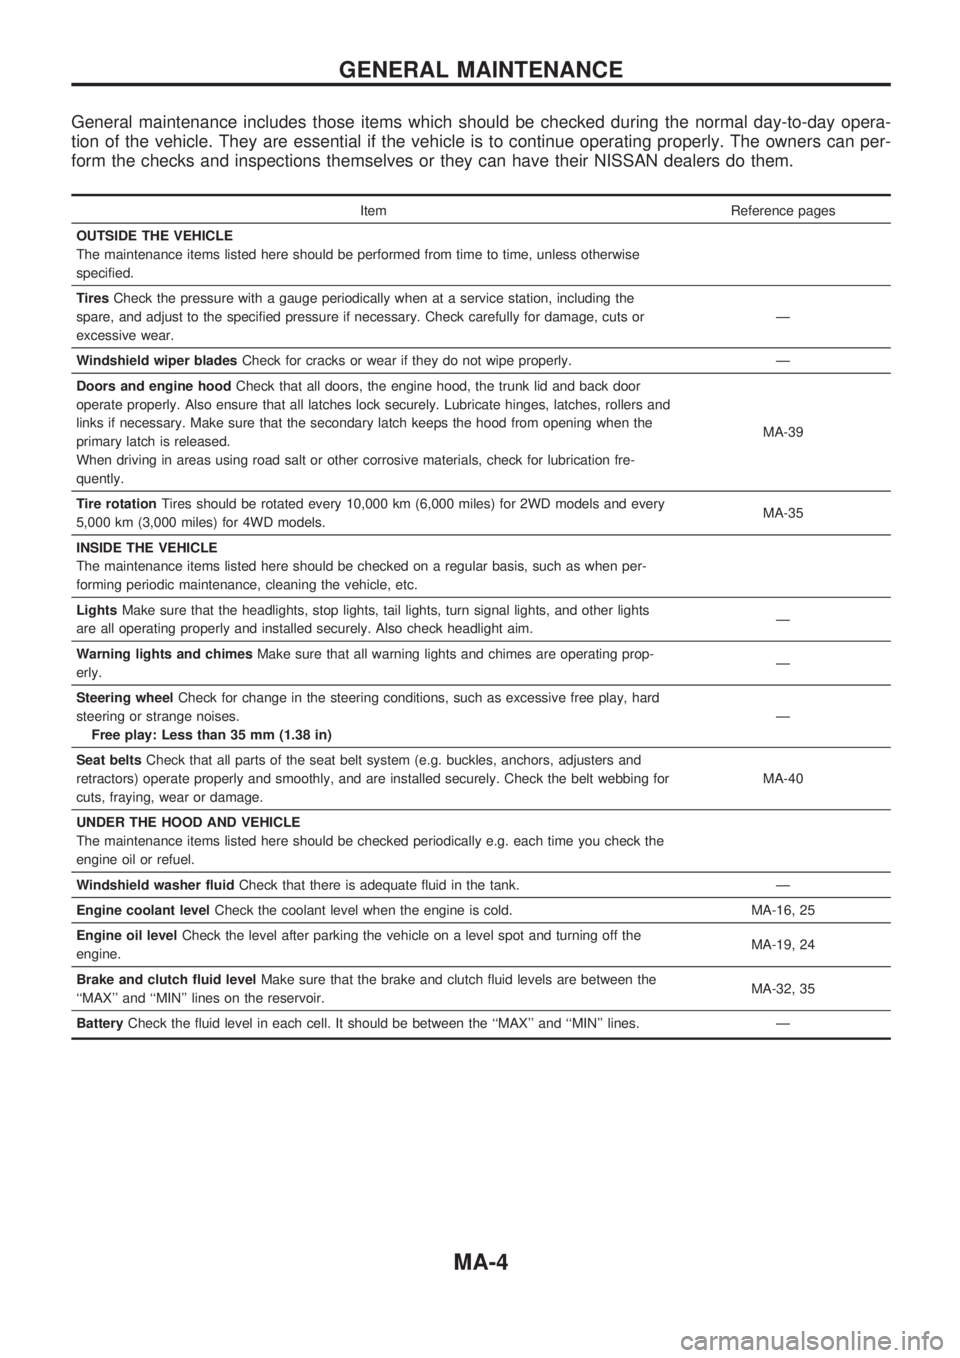
General maintenance includes those items which should be checked during the normal day-to-day opera-
tion of the vehicle. They are essential if the vehicle is to continue operating properly. The owners can per-
form the checks and inspections themselves or they can have their NISSAN dealers do them.
Item Reference pages
OUTSIDE THE VEHICLE
The maintenance items listed here should be performed from time to time, unless otherwise
specified.
TiresCheck the pressure with a gauge periodically when at a service station, including the
spare, and adjust to the specified pressure if necessary. Check carefully for damage, cuts or
excessive wear.Ð
Windshield wiper bladesCheck for cracks or wear if they do not wipe properly. Ð
Doors and engine hoodCheck that all doors, the engine hood, the trunk lid and back door
operate properly. Also ensure that all latches lock securely. Lubricate hinges, latches, rollers and
links if necessary. Make sure that the secondary latch keeps the hood from opening when the
primary latch is released.
When driving in areas using road salt or other corrosive materials, check for lubrication fre-
quently.MA-39
Tire rotationTires should be rotated every 10,000 km (6,000 miles) for 2WD models and every
5,000 km (3,000 miles) for 4WD models.MA-35
INSIDE THE VEHICLE
The maintenance items listed here should be checked on a regular basis, such as when per-
forming periodic maintenance, cleaning the vehicle, etc.
LightsMake sure that the headlights, stop lights, tail lights, turn signal lights, and other lights
are all operating properly and installed securely. Also check headlight aim.Ð
Warning lights and chimesMake sure that all warning lights and chimes are operating prop-
erly.Ð
Steering wheelCheck for change in the steering conditions, such as excessive free play, hard
steering or strange noises.
Free play: Less than 35 mm (1.38 in)Ð
Seat beltsCheck that all parts of the seat belt system (e.g. buckles, anchors, adjusters and
retractors) operate properly and smoothly, and are installed securely. Check the belt webbing for
cuts, fraying, wear or damage.MA-40
UNDER THE HOOD AND VEHICLE
The maintenance items listed here should be checked periodically e.g. each time you check the
engine oil or refuel.
Windshield washer fluidCheck that there is adequate fluid in the tank. Ð
Engine coolant levelCheck the coolant level when the engine is cold. MA-16, 25
Engine oil levelCheck the level after parking the vehicle on a level spot and turning off the
engine.MA-19, 24
Brake and clutch fluid levelMake sure that the brake and clutch fluid levels are between the
``MAX'' and ``MIN'' lines on the reservoir.MA-32, 35
BatteryCheck the fluid level in each cell. It should be between the ``MAX'' and ``MIN'' lines. Ð
GENERAL MAINTENANCE
MA-4
Page 981 of 1659
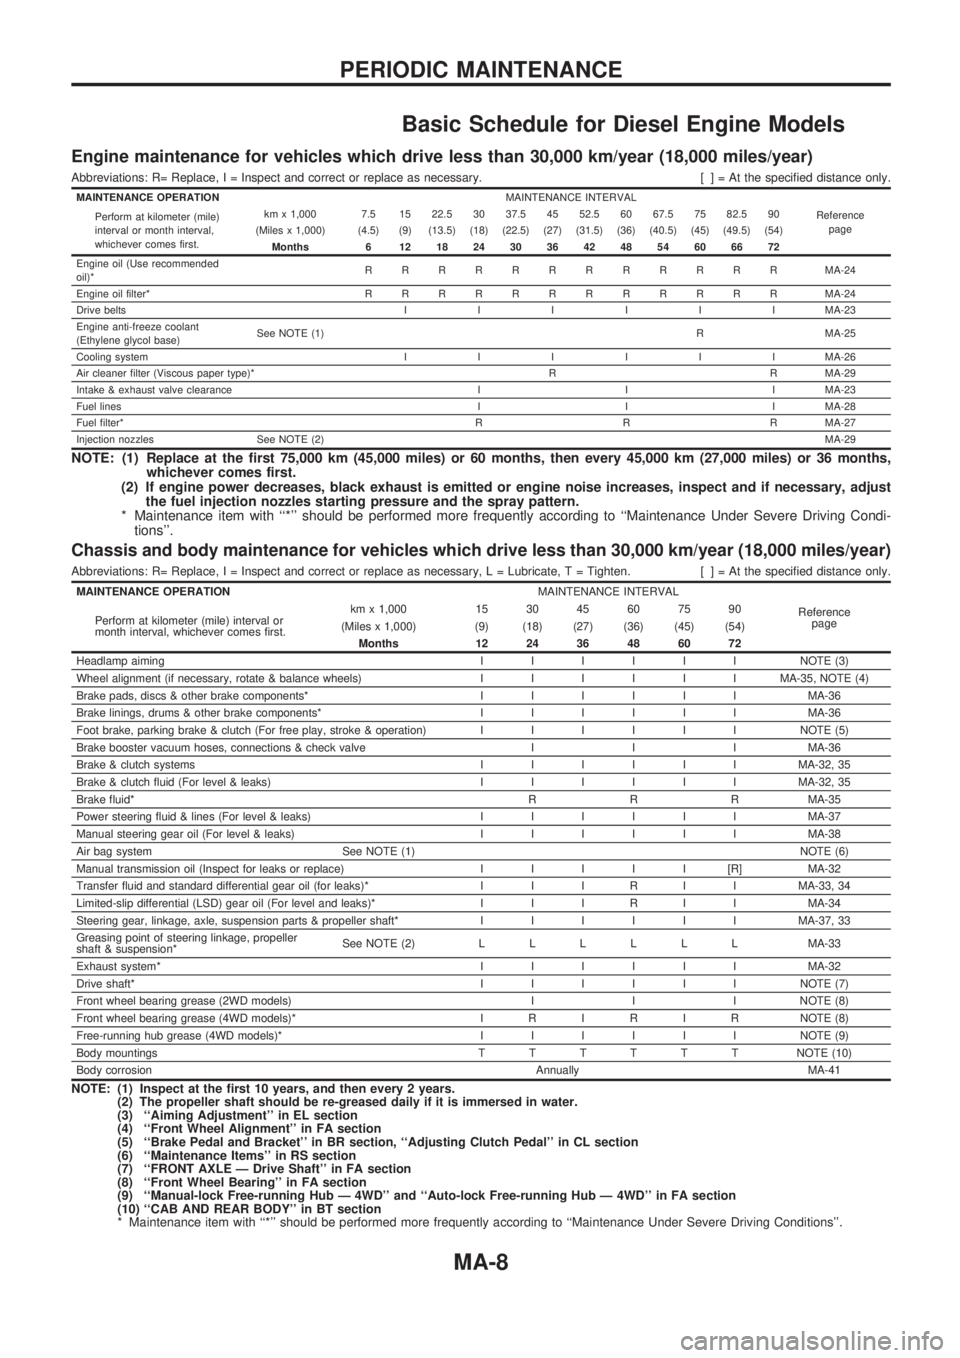
Basic Schedule for Diesel Engine Models
Engine maintenance for vehicles which drive less than 30,000 km/year (18,000 miles/year)
Abbreviations: R= Replace, I = Inspect and correct or replace as necessary. [ ] = At the specified distance only.
MAINTENANCE OPERATIONMAINTENANCE INTERVAL
Reference
page Perform at kilometer (mile)
interval or month interval,
whichever comes first.km x 1,000 7.5 15 22.5 30 37.5 45 52.5 60 67.5 75 82.5 90
(Miles x 1,000) (4.5) (9) (13.5) (18) (22.5) (27) (31.5) (36) (40.5) (45) (49.5) (54)
Months 6 12 18 24 30 36 42 48 54 60 66 72
Engine oil (Use recommended
oil)*RRRRRRRRRRRRMA-24
Engine oil filter*RRRRRRRRRRRRMA-24
Drive beltsIIIIIIMA-23
Engine anti-freeze coolant
(Ethylene glycol base)See NOTE (1)R MA-25
Cooling systemIIIIIIMA-26
Air cleaner filter (Viscous paper type)* R R MA-29
Intake & exhaust valve clearance I I I MA-23
Fuel linesI I I MA-28
Fuel filter*R R R MA-27
Injection nozzles See NOTE (2)MA-29
NOTE: (1) Replace at the first 75,000 km (45,000 miles) or 60 months, then every 45,000 km (27,000 miles) or 36 months,
whichever comes first.
(2) If engine power decreases, black exhaust is emitted or engine noise increases, inspect and if necessary, adjust
the fuel injection nozzles starting pressure and the spray pattern.
* Maintenance item with ``*'' should be performed more frequently according to ``Maintenance Under Severe Driving Condi-
tions''.
Chassis and body maintenance for vehicles which drive less than 30,000 km/year (18,000 miles/year)
Abbreviations: R= Replace, I = Inspect and correct or replace as necessary, L = Lubricate, T = Tighten. [ ] = At the specified distance only.
MAINTENANCE OPERATIONMAINTENANCE INTERVAL
Reference
page Perform at kilometer (mile) interval or
month interval, whichever comes first.km x 1,000 15 30 45 60 75 90
(Miles x 1,000) (9) (18) (27) (36) (45) (54)
Months 12 24 36 48 60 72
Headlamp aimingIIIIIINOTE (3)
Wheel alignment (if necessary, rotate & balance wheels)IIIIIIMA-35, NOTE (4)
Brake pads, discs & other brake components*IIIIIIMA-36
Brake linings, drums & other brake components*IIIIIIMA-36
Foot brake, parking brake & clutch (For free play, stroke & operation)IIIIIINOTE (5)
Brake booster vacuum hoses, connections & check valve I I I MA-36
Brake & clutch systemsIIIIIIMA-32, 35
Brake & clutch fluid (For level & leaks)IIIIIIMA-32, 35
Brake fluid*R R R MA-35
Power steering fluid & lines (For level & leaks)IIIIIIMA-37
Manual steering gear oil (For level & leaks)IIIIIIMA-38
Air bag system See NOTE (1)NOTE (6)
Manual transmission oil (Inspect for leaks or replace)IIIII[R]MA-32
Transfer fluid and standard differential gear oil (for leaks)* I I I R I I MA-33, 34
Limited-slip differential (LSD) gear oil (For level and leaks)* I I I R I I MA-34
Steering gear, linkage, axle, suspension parts & propeller shaft*IIIIIIMA-37, 33
Greasing point of steering linkage, propeller
shaft & suspension*See NOTE (2)LLLLLLMA-33
Exhaust system*IIIIIIMA-32
Drive shaft*IIIIIINOTE (7)
Front wheel bearing grease (2WD models) I I I NOTE (8)
Front wheel bearing grease (4WD models)* I R I R I R NOTE (8)
Free-running hub grease (4WD models)*IIIIIINOTE (9)
Body mountingsTTTTTTNOTE (10)
Body corrosionAnnually MA-41
NOTE: (1) Inspect at the first 10 years, and then every 2 years.
(2) The propeller shaft should be re-greased daily if it is immersed in water.
(3) ``Aiming Adjustment'' in EL section
(4) ``Front Wheel Alignment'' in FA section
(5) ``Brake Pedal and Bracket'' in BR section, ``Adjusting Clutch Pedal'' in CL section
(6) ``Maintenance Items'' in RS section
(7) ``FRONT AXLE Ð Drive Shaft'' in FA section
(8) ``Front Wheel Bearing'' in FA section
(9) ``Manual-lock Free-running Hub Ð 4WD'' and ``Auto-lock Free-running Hub Ð 4WD'' in FA section
(10) ``CAB AND REAR BODY'' in BT section
* Maintenance item with ``*'' should be performed more frequently according to ``Maintenance Under Severe Driving Conditions''.
PERIODIC MAINTENANCE
MA-8
Page 982 of 1659
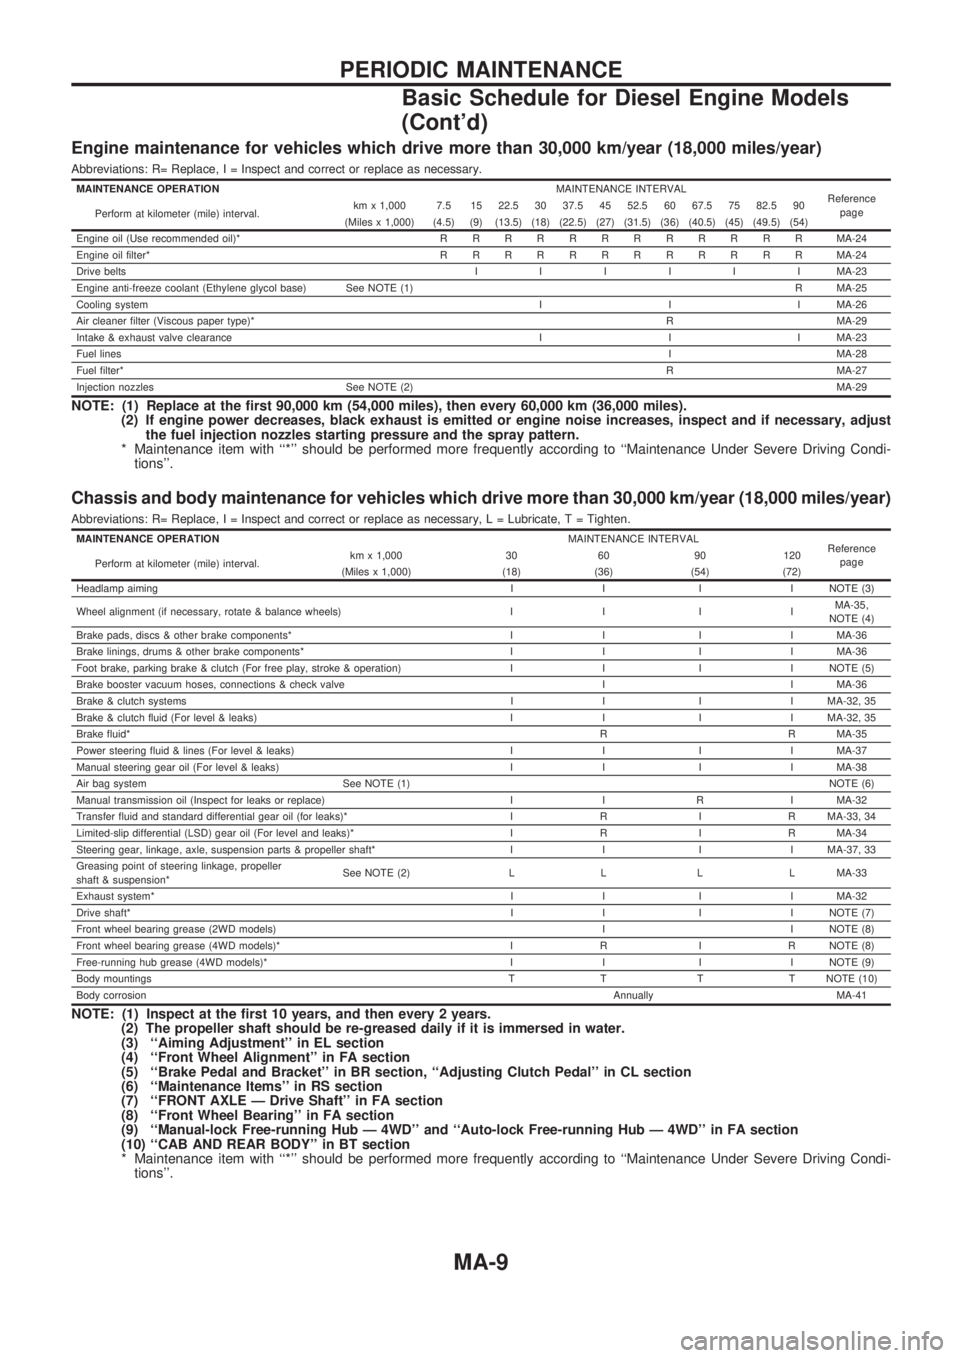
Engine maintenance for vehicles which drive more than 30,000 km/year (18,000 miles/year)
Abbreviations: R= Replace, I = Inspect and correct or replace as necessary.
MAINTENANCE OPERATIONMAINTENANCE INTERVAL
Reference
page
Perform at kilometer (mile) interval.km x 1,000 7.5 15 22.5 30 37.5 45 52.5 60 67.5 75 82.5 90
(Miles x 1,000) (4.5) (9) (13.5) (18) (22.5) (27) (31.5) (36) (40.5) (45) (49.5) (54)
Engine oil (Use recommended oil)*RRRRRRRRRRRRMA-24
Engine oil filter*RRRRRRRRRRRRMA-24
Drive beltsIIIIIIMA-23
Engine anti-freeze coolant (Ethylene glycol base) See NOTE (1)R MA-25
Cooling systemI I I MA-26
Air cleaner filter (Viscous paper type)*R MA-29
Intake & exhaust valve clearance I I I MA-23
Fuel linesI MA-28
Fuel filter*R MA-27
Injection nozzles See NOTE (2)MA-29
NOTE: (1) Replace at the first 90,000 km (54,000 miles), then every 60,000 km (36,000 miles).
(2) If engine power decreases, black exhaust is emitted or engine noise increases, inspect and if necessary, adjust
the fuel injection nozzles starting pressure and the spray pattern.
* Maintenance item with ``*'' should be performed more frequently according to ``Maintenance Under Severe Driving Condi-
tions''.
Chassis and body maintenance for vehicles which drive more than 30,000 km/year (18,000 miles/year)
Abbreviations: R= Replace, I = Inspect and correct or replace as necessary, L = Lubricate, T = Tighten.
MAINTENANCE OPERATIONMAINTENANCE INTERVAL
Reference
page
Perform at kilometer (mile) interval.km x 1,000 30 60 90 120
(Miles x 1,000) (18) (36) (54) (72)
Headlamp aimingI I I I NOTE (3)
Wheel alignment (if necessary, rotate & balance wheels) I I I IMA-35,
NOTE (4)
Brake pads, discs & other brake components* I I I I MA-36
Brake linings, drums & other brake components* I I I I MA-36
Foot brake, parking brake & clutch (For free play, stroke & operation) I I I I NOTE (5)
Brake booster vacuum hoses, connections & check valve I I MA-36
Brake & clutch systems I I I I MA-32, 35
Brake & clutch fluid (For level & leaks) I I I I MA-32, 35
Brake fluid*R R MA-35
Power steering fluid & lines (For level & leaks) I I I I MA-37
Manual steering gear oil (For level & leaks) I I I I MA-38
Air bag system See NOTE (1)NOTE (6)
Manual transmission oil (Inspect for leaks or replace) I I R I MA-32
Transfer fluid and standard differential gear oil (for leaks)* I R I R MA-33, 34
Limited-slip differential (LSD) gear oil (For level and leaks)* I R I R MA-34
Steering gear, linkage, axle, suspension parts & propeller shaft* I I I I MA-37, 33
Greasing point of steering linkage, propeller
shaft & suspension*See NOTE (2) L L L L MA-33
Exhaust system*I I I I MA-32
Drive shaft*I I I I NOTE (7)
Front wheel bearing grease (2WD models) I I NOTE (8)
Front wheel bearing grease (4WD models)* I R I R NOTE (8)
Free-running hub grease (4WD models)* I I I I NOTE (9)
Body mountingsT T T T NOTE (10)
Body corrosionAnnually MA-41
NOTE: (1) Inspect at the first 10 years, and then every 2 years.
(2) The propeller shaft should be re-greased daily if it is immersed in water.
(3) ``Aiming Adjustment'' in EL section
(4) ``Front Wheel Alignment'' in FA section
(5) ``Brake Pedal and Bracket'' in BR section, ``Adjusting Clutch Pedal'' in CL section
(6) ``Maintenance Items'' in RS section
(7) ``FRONT AXLE Ð Drive Shaft'' in FA section
(8) ``Front Wheel Bearing'' in FA section
(9) ``Manual-lock Free-running Hub Ð 4WD'' and ``Auto-lock Free-running Hub Ð 4WD'' in FA section
(10) ``CAB AND REAR BODY'' in BT section
* Maintenance item with ``*'' should be performed more frequently according to ``Maintenance Under Severe Driving Condi-
tions''.
PERIODIC MAINTENANCE
Basic Schedule for Diesel Engine Models
(Cont'd)
MA-9
Page 991 of 1659
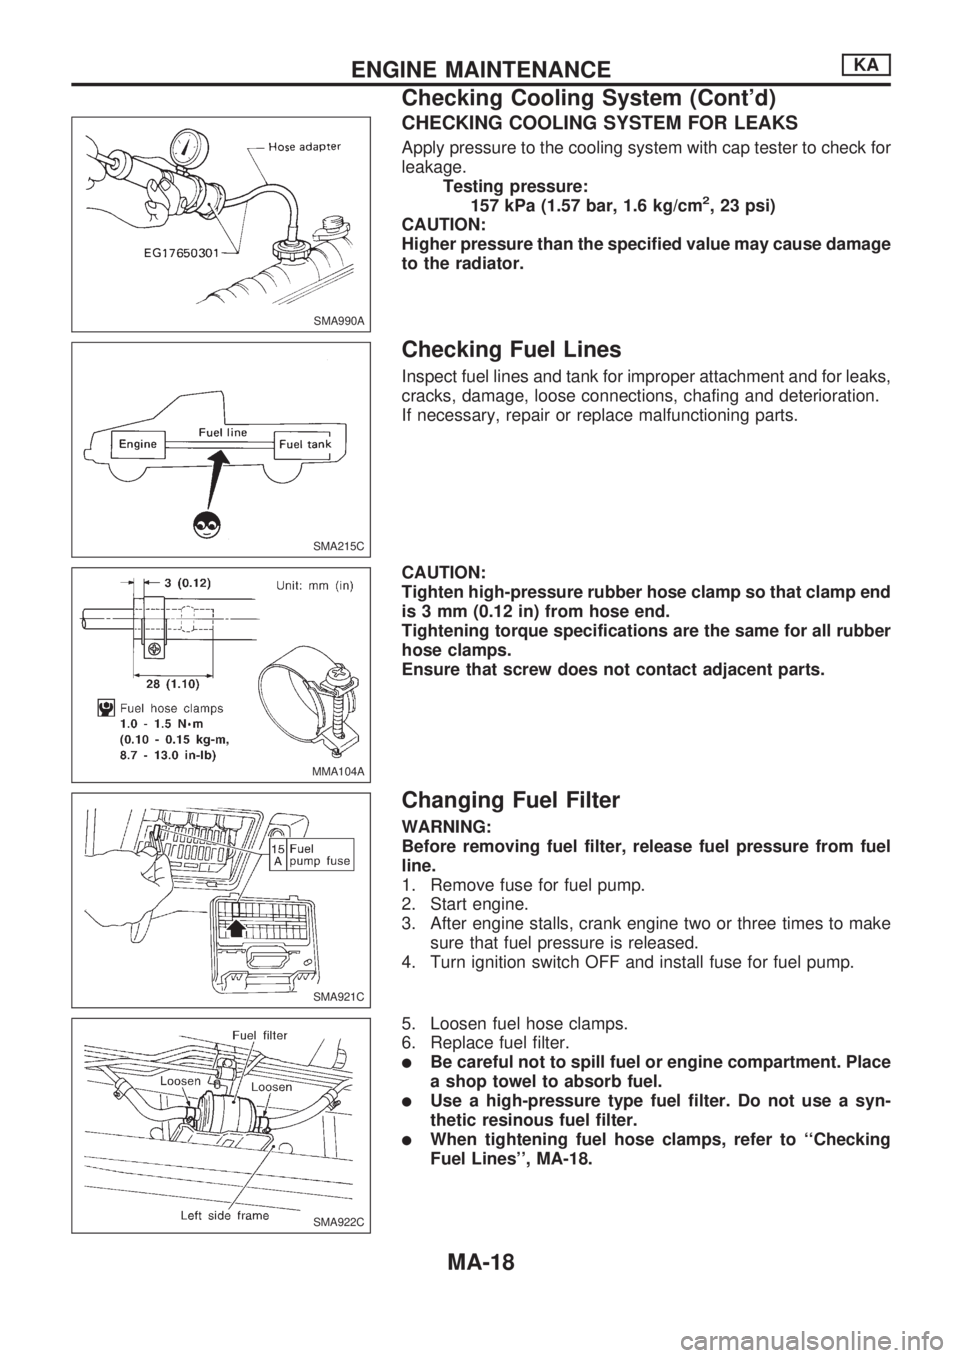
CHECKING COOLING SYSTEM FOR LEAKS
Apply pressure to the cooling system with cap tester to check for
leakage.
Testing pressure:
157 kPa (1.57 bar, 1.6 kg/cm
2, 23 psi)
CAUTION:
Higher pressure than the specified value may cause damage
to the radiator.
Checking Fuel Lines
Inspect fuel lines and tank for improper attachment and for leaks,
cracks, damage, loose connections, chafing and deterioration.
If necessary, repair or replace malfunctioning parts.
CAUTION:
Tighten high-pressure rubber hose clamp so that clamp end
is 3 mm (0.12 in) from hose end.
Tightening torque specifications are the same for all rubber
hose clamps.
Ensure that screw does not contact adjacent parts.
Changing Fuel Filter
WARNING:
Before removing fuel filter, release fuel pressure from fuel
line.
1. Remove fuse for fuel pump.
2. Start engine.
3. After engine stalls, crank engine two or three times to make
sure that fuel pressure is released.
4. Turn ignition switch OFF and install fuse for fuel pump.
5. Loosen fuel hose clamps.
6. Replace fuel filter.
lBe careful not to spill fuel or engine compartment. Place
a shop towel to absorb fuel.
lUse a high-pressure type fuel filter. Do not use a syn-
thetic resinous fuel filter.
lWhen tightening fuel hose clamps, refer to ``Checking
Fuel Lines'', MA-18.
SMA990A
SMA215C
MMA104A
SMA921C
SMA922C
ENGINE MAINTENANCEKA
Checking Cooling System (Cont'd)
MA-18
Page 1000 of 1659
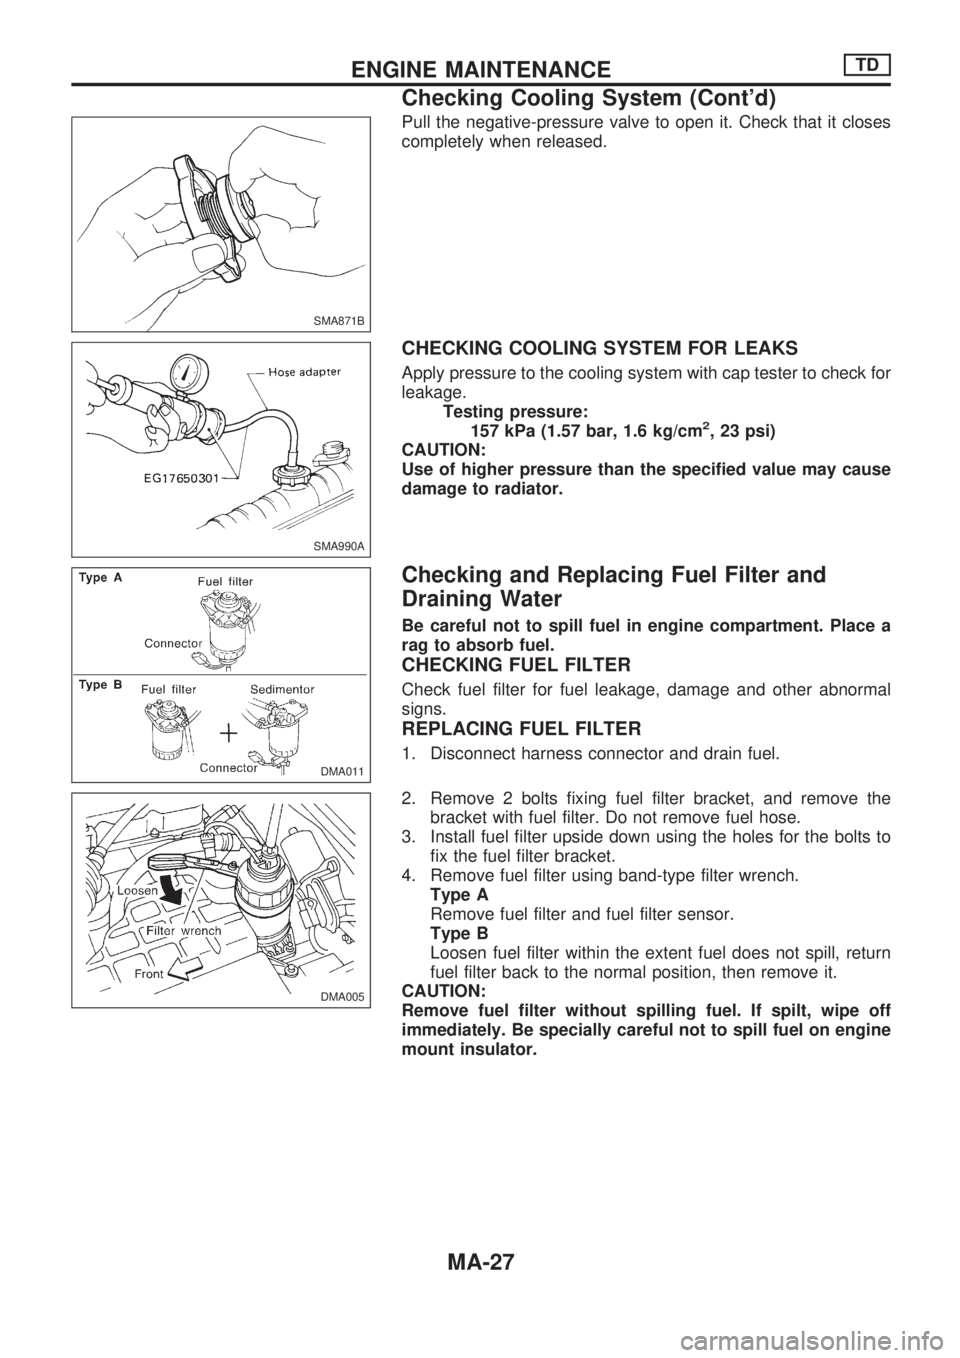
Pull the negative-pressure valve to open it. Check that it closes
completely when released.
CHECKING COOLING SYSTEM FOR LEAKS
Apply pressure to the cooling system with cap tester to check for
leakage.
Testing pressure:
157 kPa (1.57 bar, 1.6 kg/cm
2, 23 psi)
CAUTION:
Use of higher pressure than the specified value may cause
damage to radiator.
Checking and Replacing Fuel Filter and
Draining Water
Be careful not to spill fuel in engine compartment. Place a
rag to absorb fuel.
CHECKING FUEL FILTER
Check fuel filter for fuel leakage, damage and other abnormal
signs.
REPLACING FUEL FILTER
1. Disconnect harness connector and drain fuel.
2. Remove 2 bolts fixing fuel filter bracket, and remove the
bracket with fuel filter. Do not remove fuel hose.
3. Install fuel filter upside down using the holes for the bolts to
fix the fuel filter bracket.
4. Remove fuel filter using band-type filter wrench.
Type A
Remove fuel filter and fuel filter sensor.
Type B
Loosen fuel filter within the extent fuel does not spill, return
fuel filter back to the normal position, then remove it.
CAUTION:
Remove fuel filter without spilling fuel. If spilt, wipe off
immediately. Be specially careful not to spill fuel on engine
mount insulator.
SMA871B
SMA990A
DMA011
DMA005
ENGINE MAINTENANCETD
Checking Cooling System (Cont'd)
MA-27
Page 1002 of 1659
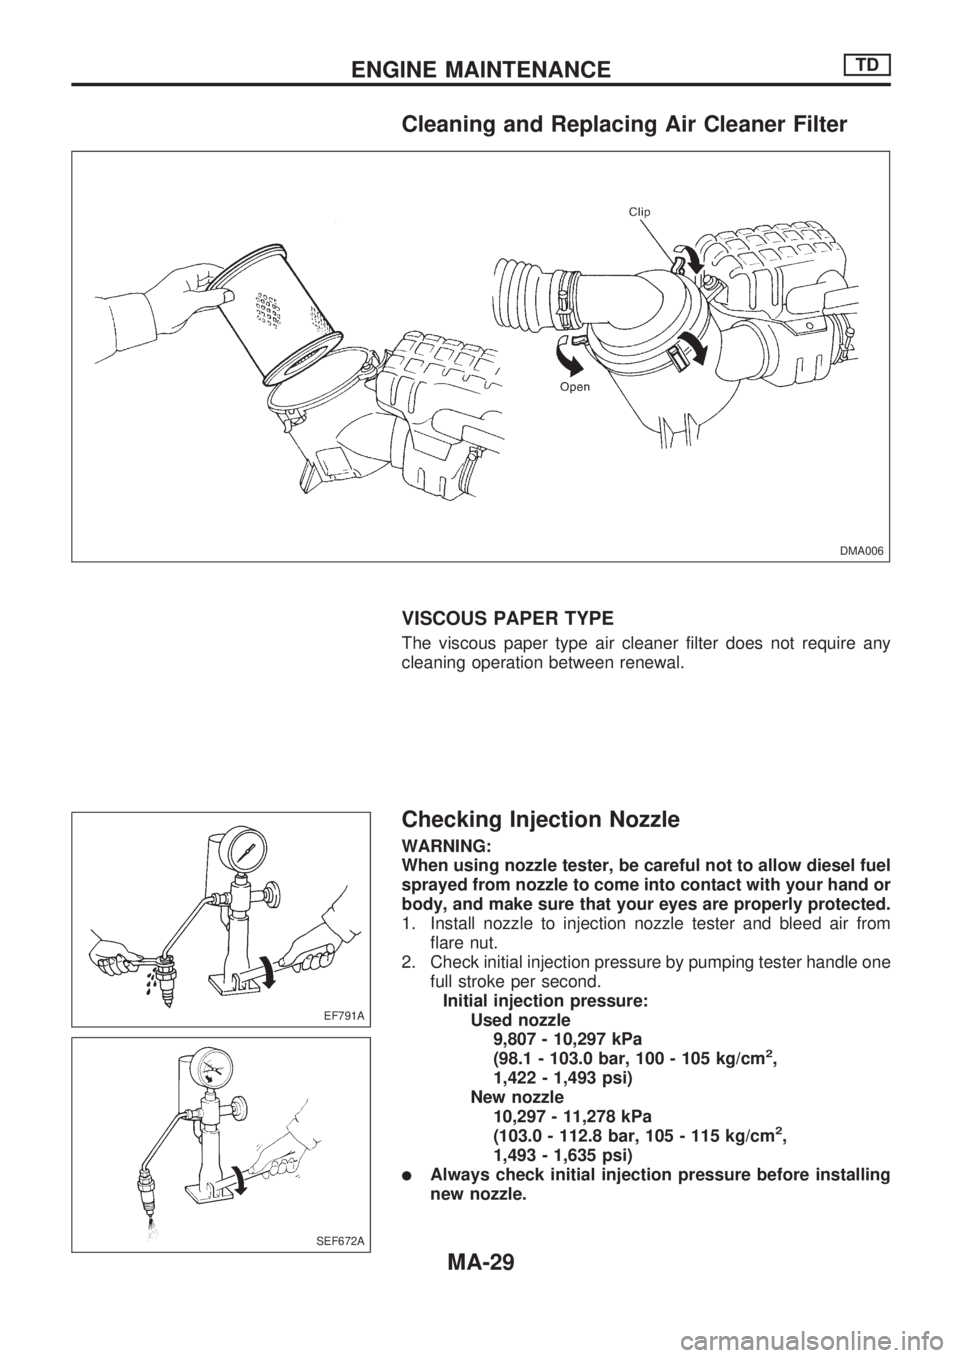
Cleaning and Replacing Air Cleaner Filter
VISCOUS PAPER TYPE
The viscous paper type air cleaner filter does not require any
cleaning operation between renewal.
Checking Injection Nozzle
WARNING:
When using nozzle tester, be careful not to allow diesel fuel
sprayed from nozzle to come into contact with your hand or
body, and make sure that your eyes are properly protected.
1. Install nozzle to injection nozzle tester and bleed air from
flare nut.
2. Check initial injection pressure by pumping tester handle one
full stroke per second.
Initial injection pressure:
Used nozzle
9,807 - 10,297 kPa
(98.1 - 103.0 bar, 100 - 105 kg/cm
2,
1,422 - 1,493 psi)
New nozzle
10,297 - 11,278 kPa
(103.0 - 112.8 bar, 105 - 115 kg/cm
2,
1,493 - 1,635 psi)
lAlways check initial injection pressure before installing
new nozzle.
DMA006
EF791A
SEF672A
ENGINE MAINTENANCETD
MA-29
Page 1003 of 1659
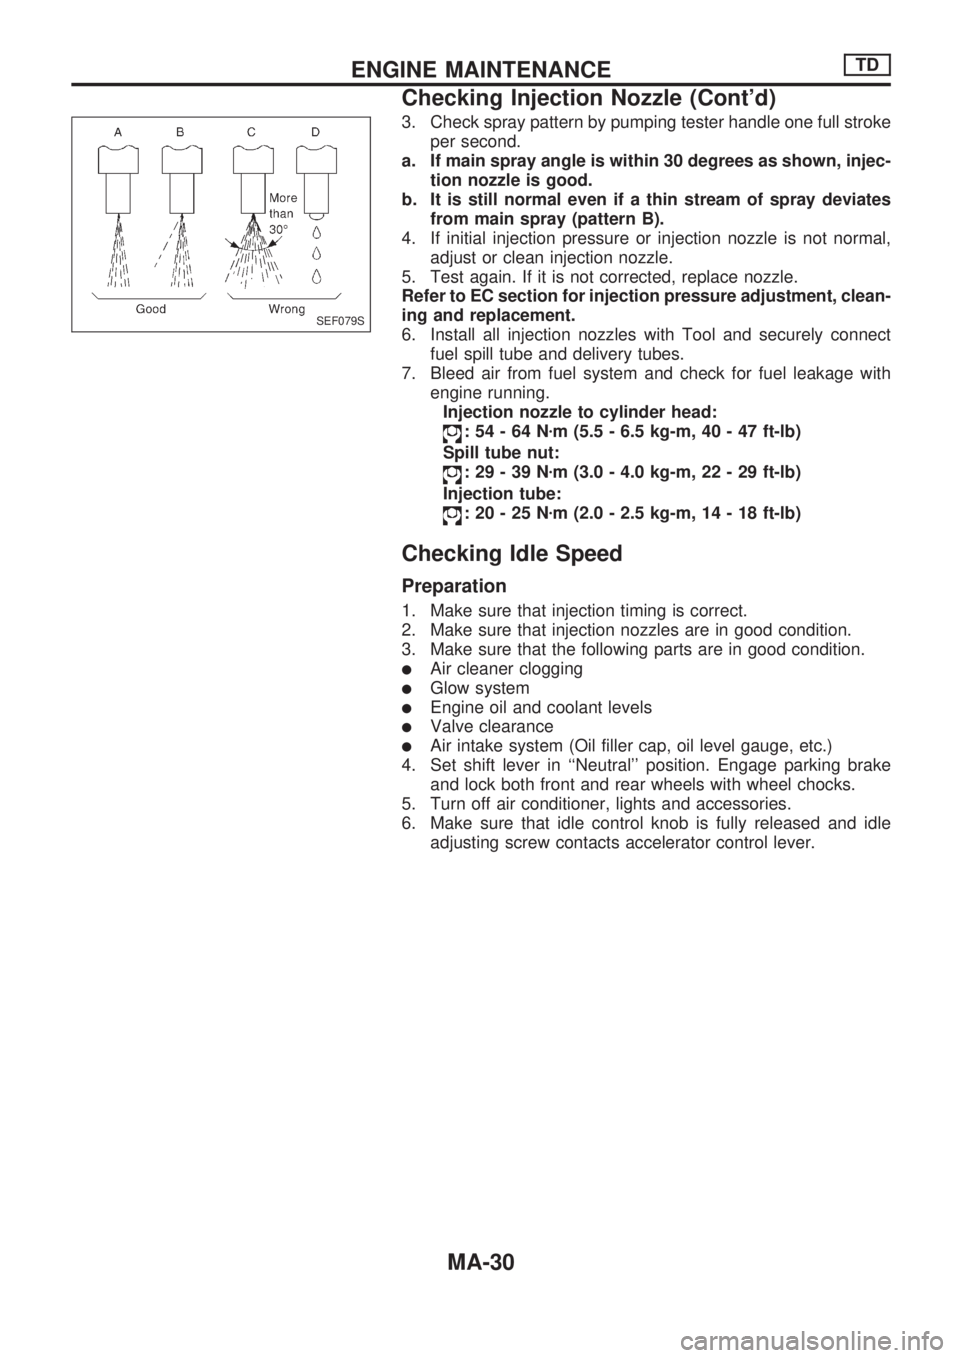
3. Check spray pattern by pumping tester handle one full stroke
per second.
a. If main spray angle is within 30 degrees as shown, injec-
tion nozzle is good.
b. It is still normal even if a thin stream of spray deviates
from main spray (pattern B).
4. If initial injection pressure or injection nozzle is not normal,
adjust or clean injection nozzle.
5. Test again. If it is not corrected, replace nozzle.
Refer to EC section for injection pressure adjustment, clean-
ing and replacement.
6. Install all injection nozzles with Tool and securely connect
fuel spill tube and delivery tubes.
7. Bleed air from fuel system and check for fuel leakage with
engine running.
Injection nozzle to cylinder head:
:54-64Nzm (5.5 - 6.5 kg-m, 40 - 47 ft-lb)
Spill tube nut:
:29-39Nzm (3.0 - 4.0 kg-m, 22 - 29 ft-lb)
Injection tube:
:20-25Nzm (2.0 - 2.5 kg-m, 14 - 18 ft-lb)
Checking Idle Speed
Preparation
1. Make sure that injection timing is correct.
2. Make sure that injection nozzles are in good condition.
3. Make sure that the following parts are in good condition.
lAir cleaner clogging
lGlow system
lEngine oil and coolant levels
lValve clearance
lAir intake system (Oil filler cap, oil level gauge, etc.)
4. Set shift lever in ``Neutral'' position. Engage parking brake
and lock both front and rear wheels with wheel chocks.
5. Turn off air conditioner, lights and accessories.
6. Make sure that idle control knob is fully released and idle
adjusting screw contacts accelerator control lever.
SEF079S
ENGINE MAINTENANCETD
Checking Injection Nozzle (Cont'd)
MA-30
Page 1347 of 1659
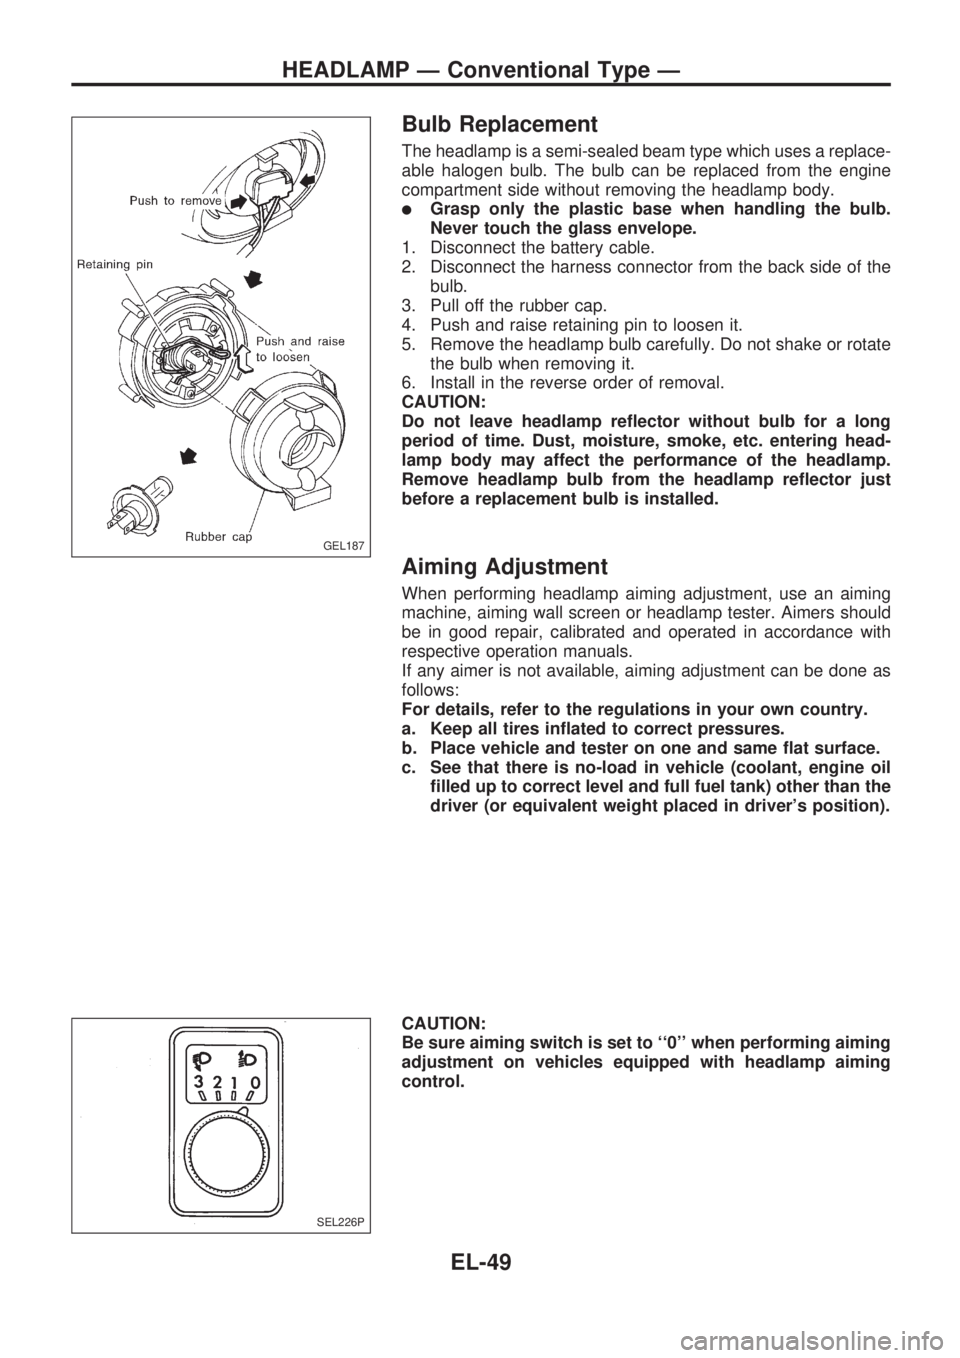
Bulb Replacement
The headlamp is a semi-sealed beam type which uses a replace-
able halogen bulb. The bulb can be replaced from the engine
compartment side without removing the headlamp body.
lGrasp only the plastic base when handling the bulb.
Never touch the glass envelope.
1. Disconnect the battery cable.
2. Disconnect the harness connector from the back side of the
bulb.
3. Pull off the rubber cap.
4. Push and raise retaining pin to loosen it.
5. Remove the headlamp bulb carefully. Do not shake or rotate
the bulb when removing it.
6. Install in the reverse order of removal.
CAUTION:
Do not leave headlamp reflector without bulb for a long
period of time. Dust, moisture, smoke, etc. entering head-
lamp body may affect the performance of the headlamp.
Remove headlamp bulb from the headlamp reflector just
before a replacement bulb is installed.
Aiming Adjustment
When performing headlamp aiming adjustment, use an aiming
machine, aiming wall screen or headlamp tester. Aimers should
be in good repair, calibrated and operated in accordance with
respective operation manuals.
If any aimer is not available, aiming adjustment can be done as
follows:
For details, refer to the regulations in your own country.
a. Keep all tires inflated to correct pressures.
b. Place vehicle and tester on one and same flat surface.
c. See that there is no-load in vehicle (coolant, engine oil
filled up to correct level and full fuel tank) other than the
driver (or equivalent weight placed in driver's position).
CAUTION:
Be sure aiming switch is set to ``0'' when performing aiming
adjustment on vehicles equipped with headlamp aiming
control.
GEL187
SEL226P
HEADLAMP Ð Conventional Type Ð
EL-49