Page 100 of 1659
BODY & TRIM
SECTIONBT
CONTENTS
PRECAUTIONS......................................................... 1
Service Notice ........................................................ 1
Supplemental Restraint System (SRS) ``AIR
BAG'' (4WD models).............................................. 1
Supplemental Restraint System (SRS) ``AIR
BAG'' (2WD models).............................................. 1
GENERAL SERVICING............................................. 2
Clip and Fastener .................................................. 2
BODY END................................................................ 5
Body Front End ...................................................... 5
Body Rear End ...................................................... 8
DOOR....................................................................... 10
Front Door ............................................................ 10
Rear Door ............................................................ 11
INSTRUMENT PANEL............................................. 12
INTERIOR TRIM...................................................... 15
Side and Floor Trim ............................................. 15
Door Trim ............................................................. 18
Roof Trim ............................................................. 21EXTERIOR............................................................... 24
SEAT........................................................................ 30
Front Seat ............................................................ 30
Heated Seat ......................................................... 32
Rear Seat ............................................................. 33
Jump Seat ............................................................ 34
SUNROOF................................................................ 35
WINDSHIELD AND WINDOWS.............................. 36
Windshield............................................................ 37
Side Window ........................................................ 38
MIRROR................................................................... 39
Door Mirror ........................................................... 39
CAB AND REAR BODY.......................................... 40
Removal ............................................................... 40
Body Mounting ..................................................... 41
BODY ALIGNMENT................................................. 43
Engine Compartment ........................................... 44
Underbody............................................................ 46
.For seat belt, refer to MA and RS section.
.For wiring diagrams of body electrical systems, refer to EL section.BT
Page 118 of 1659
Door Trim
REMOVAL Ð Door trim
Front door trim
V1Remove inside handle escutcheon.
V2Remove power window switch, then disconnect the connector.
V3Remove window regulator handle.
V4Remove door armrest.
V5Remove screw securing pull handle and remove pull handle.
V6Remove bolt, screw and clip securing door finisher.
V7Lift out door finisher.
Rear door trim
V8Remove inside handle escutcheon.
V9Remove screws securing door handle and remove door handle.
V10Remove clips and lift out door finisher, then disconnect power window switch connector.
INTERIOR TRIM
BT-18
Page 121 of 1659
Roof Trim
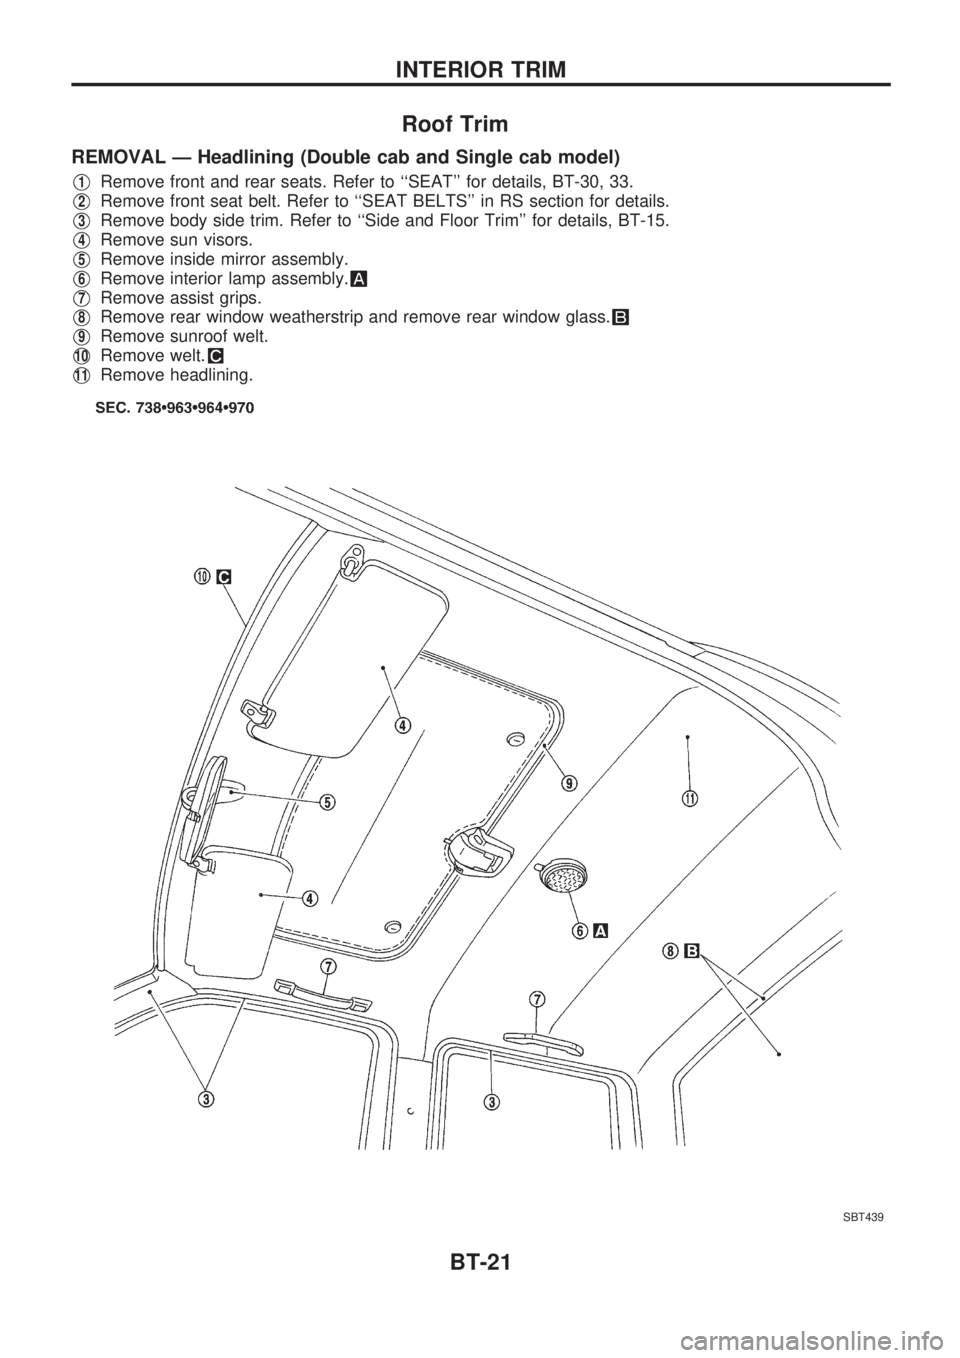
REMOVAL Ð Headlining (Double cab and Single cab model)
V1Remove front and rear seats. Refer to ``SEAT'' for details, BT-30, 33.
V2Remove front seat belt. Refer to ``SEAT BELTS'' in RS section for details.
V3Remove body side trim. Refer to ``Side and Floor Trim'' for details, BT-15.
V4Remove sun visors.
V5Remove inside mirror assembly.
V6Remove interior lamp assembly.
V7Remove assist grips.
V8Remove rear window weatherstrip and remove rear window glass.
V9Remove sunroof welt.
V10Remove welt.
V11Remove headlining.
SBT439
INTERIOR TRIM
BT-21
Page 123 of 1659
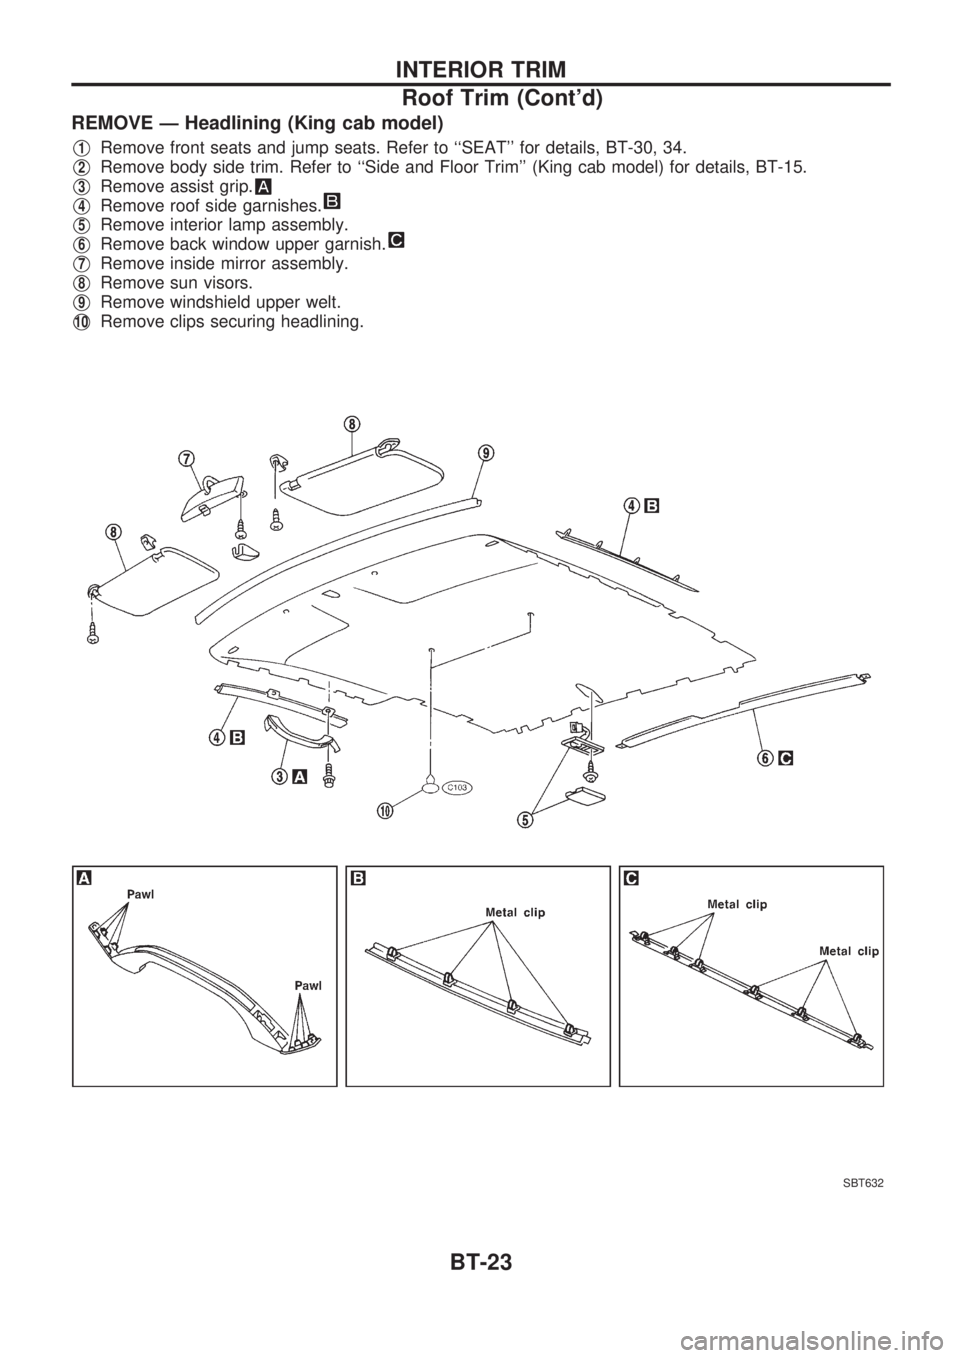
REMOVE Ð Headlining (King cab model)
V1Remove front seats and jump seats. Refer to ``SEAT'' for details, BT-30, 34.
V2Remove body side trim. Refer to ``Side and Floor Trim'' (King cab model) for details, BT-15.
V3Remove assist grip.
V4Remove roof side garnishes.
V5Remove interior lamp assembly.
V6Remove back window upper garnish.
V7Remove inside mirror assembly.
V8Remove sun visors.
V9Remove windshield upper welt.
V10Remove clips securing headlining.
SBT632
INTERIOR TRIM
Roof Trim (Cont'd)
BT-23
Page 127 of 1659
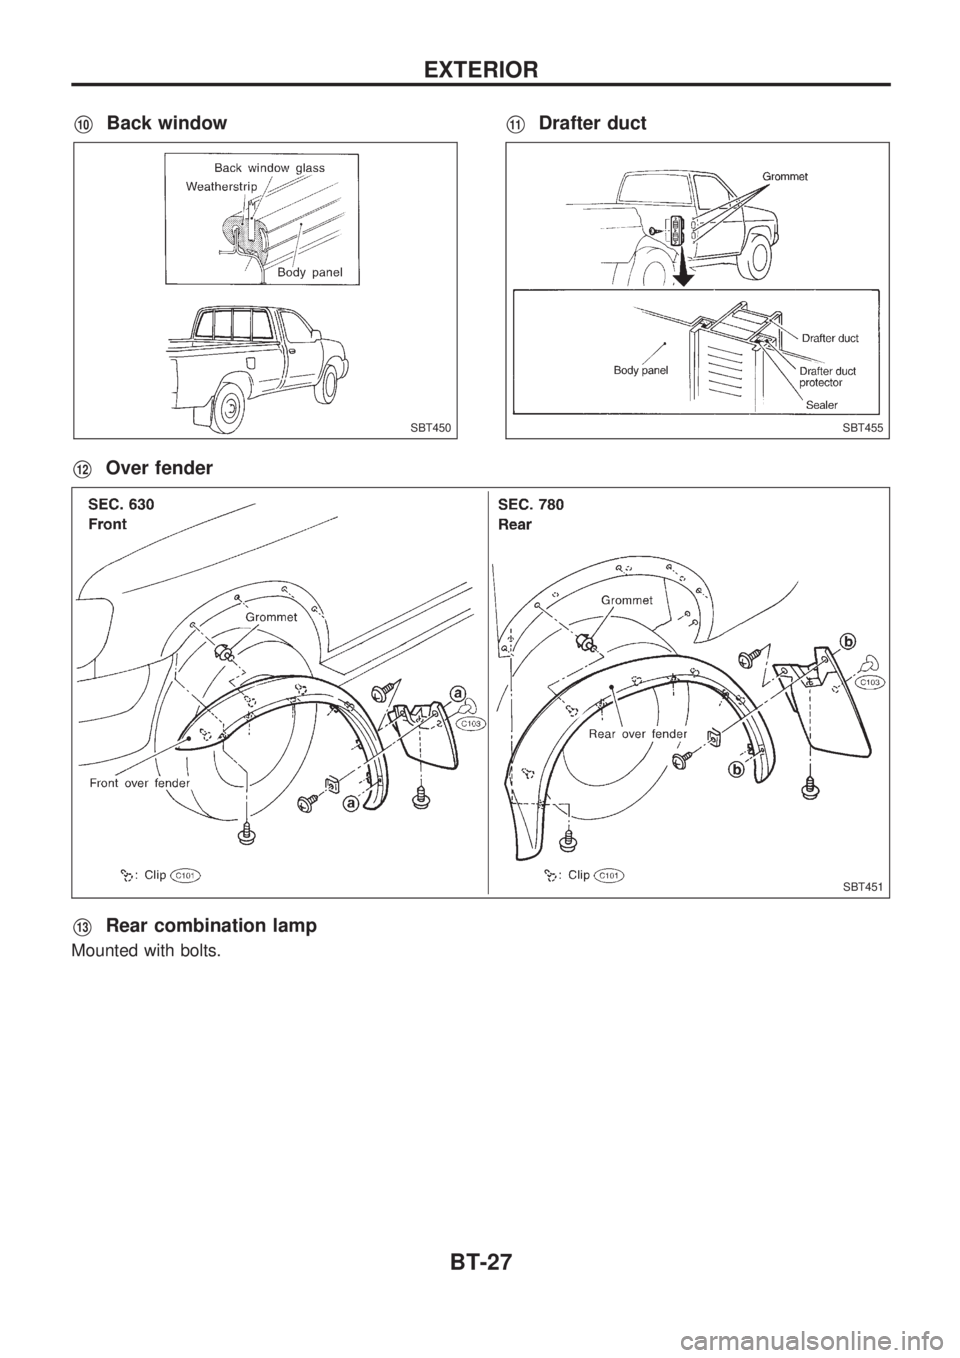
V10Back windowV11Drafter duct
V12Over fender
V13Rear combination lamp
Mounted with bolts.
SBT450SBT455
SBT451
EXTERIOR
BT-27
Page 128 of 1659
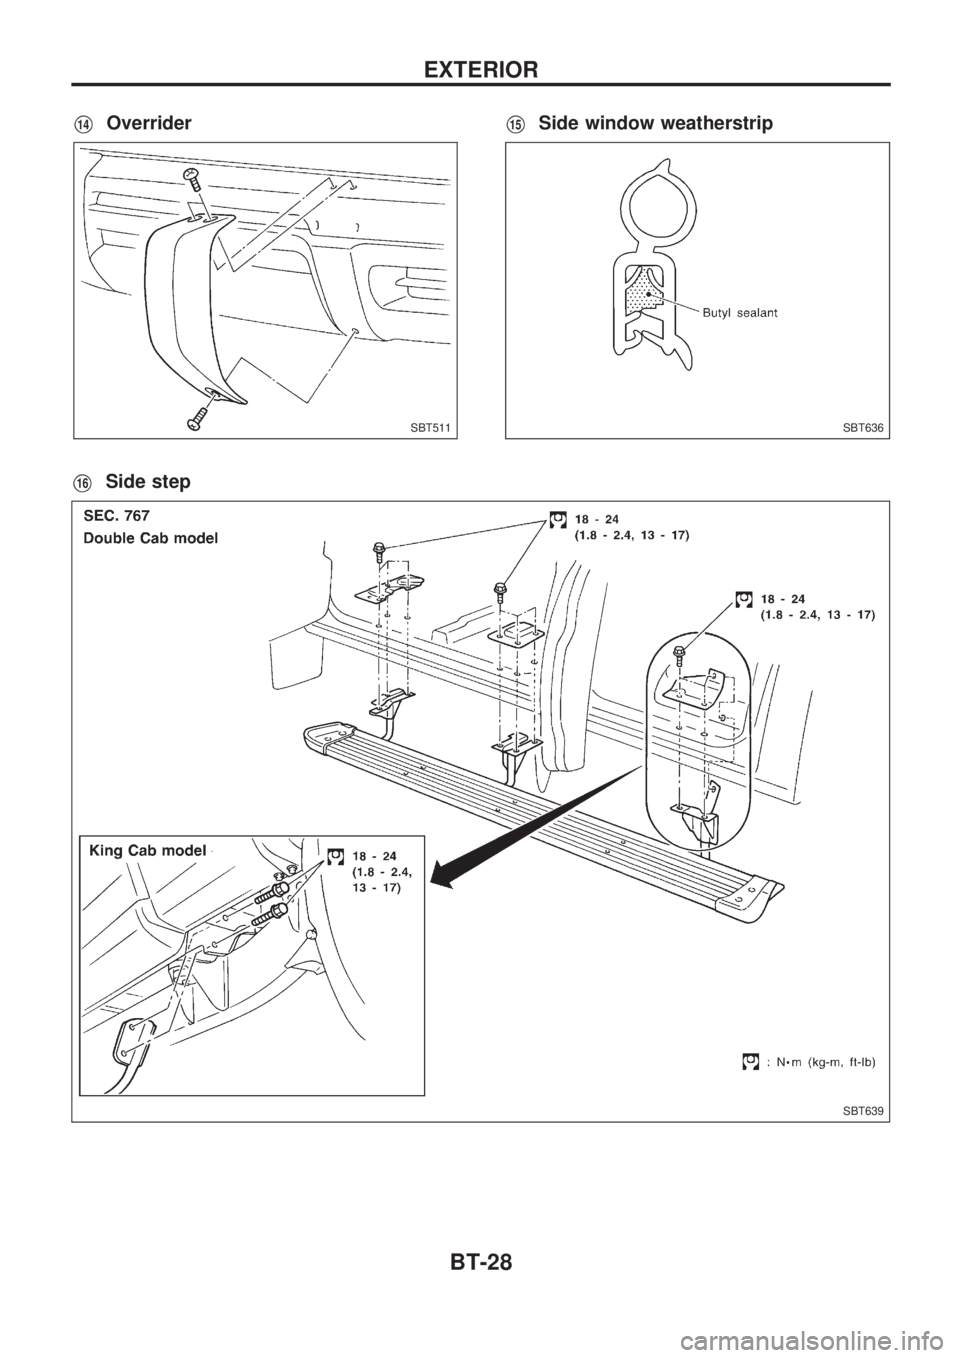
V14OverriderV15Side window weatherstrip
V16Side step
SBT511SBT636
SBT639
EXTERIOR
BT-28
Page 136 of 1659
REMOVAL
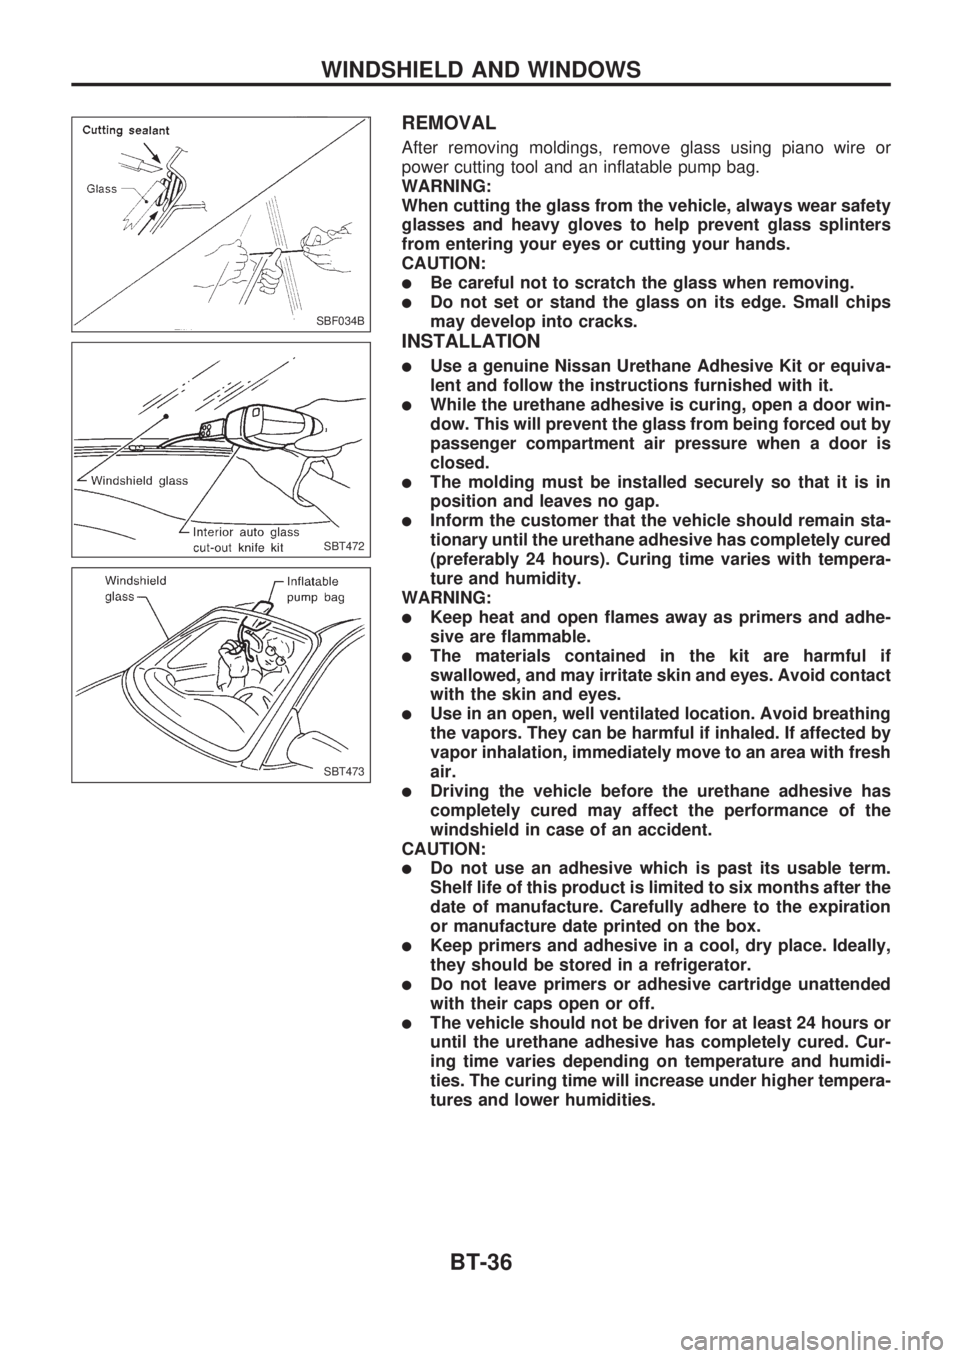
After removing moldings, remove glass using piano wire or
power cutting tool and an inflatable pump bag.
WARNING:
When cutting the glass from the vehicle, always wear safety
glasses and heavy gloves to help prevent glass splinters
from entering your eyes or cutting your hands.
CAUTION:
lBe careful not to scratch the glass when removing.
lDo not set or stand the glass on its edge. Small chips
may develop into cracks.
INSTALLATION
lUse a genuine Nissan Urethane Adhesive Kit or equiva-
lent and follow the instructions furnished with it.
lWhile the urethane adhesive is curing, open a door win-
dow. This will prevent the glass from being forced out by
passenger compartment air pressure when a door is
closed.
lThe molding must be installed securely so that it is in
position and leaves no gap.
lInform the customer that the vehicle should remain sta-
tionary until the urethane adhesive has completely cured
(preferably 24 hours). Curing time varies with tempera-
ture and humidity.
WARNING:
lKeep heat and open flames away as primers and adhe-
sive are flammable.
lThe materials contained in the kit are harmful if
swallowed, and may irritate skin and eyes. Avoid contact
with the skin and eyes.
lUse in an open, well ventilated location. Avoid breathing
the vapors. They can be harmful if inhaled. If affected by
vapor inhalation, immediately move to an area with fresh
air.
lDriving the vehicle before the urethane adhesive has
completely cured may affect the performance of the
windshield in case of an accident.
CAUTION:
lDo not use an adhesive which is past its usable term.
Shelf life of this product is limited to six months after the
date of manufacture. Carefully adhere to the expiration
or manufacture date printed on the box.
lKeep primers and adhesive in a cool, dry place. Ideally,
they should be stored in a refrigerator.
lDo not leave primers or adhesive cartridge unattended
with their caps open or off.
lThe vehicle should not be driven for at least 24 hours or
until the urethane adhesive has completely cured. Cur-
ing time varies depending on temperature and humidi-
ties. The curing time will increase under higher tempera-
tures and lower humidities.
SBF034B
SBT472
SBT473
WINDSHIELD AND WINDOWS
BT-36
Page 137 of 1659
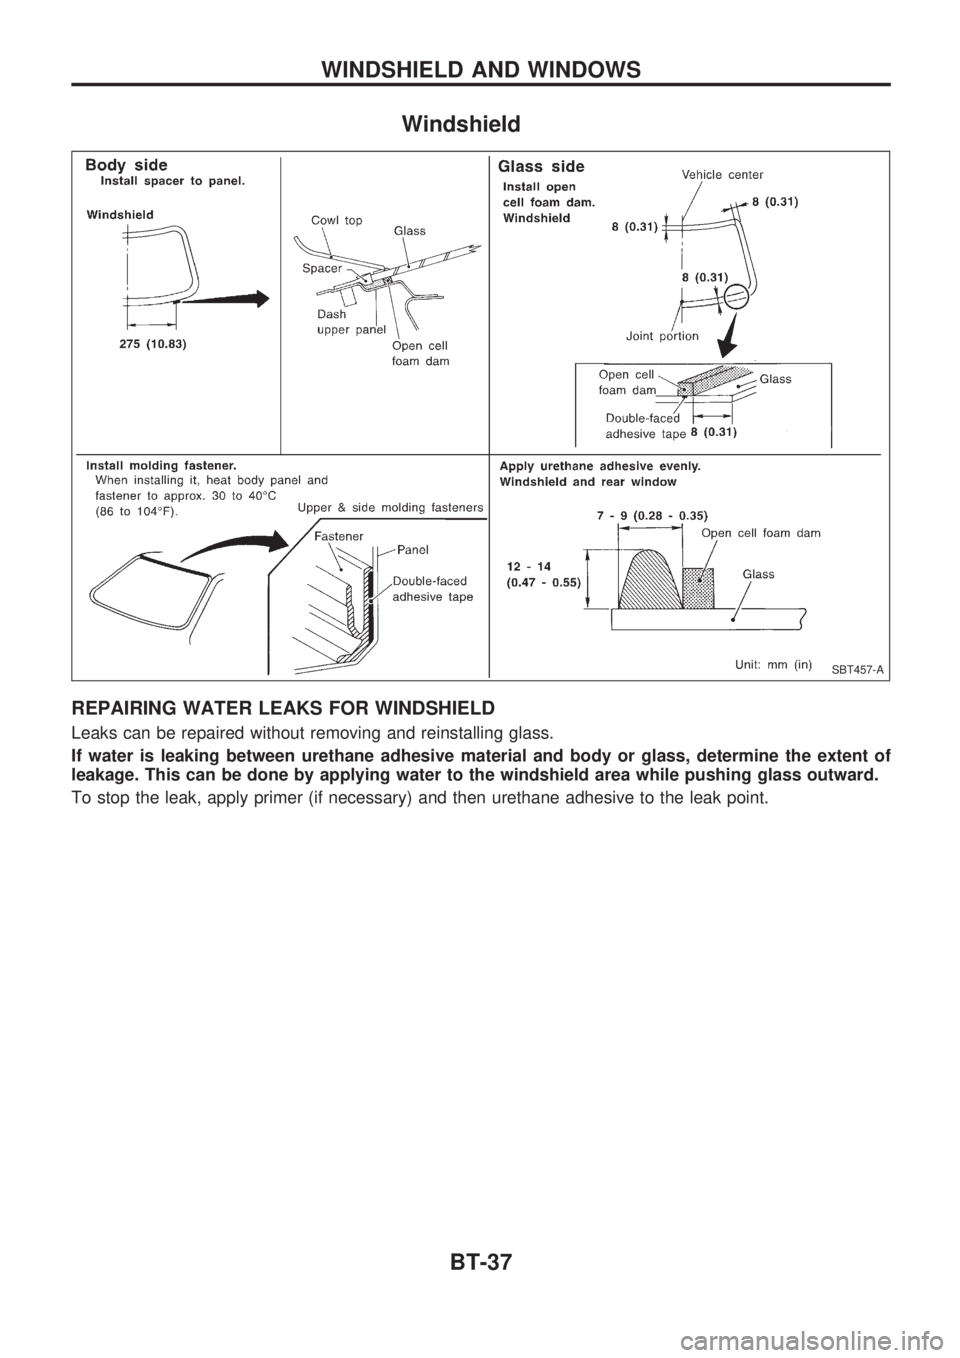
Windshield
REPAIRING WATER LEAKS FOR WINDSHIELD
Leaks can be repaired without removing and reinstalling glass.
If water is leaking between urethane adhesive material and body or glass, determine the extent of
leakage. This can be done by applying water to the windshield area while pushing glass outward.
To stop the leak, apply primer (if necessary) and then urethane adhesive to the leak point.
SBT457-A
WINDSHIELD AND WINDOWS
BT-37