Page 1196 of 1659
DIAGNOSTIC PROCEDURE 4 (Continued from
DIAGNOSTIC PROCEDURE 2)
Inspecting SRS malfunctioning record
Is it the first time for maintenance of
SRS?
Yes
cNo
``SELF-DIAG [PAST]''
(previously entered) might
not be erased after repair.
Go to DIAGNOSTIC PRO-
CEDURE 3, step 8 (RS-
31).
GO TO DIAGNOSTIC PROCEDURE 5
(RS-34).
.
TROUBLE DIAGNOSES Ð Supplemental Restraint System (SRS) Ð
4WD models
Trouble Diagnoses with CONSULT (Cont'd)
RS-33
Page 1198 of 1659
![NISSAN PICK-UP 1998 Repair Manual If no self-diagnostic failure is detected on ``SELF-DIAG [PAST],
touch ``BACK and go back to ``SELECT DIAG MODE.
8. Touch ``TROUBLE DIAG RECORD.
NOTE:
With TROUBLE DIAG RECORD, diagnosis resul NISSAN PICK-UP 1998 Repair Manual If no self-diagnostic failure is detected on ``SELF-DIAG [PAST],
touch ``BACK and go back to ``SELECT DIAG MODE.
8. Touch ``TROUBLE DIAG RECORD.
NOTE:
With TROUBLE DIAG RECORD, diagnosis resul](/manual-img/5/57374/w960_57374-1197.png)
If no self-diagnostic failure is detected on ``SELF-DIAG [PAST]'',
touch ``BACK'' and go back to ``SELECT DIAG MODE''.
8. Touch ``TROUBLE DIAG RECORD''.
NOTE:
With TROUBLE DIAG RECORD, diagnosis results previ-
ously erased by a reset operation can be displayed.
9. Diagnostic code is displayed on ``TROUBLE DIAG
RECORD''.
10. Touch ``PRINT''.
11. Compare diagnostic codes to the INTERMITTENT PROB-
LEM DIAGNOSTIC CODE CHART, page RS-36.
12. Touch ``BACK'' key of CONSULT until SELECT SYSTEM
appears, then turn off CONSULT.
13. Turn ignition switch ``OFF'', then disconnect CONSULT and
both battery cables.
14. Repair the system as outlined by the ``Repair order'' in
INTERMITTENT PROBLEM DIAGNOSTIC CODE CHART,
that corresponds to the problem code. For replacement pro-
cedure of component parts, refer to RS-10.
15. Go to DIAGNOSTIC PROCEDURE 3, page RS-31, for final
checking.
SRS062
SRS055
SRS315
TROUBLE DIAGNOSES Ð Supplemental Restraint System (SRS) Ð
4WD models
Trouble Diagnoses with CONSULT (Cont'd)
RS-35
Page 1199 of 1659
![NISSAN PICK-UP 1998 Repair Manual INTERMITTENT PROBLEM DIAGNOSTIC CODE CHART (``SELF-DIAG [PAST] or
``TROUBLE DIAG RECORD)
Diagnostic item Explanation Repair order
NO SELF DIAGNOSTIC
FAILURE INDICATED.
lNo malfunction is detected. NISSAN PICK-UP 1998 Repair Manual INTERMITTENT PROBLEM DIAGNOSTIC CODE CHART (``SELF-DIAG [PAST] or
``TROUBLE DIAG RECORD)
Diagnostic item Explanation Repair order
NO SELF DIAGNOSTIC
FAILURE INDICATED.
lNo malfunction is detected.](/manual-img/5/57374/w960_57374-1198.png)
INTERMITTENT PROBLEM DIAGNOSTIC CODE CHART (``SELF-DIAG [PAST]'' or
``TROUBLE DIAG RECORD'')
Diagnostic item Explanation Repair order
NO SELF DIAGNOSTIC
FAILURE INDICATED.
lNo malfunction is detected.lGo to DIAGNOSTIC PROCEDURE 3 (RS-31)
after charging battery.
AIRBAG MODULE
[OPEN]
lDriver's air bag module circuit is open.
(including the spiral cable)lVisually check the wiring harness connection.
lReplace the harness if it has visible damage.
lReplace driver's air bag module.
(Before disposal of it, it must be deployed.)
lReplace the spiral cable.
lReplace the diagnosis sensor unit. AIRBAG MODULE
[VB-SHORT]
lDriver's air bag module circuit is shorted to
some power supply circuit. (including the spi-
ral cable)
AIRBAG MODULE
[GND-SHORT]
lDriver's air bag module circuit is shorted to
ground. (including the spiral cable)
AIRBAG MODULE
[SHORT]
lDriver's air bag module circuits are shorted to
each other.
CONTROL UNIT
lDiagnosis sensor unit is out of order.lVisually check the wiring harness connection.
lReplace the diagnosis sensor unit.
* Intermittent problem areas cannot be easily located. For this reason, perform the procedures outlined under the repair order, then
make the final system check.
TROUBLE DIAGNOSES Ð Supplemental Restraint System (SRS) Ð
4WD models
Trouble Diagnoses with CONSULT (Cont'd)
RS-36
Page 1200 of 1659
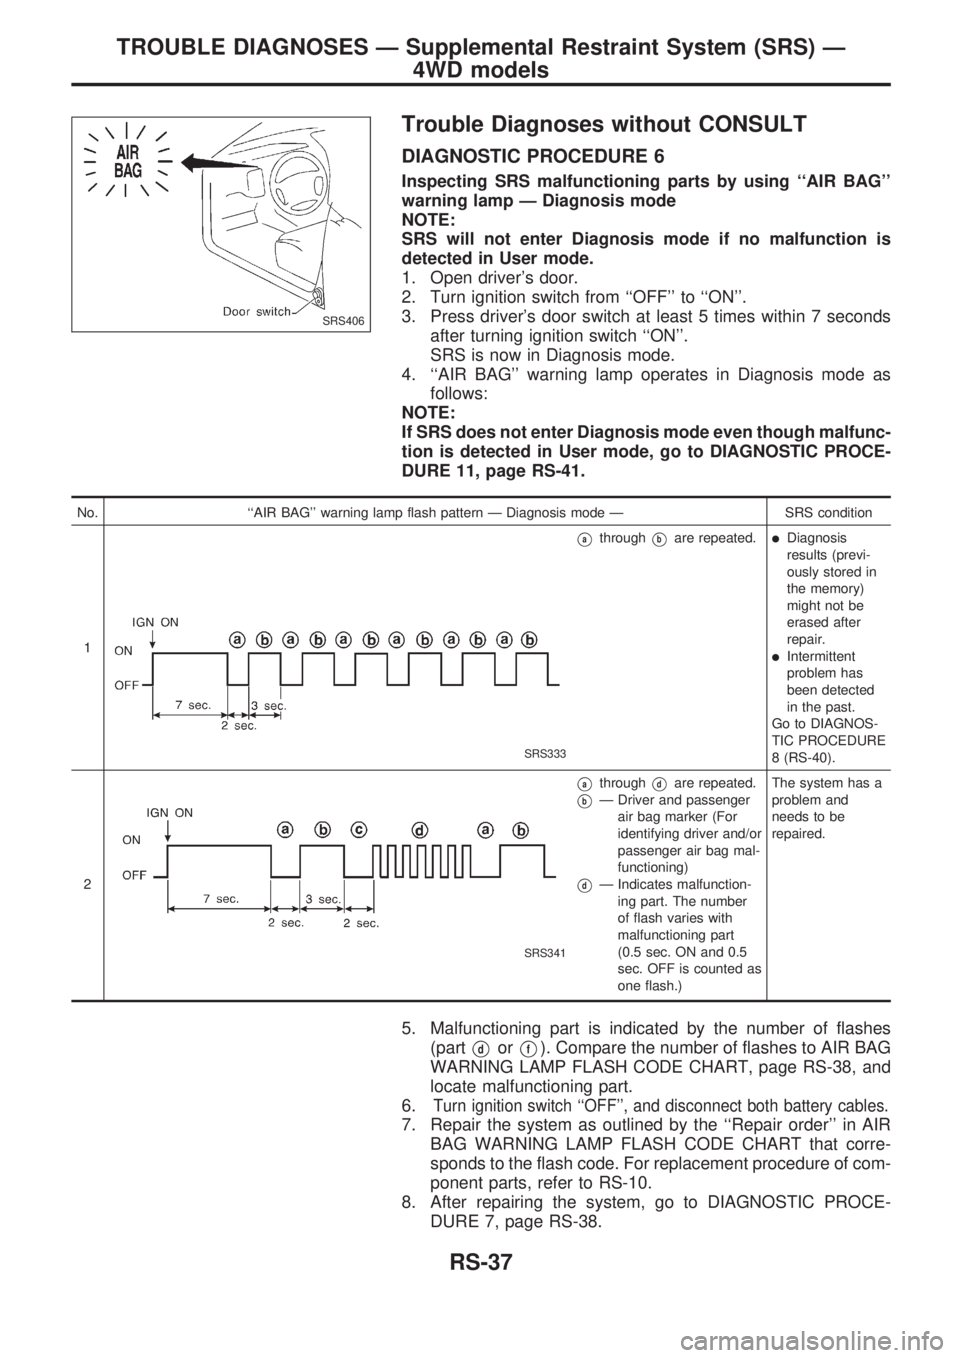
Trouble Diagnoses without CONSULT
DIAGNOSTIC PROCEDURE 6
Inspecting SRS malfunctioning parts by using ``AIR BAG''
warning lamp Ð Diagnosis mode
NOTE:
SRS will not enter Diagnosis mode if no malfunction is
detected in User mode.
1. Open driver's door.
2. Turn ignition switch from ``OFF'' to ``ON''.
3. Press driver's door switch at least 5 times within 7 seconds
after turning ignition switch ``ON''.
SRS is now in Diagnosis mode.
4. ``AIR BAG'' warning lamp operates in Diagnosis mode as
follows:
NOTE:
If SRS does not enter Diagnosis mode even though malfunc-
tion is detected in User mode, go to DIAGNOSTIC PROCE-
DURE 11, page RS-41.
No. ``AIR BAG'' warning lamp flash pattern Ð Diagnosis mode Ð SRS condition
1
SRS333
VathroughVbare repeated.lDiagnosis
results (previ-
ously stored in
the memory)
might not be
erased after
repair.
lIntermittent
problem has
been detected
in the past.
Go to DIAGNOS-
TIC PROCEDURE
8 (RS-40).
2
SRS341
VathroughVdare repeated.
VbÐ Driver and passenger
air bag marker (For
identifying driver and/or
passenger air bag mal-
functioning)
VdÐ Indicates malfunction-
ing part. The number
of flash varies with
malfunctioning part
(0.5 sec. ON and 0.5
sec. OFF is counted as
one flash.)The system has a
problem and
needs to be
repaired.
5. Malfunctioning part is indicated by the number of flashes
(part
VdorVf). Compare the number of flashes to AIR BAG
WARNING LAMP FLASH CODE CHART, page RS-38, and
locate malfunctioning part.
6.
Turn ignition switch ``OFF'', and disconnect both battery cables.
7. Repair the system as outlined by the ``Repair order'' in AIR
BAG WARNING LAMP FLASH CODE CHART that corre-
sponds to the flash code. For replacement procedure of com-
ponent parts, refer to RS-10.
8. After repairing the system, go to DIAGNOSTIC PROCE-
DURE 7, page RS-38.
SRS406
TROUBLE DIAGNOSES Ð Supplemental Restraint System (SRS) Ð
4WD models
RS-37
Page 1202 of 1659
5. If ``AIR BAG'' warning lamp operates as shown in No. 1 in
chart above, turn ignition switch ``OFF'' to reset from Diag-
nosis mode to User mode and to erase the memory of the
malfunction. Then go to step 6.
If ``AIR BAG'' warning lamp operates as shown in No. 2 or
No. 3 in chart above, the malfunctioning part is not repaired
completely, or another malfunctioning part is detected. Go to
DIAGNOSTIC PROCEDURE 6, page RS-37, and repair mal-
functioning part completely.
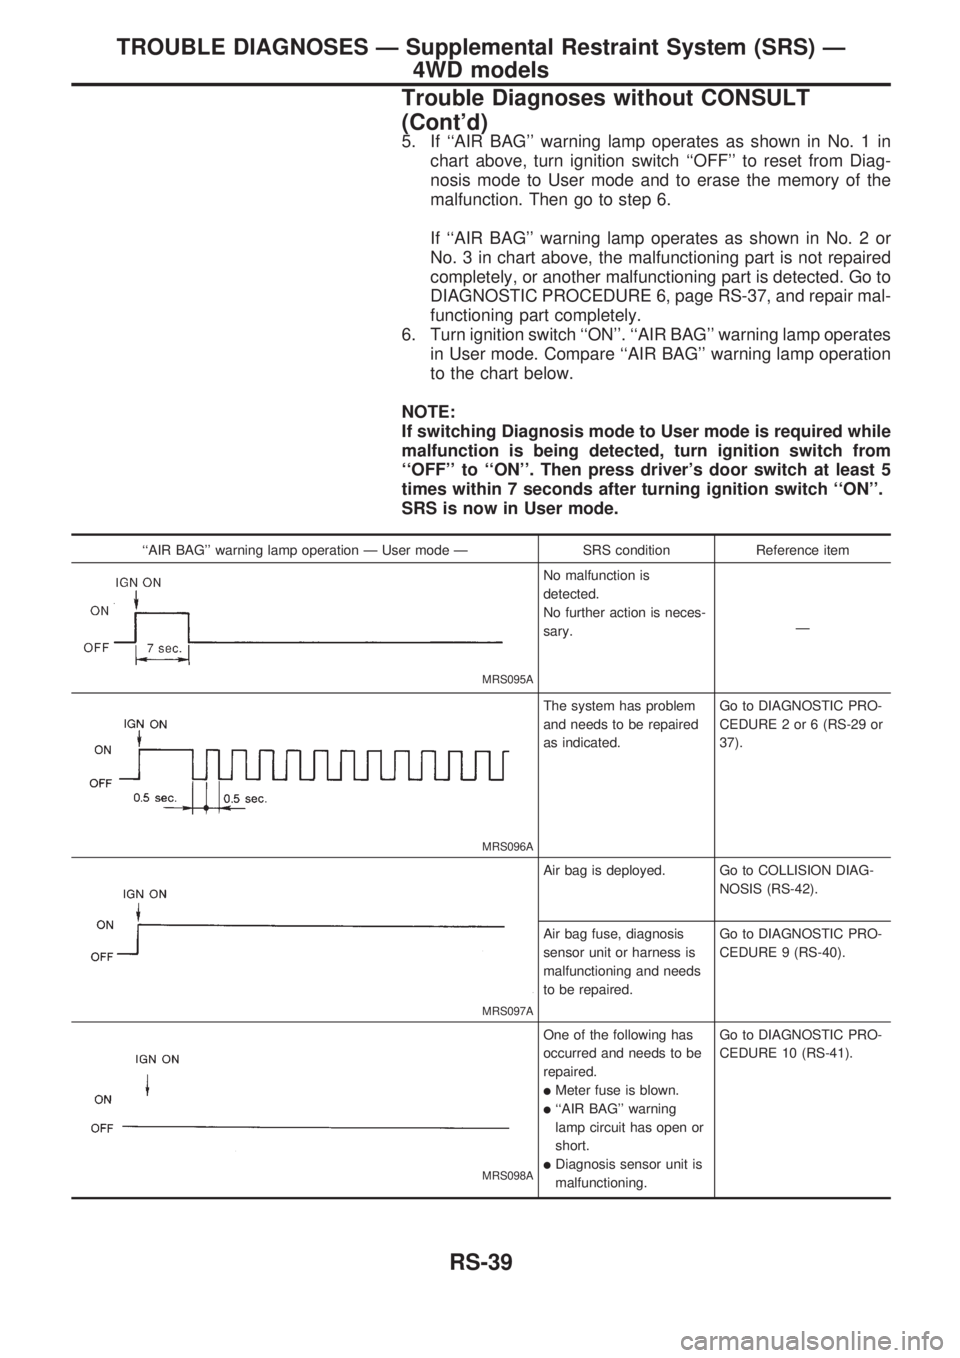
6. Turn ignition switch ``ON''. ``AIR BAG'' warning lamp operates
in User mode. Compare ``AIR BAG'' warning lamp operation
to the chart below.
NOTE:
If switching Diagnosis mode to User mode is required while
malfunction is being detected, turn ignition switch from
``OFF'' to ``ON''. Then press driver's door switch at least 5
times within 7 seconds after turning ignition switch ``ON''.
SRS is now in User mode.
``AIR BAG'' warning lamp operation Ð User mode Ð SRS condition Reference item
MRS095A
No malfunction is
detected.
No further action is neces-
sary.Ð
MRS096A
The system has problem
and needs to be repaired
as indicated.Go to DIAGNOSTIC PRO-
CEDURE 2 or 6 (RS-29 or
37).
MRS097A
Air bag is deployed. Go to COLLISION DIAG-
NOSIS (RS-42).
Air bag fuse, diagnosis
sensor unit or harness is
malfunctioning and needs
to be repaired.Go to DIAGNOSTIC PRO-
CEDURE 9 (RS-40).
MRS098A
One of the following has
occurred and needs to be
repaired.
lMeter fuse is blown.
l``AIR BAG'' warning
lamp circuit has open or
short.
lDiagnosis sensor unit is
malfunctioning.Go to DIAGNOSTIC PRO-
CEDURE 10 (RS-41).
TROUBLE DIAGNOSES Ð Supplemental Restraint System (SRS) Ð
4WD models
Trouble Diagnoses without CONSULT
(Cont'd)
RS-39
Page 1203 of 1659
DIAGNOSTIC PROCEDURE 8 (Continued from
DIAGNOSTIC PROCEDURE 6)
Inspecting SRS malfunctioning record
Is it the first time for maintenance of
SRS?
Yes
cNo
Diagnosis results (previ-
ously stored in the
memory) might not be
erased after repair.
Go to DIAGNOSTIC
PROCEDURE 7, step 5
(RS-38).
GO TO DIAGNOSTIC PROCEDURE 5
(RS-34). (Further inspection cannot be
performed without using CONSULT.)
Trouble Diagnoses: Air Bag Warning Lamp
Does Not Turn OFF
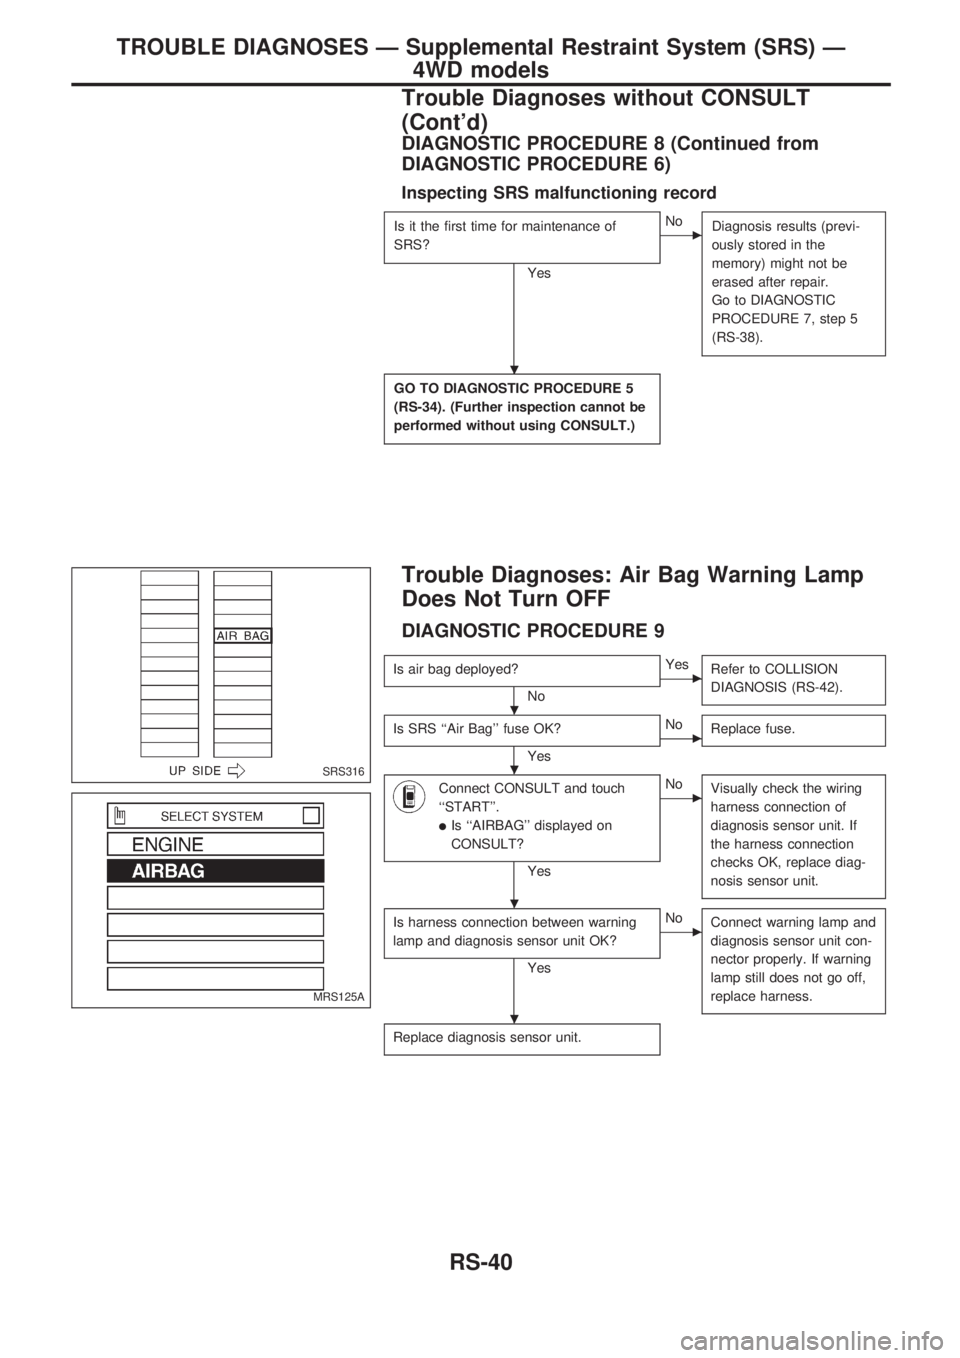
DIAGNOSTIC PROCEDURE 9
Is air bag deployed?
No
cYes
Refer to COLLISION
DIAGNOSIS (RS-42).
Is SRS ``Air Bag'' fuse OK?
Yes
cNo
Replace fuse.
Connect CONSULT and touch
``START''.
lIs ``AIRBAG'' displayed on
CONSULT?
Yes
cNo
Visually check the wiring
harness connection of
diagnosis sensor unit. If
the harness connection
checks OK, replace diag-
nosis sensor unit.
Is harness connection between warning
lamp and diagnosis sensor unit OK?
Yes
cNo
Connect warning lamp and
diagnosis sensor unit con-
nector properly. If warning
lamp still does not go off,
replace harness.
Replace diagnosis sensor unit.
SRS316
MRS125A
.
.
.
.
.
TROUBLE DIAGNOSES Ð Supplemental Restraint System (SRS) Ð
4WD models
Trouble Diagnoses without CONSULT
(Cont'd)
RS-40
Page 1212 of 1659
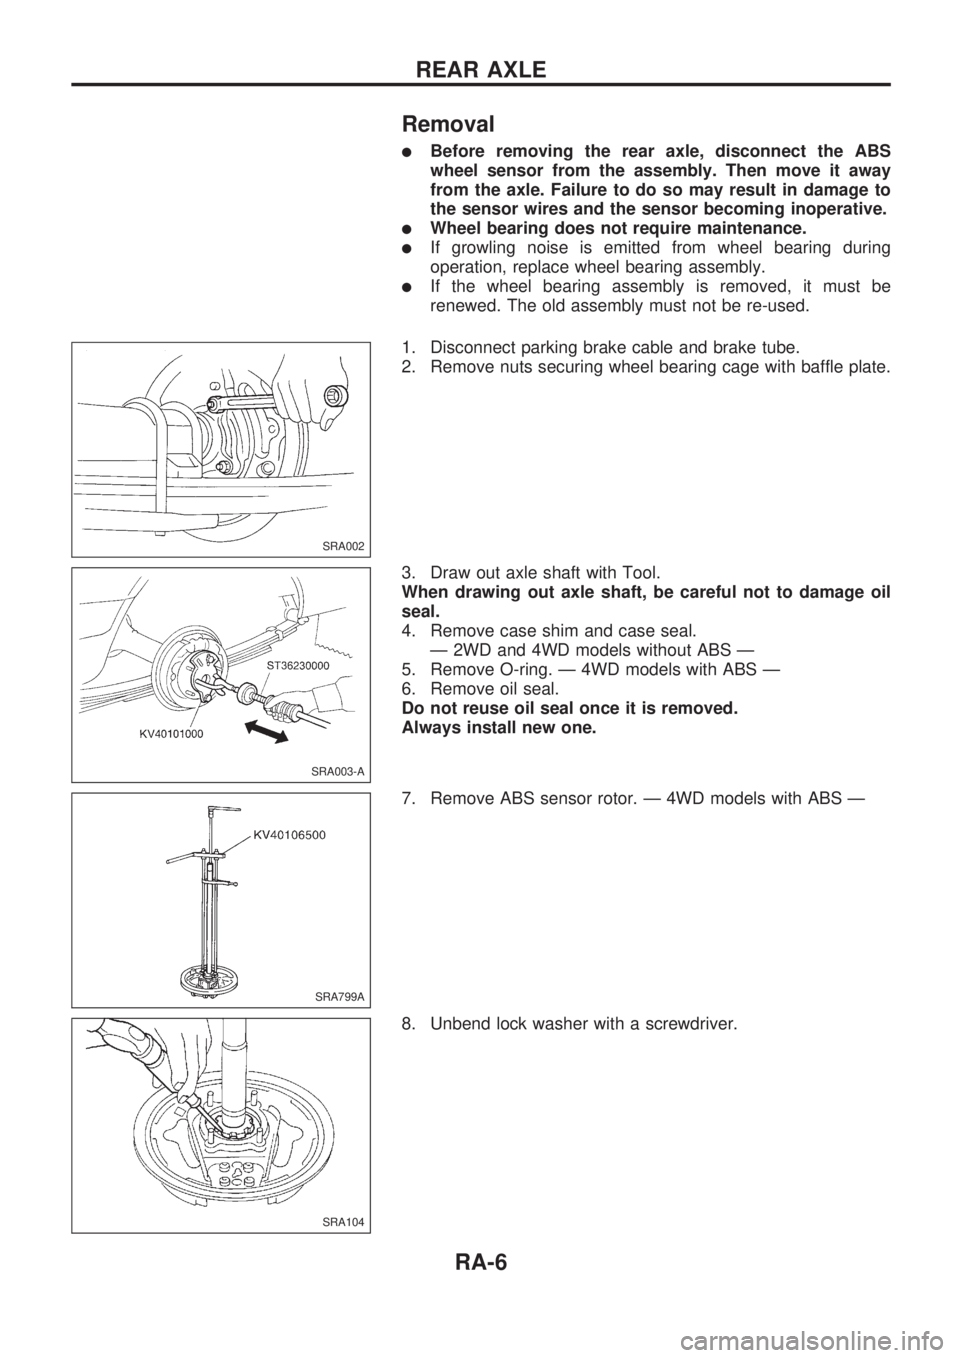
Removal
lBefore removing the rear axle, disconnect the ABS
wheel sensor from the assembly. Then move it away
from the axle. Failure to do so may result in damage to
the sensor wires and the sensor becoming inoperative.
lWheel bearing does not require maintenance.
lIf growling noise is emitted from wheel bearing during
operation, replace wheel bearing assembly.
lIf the wheel bearing assembly is removed, it must be
renewed. The old assembly must not be re-used.
1. Disconnect parking brake cable and brake tube.
2. Remove nuts securing wheel bearing cage with baffle plate.
3. Draw out axle shaft with Tool.
When drawing out axle shaft, be careful not to damage oil
seal.
4. Remove case shim and case seal.
Ð 2WD and 4WD models without ABS Ð
5. Remove O-ring. Ð 4WD models with ABS Ð
6. Remove oil seal.
Do not reuse oil seal once it is removed.
Always install new one.
7. Remove ABS sensor rotor. Ð 4WD models with ABS Ð
8. Unbend lock washer with a screwdriver.
SRA002
SRA003-A
SRA799A
SRA104
REAR AXLE
RA-6
Page 1215 of 1659
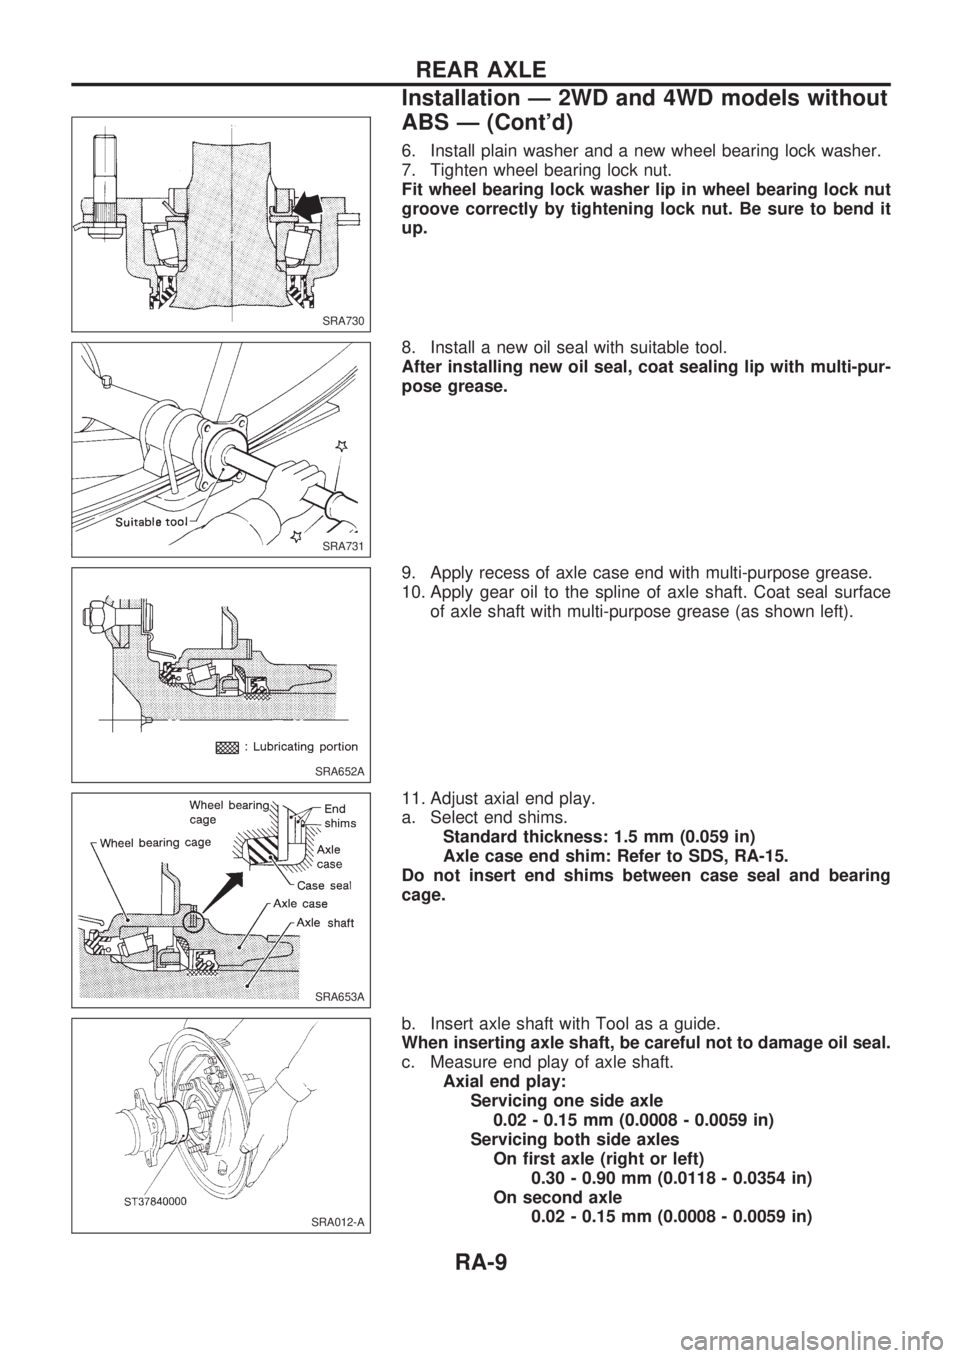
6. Install plain washer and a new wheel bearing lock washer.
7. Tighten wheel bearing lock nut.
Fit wheel bearing lock washer lip in wheel bearing lock nut
groove correctly by tightening lock nut. Be sure to bend it
up.
8. Install a new oil seal with suitable tool.
After installing new oil seal, coat sealing lip with multi-pur-
pose grease.
9. Apply recess of axle case end with multi-purpose grease.
10. Apply gear oil to the spline of axle shaft. Coat seal surface
of axle shaft with multi-purpose grease (as shown left).
11. Adjust axial end play.
a. Select end shims.
Standard thickness: 1.5 mm (0.059 in)
Axle case end shim: Refer to SDS, RA-15.
Do not insert end shims between case seal and bearing
cage.
b. Insert axle shaft with Tool as a guide.
When inserting axle shaft, be careful not to damage oil seal.
c. Measure end play of axle shaft.
Axial end play:
Servicing one side axle
0.02 - 0.15 mm (0.0008 - 0.0059 in)
Servicing both side axles
On first axle (right or left)
0.30 - 0.90 mm (0.0118 - 0.0354 in)
On second axle
0.02 - 0.15 mm (0.0008 - 0.0059 in)
SRA730
SRA731
SRA652A
SRA653A
SRA012-A
REAR AXLE
Installation Ð 2WD and 4WD models without
ABS Ð (Cont'd)
RA-9