Page 174 of 1659

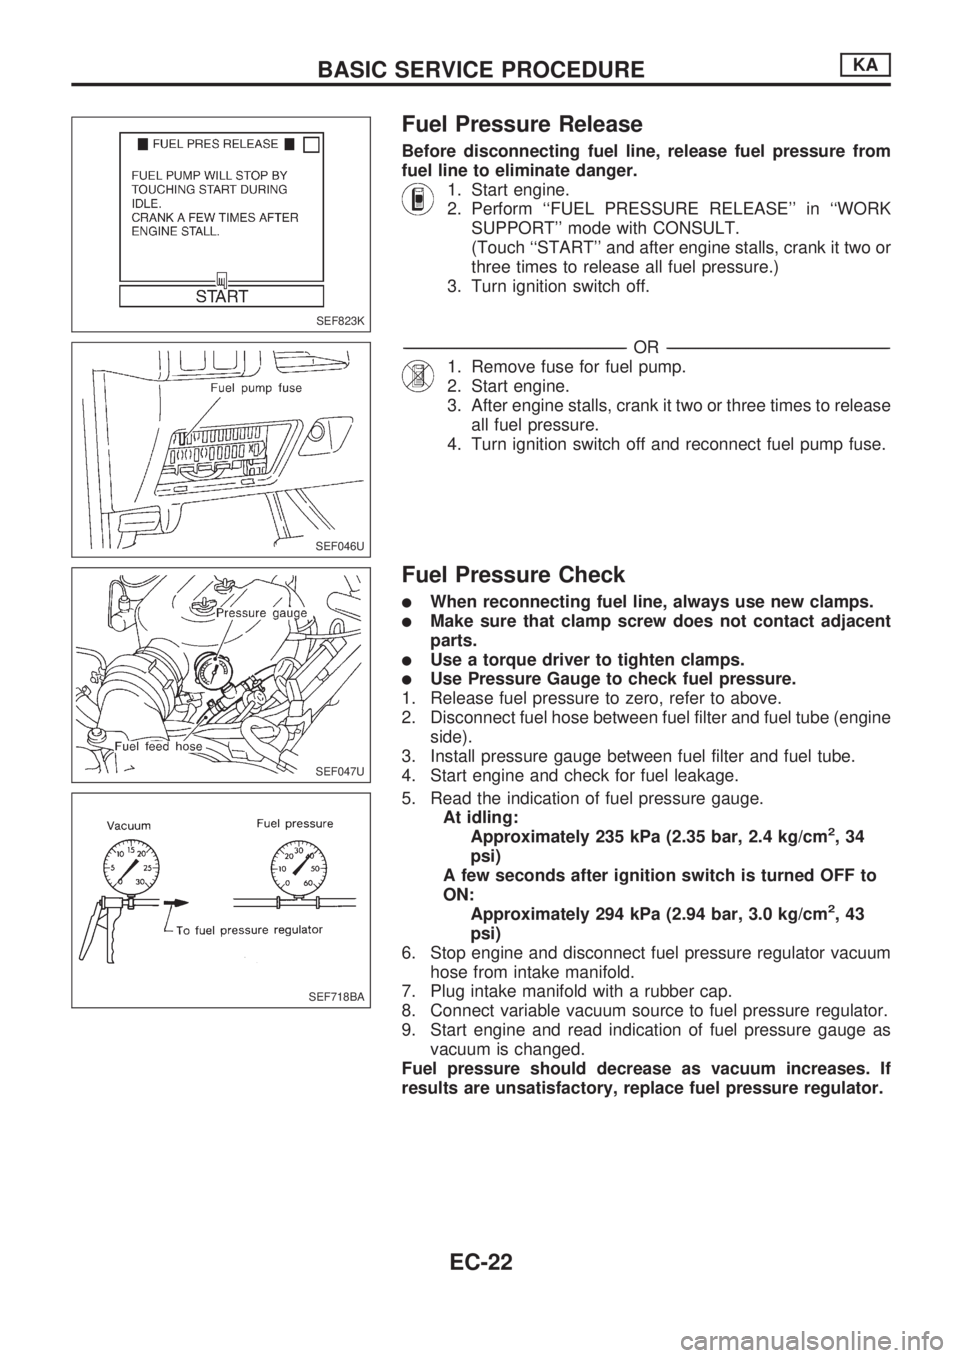
Fuel Pressure Release
Before disconnecting fuel line, release fuel pressure from
fuel line to eliminate danger.
1. Start engine.
2. Perform ``FUEL PRESSURE RELEASE'' in ``WORK
SUPPORT'' mode with CONSULT.
(Touch ``START'' and after engine stalls, crank it two or
three times to release all fuel pressure.)
3. Turn ignition switch off.
-------------------------------------------------------------------------------------------------------------------------------------------------------------------------------------------------------------------------------------------------OR-------------------------------------------------------------------------------------------------------------------------------------------------------------------------------------------------------------------------------------------------
1. Remove fuse for fuel pump.
2. Start engine.
3. After engine stalls, crank it two or three times to release
all fuel pressure.
4. Turn ignition switch off and reconnect fuel pump fuse.
Fuel Pressure Check
lWhen reconnecting fuel line, always use new clamps.
lMake sure that clamp screw does not contact adjacent
parts.
lUse a torque driver to tighten clamps.
lUse Pressure Gauge to check fuel pressure.
1. Release fuel pressure to zero, refer to above.
2. Disconnect fuel hose between fuel filter and fuel tube (engine
side).
3. Install pressure gauge between fuel filter and fuel tube.
4. Start engine and check for fuel leakage.
5. Read the indication of fuel pressure gauge.
At idling:
Approximately 235 kPa (2.35 bar, 2.4 kg/cm
2,34
psi)
A few seconds after ignition switch is turned OFF to
ON:
Approximately 294 kPa (2.94 bar, 3.0 kg/cm
2,43
psi)
6. Stop engine and disconnect fuel pressure regulator vacuum
hose from intake manifold.
7. Plug intake manifold with a rubber cap.
8. Connect variable vacuum source to fuel pressure regulator.
9. Start engine and read indication of fuel pressure gauge as
vacuum is changed.
Fuel pressure should decrease as vacuum increases. If
results are unsatisfactory, replace fuel pressure regulator.
SEF823K
SEF046U
SEF047U
SEF718BA
BASIC SERVICE PROCEDUREKA
EC-22
Page 991 of 1659

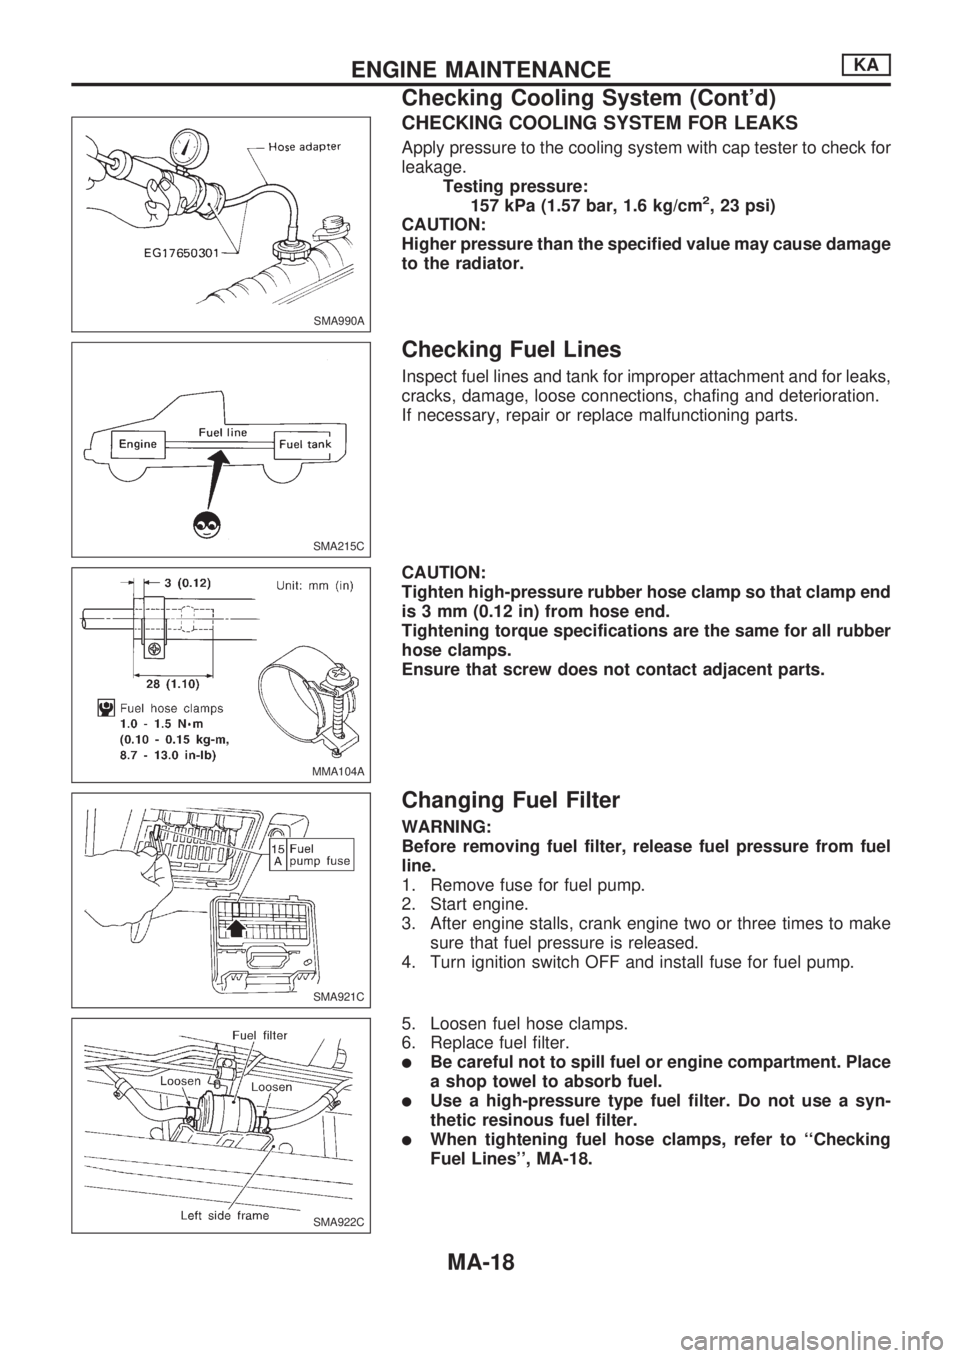
CHECKING COOLING SYSTEM FOR LEAKS
Apply pressure to the cooling system with cap tester to check for
leakage.
Testing pressure:
157 kPa (1.57 bar, 1.6 kg/cm
2, 23 psi)
CAUTION:
Higher pressure than the specified value may cause damage
to the radiator.
Checking Fuel Lines
Inspect fuel lines and tank for improper attachment and for leaks,
cracks, damage, loose connections, chafing and deterioration.
If necessary, repair or replace malfunctioning parts.
CAUTION:
Tighten high-pressure rubber hose clamp so that clamp end
is 3 mm (0.12 in) from hose end.
Tightening torque specifications are the same for all rubber
hose clamps.
Ensure that screw does not contact adjacent parts.
Changing Fuel Filter
WARNING:
Before removing fuel filter, release fuel pressure from fuel
line.
1. Remove fuse for fuel pump.
2. Start engine.
3. After engine stalls, crank engine two or three times to make
sure that fuel pressure is released.
4. Turn ignition switch OFF and install fuse for fuel pump.
5. Loosen fuel hose clamps.
6. Replace fuel filter.
lBe careful not to spill fuel or engine compartment. Place
a shop towel to absorb fuel.
lUse a high-pressure type fuel filter. Do not use a syn-
thetic resinous fuel filter.
lWhen tightening fuel hose clamps, refer to ``Checking
Fuel Lines'', MA-18.
SMA990A
SMA215C
MMA104A
SMA921C
SMA922C
ENGINE MAINTENANCEKA
Checking Cooling System (Cont'd)
MA-18
Page 1000 of 1659

Pull the negative-pressure valve to open it. Check that it closes
completely when released.
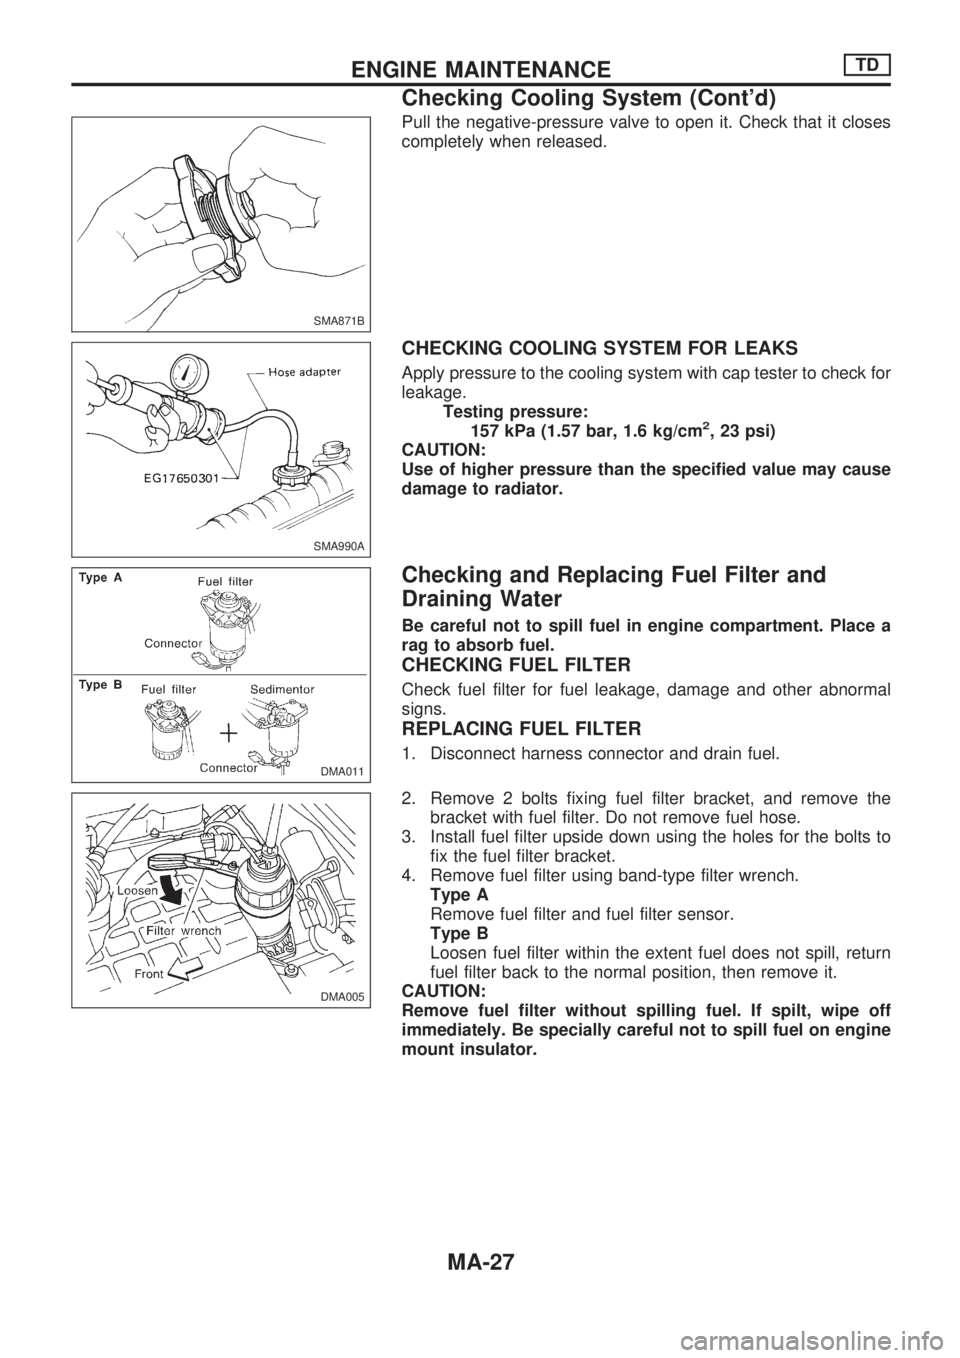
CHECKING COOLING SYSTEM FOR LEAKS
Apply pressure to the cooling system with cap tester to check for
leakage.
Testing pressure:
157 kPa (1.57 bar, 1.6 kg/cm
2, 23 psi)
CAUTION:
Use of higher pressure than the specified value may cause
damage to radiator.
Checking and Replacing Fuel Filter and
Draining Water
Be careful not to spill fuel in engine compartment. Place a
rag to absorb fuel.
CHECKING FUEL FILTER
Check fuel filter for fuel leakage, damage and other abnormal
signs.
REPLACING FUEL FILTER
1. Disconnect harness connector and drain fuel.
2. Remove 2 bolts fixing fuel filter bracket, and remove the
bracket with fuel filter. Do not remove fuel hose.
3. Install fuel filter upside down using the holes for the bolts to
fix the fuel filter bracket.
4. Remove fuel filter using band-type filter wrench.
Type A
Remove fuel filter and fuel filter sensor.
Type B
Loosen fuel filter within the extent fuel does not spill, return
fuel filter back to the normal position, then remove it.
CAUTION:
Remove fuel filter without spilling fuel. If spilt, wipe off
immediately. Be specially careful not to spill fuel on engine
mount insulator.
SMA871B
SMA990A
DMA011
DMA005
ENGINE MAINTENANCETD
Checking Cooling System (Cont'd)
MA-27
Page 1003 of 1659

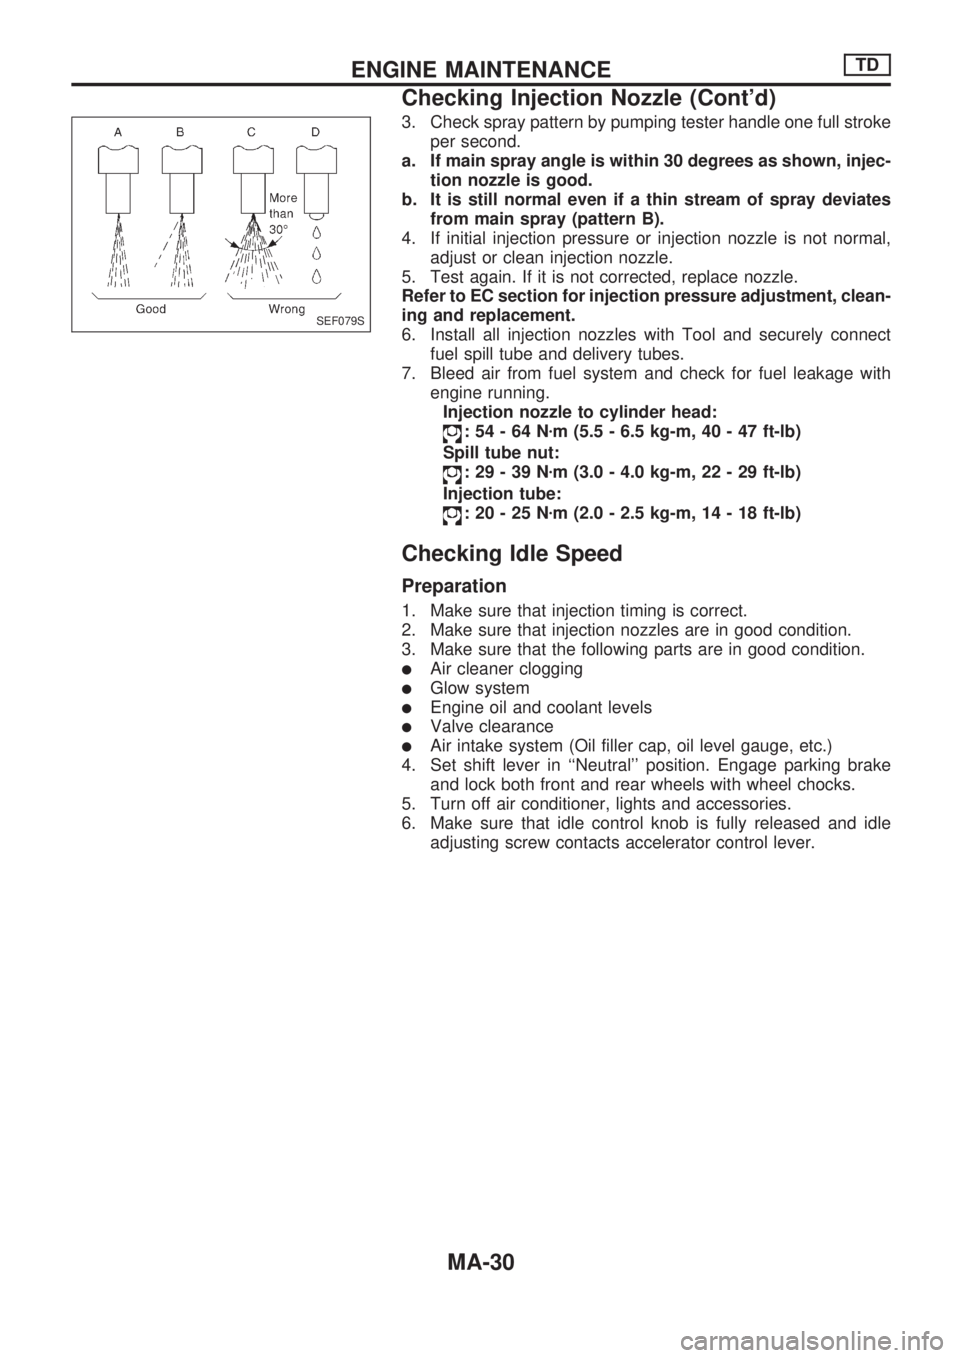
3. Check spray pattern by pumping tester handle one full stroke
per second.
a. If main spray angle is within 30 degrees as shown, injec-
tion nozzle is good.
b. It is still normal even if a thin stream of spray deviates
from main spray (pattern B).
4. If initial injection pressure or injection nozzle is not normal,
adjust or clean injection nozzle.
5. Test again. If it is not corrected, replace nozzle.
Refer to EC section for injection pressure adjustment, clean-
ing and replacement.
6. Install all injection nozzles with Tool and securely connect
fuel spill tube and delivery tubes.
7. Bleed air from fuel system and check for fuel leakage with
engine running.
Injection nozzle to cylinder head:
:54-64Nzm (5.5 - 6.5 kg-m, 40 - 47 ft-lb)
Spill tube nut:
:29-39Nzm (3.0 - 4.0 kg-m, 22 - 29 ft-lb)
Injection tube:
:20-25Nzm (2.0 - 2.5 kg-m, 14 - 18 ft-lb)
Checking Idle Speed
Preparation
1. Make sure that injection timing is correct.
2. Make sure that injection nozzles are in good condition.
3. Make sure that the following parts are in good condition.
lAir cleaner clogging
lGlow system
lEngine oil and coolant levels
lValve clearance
lAir intake system (Oil filler cap, oil level gauge, etc.)
4. Set shift lever in ``Neutral'' position. Engage parking brake
and lock both front and rear wheels with wheel chocks.
5. Turn off air conditioner, lights and accessories.
6. Make sure that idle control knob is fully released and idle
adjusting screw contacts accelerator control lever.
SEF079S
ENGINE MAINTENANCETD
Checking Injection Nozzle (Cont'd)
MA-30