1998 JAGUAR X308 warning
[x] Cancel search: warningPage 6 of 2490

Brake Pads (70.40.02) ‐ Vehicles With:
High Performance Brakes
206‐04: Rear Disc Brake
Specification
Description and Operation
Rear Disc Brake
Removal and Installation
Brake Caliper (70.55.03) (70.55.25) ‐ Vehicles With: Standard Brakes
Brake Caliper (70.55.03) (70.55.25) ‐ Vehicles With: High Performance Brakes
Brake Disc (70.10.11) ‐ Vehicles With: Standard Brakes
Brake Dis
c (70.10.11) ‐ Vehicles With: High Performance Brakes
Brake Pads (70.40.03) ‐ Vehicles With: Standard Brakes
Brake Pads (70.40.03) ‐ Vehicles With: High Performance Brakes
206‐05: Parking Brake and Actuation
Specification
Description and Operation
Parking Brake
General Procedures
Parking Brake Cable Adjustment (70.35.10)
Parking Brake Shoe and Li
ning Adjustment (70.35.37)
Removal and Installation
Parking Brake Control (70.35.08)
Parking Brake Control Shroud (76.13.63)
Parking Brake Shoes (70.40.05)
Parking Brake Warning Indicator Switch (86.65.45)
206‐06: Hydraulic Brake Actuation
Specification
Description and Operation
Hydraulic Brake Actuation
Removal and Installation
Brake Fluid Reservoir (70.30.16)
Brake Master Cylinder (70.30.
08)
Brake Pedal and Bracket (70.35.03)
Brake Pedal and Bracket, Brake Booster and Brake Master Cylinder (70.35.39)
Page 22 of 2490

Ambient Air Temperature Sensor (82.20. 02)
Cold Ai
r
Bypass Blend Door Actuator (82.20.86)
Defrost Vent/Register Blend Door Actuator (82.20.84)
Footwell Vent/Duct Blend Door Actuator (80.20.20 or 82.20.85)
Instrument Panel Blend Door Actuator (82.20.83)
Remote Climate Control Module LHD (82.20.65)
Remote Climate Control Module RHD (82.20.65)
413: Instrumentation and Warning Sy
stems
413‐00: Instrument Cluster and Panel Illumination
Description and Operation
Instrument Cluster and Panel Illumination
Removal and Installation
Instrument Panel Dimmer Switch (86.65.07)
413‐01: Instrument Cluster
Description and Operation
Instrument Cluster
Diagnosis and Testing
Instrument Cluster
Removal and Installation
Instrument Clust
er (88.20.01)
413‐06: Horn
Description and Operation
Horn
Diagnosis and Testing
Horn
413‐07: Clock
Description and Operation
Clock
Diagnosis and Testing
Clock
Removal and Installation
Clock (88.15.07)
Page 32 of 2490

Rear Cup Holder (76.25.27)
Steering Col u
mn
Lower Shroud (76.46.03)
Steering Column Upper Shroud (76.46.02)
501‐14: Handles, Locks, Latches and Entry Systems
Description and Operation
Handles, Locks, Latches and Entry Systems
Removal and Installation
Exterior Driver Door Handle (76.58.07)
Driver Door Latch (76.37.74)
Glove Compartment Lid Ha
ndle (76.52.08)
Glove Compartment Lid Lock Cylinder (76.52.23)
Luggage Compartment Lid Latch (76.19.25)
Luggage Compartment Lid Latch Actuator (76.19.25)
Luggage Compartment Lid Release Switch (86.25.56)
Luggage Compartment Lid Warning Indicator Switch (86.65.93)
Exterior Passenger Door Handle (76.58.08)
Passenger Door Latch (76.37.75)
Exterior Rear Door Handle (76.58.02)
Rear Door Latch (76.37.09)
501‐16: Wipers and Washers
Descriptio
n and Operation
Wipers and Washers
Removal and Installation
Headlamp Washer Jet (84.20.08)
Headlamp Washer Pump (84.20.21)
Rain Sensor (84.12.10) (86.56.62)
Windshield Washer Pump (84.10.21)
Windshield Washer Reservoir (84.10.01) (84.10.03)
Windshield Wiper Motor (84.15.13)
Windshield Wiper/
Washer Switch (86.65.42)
Wiper Pivot Arm (84.15.03)
Page 35 of 2490

General Infor
mation - Gene
ral Service Information
Description an
d Operation
Safety Notice
Appropri
ate service me
thods and proper repair procedures are essential for the safe, reliable operation of all motor vehicles,
as well as the safety of the person do ing the work. This manual provides genera l directions for accomplishing service and
repair work with tested, effect ive, techniques. Following them will help assure reliability.
There are numerous variations in procedures, techniques, tools, and parts for servicing vehicles, as well as in the skill of the
person doing the work. This manual cannot possibly anticipate all such variations and provide advice or cautions as to each.
Accordingly, anyone who depart s from the instructions provided in the manua l must first establish that neither personal
safety nor vehicle integrity is compromised from choices of methods, tools or parts.
Notes, Ca
utions and Warnings
Throughout
this manual, important inform
ation is highlighted by the use of notes, cautions and warnings. NOTES give
additional information on a topic or proc edure, CAUTIONS are given to prevent da mage to the vehicle, and WARNINGS are
given to prevent personal injury.
Worksh
op Manual Organization
This
manual incorporates descript
ive, diagnostic, and repair information to help trained Jaguar technicians complete service
and rectification procedures. The informat ion can be accessed by choosing the appropriate five digit section number. For
example, Section 412-03 covers air conditioning , which is part of the Climate Control System.
The manual is organized into groups covering generic aspects of the vehicle systems; the first digit of the section
number represents a group se lected from the following:
1. General Information.
2. Chassis.
3. Powertrain.
4. Electrical.
5. Body and Paint.
Each of the groups comprises sections re lating to specific areas of the vehicle.
The second and third digits of the section number indicate the vehicle system.
The last two digits of the se ction number define the system covered, more specifically.
Each section comprises one or more of the following sub-sections:
Specification
Page 54 of 2490

Wh en t
he vehicle is being reco
vered by rear suspended tow:
The ignition key must be remo ved from the ig
nition switch to lock the stee
ring with the front wheels facing straight
ahead.
The re ar
wheels must be
correctly positioned in the lifting cradle and securely tied down.
Em
ergency Towing
WARNING: IF THE
ENGINE IS NOT
RUNNING, THE STEERING WILL BECOME HEAVY AND THE FORCE NECESSARY TO
EFFECTIVELY APPLY THE BRAKES WILL BE GREATLY INCREASED.
• CAUTIONS:
A vehicle with a defective transmission must be towed by rear suspended tow.
The vehicle towing point is not suit able for use with a solid tow-bar.
Do not use the crossbeam tie bar as a towing location.
When the vehicle is being towed on its own wheels:
Loc a
l regulations for the towing of ve
hicles must be followed. In some co untries the registration number of the
towing vehicle and an 'On Tow' sign or warning triangle must be displayed at the rear of the towed vehicle.
The gear s
elector lever
must be in Neutral.
The
ignition switch must be in positi
on II to release the steering lock and make the direction indicators, horn and
stop lamps operate.
A di
stance of 0.8 km (0.5 mi
le) must not be exceeded.
A spe
ed of 48 km/h (30 mph) must not be exceeded.
The tow rope must be attached using th
e towi
ng location provided; refer to Front Towing Point in this section.
Rear Su
spended
Tow
Page 72 of 2490

3. Lower front of vehicl
e.
4. W
A
RNING: ENSURE THAT THE DOWEL OF TOOL 204-114
IS CORRECTLY POSITIONED ACROSS THE SUSPENSION TURRET
SLOT.
Locate special tool in suspension turret slot.
Pas s
special tool 204-114 thro
ugh slot in suspension turret
and rotate stem to locate dowel.
5. WARNING: WHE N
TIGHTENING
TOOL NUT, USE LOWER
DOWEL AS A GUIDE TO ENSURE THAT THE TOOL STEM DOES
NOT ROTATE AND DISTURB POSITION OF DOWEL IN
SUSPENSION TURRET.
Tighten nut of special tool 204-114 to full extent, to achieve
suspension mid-laden position.
6. Ra
ise front of vehicle and support
on stands. refer to Section
100-02.
7. Remove appropriate road wheel. Refer to Section 100-02.
8. Remove an d discard tiestraps se
curing wheel speed sensor
harness to upper wishbone.
9. Move steering to appropriate full lock for access to suspension.
10 . R
emove nut securing upper wish
bone ball joint to vertical
link.
11. CAUTION: Do not use special tool 211-098 in the
Page 88 of 2490

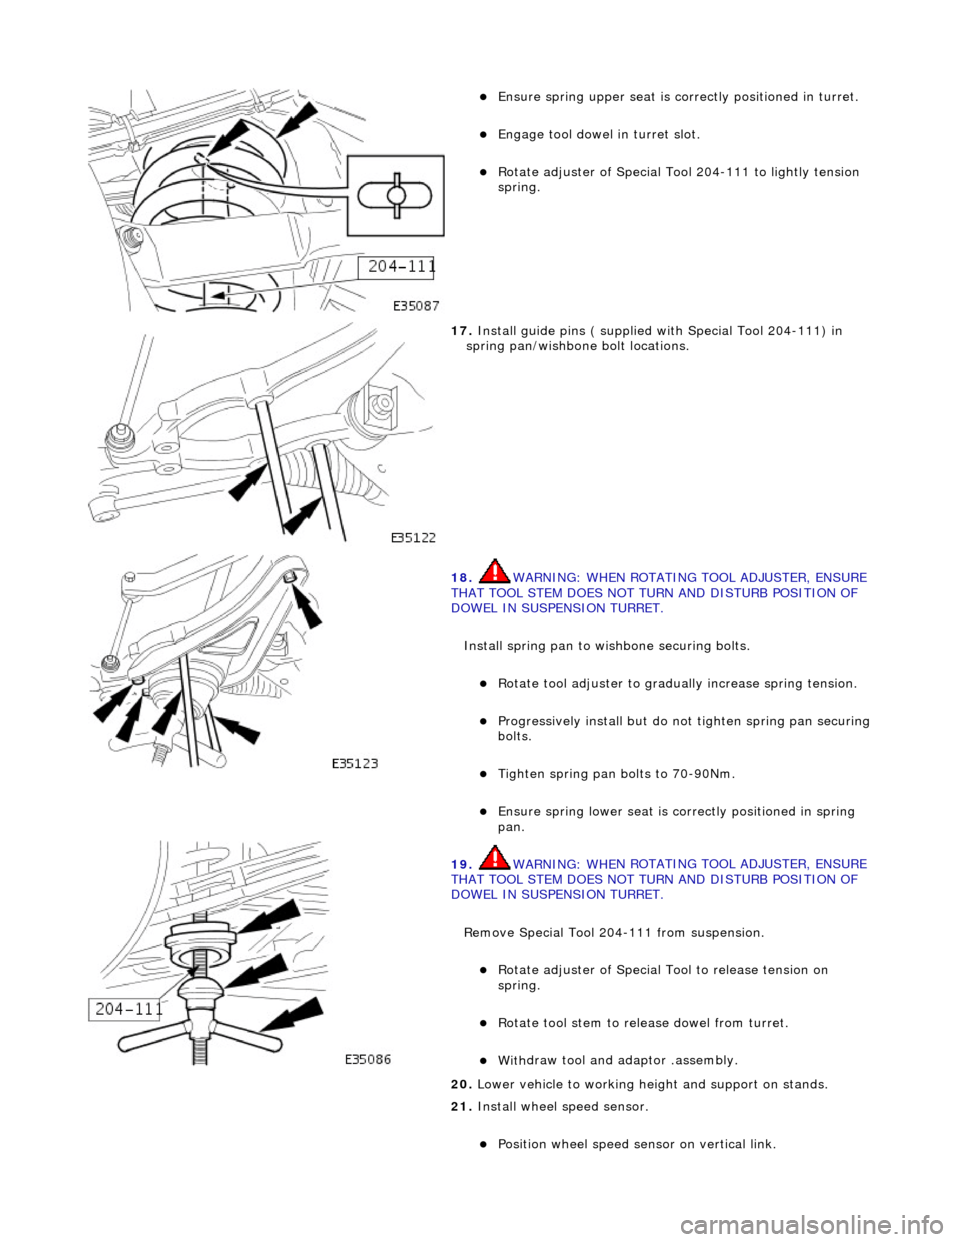
Ensure spring
upper se
at is correctly positioned in turret.
Engage tool dowel in turret slo
t.
R
o
tate adjuster of Special Tool 204-111 to lightly tension
spring.
17 . Ins
tall guide pins ( supplied with Special Tool 204-111) in
spring pan/wishbone bolt locations.
18 . WARNING: WHE
N ROTATING TOOL ADJUSTER, ENSURE
THAT TOOL STEM DOES NOT TU RN AND DISTURB POSITION OF
DOWEL IN SUSPENSION TURRET.
Install spring pan to wishbone securing bolts.
Ro t
ate tool adjuster to gradua
lly increase spring tension.
Pr
ogressively install but do no
t tighten spring pan securing
bolts.
Tigh ten spring pan
bolts to 70-90Nm.
Ensure spri
ng
lower seat is co
rrectly positioned in spring
pan.
19 . WARNING: WHE
N ROTATING TOOL ADJUSTER, ENSURE
THAT TOOL STEM DOES NOT TU RN AND DISTURB POSITION OF
DOWEL IN SUSPENSION TURRET.
Remove Special Tool 204-111 from suspension.
Rotat
e adjuster of Special Tool to release tension on
spring.
R otate
tool stem to release dowel from turret.
With
draw tool and adaptor
.assembly.
20
. Lower vehi
cle to working heig
ht and support on stands.
21. Install wheel speed sensor.
Positi
on wheel speed sensor on vertical link.
Page 102 of 2490

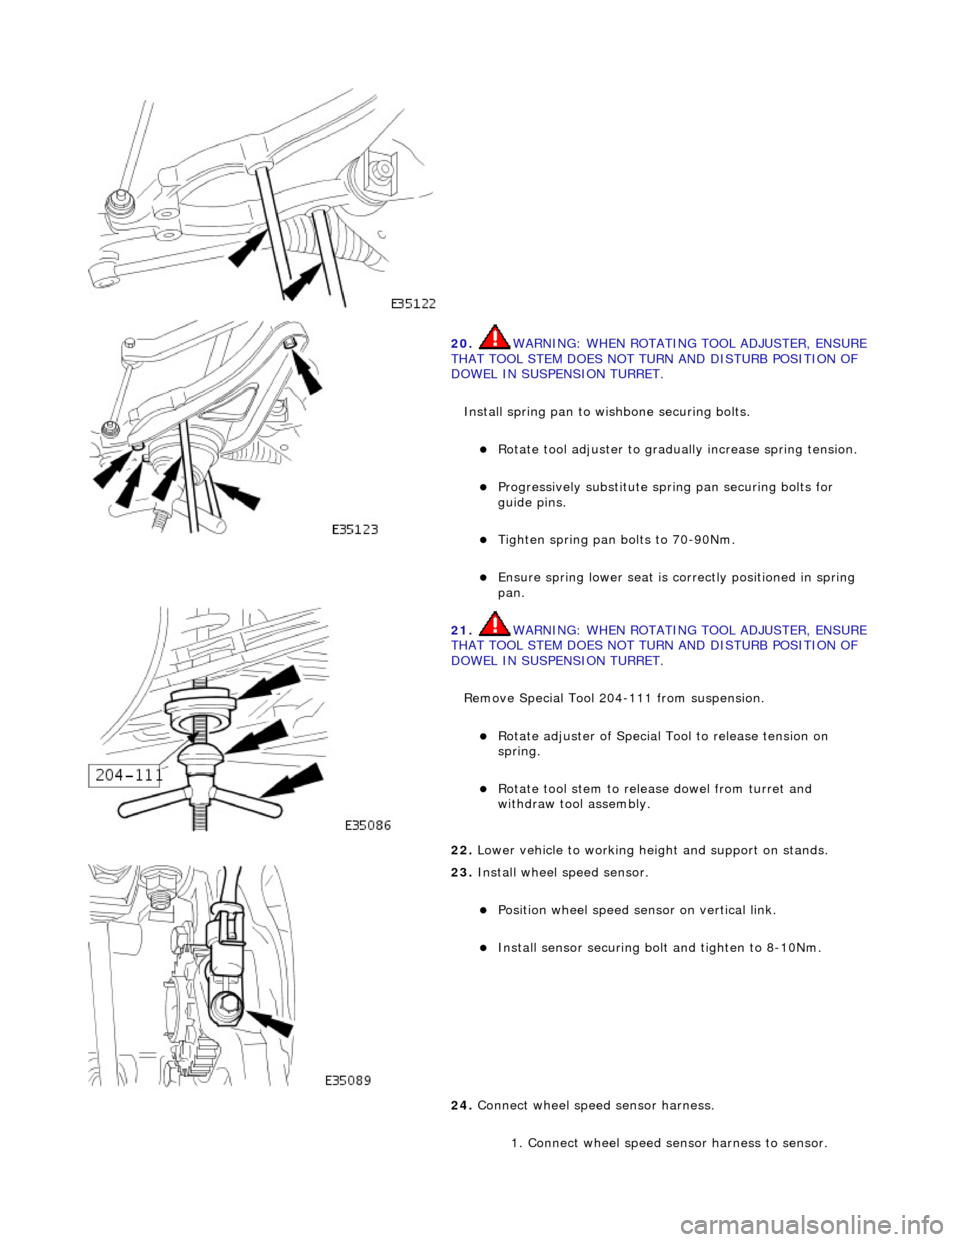
20. WARNING: WHE
N ROTATING TOOL ADJUSTER, ENSURE
THAT TOOL STEM DOES NOT TU RN AND DISTURB POSITION OF
DOWEL IN SUSPENSION TURRET.
Install spring pan to wishbone securing bolts.
Ro t
ate tool adjuster to gradua
lly increase spring tension.
Pr
ogressively substitute spri
ng pan securing bolts for
guide pins.
Tighten spring pan
bolts to 70-90Nm.
Ensure spri
ng
lower seat is co
rrectly positioned in spring
pan.
21 . WARNING: WHE
N ROTATING TOOL ADJUSTER, ENSURE
THAT TOOL STEM DOES NOT TU RN AND DISTURB POSITION OF
DOWEL IN SUSPENSION TURRET.
Remove Special Tool 204-111 from suspension.
Rotat
e adjuster of Special Tool to release tension on
spring.
R o
tate tool stem to release dowel from turret and
withdraw tool assembly.
22 . Lower vehi
cle to working heig
ht and support on stands.
23 . Inst
all wheel speed sensor.
Posi
ti
on wheel speed sensor on vertical link.
Instal
l sensor securing bolt
and tighten to 8-10Nm.
24. Connect wheel speed sensor harness.
1. Connect wheel speed sensor harness to sensor.