1998 JAGUAR X308 drive plate
[x] Cancel search: drive platePage 1787 of 2490
Heating and Ventilation - Heater Core
Removal and Installation
Removal
Installation
1.
Drain radiator coolant only; re fer to 26.10.01 or (SC) 26.10.01.
2. Remove instrument panel for access; refer to 76.46.01.
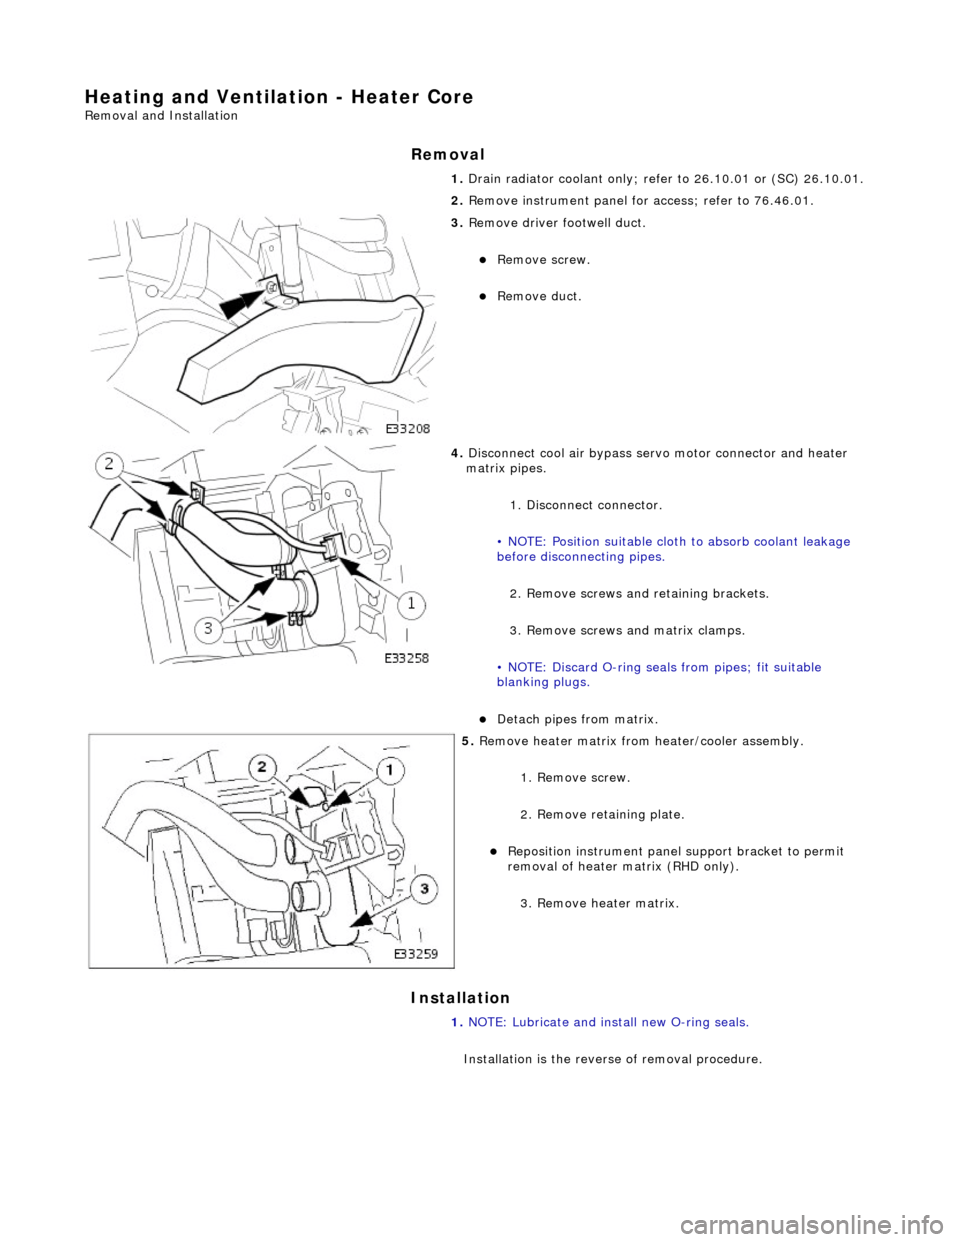
3. Remove driver footwell duct.
Remove screw.
Remove duct.
4. Disconnect cool air bypass serv o motor connector and heater
matrix pipes.
1. Disconnect connector.
• NOTE: Position suitable clot h to absorb coolant leakage
before disconnecting pipes.
2. Remove screws and retaining brackets.
3. Remove screws and matrix clamps.
• NOTE: Discard O-ring seals from pipes; fit suitable
blanking plugs.
Detach pipes from matrix.
5. Remove heater matrix from heater/cooler assembly.
1. Remove screw.
2. Remove retaining plate.
Reposition instrument panel support bracket to permit
removal of heater matrix (RHD only).
3. Remove heater matrix.
1. NOTE: Lubricate and install new O-ring seals.
Installation is the reverse of removal procedure.
Page 1972 of 2490
Daytime Running Lamps (DRL) - Daytime Running Lamps (DRL)
Diagnosis and Testing
Tests Using the Portable Diagnostic Unit
Refer to PDU User Guide
The complexity of the electronics involved with the Body Pr ocessor and the multiplexed communication networks which are
associated with it, preclude the use of wo rkshop general electrical test equipment. Therefore, reference should be made to
the PDU User Guide for detail ed instructions on testing the Daytime Running Function.
The Daytime Running function is exactly the same as for the normal operation of the side lamps (or dipped beam, where
specified) in as much as the body processor drives the same lamps from the same outputs.
The body processor has been programmed to respond to an alternative set of cond itions in order to operate the lamps,
instead of waiting for a signal from the normal light switch.
The conditions which have to be set are; ignition switch se t to position II or III and sidelight switch set to OFF. The
sidelights, side marker lamps (if fitted and enabled), tail lights and number plate lights will all be switched ON.
The PDU systematically tests and analyses all functions of the daytime running lamps.
Where a fault is indicated, before replac ing a component, some basic diagnostic methods may be necessary to confirm that
connections are good and that wiring is not damaged.
Page 2023 of 2490
sliding roof finisher and clips. Carpet covered trims line the trunk and are secured by fir tree fasteners to the sides and fro nt inner panel.
Rear View Mirrors
The.interior rear view mirror is an electrochromic unit that automatically da rkens to prevent glare from following vehicle
lights. This automatic function is selected by pressing the switch at the bottom of the mirror. Pressing the switch again
cancels this function. An LED then illuminates when automatic dipping is operative. The light sensing unit for the Night
Sentinel automatic lamp operating system is also incorporated in the mirror casing.
The door mirrors are cheater mounted, colo r-keyed units, remote electrically adjustable and heated. Adjustment of both
mirrors is carried out from the driver's door switchpack.A slider switch selects the mirror to be adjusted, and a disc switch
adjusts the selected mirror to the required position. Mirror ad justment can only be made when the ignition switch is in
position I or II or the driver's door is open, and the selector switch is moved from the central position. The door mirrors also
automatically darken under control of the electrochromic interior rear view mirror. Mirror heating elements operate on
selection of backlight heating.
Automatic dipping of passenger door mirror for kerb view when reversing, is fitted as part of the memory pack. With the
ignition switch in position II, the mirror selector switch in the left or right position and reverse gear selected, automatic
dipping is initiated by moving the mirror toggle switch rearwards and releasing. On receipt of the dip signal, the passenger
door mirror is driven downwards either 7 degrees, bottom of travel, or 4,5 to 5,5 seconds, whichever occurs first.
Subsequent rearward movement of the toggle switch achieves further dipping of the mirror in the same increments and
sequence. The mirror can be manu ally returned to the normal memorised positi on by moving the toggle switch forward with
reverse gear selected. The mirror will auto matically return to memorised position on deselection of reverse gear, or moving
ignition switch from position II.
Door mirror fold-back where fitted, to facilitate parking in conf ined spaces, can be initiated when the ignition switch is in
position I or II, the mirror selector switch is in the centra l position and vehicle speed is below 19 km/h (12 mph). Mirror
fold-back is then initiated by moving the toggle switch rear wards and releasing it. The door mirrors are returned to the
normal driving position by agai n moving toggle switch rearwards. There is no speed constraint on this operation. In the
event of a fold-back mirror becoming 'out of position' due to acci dental impact, it must only be re-positioned by initiating
the fold-back sequence.
Loss of power supplies will result in loss of mirror fold-back memory. In the event of such a memory loss with mirrors in the
normal position, fold-back will operate on second movement of the toggle swit ch. On loss of memory with mirrors in the
fold-back position, they will return to the no rmal position on next fold-back operation.
Bumpers
Each bumper comprises a beam mounted to the body via two strut assemblies, and a moulded polypropylene cover
incorporating side armatures and chrome plated blades. Each strut is secured to the BIW by three bolts and supports the
beam on a single bolt/height adjuster. The front bumper cover which is moulded to form a lo wer air intake for the cooling
pack, also incorporates left and right handed twin fog lamps, brake coolin g ducts. Side marker lamps fitted for some
markets serve only as reflectors for UK and Europe. A plastic undertray secured to the lower edge of the front bumper,
improves airflow and minimises the ingres s of road grime in that area. Standard bumpers have glass mat thermoplastic
(GMT) beams mounted on GMT struts. For certain markets, aluminium bumper beams are installed on menasco energy
absorbing struts. Whilst both types of front bumper provide a fu lly integrated 'soft front end' that satisfies bumper impact
requirements, the energy absorbing front and rear bumpers are further designed to withstand 5mph (8kph) impacts with no
visible damage sustained. Side markers/re flectors, and direction indicators are designed for ease of ac cess from the outside
of the bumper. For adjustment and bulb change, the fog lamps are accessed from th e bumper interior. The bumper covers
are body coloured and matched. Replacement covers are supplied complete with side armatures and are finished in primer
Trunk
The trunk houses the spare wheel, the battery, an electrical carrier containing electrical fuses, relays and modules and a
compact disc auto-changer attached to body bracketry. The trun k is fitted with push-fit liners to the sides and front inner
panel.The carpet covered floor is in two removable sections, one covering the spare wheel and wheel changing equipment,
the other covering the battery and electrical carrier. The front and rear edges of the floor board loca te in blocks on the fuel
tank backboard and the rear of the body , which provide two height settings to accommodate the difference in thickness
between the space saver and full sized spare wheels. A moulded finisher covering the rear of the trunk below the sill is
secured to the rear panel by tabs and fir tree fasteners. Finisher panels fitted over the rear lamp units provide for access
from the trunk. Finisher panels fitted to the rear lamp units provide trunk inte rior access to the lamps. The trunk lid
underside is fitted with a removable mo ulded liner and two trunk illumination light s. Trunk locking is based on a central
latch and striker, operated electrically through the central lo cking system by an adjacent actuator or by key in a barrel lock
Page 2041 of 2490
Body Closures - Fuel Filler Door Removal and Installation
Removal
Installation
1.
Remove battery cover and disconnect ground cable from battery
terminal. Refer to Section 86.15.19.
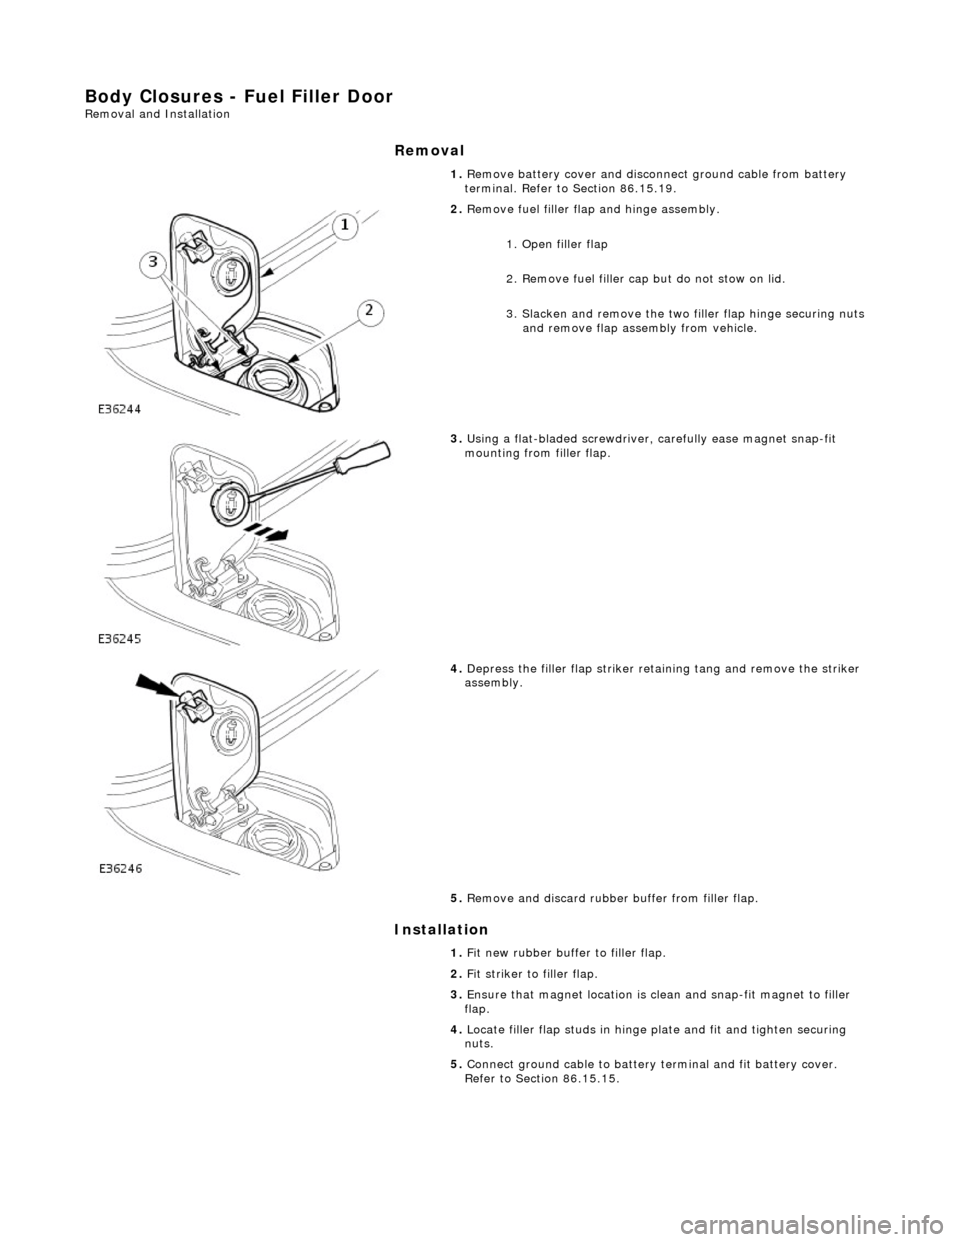
2. Remove fuel filler flap and hinge assembly.
1. Open filler flap
2. Remove fuel filler cap but do not stow on lid.
3. Slacken and remove the two filler flap hinge securing nuts and remove flap assembly from vehicle.
3. Using a flat-bladed screwdriver, carefully ease magnet snap-fit
mounting from filler flap.
4. Depress the filler flap striker retaining tang and remove the striker
assembly.
5. Remove and discard rubber buffer from filler flap.
1. Fit new rubber buffer to filler flap.
2. Fit striker to filler flap.
3. Ensure that magnet location is clean and snap-fit magnet to filler
flap.
4. Locate filler flap studs in hinge plate and fit and tighten securing
nuts.
5. Connect ground cable to battery terminal and fit battery cover.
Refer to Section 86.15.15.
Page 2054 of 2490
Interior Trim and Ornamentation - Interior Trim
Description and Operation
Carpets
The passenger compartment carpet is a one piece moulded constr uction with integral sound deadening material, heel mats
and driver's footrest. The carpet is attach ed to the vehicle floor by plastic clips fitted below the door treadplates. Removal of the carpet necessitates re moval of the front seats, lifting of the centre console rear extens ion and removal of the heelboard
carpet.
Fascia
The full width, slush moulded, soft feel PVC fascia is mounted on an injection moulded armature and is faced with wood
veneer. In addition to the air conditioning and central, outer and demisting vents, it accepts instrument packs dedicated to
market requirements and a centrally mounted analogue clock.
Doors
The one-piece door casings are trimmed in UEV to match the seating, with wood veneer at the waistline and a carpet insert
at the front lower corner. Each casing is secured to the door inner panel by fir tree press fast eners along the lower section,
two armrest fixings at the centre and vene er panel dowels and fixings at the top. The armrests which are common to front
and rear doors, are trimmed in matching leather or UEV according to specification. The door switchpacks, dedicated to
driver and front or rear passenger, are in corporated in the armrests. A speaker is in stalled in the lower section of each door
and a tweeter is incorporated behind each interior door handle escutcheon. Where premium ICE is fitted, the front tweeters
are installed in the upper A posts.
A, B, C and D Posts
On each side,a grained UEV finisher trimmed to match the headlining is secured to the 'A' post and cantrail by fir tree
fasteners locating in BIW apertures. The upper 'D' post finisher is trimmed and secured in the same manner. The single
piece'B/C' post finishers, also finished in grained matching UEV, each have a front se at belt exit aperture and are secured to
the BIW by four spring clips and two fir tree fasteners.
Headlining
The one-piece headlining consists of a 6mm thick polyurethane foam membrane covered with suede effect knitted polyester. The headlining is secured to the BIW roof by body tangs, the roof console, sun visors, combined grab handles and coat
hooks, the cantrail finishers and where fitt ed, the sliding roof finisher and clips.
Trunk
Carpet covered trims line the trunk and are secured by fir tr ee fasteners to the sides and front inner panel. The carpet
covered, two-section, removable trunk fl oor provides access to the spare wheel and wheel changing equipment, the battery
and electrical carrier. The floor board rests on the spare wheel, with the front and rear edges locating in blocks on the fuel
tank backboard and the rear of the body. The support blocks provide for two floor he ight settings to accommodate either a
space saver or full size spare wheel.A moulded finisher covering the rear of the trunk below the sill is secured to the rear
panel by tabs and fir tree fasteners. Finish er panels fitted to the rear lamp units provide trunk interior access to the lamps.
The trunk lid underside is fitted with a removabl e moulded liner and two trunk illumination lights.
Page 2142 of 2490
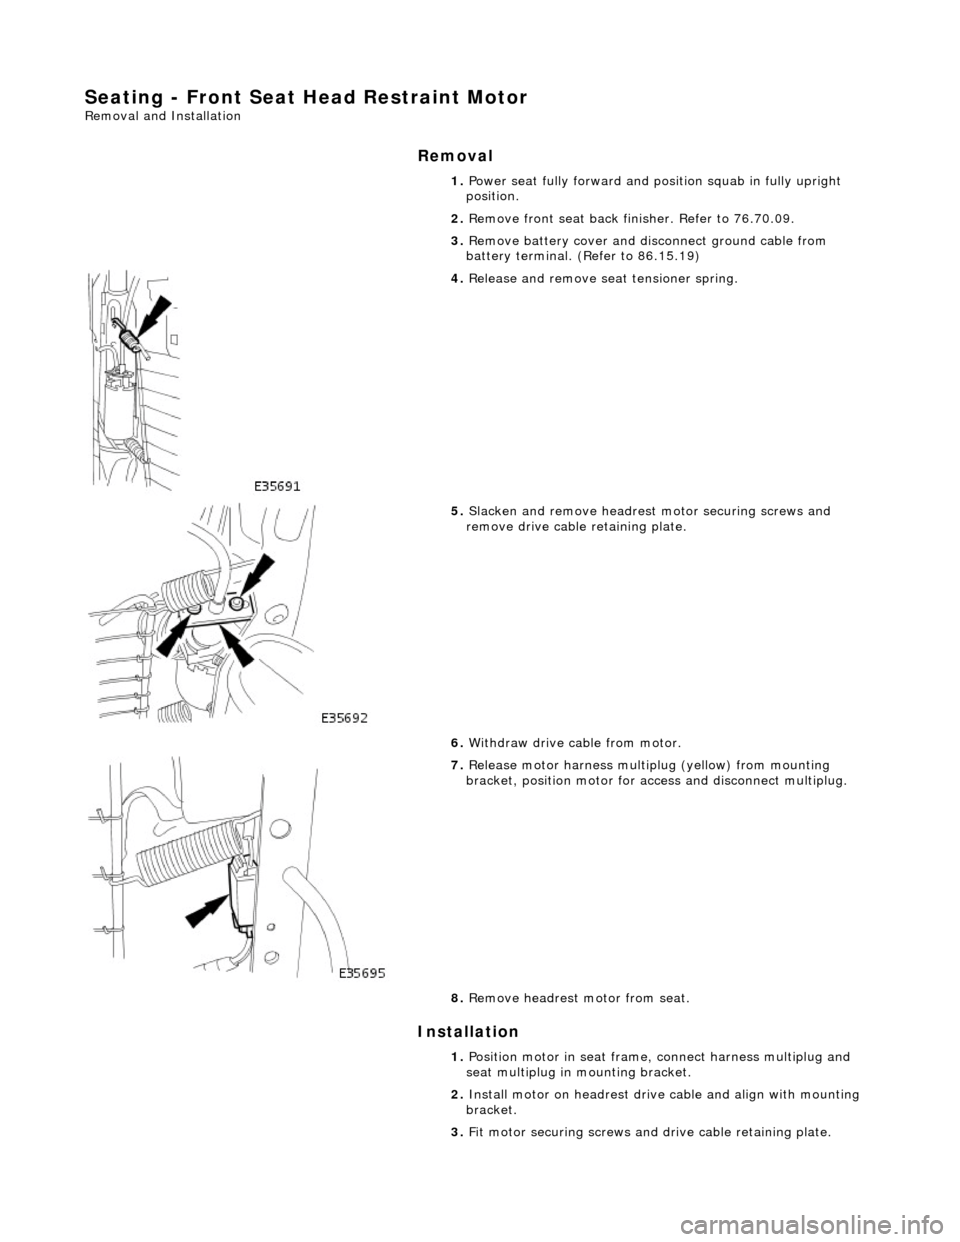
Seating - Front Seat Head Restraint Motor
Removal and Installation
Removal
Installation
1. Power seat fully forward and position squab in fully upright
position.
2. Remove front seat back finisher. Refer to 76.70.09.
3. Remove battery cover and disc onnect ground cable from
battery terminal. (Refer to 86.15.19)
4. Release and remove se at tensioner spring.
5. Slacken and remove headrest motor securing screws and
remove drive cable retaining plate.
6. Withdraw drive cable from motor.
7. Release motor harness multiplug (yellow) from mounting
bracket, position motor for acce ss and disconnect multiplug.
8. Remove headrest motor from seat.
1. Position motor in seat frame, connect harness multiplug and
seat multiplug in mounting bracket.
2. Install motor on headrest driv e cable and align with mounting
bracket.
3. Fit motor securing screws and drive cable retaining plate.
Page 2145 of 2490
Installation
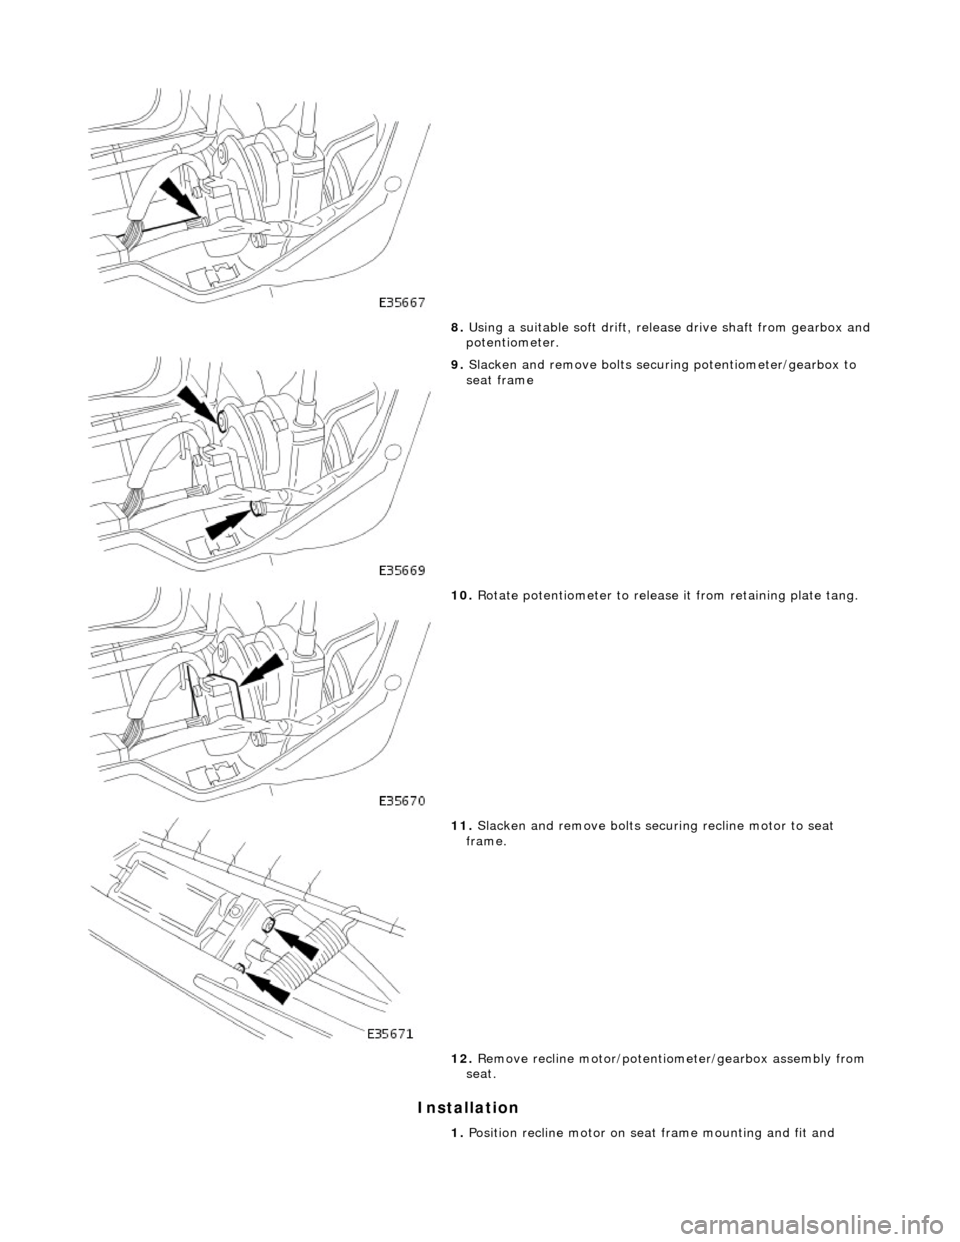
8. Using a suitable soft drift, release drive shaft from gearbox and potentiometer.
9. Slacken and remove bolts securi ng potentiometer/gearbox to
seat frame
10. Rotate potentiometer to release it from retaining plate tang.
11. Slacken and remove bolts securing recline motor to seat
frame.
12. Remove recline motor/potentio meter/gearbox assembly from
seat.
1. Position recline motor on seat frame mounting and fit and
Page 2146 of 2490
tighten securing bolts.
2.
Position potentiometer on gearbox.
3. Engage drive shaft in po tentiometer and gearbox.
4. Install potentiometer retaining plate.
5. Rotate potentiometer to en gage retaining plate tang.
6. Fit and tighten retaining plate/gearbox securing bolts.
7. Fit and fully seat new gearbo x drive shaft securing clip
8. Fit seat cover RH side to seat frame and fully seat securing
clips.
9. Fit seat cover LH side to seat frame and fully seat securing
clips.
10. Fit seat cover to lower frame retaining strip.
11. Position seat for acces and fit seat back finisher. Refer to
76.70.09.
12. Install seat in vehicle. Refer to 76.70.01.
13. Connect ground cable to batt ery terminal and fit battery
cover. Refer to 86.15.15.
14. Motor seat fully forward and fully rearward, checking for
satisfactory operation.
15. Return seat to original position.