Page 2241 of 2490
Installation
8. Slacken and remove four screws securing major gauge
module/surround to fascia and withdraw surround.
1. Position major gauge surround on panel, routing harness
multiplugs through apertures.
2. Fit and tighten screws securing major gauge module/surround
to fascia.
3. Connect harness multiplug to tr ip keyboard and fit and fully
seat keyboard in gauge surround, ensuring correct location of
retaining tangs
4. Connect harness multiplug to fog lamp switch and fit and fully
seat switch in gaug e surround, ensuring correct location of
tangs.
5. Fit veneer panel. Refer to 76.47.24.
6. Connect ground cable to battery terminal and fit battery cover.
Refer to 86.15.15.
7. Return steering column to original position.
Page 2247 of 2490
39. CAUTION: The 'A' post facia mounting brackets are pre-
set to the body and must no t under any circumstances be
disturbed.
Remove two bolts securing facia to LH'A' post mounting
bracket.
40. With assistance, carefully pull facia assembly rearwards,
withdrawing centre locating pin from front bulkhead and
disengaging side dowels from slots in'A' post brackets.
41. Remove facia assembly from vehicle and place on clean
bench correct way up, with back facing outward.
42. Disconnect key transponder module harness multiplug.
43. Remove key transponder module.
1. Remove two screws securi ng key transponder module
to facia and remove transponder module.
2. Remove and discard plastic inserts from facia steel
Page 2258 of 2490
31. Connect body processor module harness multiplug to facia
harness and tighten captive securing bolt.
32. Install illumination control module on facia. mounting.
1. Connect module to facia harness multiplug.
2. Slide module downward to secure on mounting bracket.
33. Install new key transponder module securing screw plastic
inserts to facia. Position key transponder module in facia and
install securing screws.
34. Connect key transponder module harness multiplug to facia
harness.
Page 2271 of 2490

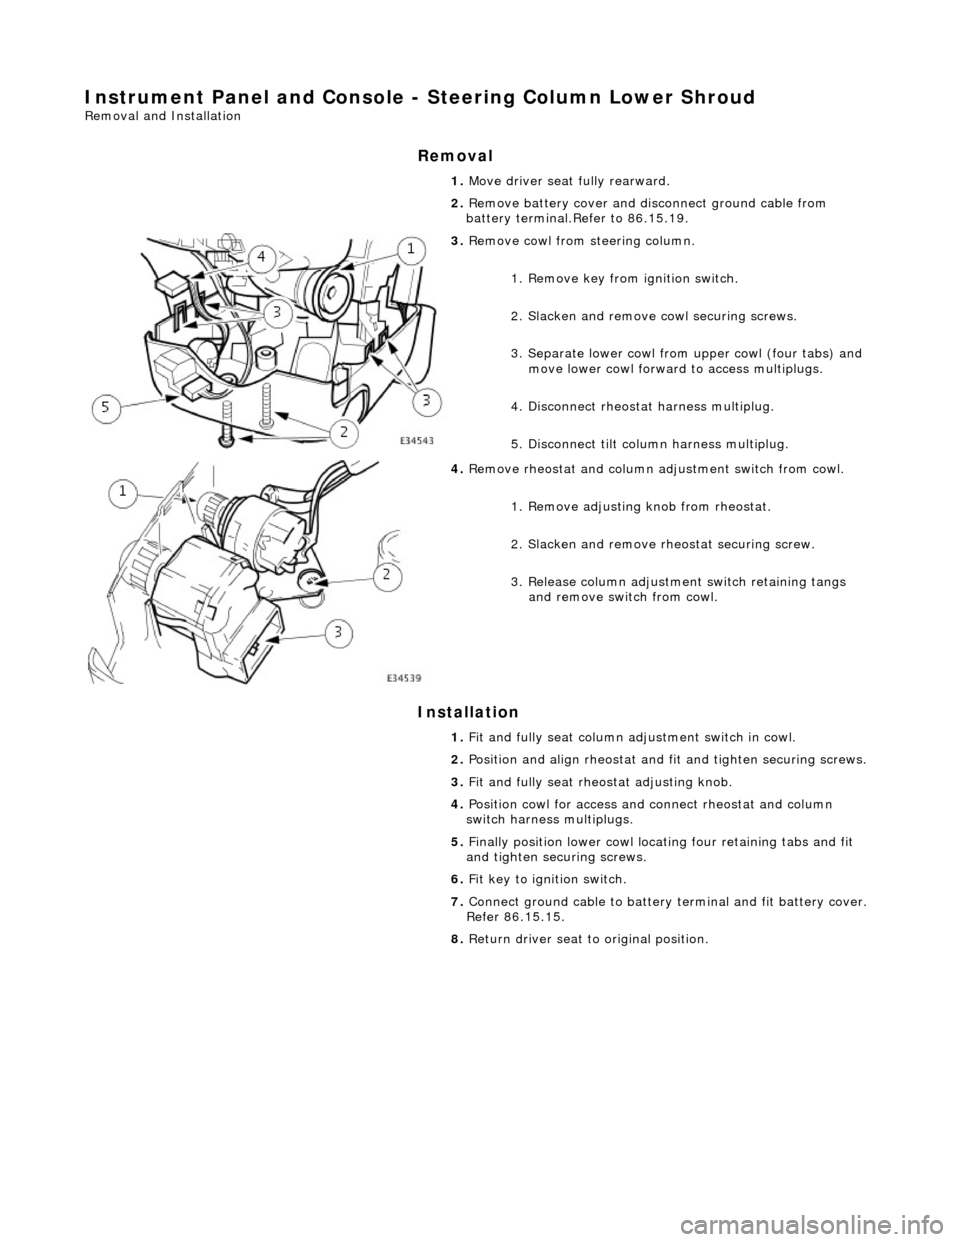
Instrument Panel and Console - Steering Column Lower Shroud
Removal and Installation
Removal
Installation
1.
Move driver seat fully rearward.
2. Remove battery cover and disconnect ground cable from
battery terminal.Refer to 86.15.19.
3. Remove cowl from steering column.
1. Remove key from ignition switch.
2. Slacken and remove cowl securing screws.
3. Separate lower cowl from upper cowl (four tabs) and move lower cowl forward to access multiplugs.
4. Disconnect rheostat harness multiplug.
5. Disconnect tilt column harness multiplug.
4. Remove rheostat and column adjustment switch from cowl.
1. Remove adjusting knob from rheostat.
2. Slacken and remove rh eostat securing screw.
3. Release column adjustment switch retaining tangs and remove switch from cowl.
1. Fit and fully seat column ad justment switch in cowl.
2. Position and align rheostat and fit and tighten securing screws.
3. Fit and fully seat rheo stat adjusting knob.
4. Position cowl for access and connect rheostat and column
switch harness multiplugs.
5. Finally position lower cowl locating four retaining tabs and fit
and tighten securing screws.
6. Fit key to ignition switch.
7. Connect ground cable to battery terminal and fit battery cover.
Refer 86.15.15.
8. Return driver seat to original position.
Page 2273 of 2490

Handles, Locks, Latches and Entry Systems - Handles, Locks, Latches and
Entry Systems
Description and Operation
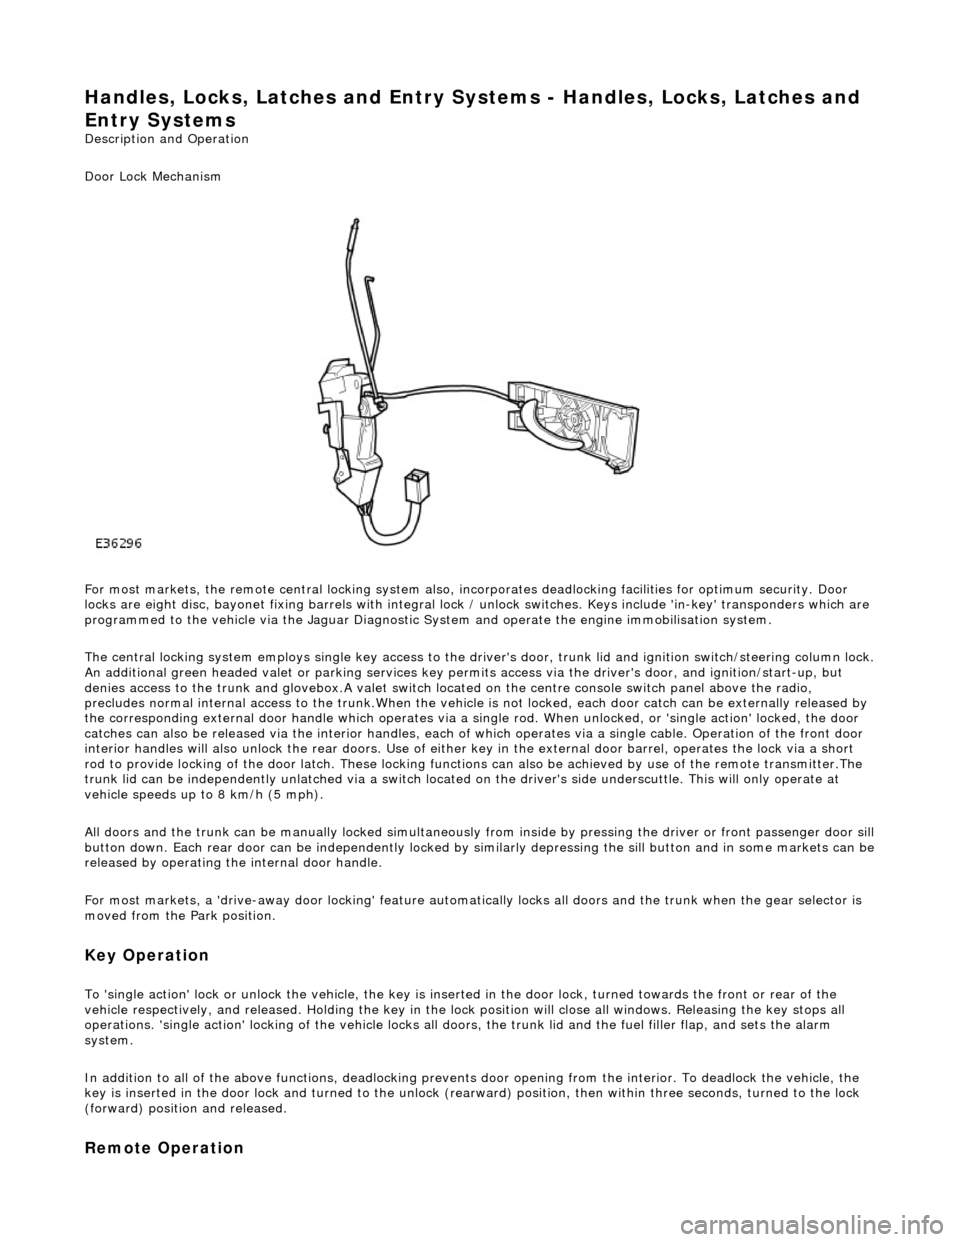
Door Lock Mechanism
For most markets, the remote central locking system also, in corporates deadlocking facilities for optimum security. Door
locks are eight disc, bayonet fixing barrels with integral lock / unlock switches. Keys include 'in-key' transponders which are
programmed to the vehicle via the Jaguar Diagnostic Sy stem and operate the engine immobilisation system.
The central locking system employs single key access to the driv er's door, trunk lid and ignition switch/steering column lock.
An additional green headed valet or park ing services key permits access via the driver's door, and ignition/start-up, but
denies access to the trunk and glovebox.A valet switch located on the centre console switch panel above the radio,
precludes normal internal access to the trunk.When the vehicle is not locked, each door catch can be externally released by
the corresponding external door handle which operates via a si ngle rod. When unlocked, or 'single action' locked, the door
catches can also be released via the interior handles, each of which operates via a single cable. Operation of the front door
interior handles will also unlock the rear doors. Use of either key in the external door barrel, operates the lock via a short
rod to provide locking of the door latch. These locking functions can also be achieved by use of the remote transmitter.The
trunk lid can be independently unlatched via a switch located on the driver's side underscuttle. This will only operate at
vehicle speeds up to 8 km/h (5 mph).
All doors and the trunk can be manually lock ed simultaneously from inside by pressing the driver or front passenger door sill
button down. Each rear door can be independently locked by si milarly depressing the sill button and in some markets can be released by operating the internal door handle.
For most markets, a 'drive-away door locking' feature automati cally locks all doors and the trunk when the gear selector is
moved from the Park position.
Key Operation
To 'single action' lock or unlock the vehicle, the key is inserted in the door lock , turned towards the front or rear of the
vehicle respectively, and released. Holding the key in the lock position will close all windows. Releasing the key stops all
operations. 'single action' locking of the vehicle locks all doors, the trunk lid and the fuel filler flap, and sets the alarm
system.
In addition to all of the above functions, deadlocking prevents door opening from th e interior. To deadlock the vehicle, the
key is inserted in the door lock and turned to the unlock (rearw ard) position, then within three seconds, turned to the lock
(forward) position and released.
Remote Operation
Page 2285 of 2490

Handles, Locks, Latches and Entry Systems - Glove Compartment Lid Lock
Cylinder
Removal and Installation
Removal
Installation
1. Remove glovebox handle and lock assembly. Refer to
76.52.08.
2. Remove plastic lock rod operat ing bush from lock barrel.
3. Remove operating bush bias spring from lock barrel.
4. Slacken and remove screw securing barrel to housing and
remove barrel from lock housing.
5. Thoroughly clean lock housing.
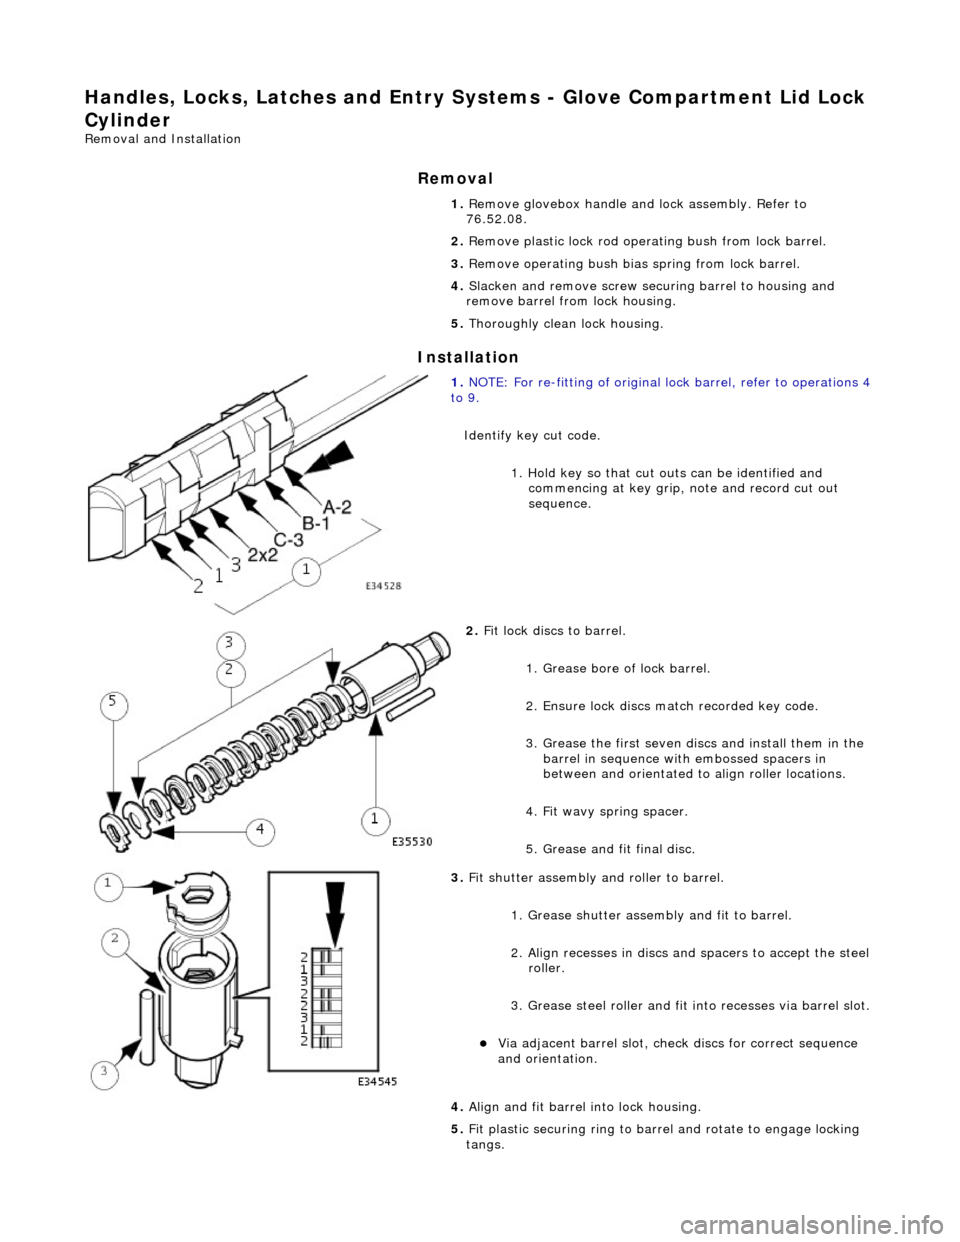
1. NOTE: For re-fitting of original lock barrel, refer to operations 4 to 9.
Identify key cut code. 1. Hold key so that cut ou ts can be identified and
commencing at key grip, note and record cut out
sequence.
2. Fit lock discs to barrel.
1. Grease bore of lock barrel.
2. Ensure lock discs match recorded key code.
3. Grease the first seven discs and install them in the barrel in sequence with embossed spacers in
between and orientated to align roller locations.
4. Fit wavy spring spacer.
5. Grease and fit final disc.
3. Fit shutter assembly an d roller to barrel.
1. Grease shutter assemb ly and fit to barrel.
2. Align recesses in discs and spacers to accept the steel roller.
3. Grease steel roller and fit into recesses via barrel slot.
Via adjacent barrel slot, check discs for correct sequence
and orientation.
4. Align and fit barrel into lock housing.
5. Fit plastic securing ring to barrel and rotate to engage locking
tangs.
Page 2286 of 2490
6.
Fit bias spring to operating arm ensuring it is fully seated and
tensioned, with ends positioned each side of pillar.
7. Fit operating arm and bias spring assembly to barrel and
secure with 'C' clip.
8. Fit lock barrel assembly to housing.
9. Position lock assembly in handle and fit and tighten securing
screw.
10. Fit key and check lock function.
11. Remove key from lock.
12. Fit handle and lock assembly to glovebox lid.. Refer to 76.52
08.
Page 2322 of 2490

Wipers and Washers - Windshield Wiper/Washer Switch
Removal and Installation
Removal
1. Ensure that steering wheel is in the straight ahead, fully
lowered and fully ex tended position.
2. Remove battery cover and disc onnect ground cable from
battery terminal. Refer to 86.15.19.
3. WARNINGS:
FOLLOWING DISCONNECTION OF THE BATTERY, A PERIOD
OF AT LEAST ONE MINUTE MUST BE ALLOWED TO ELAPSE
BEFORE ANY WORK IS CARRIED OUT ON AN AIR BAG MODULE.
FOLLOWING TEN YEARS IN SERVICE, AN AIR BAG MODULE
MUST BE REMOVED AND DISPOSED OF IN THE APPROVED
MANNER, AND A NEW AIR BAG MUST BE FITTED.
AIR BAGS CONTAIN A CHEMICAL IRRITANT. IF AN AIR BAG
IS RENEWED, THE ORIGINAL UNIT MUST BE DISPOSED OF IN
ACCORDANCE WITH CURRENT SAFETY PROCEDURES.
IN THE EVENT OF A FAULT RUPTURING THE 10A BATTERY
SUPPLY FUSE (F4 LOCATED IN THE FUSE-BOX AT THE DRIVER'S
END OF THE FASCIA), THE FUSE MUST NOT BE RENEWED UNTIL
THE AIRBAG/SRS SYSTEM HAS BEEN DE-ACTIVATED. FUSES OF
ANY OTHER VALUE MUST NEVER BE USED, AS THIS CAN CAUSE
DISARM FAILURE.
Remove driver airbag. Refer to 76.73.39.
4. Remove steeri ng wheel.
5. Remove steering column lowe r cowl. Refer to 76.46.03.
6. Remove steering column upper cowl. Refer to 76.46.02.
7. Remove driver side unders cuttle. Refer to 76.46.11.
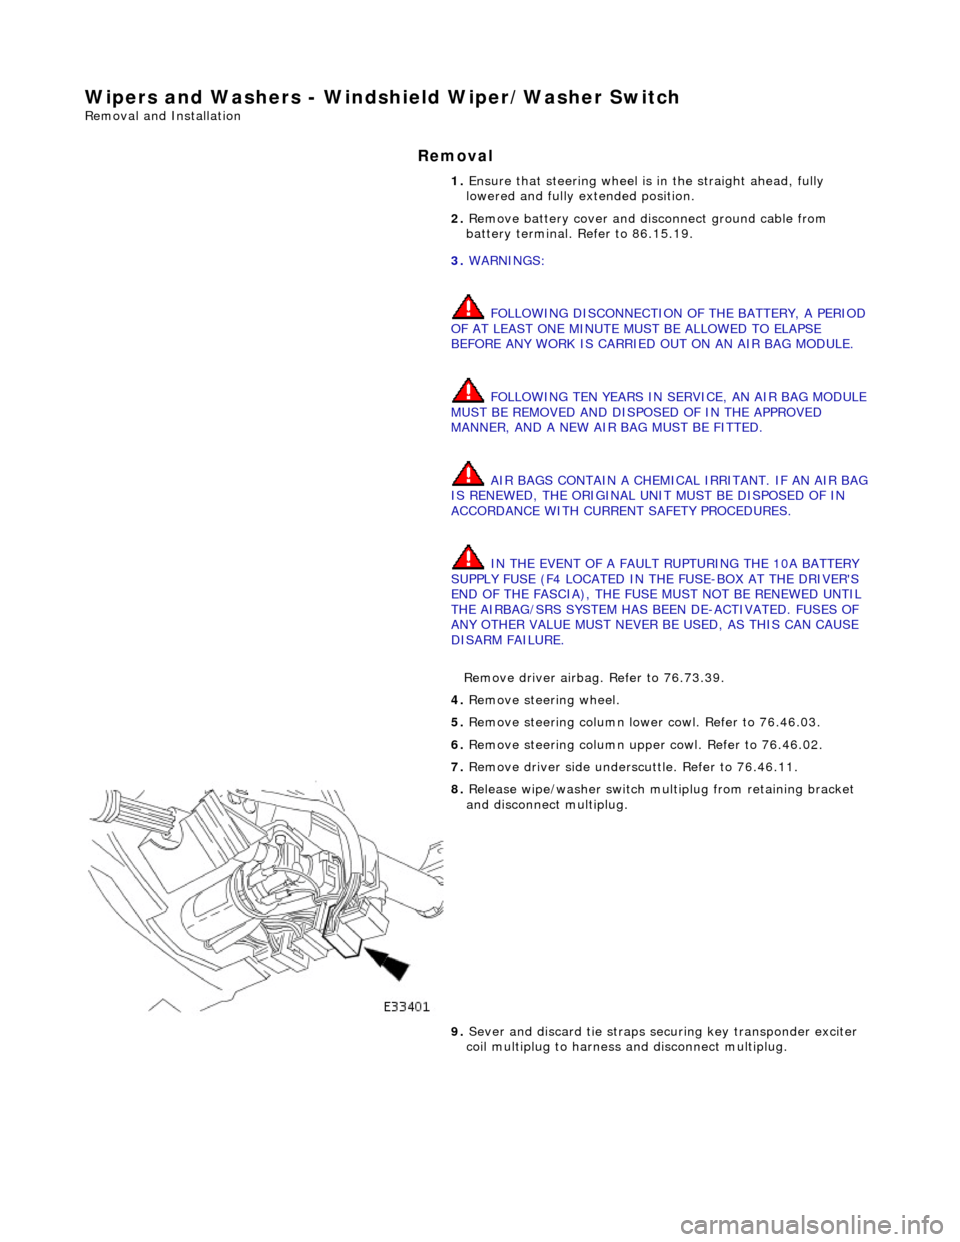
8. Release wipe/washer switch mult iplug from retaining bracket
and disconnect multiplug.
9. Sever and discard tie straps se curing key transponder exciter
coil multiplug to harness and disconnect multiplug.