Page 555 of 2490
I
nstallation
Tigh
ten each bolt to 8 to 12 Nm initial torque value.
Ti
ghten to a final torque of 57 to 63 Nm.
27. Check that the cranks haft turns freely.
28. Repeat the previous operations for each connecting rod
bearing as necessary.
1. Install the oil pan bo dy assembly. Refer to Operation 12.60.48.
2. Po
sition and align the oil pan gasket to the oil pan body
assembly.
Inse
rt the seal into the locating positions in the groove,
working around from a corner.
Press in the remai
nder of th
e seal, following the same
procedure.
3. Install th
e oil pan to the oil pan body.
1. Position and align the oil pan.
2. Install, but do not tighte n, all eighteen bolts which
secure the oil pan.
4. Tigh
ten the bolts to the correct
torque figure 11-13 Nm, in the
sequence indicated.
Tigh
ten the drain plug to 30-40 Nm.
Install a new oil
filter.
Page 558 of 2490

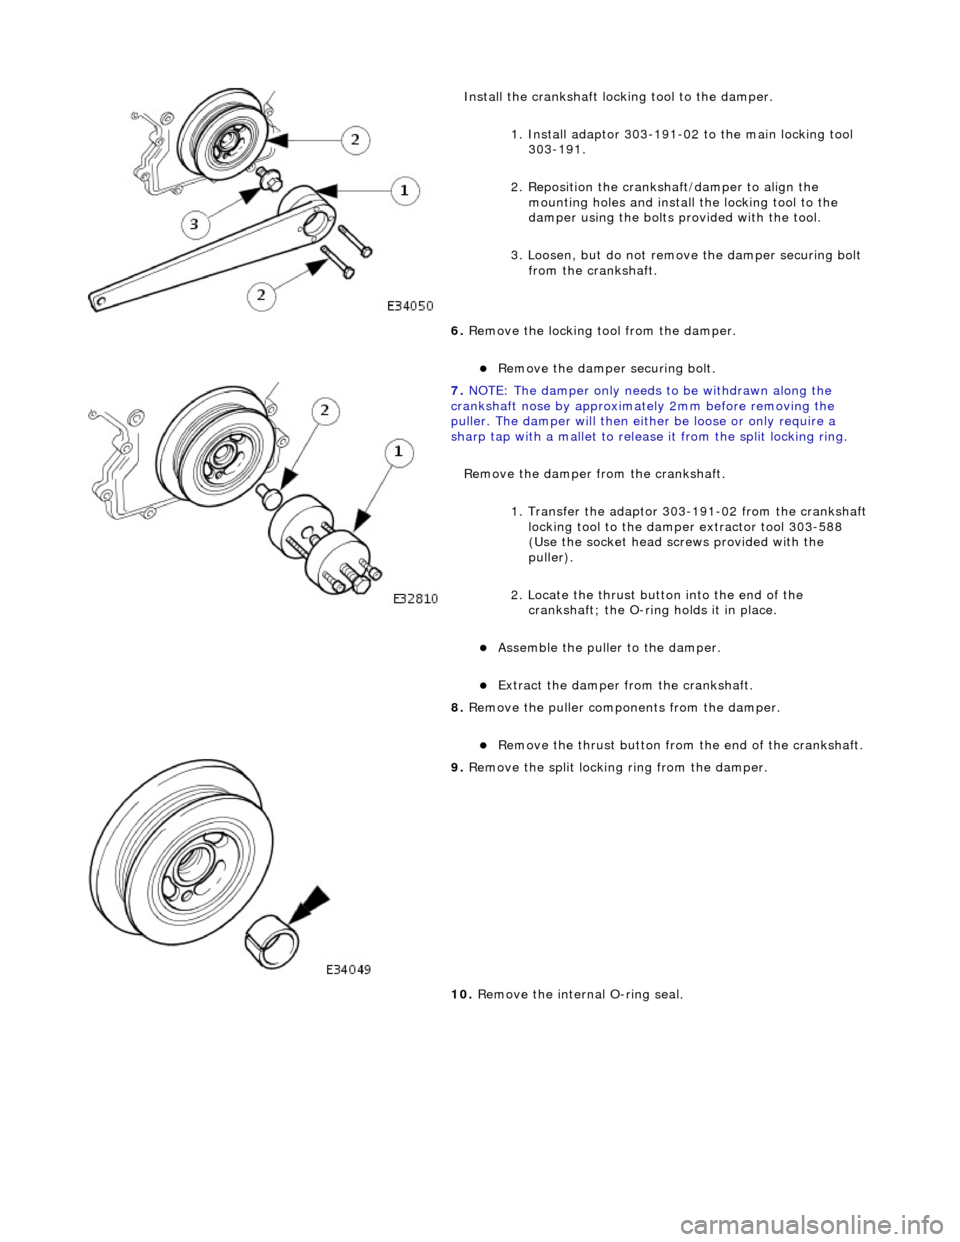
Instal
l the crankshaft locking tool to the damper.
1. Install adaptor 303-191-02 to the main locking tool 303-191.
2. Reposition the cranks haft/damper to align the
mounting holes and install the locking tool to the
damper using the bolts provided with the tool.
3. Loosen, but do not remove the damper securing bolt
from the crankshaft.
6. Remove the locking tool from the damper.
Remove
the damper securing bolt.
7. NOTE : Th
e damper only needs to be withdrawn along the
crankshaft nose by approximat ely 2mm before removing the
puller. The damper will then either be loose or only require a
sharp tap with a mallet to release it from the split locking ring.
Remove the damper from the crankshaft.
1. Transfer the adaptor 303 -191-02 from the crankshaft
locking tool to the damper extractor tool 303-588
(Use the socket head screws provided with the
puller).
2. Locate the thrust button into the end of the crankshaft; the O-ring holds it in place.
Ass
emble the puller to the damper.
Ex
trac
t the damper from the crankshaft.
8. Remove the puller components from the damper.
Re
move the thrust button from the end of the crankshaft.
9. Re
move the split locking ring from the damper.
10. Remove the internal O-ring seal.
Page 560 of 2490

3.
If
the damper is not to be installed immediately, the transit
ring should be installed temporarily to the seal.
4. Install a new O-ri
ng seal to the damper.
5. Instal
l the crankshaft damper.
Apply petroleum jelly to the damper
bore and O-ring seal.
1. Install the damper onto the crankshaft.
2. Install the split locking ring onto the crankshaft,
inside the centre bo re of the damper.
3. Install, but do not tigh ten, a new damper securing
bolt.
6. CAUTIO
N: Under no circumstan
ces should the crankshaft
setting peg 303-531 be used in the following operations, to lock
the crankshaft.
Tighten the damper securing bolt. 1. Reposition the damper to allow access to the bolt holes for installing the locking tool.
2. Install the locking tool (303-01 and 303-01-02) to the
damper using the bolts provided.
3. Fully tighten the damper securing bolt to 364-386 Nm.
7. Re
move the locking tool from the damper.
8. Install the drive belt to the fr ont accessory drive. Refer to
Section 303-05.
9. Install the twin fan and motor assembly. Refer to Section 303-
03.
10. Install the plastic mesh cove r to the torque converter
housing; if removed for acce ss to lock the crankshaft.
11. Reset the engine compartment cover to the normal position
and connect the gas struts.
12. Remove the paintwork protection sheets and close the engine
compartment.
Page 562 of 2490

5. Re
move the twin fan and motor
assembly for access. Refer to
Operation 26.25.12
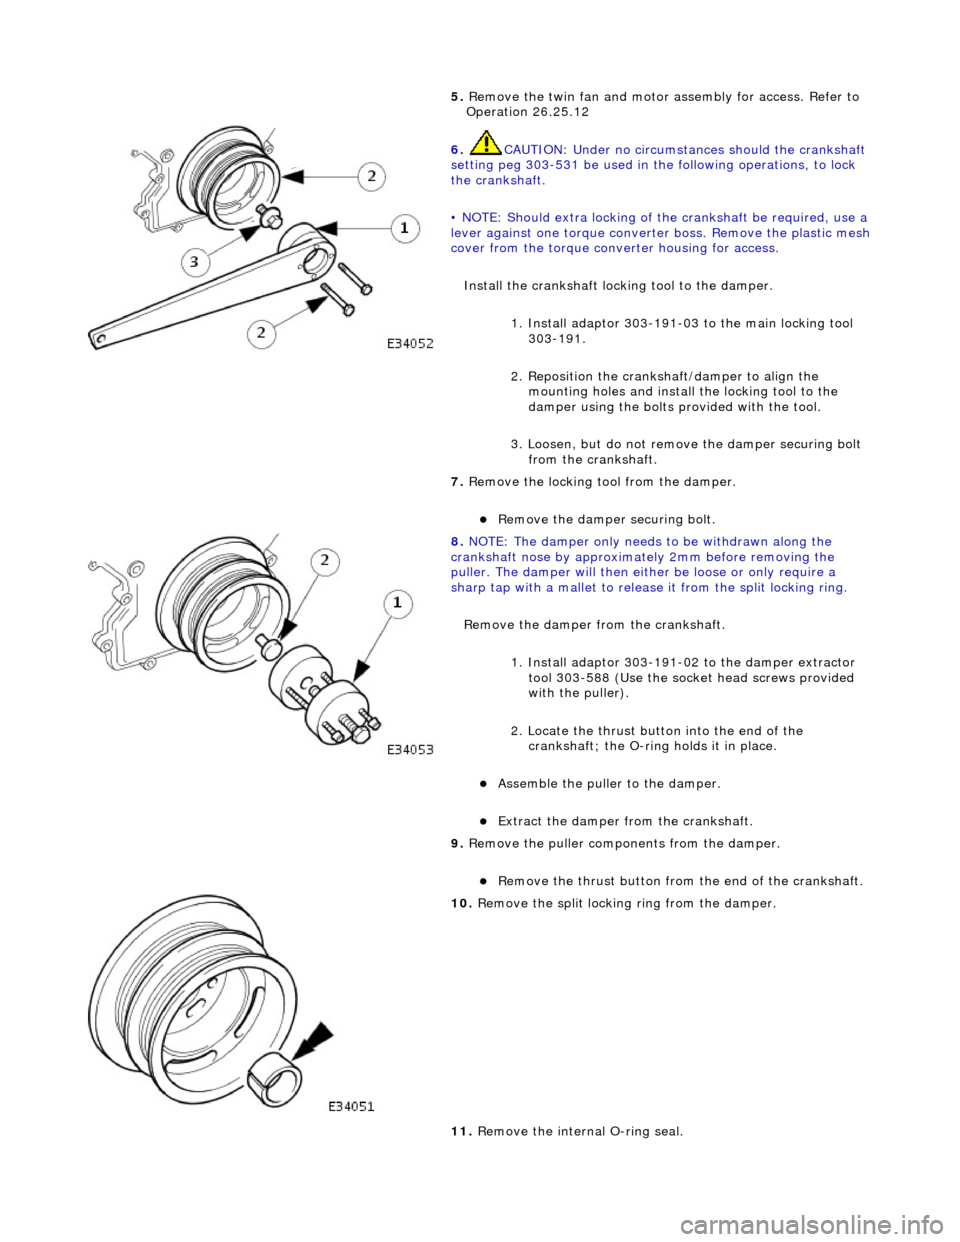
6. CAUTIO
N: Under no circumstan
ces should the crankshaft
setting peg 303-531 be used in the following operations, to lock
the crankshaft.
• NOTE: Should extra locking of the crankshaft be required, use a
lever against one torque converte r boss. Remove the plastic mesh
cover from the torque converter housing for access.
Install the crankshaft locking tool to the damper. 1. Install adaptor 303-191-03 to the main locking tool 303-191.
2. Reposition the cranks haft/damper to align the
mounting holes and install the locking tool to the
damper using the bolts provided with the tool.
3. Loosen, but do not remove the damper securing bolt
from the crankshaft.
7. Re
move the locking tool from the damper.
Re
move
the damper securing bolt.
8. NOTE : Th
e damper only needs to be withdrawn along the
crankshaft nose by approximat ely 2mm before removing the
puller. The damper will then either be loose or only require a
sharp tap with a mallet to release it from the split locking ring.
Remove the damper from the crankshaft.
1. Install adaptor 303-191-02 to the damper extractor tool 303-588 (Use the socket head screws provided
with the puller).
2. Locate the thrust button into the end of the crankshaft; the O-ring holds it in place.
Ass
emble the puller to the damper.
Ex
trac
t the damper from the crankshaft.
9. Remove the puller components from the damper.
Re
move the thrust button from the end of the crankshaft.
10 . R
emove the split locking ring from the damper.
11. Remove the internal O-ring seal.
Page 564 of 2490

3.
If
the damper is not to be installed immediately, the transit
ring should be installed temporarily to the seal.
4. Install a new O-ri
ng seal to the damper.
5. Instal
l the crankshaft damper.
Apply petroleum jelly to the damper
bore and O-ring seal.
1. Install the damper onto the crankshaft.
2. Install the split locking ring onto the crankshaft,
inside the centre bo re of the damper.
3. Install, but do not tigh ten, a new damper securing
bolt.
6. CAUTIO
N: Under no circumstan
ces should the crankshaft
setting peg 303-531 be used in the following operations, to lock
the crankshaft.
Tighten the damper securing bolt.
1. Reposition the damper to allow access to the bolt holes for installing the locking tool.
2. Install the locking tool (303-191 and 303-191-03) to the damper using the bolts provided.
3. Fully tighten the damper securing bolt to 364-386 Nm.
7. Re
move the locking tool from the damper.
8. Install the drive belt to the fr ont accessory drive. Refer to
Operation 12.10.40.
9. Install the supercharger driv e belt. Refer to Operation
18.50.08.
10. Install the twin fan and motor assembly. Refer to Section
303-03.
11. Install the plastic mesh cove r to the torque converter
housing; if removed for acce ss to lock the crankshaft.
12. Reset the engine compartment cover to the normal position
and connect the gas struts.
13. Remove the paintwork protection sheets and close the engine
compartment.
Page 565 of 2490
Engine - Crankshaft
Inner Sp
rocket4.0L NA V8 - AJ27
In-v
ehicle Repair
Remov
al
S
pecial Tool(s)
Camshaft setting
3
03 - 530
T
iming chain tensioning
303 - 532
Wedges, primary ch
ain
303 - 533
Cranksh
aft setting
303 - 531
1. Open the engine compartment and fit paintwork protection
sheets.
2. Set the engine compartment cover to the service access
position.
3. Di
sconnect the batt
ery ground cable.
R
emove the battery cover.
4. Remove the Timing Co ver. Refer to Operation 12.65.01 in this
Section.
5. Remove the VVT bush carrier from the A-Bank.
1. Remove the three bolts which secure the carrier to the cylinder block.
Page 566 of 2490
2.
Release the carrier from
the two ring dowels and
remove it.
6. Re
move the seals from the bush carrier.
1. Remove the sealing ring (scarf jointed) from the
carrier bush groove.
2. Remove the O-ring from the carrier oil-way recess.
7. Re
move the VVT bush carrier from the B-Bank.
1. Remove the two bolts and one nut which secure the carrier to the cylinder block.
2. Release the carrier from the two ring dowels and
remove it.
8. Re
move the seals from the bush carrier.
1. Remove the sealing ring (scarf jointed) from the
carrier bush groove.
2. Remove the O-ring from the carrier oil-way recess.
9. Raise the vehicle on a ramp.
10. Remove the crankshaft position sensor.
1. Remove the bolt which secures the crankshaft position sensor to the flywheel housing.
1. Re move
the sensor and allow it to hang free under
the engine.
Page 567 of 2490
2
. Remove the access grommet (for torque converter
bolts) from the housing.
11. Fit the damper securing bolt (old one) to the crankshaft,
hand-tight only.
12
.
Rotate the crankshaft until the triangular arrow indent on
the drive plate is visible thro ugh the access hole; confirm
that the timing flat on ea ch camshaft is uppermost.
13
.
Fit the crankshaft setting peg 303 - 531 to the crankshaft
position sensor location.
1. Fit the crankshaft setting peg 303 - 531.
1. P
osition the crankshaft so that the setting peg
engages fully into the timing slot.
2
. Fit and tighten the bolt to secure the setting peg.
14. Remove the damper securing bolt from the crankshaft.
15. Lower the vehicle on the ramp.
16
.
Fit the camshaft locking tool 303 - 530 to the A-Bank
camshafts, aligning the shafts slightly as necessary.
17. Loosen the bolt which secures the sprocket to the camshaft.