Page 2035 of 2490

the BIW front upper crossmember. Two gas struts secured to the hood by pi vot pins and snap-on couplings, support the
hood in the open position. A full width insulating pad is secured by screws to the underside of the hood. A sponge rubber
tubular seal is mounted transversely to wards the front of the hood underside.
Trunk
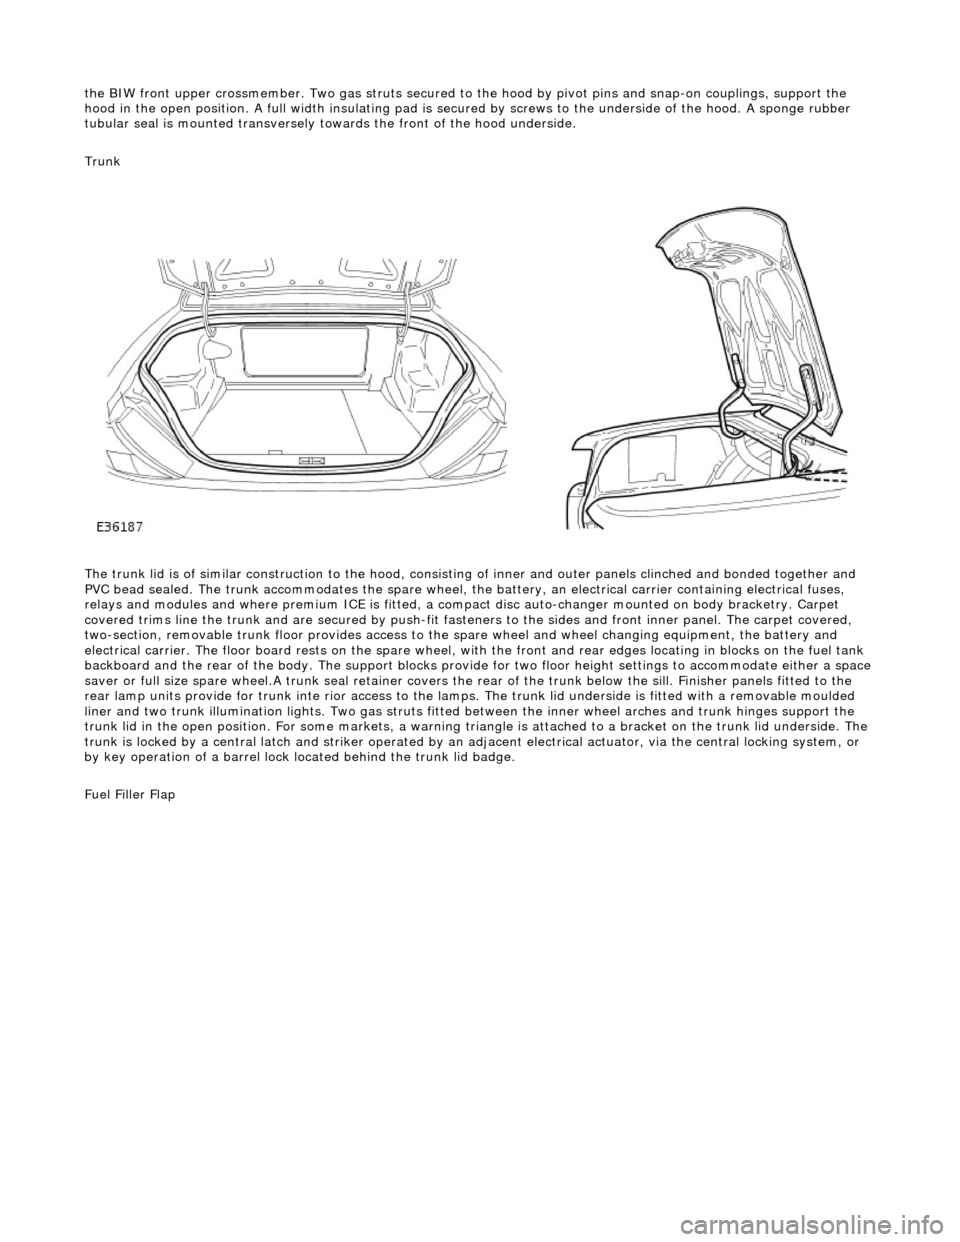
The trunk lid is of similar construction to the hood, consisting of inner and outer panels clinched and bonded together and
PVC bead sealed. The trunk accommodates the spare wheel, the battery, an electrical carrier containing electrical fuses,
relays and modules and where premium ICE is fitted, a compac t disc auto-changer mounted on body bracketry. Carpet
covered trims line the trunk and are secured by push-fit fasten ers to the sides and front inner panel. The carpet covered,
two-section, removable trunk floor prov ides access to the spare wheel and wheel changing equipment, the battery and
electrical carrier. The floor board rests on the spare wheel, with the front and rear e dges locating in blocks on the fuel tank
backboard and the rear of the body. The support blocks provide for two floor height settings to accommodate either a space
saver or full size spare wheel.A trunk seal retainer covers the re ar of the trunk below the sill. Finisher panels fitted to the
rear lamp units provide for trunk inte rior access to the lamps. The trunk lid underside is fitted with a removable moulded
liner and two trunk illumination lights. Two gas struts fitted between the inner wheel arches and trunk hinges support the
trunk lid in the open position. For some markets, a warning triangle is attached to a bracket on the trunk lid underside. The
trunk is locked by a central latch and stri ker operated by an adjacent electrical actuator, via the central locking system, or
by key operation of a barrel lock located behind the trunk lid badge.
Fuel Filler Flap
Page 2036 of 2490
The hinged fuel filler flap which is attached to the rear saddle panel by two nuts, incorporates a rubber buffer, snap-in
striker, hinge spring and fuel cap stowage magnet. The rubber fuel bowl moulding at tached via a steel armature to the body reinforcement panel, is retained at the filler neck by a clip. A mating drain tube is fitted with an internal filter. The filler flap
latch mechanism which is secured by nuts to the fuel bowl armature, comprises a locking pin and actuator. The actuator,
driven directly by the security and lock ing control module, operates independently from the central locking system. Locking
of the fuel filler flap can only be achieved by operation of the key or the remote rf transmitter.
Page 2048 of 2490
Body Closures - Luggage Compartment Lid Hinge
Removal and Installation
Removal
Installation
1. CAUTION: Before slackening hi nge securing bolts, ensure
that trunk lid is sufficiently supported to prevent paintwork
damage .
Remove hinge cover.
2. Sever and discard tie straps se curing harness to hinge (RH
hinge only) and position harness clear of hinge.
3. Disconnect gas strut rod end from from hinge pivot. Refer to
76.19.27.
4. Slacken and remove bolts securing hinge to trunk lid.
5. Slacken and remove bolts securing hinge to underside of
BIW saddle panel.
6. Remove hinge from vehicle.
1. Fit and tighten bolts securing hinge to BIW saddle panel.
2. Fit but do not tighten bolts se curing hing to trunk lid.
Page 2051 of 2490
Body Closures - Luggage Compartment Lid Striker
Removal and Installation
Removal
Installation
1.
Remove rear finisher. Refer to 76.19.44.
2. Lightly mark position of stri ker top edge on rear panel.
3. Slacken and remove the two bolts and spring washers securing
striker to trunk rear panel.
4. Remove striker fro m rear panel.
1. Position striker on rear panel, aligning top edge with mark.
2. Fit and lightly tighten securing bolts with spring washers.
3. Shut trunk lid and check alignment with rear fenders.
4. If necessary, slacken securing bolts and adjust striker position
as required.
5. Fit trunk rear finish er. Refer to 76.19.44.
Page 2054 of 2490

Interior Trim and Ornamentation - Interior Trim
Description and Operation
Carpets
The passenger compartment carpet is a one piece moulded constr uction with integral sound deadening material, heel mats
and driver's footrest. The carpet is attach ed to the vehicle floor by plastic clips fitted below the door treadplates. Removal of the carpet necessitates re moval of the front seats, lifting of the centre console rear extens ion and removal of the heelboard
carpet.
Fascia
The full width, slush moulded, soft feel PVC fascia is mounted on an injection moulded armature and is faced with wood
veneer. In addition to the air conditioning and central, outer and demisting vents, it accepts instrument packs dedicated to
market requirements and a centrally mounted analogue clock.
Doors
The one-piece door casings are trimmed in UEV to match the seating, with wood veneer at the waistline and a carpet insert
at the front lower corner. Each casing is secured to the door inner panel by fir tree press fast eners along the lower section,
two armrest fixings at the centre and vene er panel dowels and fixings at the top. The armrests which are common to front
and rear doors, are trimmed in matching leather or UEV according to specification. The door switchpacks, dedicated to
driver and front or rear passenger, are in corporated in the armrests. A speaker is in stalled in the lower section of each door
and a tweeter is incorporated behind each interior door handle escutcheon. Where premium ICE is fitted, the front tweeters
are installed in the upper A posts.
A, B, C and D Posts
On each side,a grained UEV finisher trimmed to match the headlining is secured to the 'A' post and cantrail by fir tree
fasteners locating in BIW apertures. The upper 'D' post finisher is trimmed and secured in the same manner. The single
piece'B/C' post finishers, also finished in grained matching UEV, each have a front se at belt exit aperture and are secured to
the BIW by four spring clips and two fir tree fasteners.
Headlining
The one-piece headlining consists of a 6mm thick polyurethane foam membrane covered with suede effect knitted polyester. The headlining is secured to the BIW roof by body tangs, the roof console, sun visors, combined grab handles and coat
hooks, the cantrail finishers and where fitt ed, the sliding roof finisher and clips.
Trunk
Carpet covered trims line the trunk and are secured by fir tr ee fasteners to the sides and front inner panel. The carpet
covered, two-section, removable trunk fl oor provides access to the spare wheel and wheel changing equipment, the battery
and electrical carrier. The floor board rests on the spare wheel, with the front and rear edges locating in blocks on the fuel
tank backboard and the rear of the body. The support blocks provide for two floor he ight settings to accommodate either a
space saver or full size spare wheel.A moulded finisher covering the rear of the trunk below the sill is secured to the rear
panel by tabs and fir tree fasteners. Finish er panels fitted to the rear lamp units provide trunk interior access to the lamps.
The trunk lid underside is fitted with a removabl e moulded liner and two trunk illumination lights.
Page 2055 of 2490
Interior Trim and Ornamentation - A-Pillar Trim Panel
Removal and Installation
Removal
Installation
1.
Remove the passenger assist handle.
For additional information, refer to: Passenger Assist Handle
(501-05 Interior Trim and Ornamentation, Removal and
Installation).
2. Detach the door aperture weatherstrip.
3. Remove the A-pillar trim panel.
Remove and discard the A-pi llar trim panel fir tree
fasteners.
1. To install, reverse the removal procedure.
Install new fir tree fasteners to the A-pillar trim panel.
Page 2056 of 2490
Interior Trim and Ornamentation - B-Pillar Trim Panel
Removal and Installation
Removal
1. Position front seat and squab fully forward.
2. Remove front seat belt upper and lower anchorages. Refer to
76.73.10.
3. Remove escutcheon from trim pad aperture and seat belt.
4. Remove draught welts from adjace nt door aperture flanges.
5. Using a trim removal tool and exercising care to avoid
damage, remove and discard th e two fir tree fasteners from
bottom of trim.
6. Carefully ease centre of trim pad inwards to release four
spring clips.
Page 2058 of 2490
Interior Trim and Ornamentation - Cowl Side Trim Panel
Removal and Installation
Removal
Installation
1.
Remove draught welt from adjace nt section of door aperture
flange.
2. Remove and discard fir tree fast ener from'A' post lower trim
pad.
3. Pull trim pad rearwards to di sengage clips and remove pad
from lower 'A' post.
1. Position trim pad on 'A' post and press outwards and forward
to engage retaining clips.
2. Fit and fully seat ne w fir tree fastener.
3. Fit draught welt to door aperture flange.
4. Fit and fully seat new fir tree fastener to secure trim pad.
5. Fit draught welt to adjace nt door aperture flange.