Page 638 of 2490

se
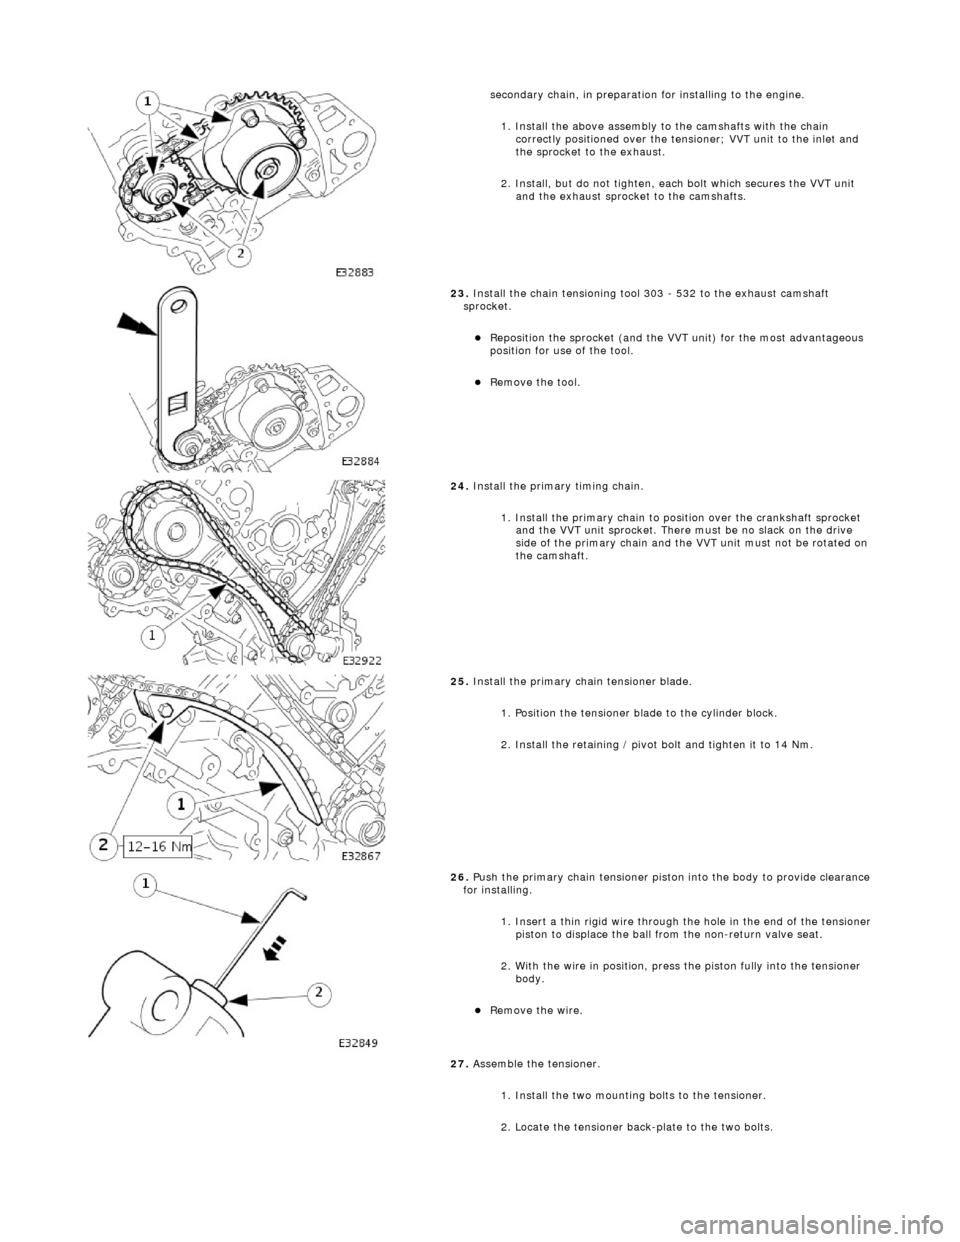
condary chain, in preparation for installing to the engine.
1. Install the above assembly to the camshafts with the chain correctly positioned over the tensioner; VVT unit to the inlet and
the sprocket to the exhaust.
2. Install, but do not tighten, each bolt which secures the VVT unit and the exhaust sprocket to the camshafts.
23 .
Install the chain t
ensioning tool 303 - 532 to the exhaust camshaft
sprocket.
Re p
osition the sprocket (and the VVT unit) for the most advantageous
position for use of the tool.
Re
move the tool.
24 . Install the
primary timing chain.
1. Install the primary chain to position over the crankshaft sprocket and the VVT unit sprocket. There mu st be no slack on the drive
side of the primary chain and the VVT unit must not be rotated on
the camshaft.
25 . Install the pri
mary chain tensioner blade.
1. Position the tensioner blade to the cylinder block.
2. Install the retaining / pivot bolt and tighten it to 14 Nm.
26 . P
ush the primary chain tensioner piston into the body to provide clearance
for installing.
1. Insert a thin rigid wire through the hole in the end of the tensioner
piston to displace the ball from the non-return valve seat.
2. With the wire in position, press the piston fully into the tensioner body.
Rem
ove the wire.
27. Assemble the tensioner.
1. Install the two mounting bolts to the tensioner.
2. Locate the tensioner back-plate to the two bolts.
Page 666 of 2490

Installation
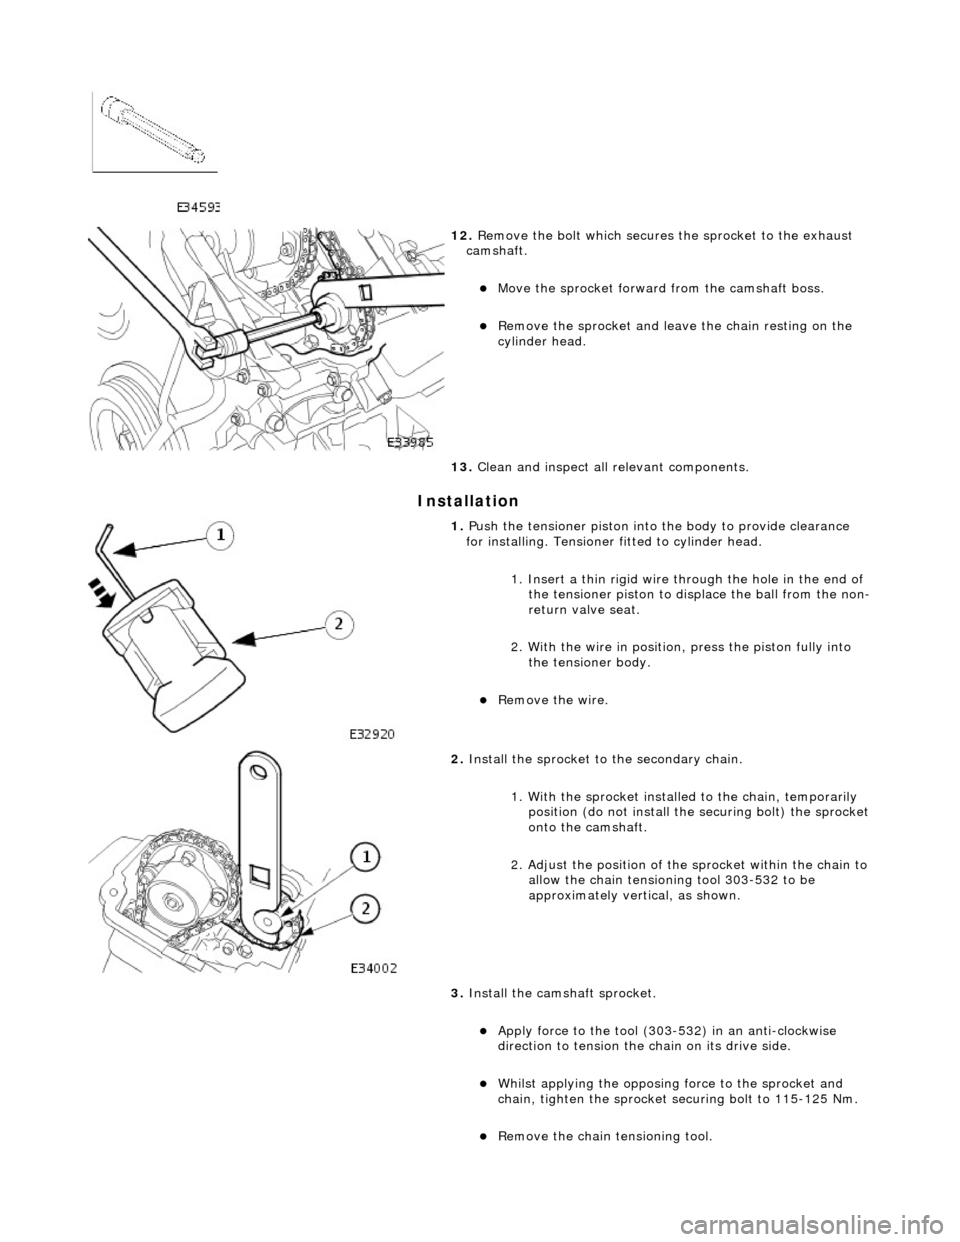
12. Remove the bolt which secures the sprocket to the exhaust
camshaft.
Move the sprocket forward from the camshaft boss.
Remove the sprocket and leav e the chain resting on the
cylinder head.
13. Clean and inspect all relevant components.
1. Push the tensioner piston into the body to provide clearance
for installing. Tensioner fitted to cylinder head.
1. Insert a thin rigid wire th rough the hole in the end of
the tensioner piston to displace the ball from the non-
return valve seat.
2. With the wire in position, press the piston fully into the tensioner body.
Remove the wire.
2. Install the sprocket to the secondary chain.
1. With the sprocket installe d to the chain, temporarily
position (do not install the securing bolt) the sprocket
onto the camshaft.
2. Adjust the position of the sprocket within the chain to
allow the chain tensioning tool 303-532 to be
approximately vertical, as shown.
3. Install the cams haft sprocket.
Apply force to the tool (303-532) in an anti-clockwise
direction to tension the chain on its drive side.
Whilst applying the opposing force to the sprocket and
chain, tighten the sprocket securing bolt to 115-125 Nm.
Remove the chain tensioning tool.
Page 670 of 2490

Installation
removing the bolt which secures the sprocket. 1. Place a flat piece of stee l strip along the timing cover
horizontal jointing face, adjacent to the exhaust
camshaft sprocket.
2. Secure the steel strip in place with adhesive tape.
11. A ball-ended hexagon drive bit is required to remove the
sprocket securing bolt. A suitable tool is available from Snap On as (FABLM10E) Long Series 10mm AF.
12. Remove the bolt which secures the sprocket to the exhaust
camshaft.
Move the sprocket forward from the camshaft boss.
Remove the sprocket and leav e the chain resting on the
cylinder head.
13. Clean and inspect all relevant components.
1. Push the tensioner piston into the body to provide clearance
for installing. Tensioner fitted to cylinder head.
1. Insert a thin rigid wire th rough the hole in the end of
the tensioner piston to displace the ball from the non-
return valve seat.
2. With the wire in position, press the piston fully into the tensioner body.
Remove the wire.
2. Install the sprocket to the secondary chain.
1. With the sprocket installe d to the chain, temporarily
position the sprocket onto the camshaft.
2. Adjust the position of the sprocket within the chain to
allow the chain tensioning tool 303-532 to be
approximately vertical, as shown.
Page 674 of 2490

Installation
12. Remove the bolt which secures the sprocket to the exhaust
camshaft.
Move the sprocket forward from the camshaft boss.
13. Remove the secondary chain tensioner. The tensioner piston
cannot be pushed into the body with the assembly in position.
1. Remove the two bolts which secure the tensioner.
Lift the tensioner, sprocket (release it fully from the
camshaft) and ch ain assembly.
2. Remove the tensioner rearward from between the chain.
14. Remove the sprocket and leav e the chain resting on the
cylinder head.
15. Clean and inspect all relevant components.
1. Install the sprocket to the secondary chain.
1. With the sprocket installe d to the chain, temporarily
position (do not install the securing bolt) the sprocket
onto the camshaft.
2. Adjust the position of the sprocket within the chain to
allow the chain tensioning tool 303-532 to be
approximately vertical, as shown.
Remove the chain tensioni ng tool; during future
operations, do not move the sprocket within the chain.
2. Push the tensioner piston into the body to provide clearance
for installing.
1. Insert a thin rigid wire th rough the hole in the end of
the tensioner piston to displace the ball from the non-
return valve seat.
Page 675 of 2490

2. With the wire in position, press the piston fully into the tensioner body.
Remove the wire.
3. Install the chain tensioner between the chain path.
1. Reposition the sprocket, still captive in the chain, upwards for access.
2. Install the chain tensioner between the sprockets.
Position the cam sprocket, chain and tensioner assembly
into position and locate the sprocket onto the camshaft
spigot.
4. Install the chain tensioner to the engine.
1. Fully seat the sprocket onto the camshaft and install the securing bolt, hand tight.
2. Install the two bolts which secure the tensioner and tighten to 10-14 Nm.
5. Install the cams haft sprocket.
Install the chain tensioner tool 303-532 to the sprocket
holes.
Apply force to the tool in an anti-clockwise direction to
tension the chain on its drive side.
Whilst applying the opposing force to the sprocket and
chain, tighten the sprocket securing bolt to 115-125 Nm.
Remove the chain tensioning tool.
6. Remove the tape and steel stri p from the timing cover upper
face. Wipe any residue of tape from the joint face.
7. Remove the camshaft locking tool.
8. Install the Cam Cover to Bank 1. Refer to Operation 12.29.44.
9. Raise the vehicle on the ramp.
10. Remove the crankshaft setting tool 303-531.
Page 680 of 2490

allow the chain tensioning tool 303-532 to be approximately vertical, as shown.
Remove the chain tensioni ng tool; during future
operations, do not move the sprocket within the chain.
2. Push the tensioner piston into the body to provide clearance
for installing.
1. Insert a thin rigid wire th rough the hole in the end of
the tensioner piston to displace the ball from the non-
return valve seat.
2. With the wire in position, press the piston fully into the tensioner body.
Remove the wire.
3. Install the chain tensioner between the chain path.
1. Reposition the sprocket, still captive in the chain, upwards for access.
2. Install the chain tensioner between the sprockets.
Position the cam sprocket, chain and tensioner assembly
into position and locate the sprocket onto the camshaft
spigot.
4. Install the chain tensioner to the engine.
1. Fully seat the sprocket onto the camshaft and install the securing bolt, hand tight.
2. Install the two bolts which secure the tensioner and tighten to 10-14 Nm.
5. Install the cams haft sprocket.
Install the chain tensioner tool 303-532 to the sprocket
holes.
Apply force to the tool in an anti-clockwise direction to
tension the chain on its drive side.
Page 713 of 2490
elbow.
8. Refit the Manifold Assembly to the Engine, as follows.
9. Fit eight new seals to the inlet manifold ports.
10. Fit the inlet manifold to the engine.
1. Fit the inlet manifold.
2. Fit the ten bolts which secure the inlet manifold.
11. Connect the fuel feed hose.
1. Connect the fuel feed hose at the Quick Fit connector. Ensure that the hose is fully seated to the feed pipe.
12. Connect the fuel return hose.
1. Connect the fuel return hose at the Quick Fit
connector. Ensure th at the hose is fully seated to the
feed pipe.
Page 724 of 2490
3. Fit the inlet manifold to the engine.
1. Fit the inlet manifold.
2. Fit the ten bolts which secure the inlet manifold.
4. Connect the fuel feed hose.
1. Connect the fuel feed hose at the Quick Fit connector. Ensure that the hose is fully seated to the feed pipe.
5. Connect the fuel return hose.
1. Connect the fuel return hose at the Quick Fit
connector. Ensure th at the hose is fully seated to the
feed pipe.
6. Reconnect the electrical connector to each fuel injector.