Page 2224 of 2490
Instrument Panel and Console - Floor Console
Removal and Installation
Removal
1. Turn ignition switch to posi tion II and apply footbrake.
2. Move gear selector to the the 'D' position. and release
footbrake.
3. Turn ignition switch to position'O'
4. Remove battery cover and disc onnect ground cable from
battery terminal. Refer to 86.15.19.
5. Where fitted, remove centre cons ole rear extension. Refer to
76.25.05.
6. Remove fascia centre veneer panel. Refer to 76.47.06.
7. Using a thin plastic lever, ca refully release the rear air
distribution control grill tang s at top and sides and remove
grill complete with veneer panel and control.
8. Disconnect cigar lighter and ashtray illumination harness
(white) multiplug at RH rear. of console.
9. Slacken and remove the two co nsole rear securing screws.
10. Remove 'J' gate finisher and veneer panel. Refer to 76.25.24
and 76.25.26.
11. Remove fascia centre veneer panel. Refer to 76.47.06.
Page 2225 of 2490

Installation
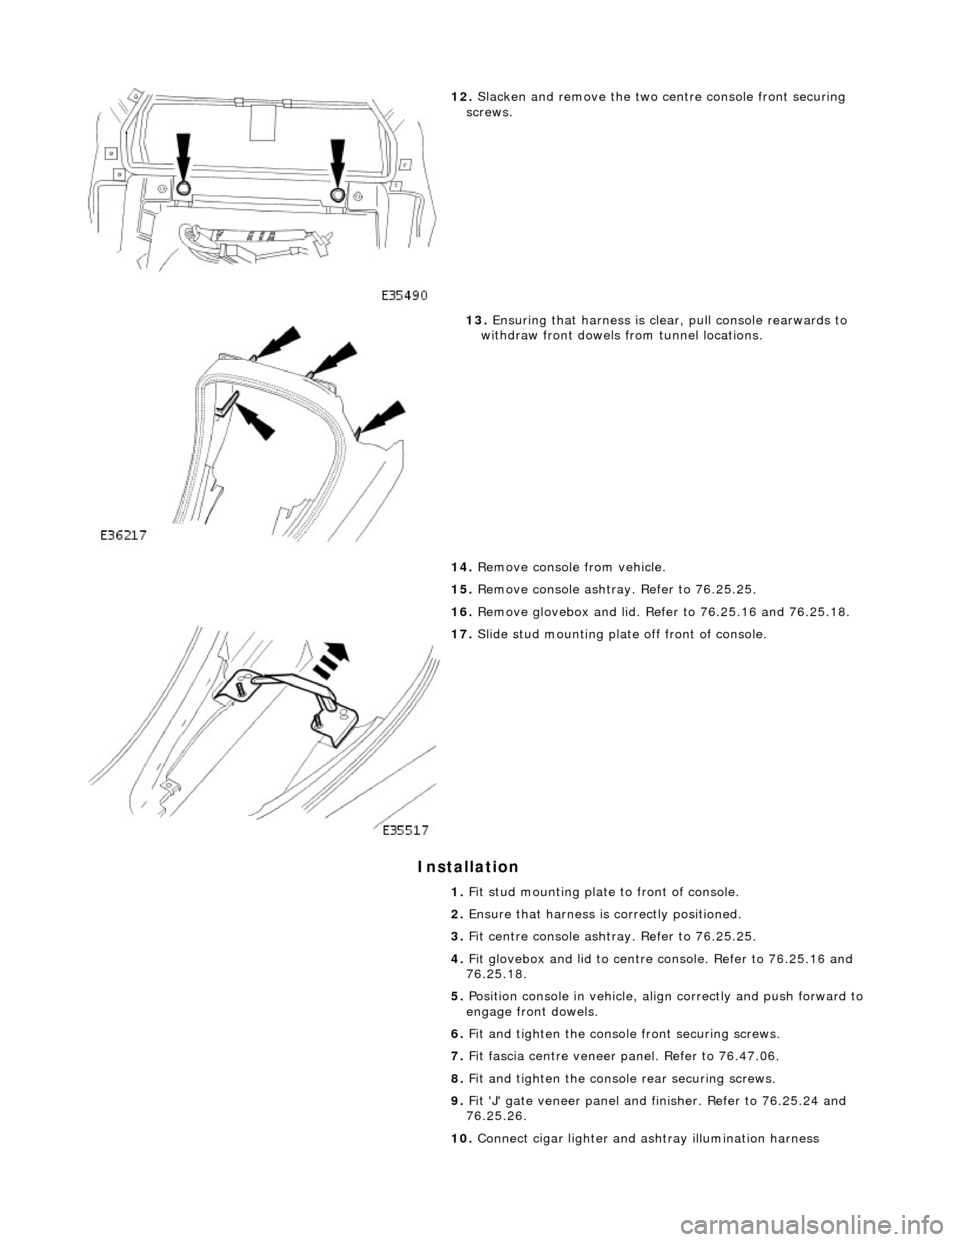
12. Slacken and remove the two ce ntre console front securing
screws.
13. Ensuring that harness is clea r, pull console rearwards to
withdraw front dowels from tunnel locations.
14. Remove console from vehicle.
15. Remove console ashtray. Refer to 76.25.25.
16. Remove glovebox and lid. Refer to 76.25.16 and 76.25.18.
17. Slide stud mounting plate off front of console.
1. Fit stud mounting plate to front of console.
2. Ensure that harness is correctly positioned.
3. Fit centre console ashtray. Refer to 76.25.25.
4. Fit glovebox and lid to centre console. Refer to 76.25.16 and
76.25.18.
5. Position console in vehicle, align correctly and push forward to
engage front dowels.
6. Fit and tighten the consol e front securing screws.
7. Fit fascia centre veneer panel. Refer to 76.47.06.
8. Fit and tighten the console rear securing screws.
9. Fit 'J' gate veneer panel and finisher. Refer to 76.25.24 and
76.25.26.
10. Connect cigar lighter and as htray illumination harness
Page 2227 of 2490

Instrument Panel and Console - Floor Console Ashtray
Removal and Installation
Removal
Installation
1.
Remove battery cover and disc onnect ground cable from
battery terminal. Refer to 86.15.19.
2. Remove center console for access . Refer to operations in this
section.
3. Open ashtray lid and remove cigar lighter.
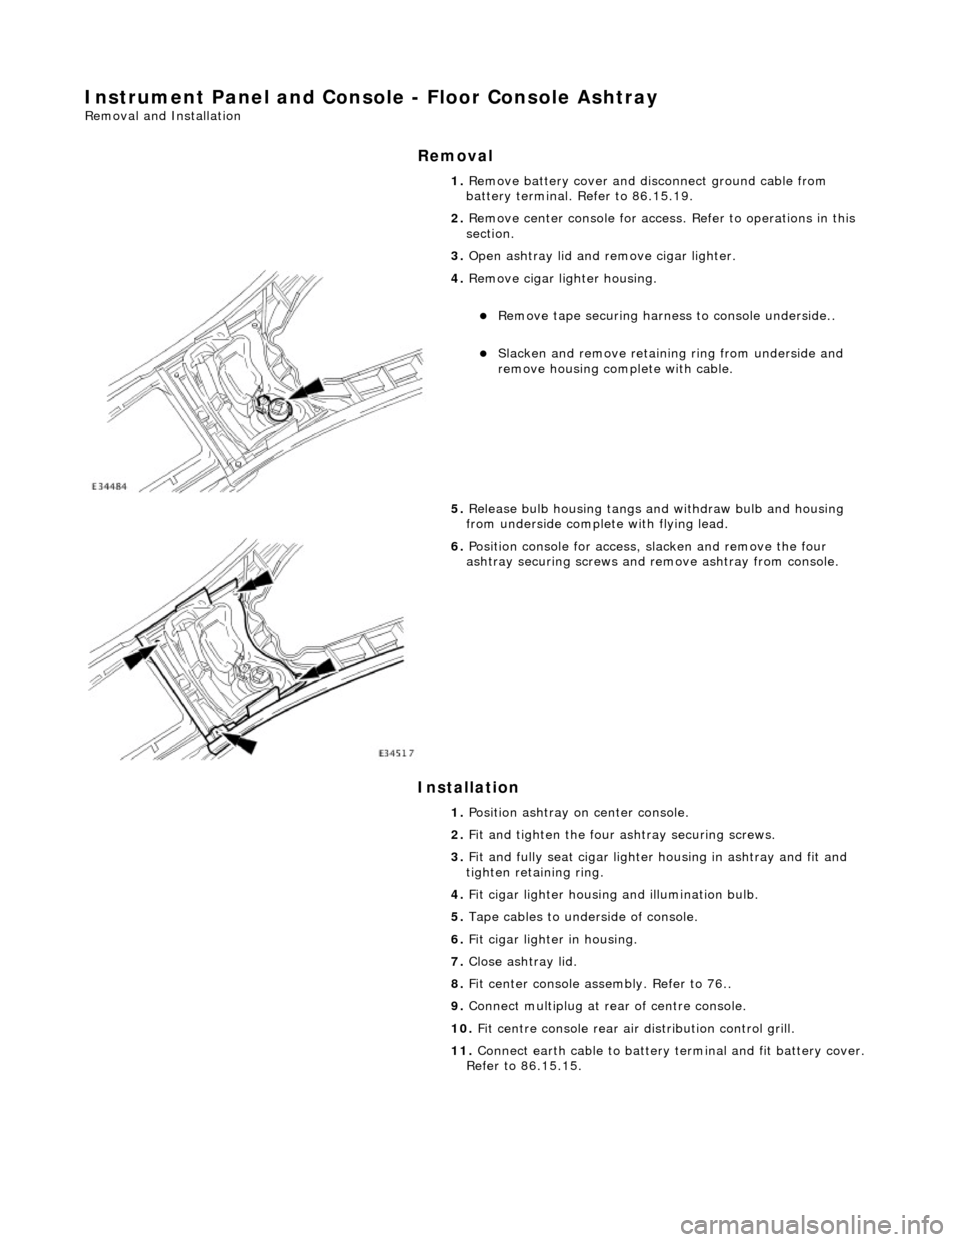
4. Remove cigar lighter housing.
Remove tape securing harnes s to console underside..
Slacken and remove retaining ring from underside and
remove housing complete with cable.
5. Release bulb housing tangs and withdraw bulb and housing
from underside complete with flying lead.
6. Position console for access, slacken and remove the four
ashtray securing screws and remove ashtray from console.
1. Position ashtray on center console.
2. Fit and tighten the four ashtray securing screws.
3. Fit and fully seat cigar lighter housing in ashtray and fit and
tighten retaining ring.
4. Fit cigar lighter housing and illumination bulb.
5. Tape cables to underside of console.
6. Fit cigar lighter in housing.
7. Close ashtray lid.
8. Fit center console assembly. Refer to 76..
9. Connect multiplug at rear of centre console.
10. Fit centre console rear air distribution control grill.
11. Connect earth cable to battery te rminal and fit battery cover.
Refer to 86.15.15.
Page 2228 of 2490
Instrument Panel and Console - Floor Console Extension
Removal and Installation
Removal
Installation
1. Using a thin plastic lever at th e edge and exercising care to
avoid damage to surface, remove veneer panel from rear
extension.
2. Slacken and remove the two rear extension securing screws.
3. Remove rear seat heater switches.
Position rear extension for access and slacken and remove
screw retaining switches.
Mark both harness multip lugs to ensure correct
reconnection and disconnect multiplugs.
4. Remove heater switches.
1. Position rear seat heater switches in rear extension.
2. Noting identity of multiplugs as marked during removal, connect
harness multiplugs to heater switches.
3. Position switches in console extension and fit and tighten
retaining screw.
4. Position and fully seat extension at rear of console and fit and
tighten securing screws.
5. Carefully fit veneer panel to rear extension.
Page 2229 of 2490
Instrument Panel and Console - Floor Console Finish Panel
Removal and Installation
Removal
1. Apply handbrake and turn ignition key to II.
2. Depress brake pedal, move gear selector to position N and turn
ignition key to O.
3. Remove battery cover and di sconnect cable from earth
terminal. Refer to Section 86.15.19.
4. Remove 'J 'gate finisher. Refer to 76.25.24.
5. Slacken and remove the two nuts and two screws securing
the retaining panel.
6. Position retaining panel for access, disconnect SPORT mode
and cruise control ON/OFF swit ch multiplugs and remove
retaining panel complete with switches.
7. Remove and discard bushes from retaining plate.
8. Carefully withdraw veneer pane l, releasing front locating
tongue from upper slot in comsole.
Page 2230 of 2490
Installation
1. Position veneer panel on consol e, ensuring that front tongue
locates correctly in console upper slot.
2. Fit and fully seat new bush es in retaining panel.
3. Position retaining panel complete with SPORT mode and cruise
control ON/OFF switches for ac cess and connect multiplugs.
4. fully seat retaining panel and fi t and tighten securing nuts and
screws.
5. Fit 'J' gate surround finisher. Refer to 76.25.24.
6. Move gear selector to position P.
7. Connect cable to battery earth te rminal and fit battery cover.
Refer to Section 86.15.15.
Page 2231 of 2490
In
strument Panel and Console - Floor Console Finish Panel Bracket
Rem
oval and Installation
Remov
al
Installation
1.
Remove 'J' gate finisher. Refer to 76.25.24.
2.
Slacken and remove the two front nuts and two rear screws
securing the retaining panel.
3.
Position retaining panel for access, disconnect SPORT mode and
cruise control ON/OFF switch multiplugs and remove retaining
panel complete with switches.
4. Remove switches from retaining panel.
5.
Remove and discard bushes from retaining panel.
1. Fit and fully seat new bushes in retaining panel.
2. Fit and fully seat SPORT mode and cruise control ON/OFF
switches in retaining panel.
3. Position retaining panel for access and connect SPORT mode and
cruise control ON/OFF switch multiplugs.
4. Fully seat retaining panel and fit and tighten securing nuts and
screws.
5. Fit 'J' gate surround finisher. Refer to 76.25.24.
Page 2232 of 2490
Instrument Panel and Console - Floor Console Stowage Compartment
Removal and Installation
Removal
Installation
1.
Open console gl ove box lid.
2. Slacken and remove the glove box lid stay securing screw and
remove lid stay.
3. Slacken and remove glove box latch securing screws and
remove latch assembly.
4. Slacken and remove glovebox liner rear securing screws.
5. Remove glovebox liner from vehicle.
1. Position glovebox liner in console.
2. Fit and tighten liner rear securing screws.
3. Position latch assembly on line r and fit and tighten securing
screws.
4. Fit and tighten check arm to lid securing screw.
5. Position lid to stay and fit and tighten securing screw.
6. Close glovebox lid.