Page 2161 of 2490
6. Using 44 hog rings, secure co ver to outer edges of frame.
7. Position cover inside armrest ap erture and secure on the eight
armrest aperture tangs.
8. CAUTION: The apertures in the foam are over-size and
must not be used for guidance wh en cutting seat belt escutcheon
apertures in cover.
Using a suitable knife, carefully cut around headrest support
box and seat belt apertures.
9. With keyways facing forward, fit headrest guide tubes in
support boxes.
10. Ensure that lower segmented end of each headrest guide
tube fully seats on lower flange of support box.
Page 2162 of 2490
11. Fit chrome finisher rings to upper ends of headrest guide
tubes.
12. Position armrest on seat squab and fit and tighten two
securing screws.
13. Position armrest rear cover on frame fully seat upper
retaining strip and secure with three hog rings.
14. Position squab mounting brackets and fit and tighten securing screws.
15. Fit and fully seat the six armres t rear aperture cover spring
clips.
16. Fit and fully seat headrests in guide tubes and fit securing
clips.
Page 2166 of 2490

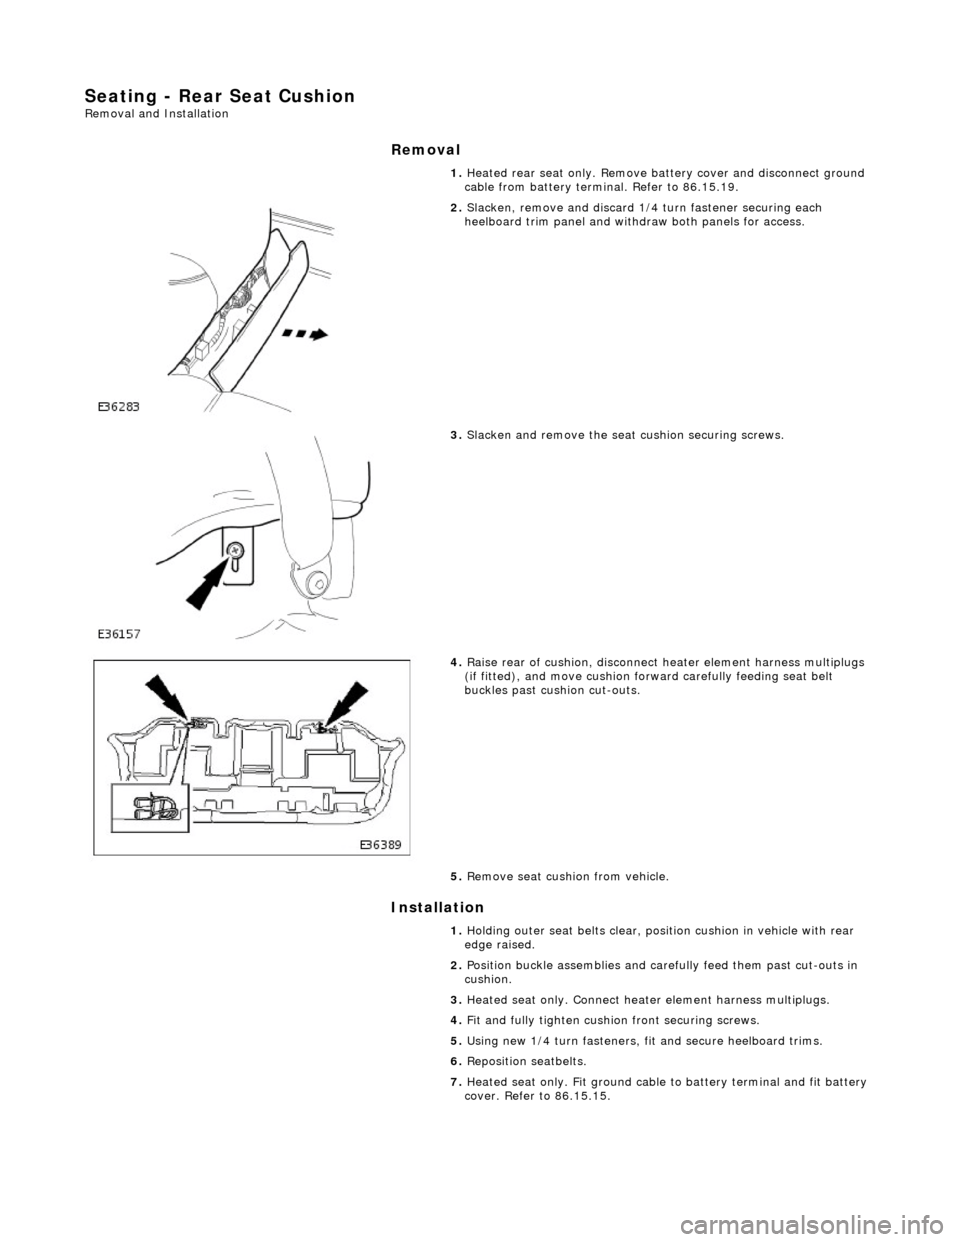
Seating - Rear Seat Cushion Removal and Installation
Removal
Installation
1.
Heated rear seat only. Remove battery cover and disconnect ground
cable from battery terminal. Refer to 86.15.19.
2. Slacken, remove and discard 1/4 turn fastener securing each
heelboard trim panel and withdraw both panels for access.
3. Slacken and remove the seat cushion securing screws.
4. Raise rear of cushion, disconnect heater element harness multiplugs
(if fitted), and move cushion forw ard carefully feeding seat belt
buckles past cushion cut-outs.
5. Remove seat cushion from vehicle.
1. Holding outer seat belts clear, posi tion cushion in vehicle with rear
edge raised.
2. Position buckle assemblies and carefully feed them past cut-outs in
cushion.
3. Heated seat only. Connect heat er element harness multiplugs.
4. Fit and fully tighten cushion front securing screws.
5. Using new 1/4 turn fasteners, fi t and secure heelboard trims.
6. Reposition seatbelts.
7. Heated seat only. Fit ground cable to battery terminal and fit battery
cover. Refer to 86.15.15.
Page 2167 of 2490
Seating - Rear Seat Cushion Cover
Removal and Installation
Removal
1. Remove rear heel boards.
2. Remove rear seat cushion. Refer to 76.70.37.
3. Place seat cushion inverted on clean work surface.
4. Remove and discard the eight hog rings securing cover at each
seat belt anchor aperture.
5. Remove and discard hog rings se curing outer edges of cover
and cushion to frame.
6. Remove and discard two hog ri ngs securing centre panel
overlap plastic edge fastener and release fastener from frame.
7. Withdraw centre overlap thro ugh cushion for access.and
remove and discard hog rings secu ring horizontal seam of right
hand panel to cushion.
Page 2168 of 2490
Installation
8. Remove and discard the six ho g rings securing right hand
panel to centre of cushion.
9. Remove and discard seven hog ri ngs securing outer side of
cover left hand panel to cushion.
10. Remove and discard the four ho g rings securing horizontal
seam of left hand panel to cushion.
11. Remove and discard the six hog rings securing securing cover
left hand panel to centre of cushion.
12. Withdraw cover from seat belt anchor apertures.
13. Remove cover from cushion.
1. Position cover on cushion.
2. Secure cover right hand panel to centre of cushion using six
hog rings .
3. Position cover right hand hand panel through cushion seat belt
anchor aperture and secure hori zontal seam to cushion using
four hog rings.
4. Position cover and pass cent re overlap through cushion.
5. Secure outer side of cover righ t hand panel to cushion using
seven hog rings.
Page 2169 of 2490
6. Secure cover left hand panel to centre of cushion using six hog
rings.
7. Position cover left hand panel th rough cushion seat belt anchor
aperture.
8. Secure horizontal seam of cover left hand panel to cushion
using four hog rings.
9. Position cover and pass cent re overlap through cushion.
10. Secure outer side of cover left hand panel to cushion using
seven hog rings.
11. Invert cushion assembly, fully se at cover centre panel overlap plastic edge fastener on frame and secure with two hog rings
12. Ensuring even tensioning, secu re outer edges of cover and
cushion to frame using hog rings.
13. Position cover at seat belt an chor apertures and secure each
with eight hog rings.
Page 2173 of 2490
Seating - Rear Seat Track
Removal and Installation
Removal
1. Remove battery cover and disc onnect ground cable from
battery terminal. Refer to 86.15.19.
2. Slacken and remove the two seat cushion front securing bolts
and nuts.
3. Move the seat cushion forward to release it from the two frame
rear tangs.
4. Disconnect the cushion heater harness multiplug and remove
cushion from seat frame.
5. Remove and discard pl astic scrivet securing lower end of side
trim to inner wheela rch stud and withdraw trim from stud.
Page 2174 of 2490
6. Push trim upwards to release keyhole aperture from squab
fixing and partially withdraw trim for access.
7. Slacken and remove seat belt lower anchor securing bolt.
8. Carefully withdraw seat belt and anchor plate through trim
aperture and escutcheon.
9. Remove side trim panel from vehicle.
10. Slacken and remove the seat squab outer securing bolt.
11. Slacken and remove the seat squab inner securing bolt.