Page 764 of 3342
G3M0371
5) Remove the snap ring. Then remove the speedometer
driven gear.
G3M0372
6) Remove vehicle speed sensor 2.
7) Tap out the speedometer shaft to the outside of the
case, and remove the oil seal.
G3M0373
5. EXTENSION SECTION
1) Take out the transfer clutch by lightly tapping the end of
the rear drive shaft.
CAUTION:
Be careful not to damage the oil seal in the extension.
G3M0867
2) Remove duty solenoid C, transfer valve body and the
transfer pipe.
CAUTION:
�Take out the inlet filter.
�Do not damage the O-ring.
�Be careful not to bend the pipe.
B3M0831A
3) Take out the roller bearing inner race with ST.
ST 398527700 PULLER
4) Take out the roller bearing outer race with ST.
NOTE:
Hook ST in the inner side of the roller bearing outer race.
ST 398527700 PULLER
58
3-2SERVICE PROCEDURE
4. Overall Transmission
Page 765 of 3342
 Check the appearance of each component and clean.
CAUTION:
Make sure each part is free of harmful cuts, damage
and other")
B: ASSEMBLY OF OVERALL TRANSMISSION
1. TORQUE CONVERTER CLUTCH CASE SECTION
1) Check the appearance of each component and clean.
CAUTION:
Make sure each part is free of harmful cuts, damage
and other faults.
G3M0377
2) Install the washer and snap ring to the speedometer
shaft with ST, and set the oil seal. Then force-fit the shaft
to the torque converter clutch case.
ST 499827000 PRESS
3) Install vehicle speed sensor 2.
CAUTION:
Use new vehicle speed sensor 2, if it has been
removed.
Tightening torque:
5.9±1.5 N⋅m (60±15 kg-cm, 52±13 in-lb)
G3M0378
4) Install the speedometer driven gear to the speedometer
shaft, and secure with a snap ring.
G3M0379
5) Force-fit the oil seal to the torque converter clutch case
with ST.
ST 398437700 DRIFT
G3M0380
6) Install the differential assembly to the case, paying spe-
cial attention not to damage the speedometer gears (drive
and driven) and the inside of the case (particularly, the dif-
ferential side retainer contact surface).
59
3-2SERVICE PROCEDURE
4. Overall Transmission
Page 766 of 3342
 Install the circlip to the axle shaft, insert the shaft into
the differential assembly, and tap it into position with a
plastic hammer.
Thrust play:
Approx. 0.3—0.5 mm (0.012—0.020 in)
CAUTION:")
7) Install the circlip to the axle shaft, insert the shaft into
the differential assembly, and tap it into position with a
plastic hammer.
Thrust play:
Approx. 0.3—0.5 mm (0.012—0.020 in)
CAUTION:
�If no play is felt, check whether the shaft is fully
inserted. If shaft insertion is correct, replace the axle
shaft.
�Be sure to use a new circlip.
G3M0368
8) Wrap vinyl tape around the splined portion of the axle
shaft.
9) Install the oil seal and outer race (taper roller bearing)
to the differential side retainer. Then screw in the retainer
and the O-ring after coating the threads with oil.
CAUTION:
�Pay attention not to damage the oil seal lips.
�Do not confuse the RH and LH oil seals.
�Keep the O-ring removed from the retainer.
B3M0352A
10) Using the ST, screw in the retainer until light contact
is felt.
ST 499787000 WRENCH ASSY
NOTE:
Screw in the RH side slightly deeper than the LH side.
G3M0382
11) Hypoid gear backlash adjustment and tooth contact
check
(1) Assemble the drive pinion assembly to the oil pump
housing.
CAUTION:
�Be careful not to bend the shims.
[W8C0].>
�Be careful not to force the pinion against the hous-
ing bore.
60
3-2SERVICE PROCEDURE
4. Overall Transmission
Page 767 of 3342
 Tighten four bolts to secure the roller bearing.
Tightening torque:
39±3 N⋅m (4.0±0.3 kg-m, 28.9±2.2 ft-lb)
G3M0883
(3) Install the oil pump housing assembly to the torque
converter c")
G3M0383
(2) Tighten four bolts to secure the roller bearing.
Tightening torque:
39±3 N⋅m (4.0±0.3 kg-m, 28.9±2.2 ft-lb)
G3M0883
(3) Install the oil pump housing assembly to the torque
converter clutch case, and secure evenly by tightening
four bolts.
Tightening torque:
41±3 N⋅m (4.2±0.3 kg-m, 30.4±2.2 ft-lb)
CAUTION:
�Thoroughly remove the liquid gasket from the case
mating surface beforehand.
�Use an old gasket or an aluminum washer so as not
to damage the mating surface of the housing.
G3M0384
(4) Rotate the drive pinion several times with ST1 and
ST2.
ST1 498937100 HOLDER
ST2 499787100 WRENCH
G3M0884
(5) Tighten the LH retainer until contact is felt while
rotating the shaft. Then loosen the RH retainer. Keep
tightening the LH retainer and loosening the RH
retainer until the pinion shaft can no longer be turned.
This is the“zero”state.
G3M0885
(6) After the“zero”state is established, back off the LH
retainer 3 notches and secure it with the lock plate.
Then back off the RH retainer and retighten until it
stops. Repeat this procedure several times. Tighten the
RH retainer 1-3/4 notches further. This sets the preload.
Finally, secure the retainer with its lock plate.
NOTE:
Turning the retainer by one tooth changes the backlash
about 0.05 mm (0.0020 in).
61
3-2SERVICE PROCEDURE
4. Overall Transmission
Page 769 of 3342
 Apply red lead evenly to the surfaces of three or
four teeth of the crown gear. Rotate the drive pinion in
the forward and reverse directions several times. Then
remove the oil pump housing, and c")
(8) Apply red lead evenly to the surfaces of three or
four teeth of the crown gear. Rotate the drive pinion in
the forward and reverse directions several times. Then
remove the oil pump housing, and check the tooth con-
tact pattern.
If tooth contact is improper, readjust the backlash or
shim thickness.
Checking item Contact pattern Corrective action
Tooth contact
Tooth contact pattern is slightly shifted
toward to under no-load rotation.
[When loaded, contact pattern moves
toward heel.]
B3M0317A
Face contact
Backlash is too large.This may cause noise and chipping at
tooth ends.
B3M0319
Increase thickness of drive pinion height
adjusting shim in order to bring drive pinion
close to crown gear.
B3M0323
Flank contact
Backlash is too small.This may cause noise and stepped wear
on surfaces.
B3M0320
Reduce thickness of drive pinion height
adjusting shim in order to move drive pin-
ion away from crown gear.
B3M0324
Toe contact
(Inside end contact)
Contact areas is small.This may cause chipping at toe ends.
B3M0321
Adjust as for flank contact.
B3M0324
Heel contact
(Outside end contact)
Contact area is small.This may cause chipping at heel ends.
B3M0322
Adjust as for face contact.
B3M0323
: Adjusting direction of drive pinion
: Adjusting direction of crown gear
63
3-2SERVICE PROCEDURE
4. Overall Transmission
Page 770 of 3342
 If tooth contact is correct, mark the retainer position
and loosen it. After fitting the O-ring, screw in the
retainer to the marked position. Then tighten the lock
plate to the specified")
G3M0885
(9) If tooth contact is correct, mark the retainer position
and loosen it. After fitting the O-ring, screw in the
retainer to the marked position. Then tighten the lock
plate to the specified torque.
Tightening torque:
25±2 N⋅m (2.5±0.2 kg-m, 18.1±1.4 ft-lb)
G3M0370
12) Install the seal pipe to the torque converter clutch
case.
CAUTION:
Be sure to use a new seal pipe.
G3M0390
13) Install two oil seals to the oil seal retainer with ST.
ST 499247300 INSTALLER
CAUTION:
�Always discard old oil seals, and install new ones.
�Pay attention to the orientation of the oil seals.
G3M0886
14) Attach the O-ring to the oil seal retainer with vaseline.
Install the seal to the oil pump housing bore.
CAUTION:
Always discard old O-rings and install new ones.
G3M0392
15) Install the oil seal retainer taking care not to damage
the oil seal lips. Then secure with three bolts.
NOTE:
Make sure the O-ring is fitted correctly in position.
Tightening torque:
7±1 N⋅m (0.7±0.1 kg-m, 5.1±0.7 ft-lb)
64
3-2SERVICE PROCEDURE
4. Overall Transmission
Page 771 of 3342
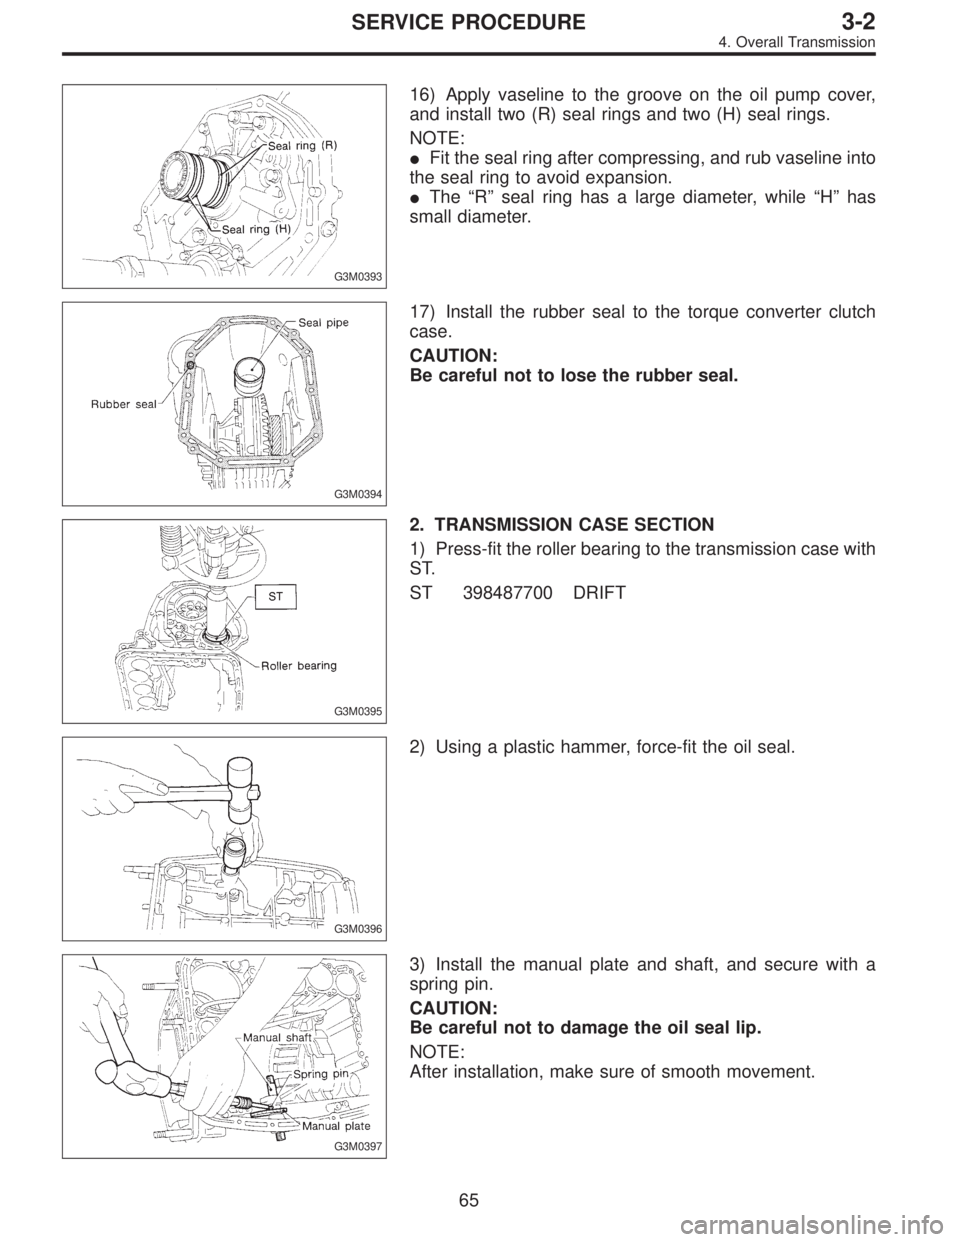
G3M0393
16) Apply vaseline to the groove on the oil pump cover,
and install two (R) seal rings and two (H) seal rings.
NOTE:
�Fit the seal ring after compressing, and rub vaseline into
the seal ring to avoid expansion.
�The“R”seal ring has a large diameter, while“H”has
small diameter.
G3M0394
17) Install the rubber seal to the torque converter clutch
case.
CAUTION:
Be careful not to lose the rubber seal.
G3M0395
2. TRANSMISSION CASE SECTION
1) Press-fit the roller bearing to the transmission case with
ST.
ST 398487700 DRIFT
G3M0396
2) Using a plastic hammer, force-fit the oil seal.
G3M0397
3) Install the manual plate and shaft, and secure with a
spring pin.
CAUTION:
Be careful not to damage the oil seal lip.
NOTE:
After installation, make sure of smooth movement.
65
3-2SERVICE PROCEDURE
4. Overall Transmission
Page 775 of 3342
G3M0409
13) Install the one-way clutch outer race.
NOTE:
Make sure the forward clutch splines are engaged cor-
rectly.
B3M0117A
14) Assemble the rear internal gear.
(1) Join the thrust needle bearing and thrust washer to
the gear with vaseline, and install the gear while rotat-
ing it.
(2) Securely engage the bearing with the dog of the
overrunning clutch hub.
CAUTION:
Install thrust needle bearing in the correct direction.
NOTE:
Installation is complete when the snap ring top surface of
the forward clutch drum recedes approximately 3.5 mm
(0.138 in).
G3M0890
15) Install the rear planetary carrier.
Attach the thrust needle bearing to the inside of the carrier
with vaseline. Then install the carrier while rotating slowly.
CAUTION:
Install thrust needle bearing in the correct direction.
G3M0891
16) Install the rear sun gear.
NOTE:
Install the gear with the oil groove facing up.
69
3-2SERVICE PROCEDURE
4. Overall Transmission
 Remove the snap ring. Then remove the speedometer
driven gear.
G3M0372
6) Remove vehicle speed sensor 2.
7) Tap out the speedometer shaft to the outside of the
case, and remove the oil seal")
 Install the one-way clutch outer race.
NOTE:
Make sure the forward clutch splines are engaged cor-
rectly.
B3M0117A
14) Assemble the rear internal gear.
(1) Join the thrust needle bearing")