1997 SSANGYONG KORANDO wheel
[x] Cancel search: wheelPage 1379 of 2053
TRANSFER CASE 5D1-9
SSANGYONG MY2002
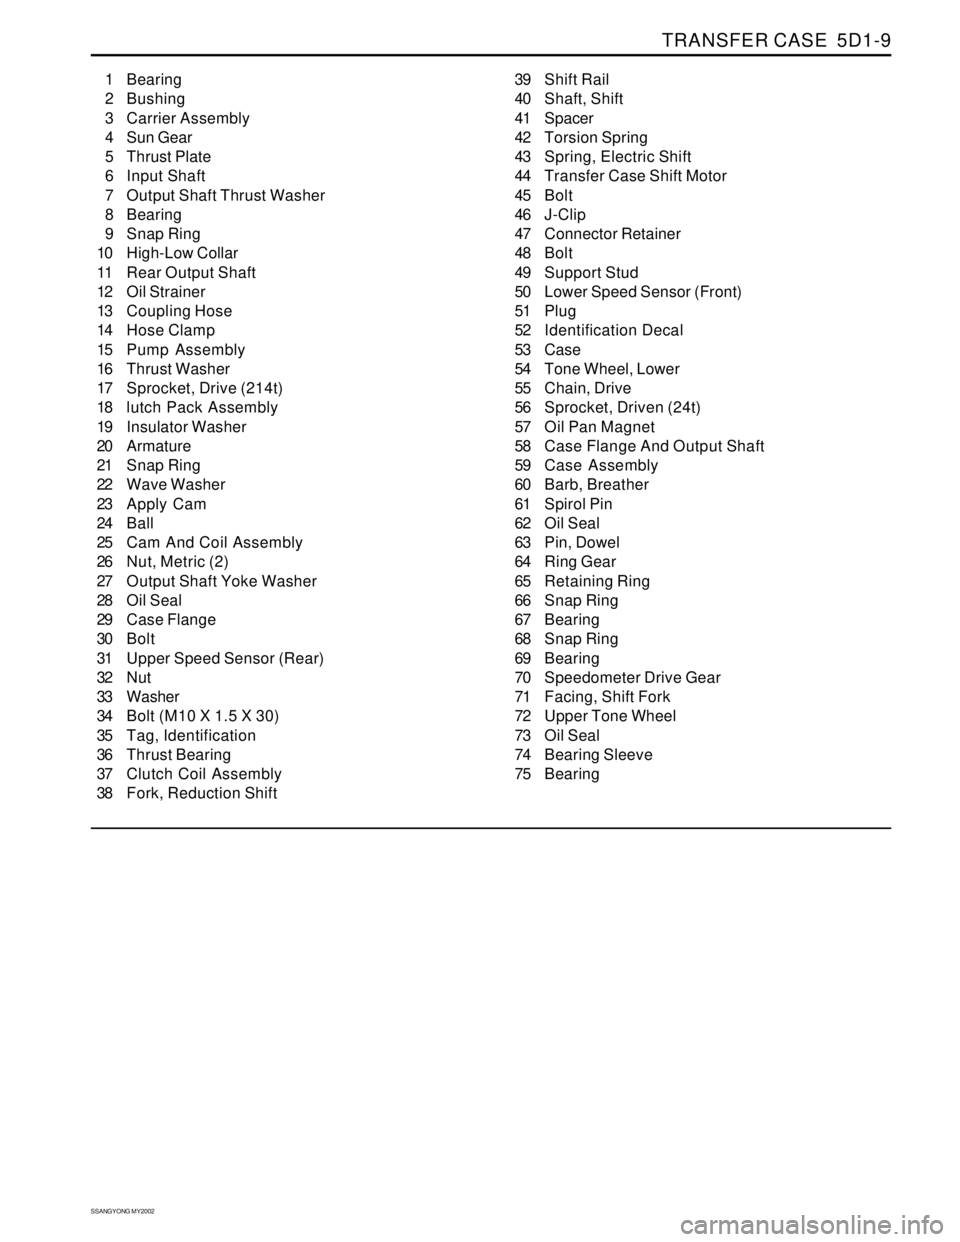
1 Bearing
2 Bushing
3 Carrier Assembly
4 Sun Gear
5 Thrust Plate
6 Input Shaft
7 Output Shaft Thrust Washer
8 Bearing
9 Snap Ring
10 High-Low Collar
11 Rear Output Shaft
12 Oil Strainer
13 Coupling Hose
14 Hose Clamp
15 Pump Assembly
16 Thrust Washer
17 Sprocket, Drive (214t)
18 lutch Pack Assembly
19 Insulator Washer
20 Armature
21 Snap Ring
22 Wave Washer
23 Apply Cam
24 Ball
25 Cam And Coil Assembly
26 Nut, Metric (2)
27 Output Shaft Yoke Washer
28 Oil Seal
29 Case Flange
30 Bolt
31 Upper Speed Sensor (Rear)
32 Nut
33 Washer
34 Bolt (M10 X 1.5 X 30)
35 Tag, Identification
36 Thrust Bearing
37 Clutch Coil Assembly
38 Fork, Reduction Shift39 Shift Rail
40 Shaft, Shift
41 Spacer
42 Torsion Spring
43 Spring, Electric Shift
44 Transfer Case Shift Motor
45 Bolt
46 J-Clip
47 Connector Retainer
48 Bolt
49 Support Stud
50 Lower Speed Sensor (Front)
51 Plug
52 Identification Decal
53 Case
54 Tone Wheel, Lower
55 Chain, Drive
56 Sprocket, Driven (24t)
57 Oil Pan Magnet
58 Case Flange And Output Shaft
59 Case Assembly
60 Barb, Breather
61 Spirol Pin
62 Oil Seal
63 Pin, Dowel
64 Ring Gear
65 Retaining Ring
66 Snap Ring
67 Bearing
68 Snap Ring
69 Bearing
70 Speedometer Drive Gear
71 Facing, Shift Fork
72 Upper Tone Wheel
73 Oil Seal
74 Bearing Sleeve
75 Bearing
Page 1381 of 2053
TRANSFER CASE 5D1-11
SSANGYONG MY2002
DIAGNOSIS
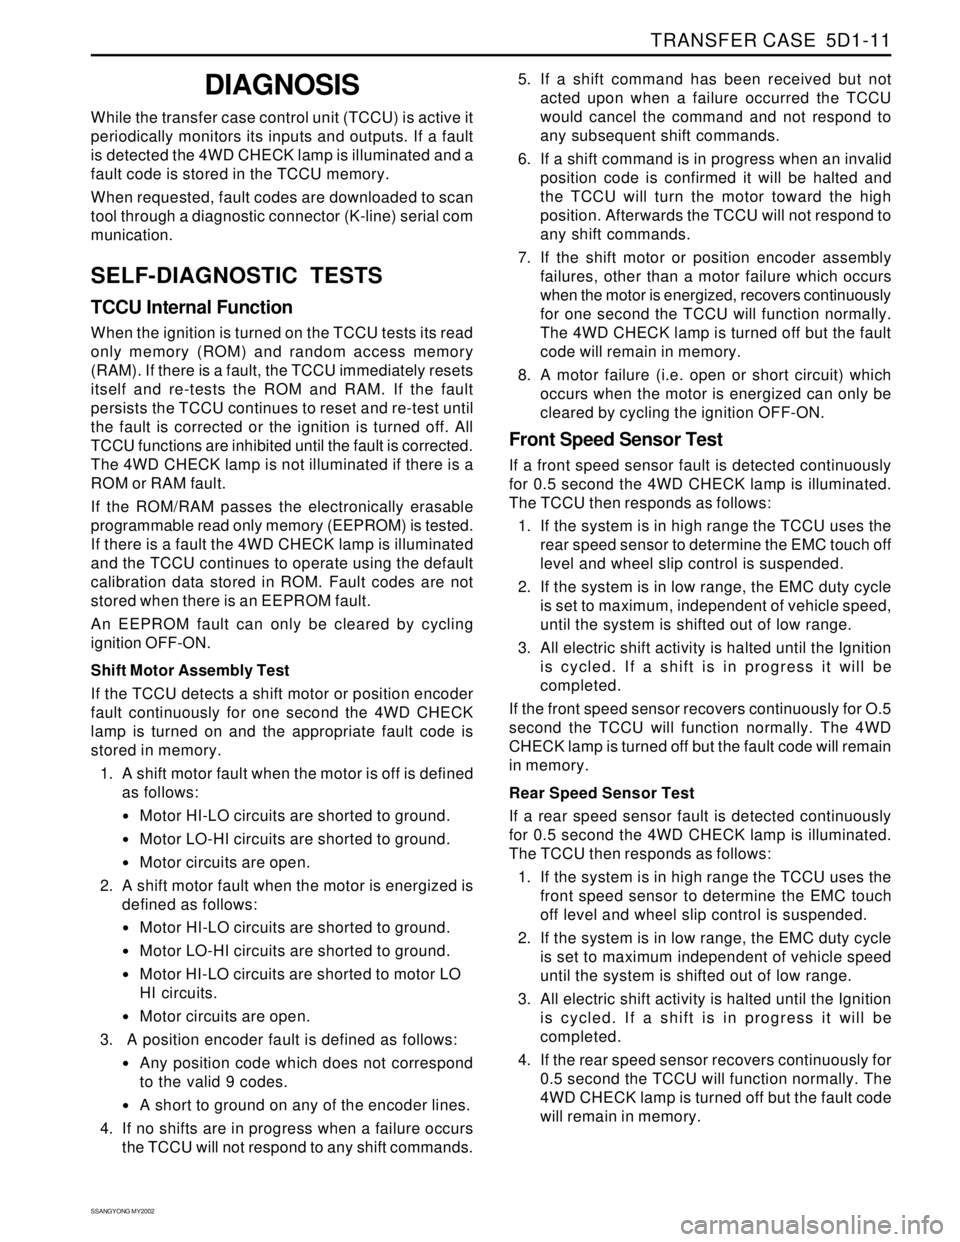
While the transfer case control unit (TCCU) is active it
periodically monitors its inputs and outputs. If a fault
is detected the 4WD CHECK lamp is illuminated and a
fault code is stored in the TCCU memory.
When requested, fault codes are downloaded to scan
tool through a diagnostic connector (K-line) serial com
munication.
SELF-DIAGNOSTIC TESTS
TCCU Internal Function
When the ignition is turned on the TCCU tests its read
only memory (ROM) and random access memory
(RAM). If there is a fault, the TCCU immediately resets
itself and re-tests the ROM and RAM. If the fault
persists the TCCU continues to reset and re-test until
the fault is corrected or the ignition is turned off. All
TCCU functions are inhibited until the fault is corrected.
The 4WD CHECK lamp is not illuminated if there is a
ROM or RAM fault.
If the ROM/RAM passes the electronically erasable
programmable read only memory (EEPROM) is tested.
If there is a fault the 4WD CHECK lamp is illuminated
and the TCCU continues to operate using the default
calibration data stored in ROM. Fault codes are not
stored when there is an EEPROM fault.
An EEPROM fault can only be cleared by cycling
ignition OFF-ON.
Shift Motor Assembly Test
If the TCCU detects a shift motor or position encoder
fault continuously for one second the 4WD CHECK
lamp is turned on and the appropriate fault code is
stored in memory.
1. A shift motor fault when the motor is off is defined
as follows:
Motor HI-LO circuits are shorted to ground.
Motor LO-HI circuits are shorted to ground.
Motor circuits are open.
2. A shift motor fault when the motor is energized is
defined as follows:
Motor HI-LO circuits are shorted to ground.
Motor LO-HI circuits are shorted to ground.
Motor HI-LO circuits are shorted to motor LO
HI circuits.
Motor circuits are open.
3. A position encoder fault is defined as follows:
Any position code which does not correspond
to the valid 9 codes.
A short to ground on any of the encoder lines.
4. If no shifts are in progress when a failure occurs
the TCCU will not respond to any shift commands.5. If a shift command has been received but not
acted upon when a failure occurred the TCCU
would cancel the command and not respond to
any subsequent shift commands.
6. If a shift command is in progress when an invalid
position code is confirmed it will be halted and
the TCCU will turn the motor toward the high
position. Afterwards the TCCU will not respond to
any shift commands.
7. If the shift motor or position encoder assembly
failures, other than a motor failure which occurs
when the motor is energized, recovers continuously
for one second the TCCU will function normally.
The 4WD CHECK lamp is turned off but the fault
code will remain in memory.
8. A motor failure (i.e. open or short circuit) which
occurs when the motor is energized can only be
cleared by cycling the ignition OFF-ON.
Front Speed Sensor Test
If a front speed sensor fault is detected continuously
for 0.5 second the 4WD CHECK lamp is illuminated.
The TCCU then responds as follows:
1. If the system is in high range the TCCU uses the
rear speed sensor to determine the EMC touch off
level and wheel slip control is suspended.
2. If the system is in low range, the EMC duty cycle
is set to maximum, independent of vehicle speed,
until the system is shifted out of low range.
3. All electric shift activity is halted until the Ignition
is cycled. If a shift is in progress it will be
completed.
If the front speed sensor recovers continuously for O.5
second the TCCU will function normally. The 4WD
CHECK lamp is turned off but the fault code will remain
in memory.
Rear Speed Sensor Test
If a rear speed sensor fault is detected continuously
for 0.5 second the 4WD CHECK lamp is illuminated.
The TCCU then responds as follows:
1. If the system is in high range the TCCU uses the
front speed sensor to determine the EMC touch
off level and wheel slip control is suspended.
2. If the system is in low range, the EMC duty cycle
is set to maximum independent of vehicle speed
until the system is shifted out of low range.
3. All electric shift activity is halted until the Ignition
is cycled. If a shift is in progress it will be
completed.
4. If the rear speed sensor recovers continuously for
0.5 second the TCCU will function normally. The
4WD CHECK lamp is turned off but the fault code
will remain in memory.
Page 1382 of 2053
SSANGYONG MY2002
5D1-12 TRANSFER CASE
Both Speed Sensor Faulty
If both the front and rear speed sensors are faulty con
tinuously for 0.5 seconds the 4WD CHECK lamp is
illuminated. The TCCU then responds as follows:
1. If the system is in high range the TCCU sets the
EMC touch off level based on a vehicle speed of
0 and wheel slip control is suspended.
2. If the system is in low range, the EMC duty cycle
is set to maximum until the system is shifted out
of low range.
3. All electric shift activity is halted until the Ignition
is cycled. If a shift is in progress it will be
completed.
If both speed sensors recover continuously for 0.5 sec-
ond the TCCU will function normally. The 4WD CHECK
lamp is turned off but the fault code will remain in
memory.
Electro-Magnetic Clutch Test
The electromagnetic clutch (EMC) is tested for open
circuit or short circuit to ground. If a fault is detected
continuously for 0.8 second the 4WD CHECK lamp is
turned on and all TODTM activity is halted.
If the EMC recovers continuously for 0.8 second the
TCCU will function normally. The 4WD CHECK lamp is
turned off but the fault code will remain in memory.
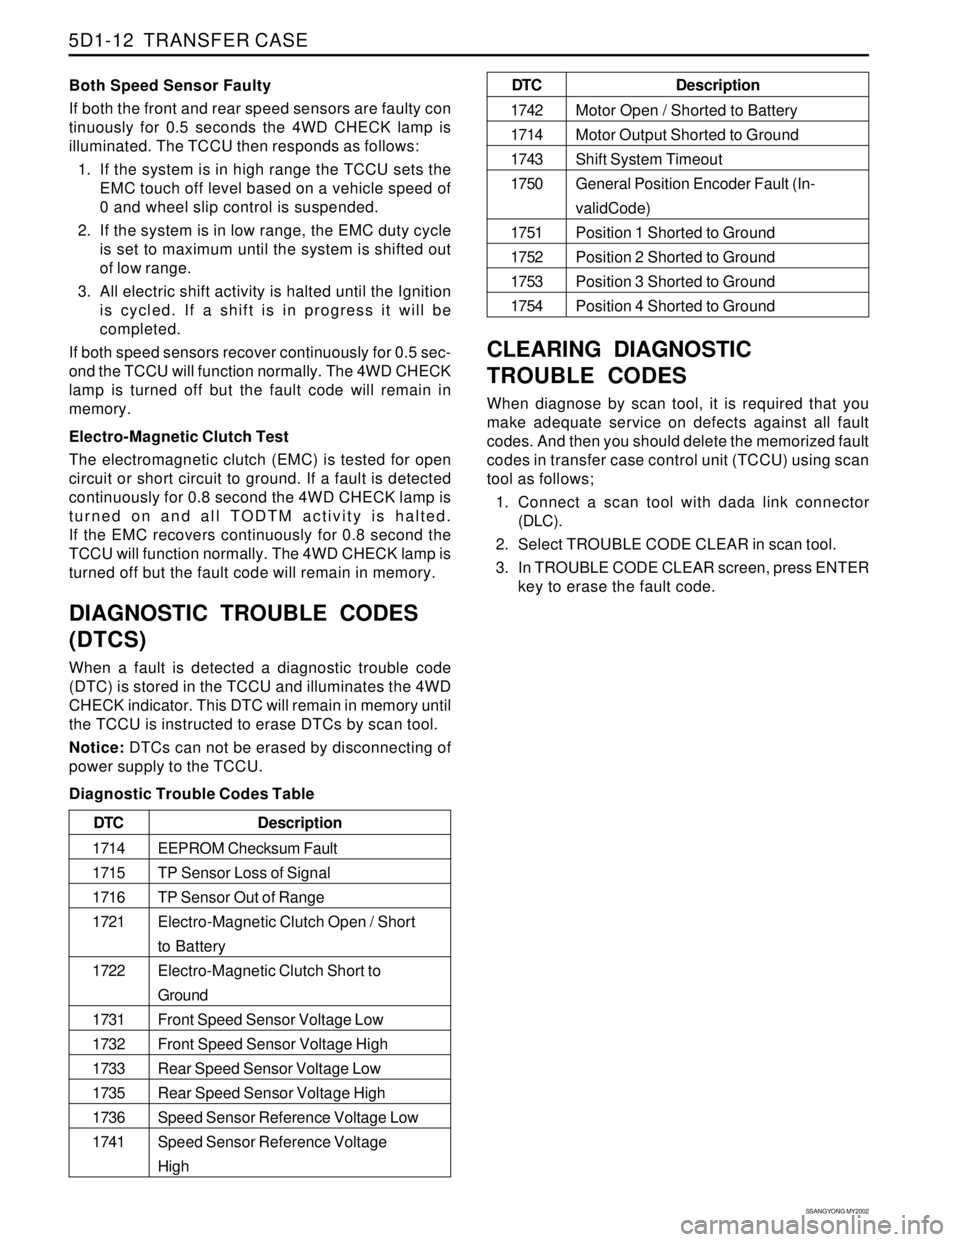
DIAGNOSTIC TROUBLE CODES
(DTCS)
When a fault is detected a diagnostic trouble code
(DTC) is stored in the TCCU and illuminates the 4WD
CHECK indicator. This DTC will remain in memory until
the TCCU is instructed to erase DTCs by scan tool.
Notice: DTCs can not be erased by disconnecting of
power supply to the TCCU.
Diagnostic Trouble Codes Table
CLEARING DIAGNOSTIC
TROUBLE CODES
When diagnose by scan tool, it is required that you
make adequate service on defects against all fault
codes. And then you should delete the memorized fault
codes in transfer case control unit (TCCU) using scan
tool as follows;
1. Connect a scan tool with dada link connector
(DLC).
2. Select TROUBLE CODE CLEAR in scan tool.
3. In TROUBLE CODE CLEAR screen, press ENTER
key to erase the fault code.
Description
EEPROM Checksum Fault
TP Sensor Loss of Signal
TP Sensor Out of Range
Electro-Magnetic Clutch Open / Short
to Battery
Electro-Magnetic Clutch Short to
Ground
Front Speed Sensor Voltage Low
Front Speed Sensor Voltage High
Rear Speed Sensor Voltage Low
Rear Speed Sensor Voltage High
Speed Sensor Reference Voltage Low
Speed Sensor Reference Voltage
High DTC
1714
1715
1716
1721
1722
1731
1732
1733
1735
1736
1741
Description
Motor Open / Shorted to Battery
Motor Output Shorted to Ground
Shift System Timeout
General Position Encoder Fault (In-
validCode)
Position 1 Shorted to Ground
Position 2 Shorted to Ground
Position 3 Shorted to Ground
Position 4 Shorted to Ground DTC
1742
1714
1743
1750
1751
1752
1753
1754
Page 1386 of 2053
SSANGYONG MY2002
5D1-16 TRANSFER CASE
KAA5D040
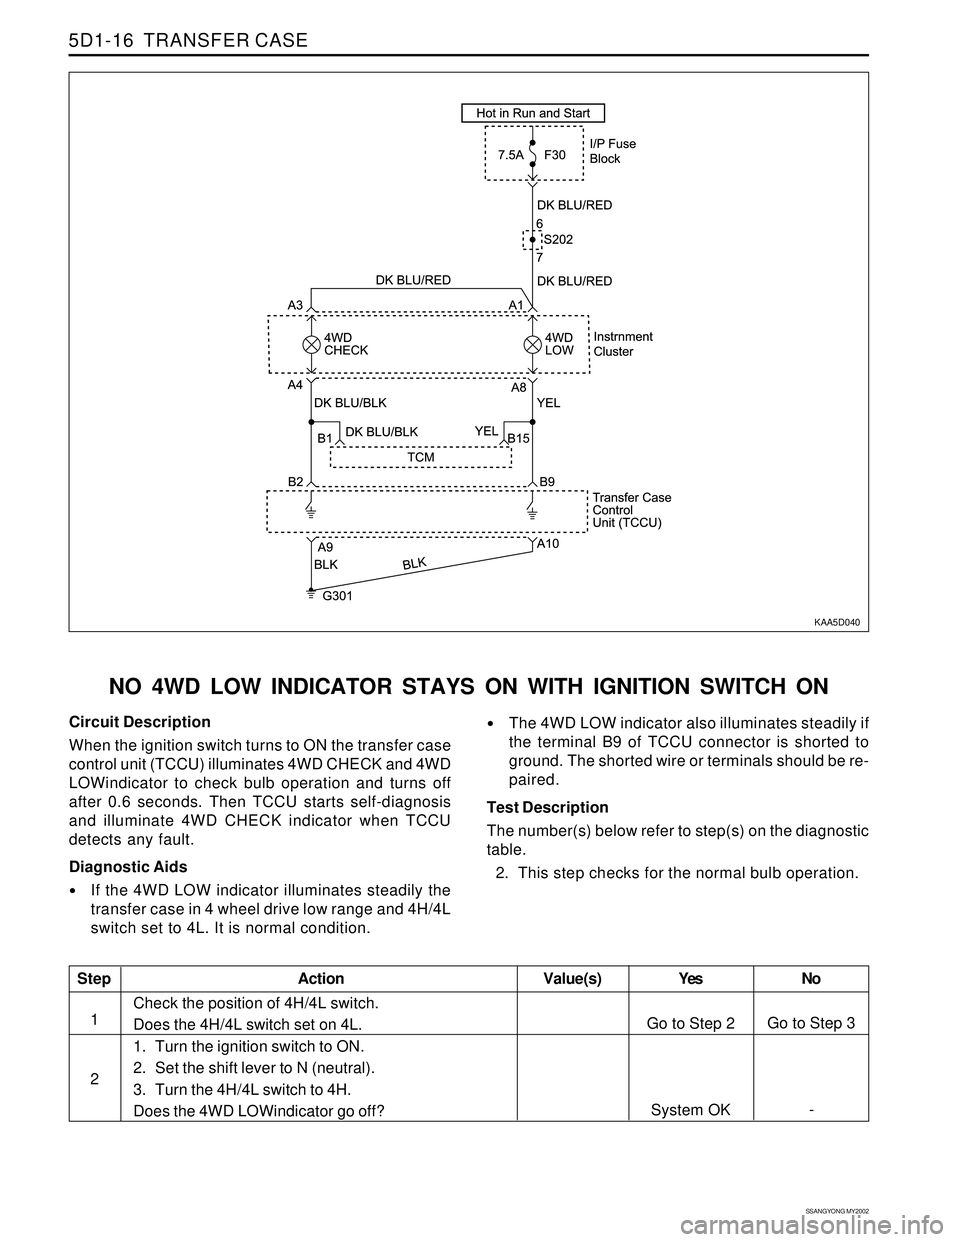
NO 4WD LOW INDICATOR STAYS ON WITH IGNITION SWITCH ON
Circuit Description
When the ignition switch turns to ON the transfer case
control unit (TCCU) illuminates 4WD CHECK and 4WD
LOWindicator to check bulb operation and turns off
after 0.6 seconds. Then TCCU starts self-diagnosis
and illuminate 4WD CHECK indicator when TCCU
detects any fault.
Diagnostic Aids
If the 4WD LOW indicator illuminates steadily the
transfer case in 4 wheel drive low range and 4H/4L
switch set to 4L. It is normal condition.
The 4WD LOW indicator also illuminates steadily if
the terminal B9 of TCCU connector is shorted to
ground. The shorted wire or terminals should be re-
paired.
Test Description
The number(s) below refer to step(s) on the diagnostic
table.
2. This step checks for the normal bulb operation.
Step
1
2
Action Yes
Go to Step 2
System OKNo
Go to Step 3
- Value(s)
Check the position of 4H/4L switch.
Does the 4H/4L switch set on 4L.
1. Turn the ignition switch to ON.
2. Set the shift lever to N (neutral).
3. Turn the 4H/4L switch to 4H.
Does the 4WD LOWindicator go off?
Page 1394 of 2053
SSANGYONG MY2002
5D1-72 TRANSFER CASE
KAA5D390
KAA5D400
KAA5D410
KAA5D420
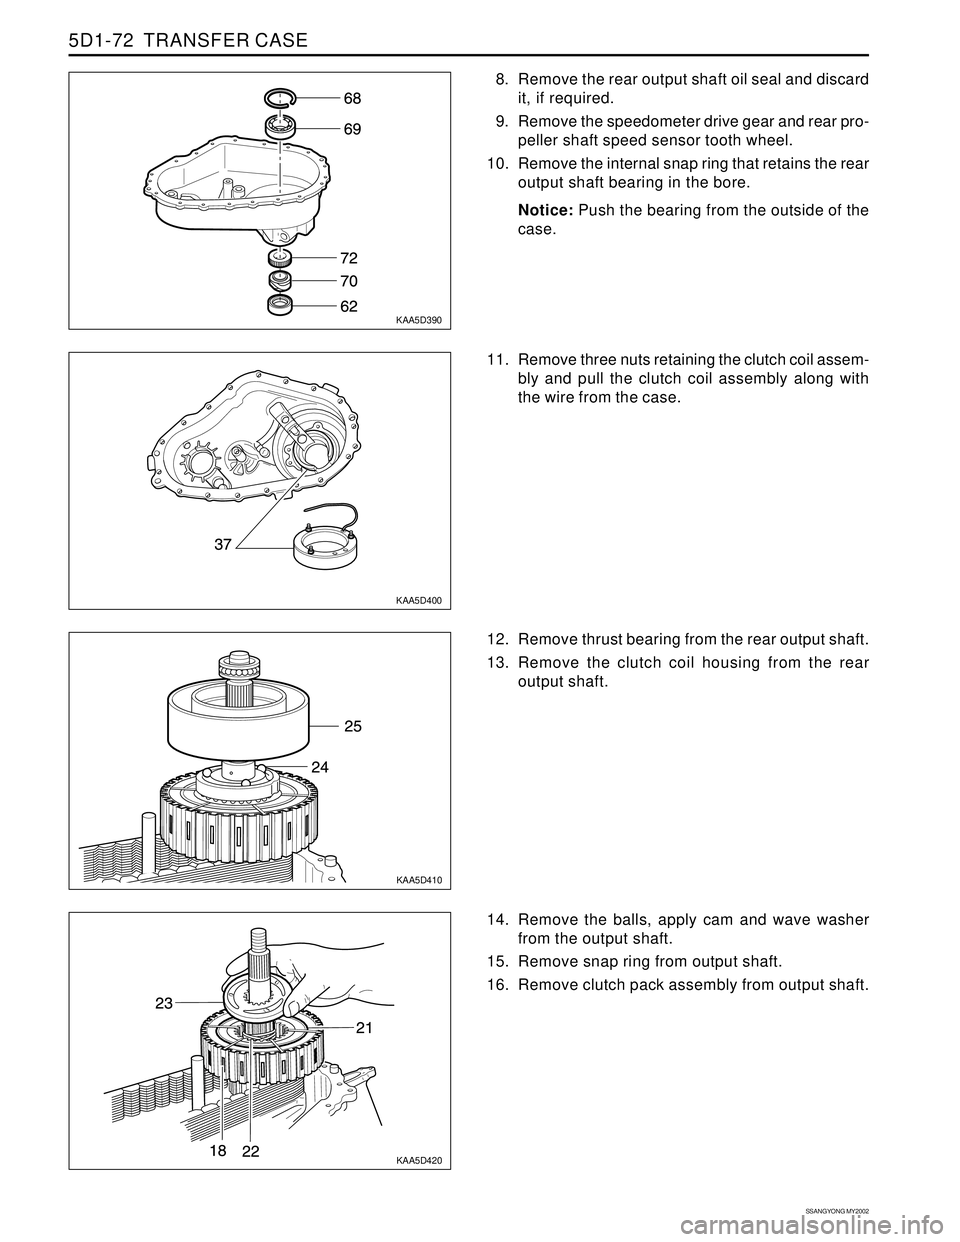
8. Remove the rear output shaft oil seal and discard
it, if required.
9. Remove the speedometer drive gear and rear pro-
peller shaft speed sensor tooth wheel.
10. Remove the internal snap ring that retains the rear
output shaft bearing in the bore.
Notice: Push the bearing from the outside of the
case.
14. Remove the balls, apply cam and wave washer
from the output shaft.
15. Remove snap ring from output shaft.
16. Remove clutch pack assembly from output shaft. 12. Remove thrust bearing from the rear output shaft.
13. Remove the clutch coil housing from the rear
output shaft. 11. Remove three nuts retaining the clutch coil assem-
bly and pull the clutch coil assembly along with
the wire from the case.
Page 1395 of 2053
TRANSFER CASE 5D1-73
SSANGYONG MY2002
KAA5D430
KAA5D440
KAA5D450
KAA5D460
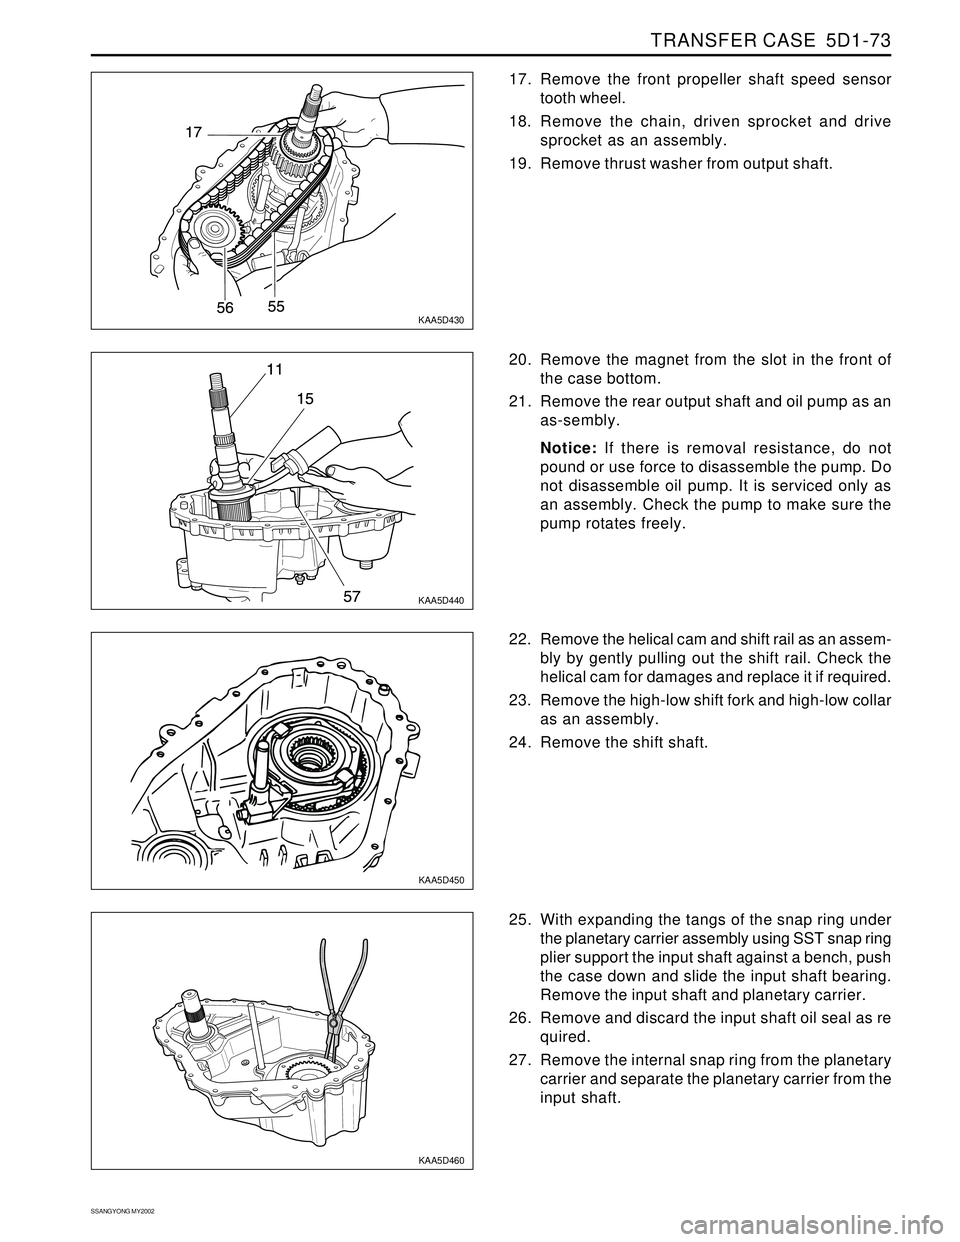
17. Remove the front propeller shaft speed sensor
tooth wheel.
18. Remove the chain, driven sprocket and drive
sprocket as an assembly.
19. Remove thrust washer from output shaft.
25. With expanding the tangs of the snap ring under
the planetary carrier assembly using SST snap ring
plier support the input shaft against a bench, push
the case down and slide the input shaft bearing.
Remove the input shaft and planetary carrier.
26. Remove and discard the input shaft oil seal as re
quired.
27. Remove the internal snap ring from the planetary
carrier and separate the planetary carrier from the
input shaft. 22. Remove the helical cam and shift rail as an assem-
bly by gently pulling out the shift rail. Check the
helical cam for damages and replace it if required.
23. Remove the high-low shift fork and high-low collar
as an assembly.
24. Remove the shift shaft. 20. Remove the magnet from the slot in the front of
the case bottom.
21. Remove the rear output shaft and oil pump as an
as-sembly.
Notice: If there is removal resistance, do not
pound or use force to disassemble the pump. Do
not disassemble oil pump. It is serviced only as
an assembly. Check the pump to make sure the
pump rotates freely.
Page 1398 of 2053
SSANGYONG MY2002
5D1-76 TRANSFER CASE
KAA5D440
KAA5D430
KAA5D420
KAA5D410
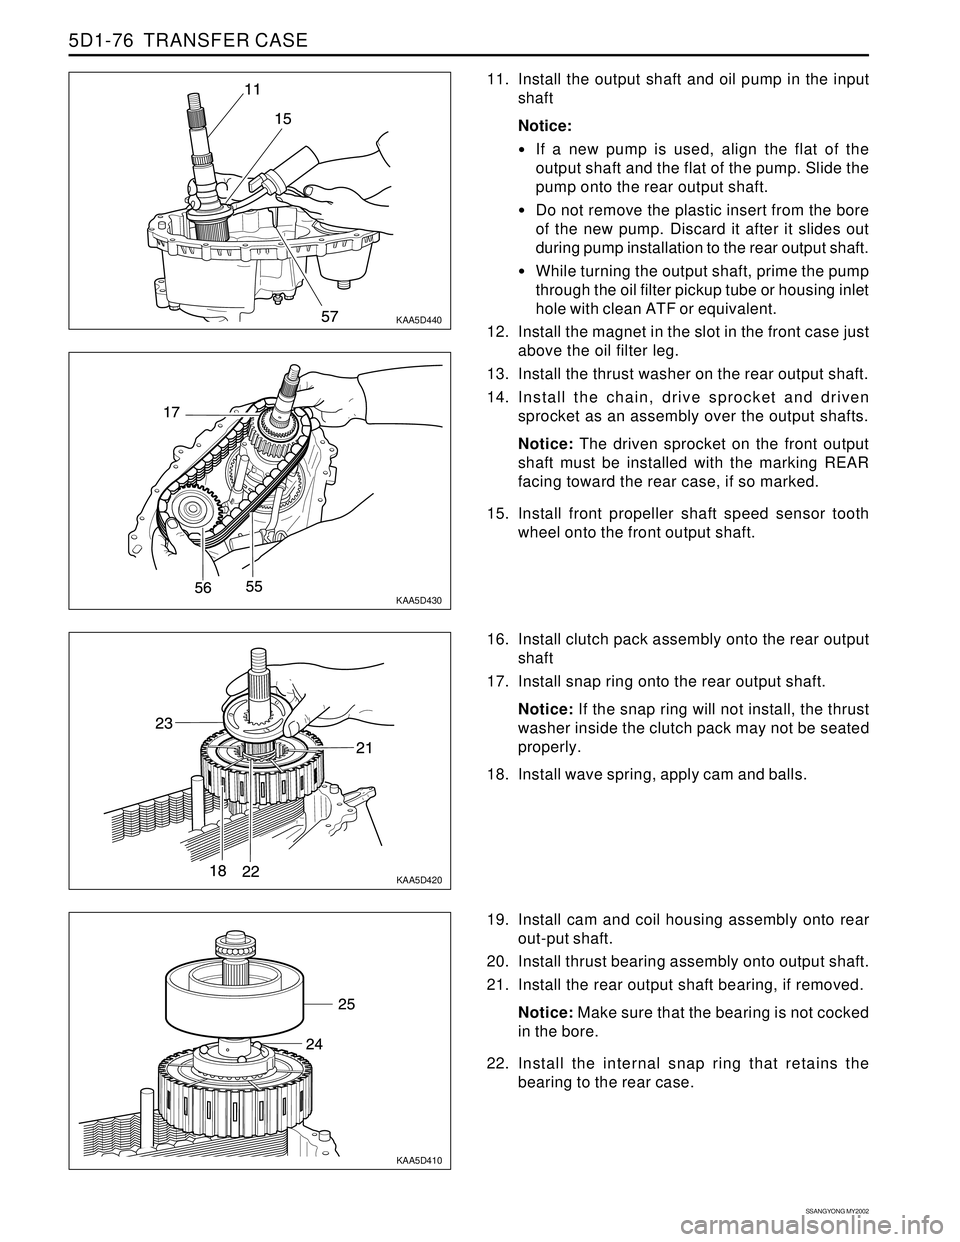
11. Install the output shaft and oil pump in the input
shaft
Notice:
If a new pump is used, align the flat of the
output shaft and the flat of the pump. Slide the
pump onto the rear output shaft.
Do not remove the plastic insert from the bore
of the new pump. Discard it after it slides out
during pump installation to the rear output shaft.
While turning the output shaft, prime the pump
through the oil filter pickup tube or housing inlet
hole with clean ATF or equivalent.
12. Install the magnet in the slot in the front case just
above the oil filter leg.
13. Install the thrust washer on the rear output shaft.
14. Install the chain, drive sprocket and driven
sprocket as an assembly over the output shafts.
Notice: The driven sprocket on the front output
shaft must be installed with the marking REAR
facing toward the rear case, if so marked.
15. Install front propeller shaft speed sensor tooth
wheel onto the front output shaft.
19. Install cam and coil housing assembly onto rear
out-put shaft.
20. Install thrust bearing assembly onto output shaft.
21. Install the rear output shaft bearing, if removed.
Notice: Make sure that the bearing is not cocked
in the bore.
22. Install the internal snap ring that retains the
bearing to the rear case. 16. Install clutch pack assembly onto the rear output
shaft
17. Install snap ring onto the rear output shaft.
Notice: If the snap ring will not install, the thrust
washer inside the clutch pack may not be seated
properly.
18. Install wave spring, apply cam and balls.
Page 1399 of 2053
TRANSFER CASE 5D1-77
SSANGYONG MY2002
KAA5D420
KAA5D590
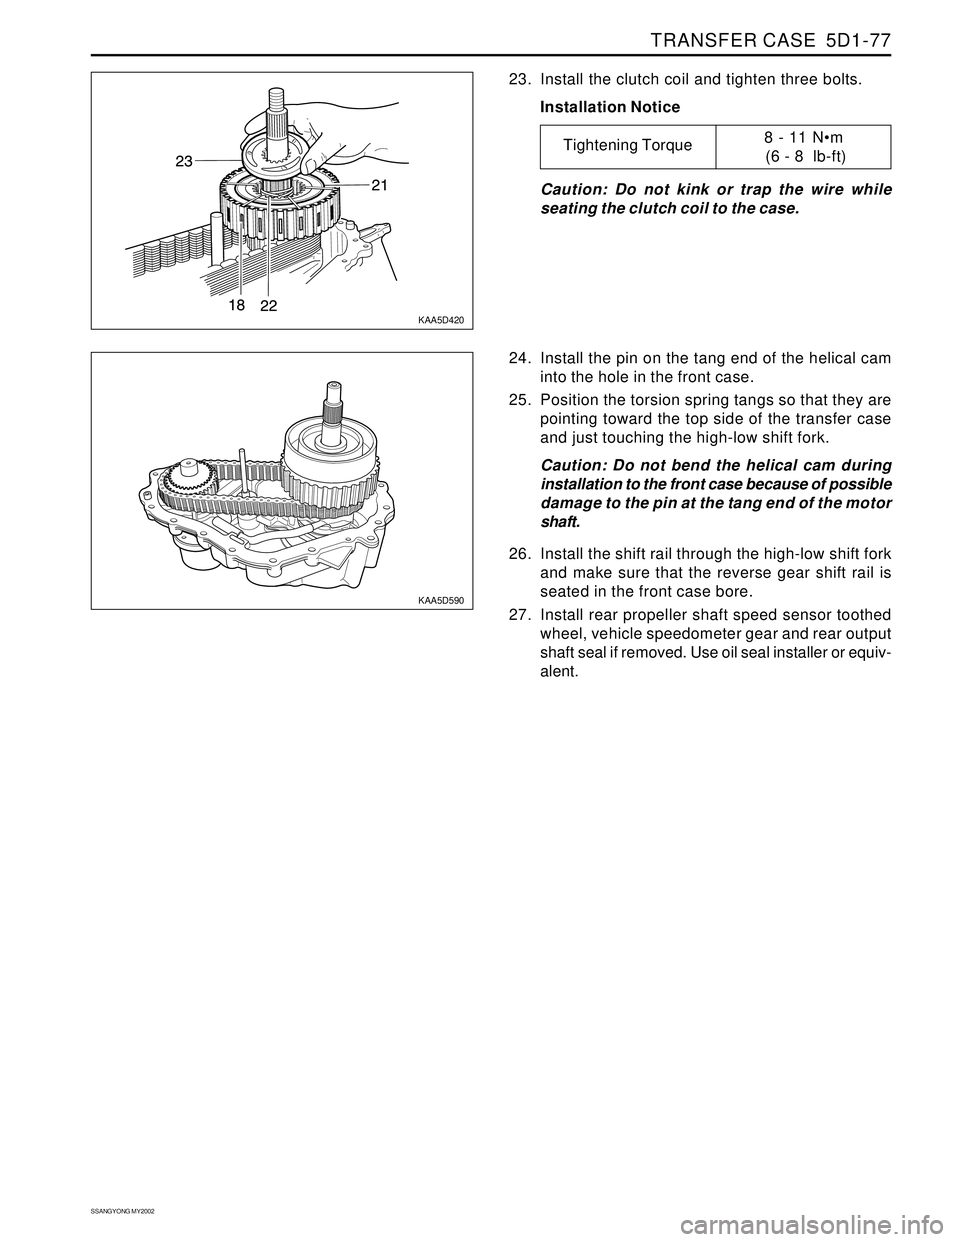
23. Install the clutch coil and tighten three bolts.
Installation Notice
Caution: Do not kink or trap the wire while
seating the clutch coil to the case.
24. Install the pin on the tang end of the helical cam
into the hole in the front case.
25. Position the torsion spring tangs so that they are
pointing toward the top side of the transfer case
and just touching the high-low shift fork.
Caution: Do not bend the helical cam during
installation to the front case because of possible
damage to the pin at the tang end of the motor
shaft.
26. Install the shift rail through the high-low shift fork
and make sure that the reverse gear shift rail is
seated in the front case bore.
27. Install rear propeller shaft speed sensor toothed
wheel, vehicle speedometer gear and rear output
shaft seal if removed. Use oil seal installer or equiv-
alent.
Tightening Torque8 - 11 Nm
(6 - 8 lb-ft)