Page 2608 of 4133
AR47.10-P-4100GH
Remove fuel tank
10.3.97
MODEL
163.113 with ENGINE 612.963
MODEL
163.128 with ENGINE 628.963
MODEL
163.136 with ENGINE 111.977
MODEL
163.154 with ENGINE 112.942
MODEL
163.157 with ENGINE 112.970
MODEL
163.172 with ENGINE 113.942
MODEL
163.175 with ENGINE 113.965
P47.10-0407-06
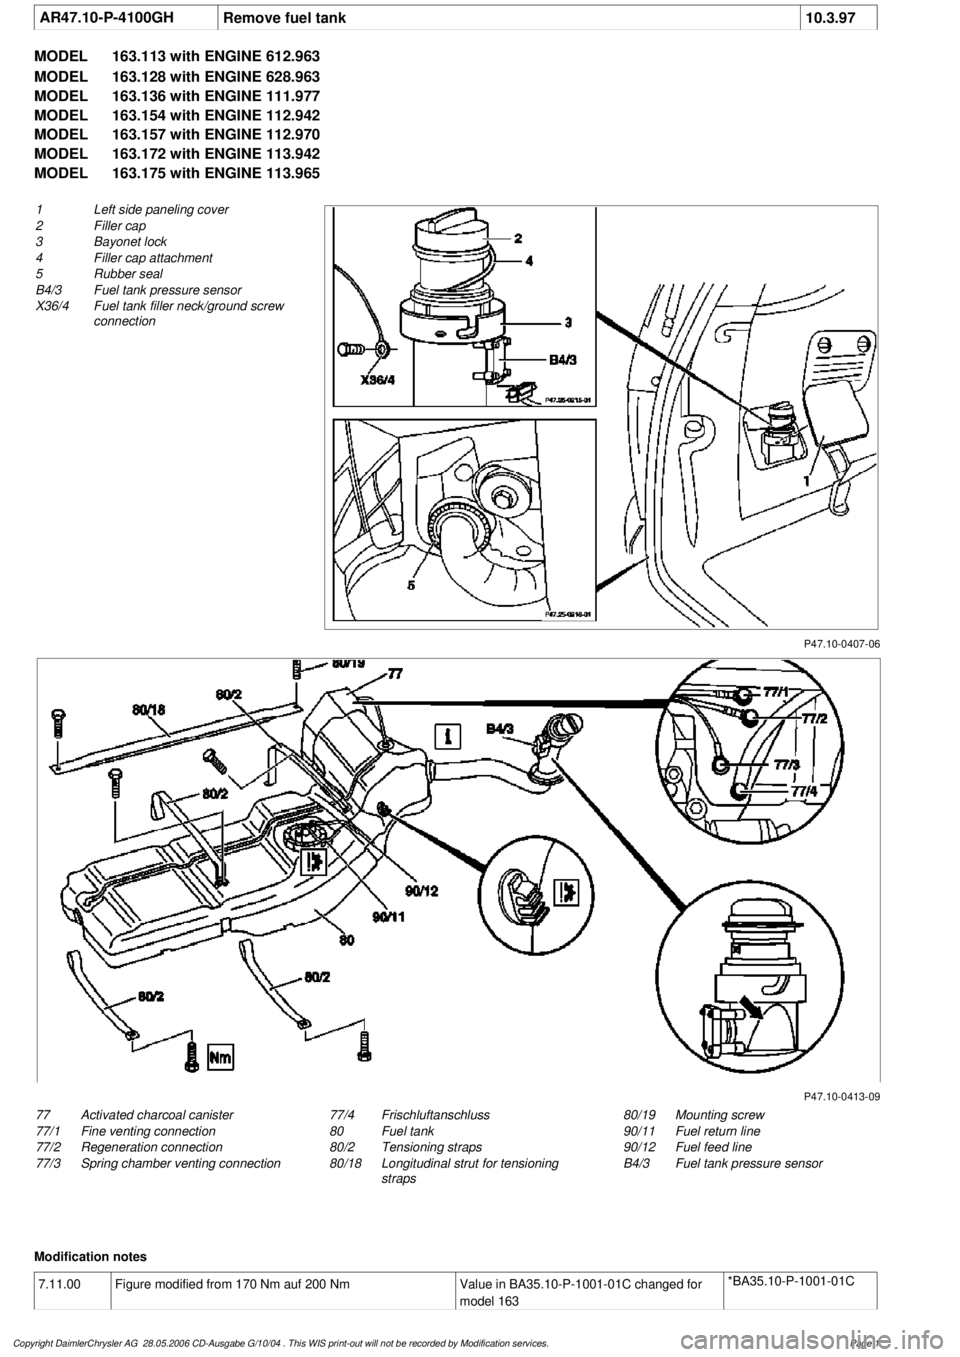
1
Left side paneling cover
2
Filler cap
3
Bayonet lock
4
Filler cap attachment
5
Rubber seal
B4/3 Fuel tank pressure sensor
X36/4
Fuel tank filler neck/ground screw
connection
P47.10-0413-09
77
Activated charcoal canister
77/1
Fine venting connection
77/2
Regeneration connection
77/3
Spring chamber venting connection
80/19
Mounting screw
90/11
Fuel return line
90/12
Fuel feed line
B4/3 Fuel tank pressure sensor
77/4
Frischluftanschluss
80
Fuel tank
80/2
Tensioning straps
80/18
Longitudinal strut for tensioning
straps
Modification notes
7.11.00
Figure modified from 170 Nm auf 200 Nm
Value in BA35.10-P-1001-01C changed for
model 163
*BA35.10-P-1001-01C
Copyright DaimlerChrysler AG 28.05.2006 CD-Ausgabe G/10/04 . This WIS print-out will not be recorde
d by Modification services.
Page 1
Page 2609 of 4133

Remove, Install
Danger!
Risk of explosion
from fuel igniting,
risk of
poisoning
from inhaling and swallowing fuel
as well as
risk of injury
to eyes and skin
from contact with fuel.
Fire, sparks, open flames or smoking
forbidden.
Pour fuels only into suitable and appropriately
marked containers.
Wear protective clothing when handling fuel.
AS47.00-Z-0001-01A
1
Drain fuel tank
Via fuel pump. NOT for model 163.113/128.
AR47.10-P-4001GH
If fuel pump faulty, and model 163.113/128.
AR47.10-P-4000GH
*BF47.10-P-1001-01A
2
Unscrew filler cap (2) and detach from filler
cap attachment (4)
3.1
Remove left seat of 3rd seat row
If installed. See owner's manual
4
Unclip cover of left-hand side panel (1)
5.1
Detach fuel lines of expansion reservoir and
separate from filler neck
As of VIN A289565. NOT for model
163.113/128.
6
Detach fuel filler neck from guide funnel
Installation:
Check O-ring and replace if
necessary. Ensure that the bayonet-lock
remains above
the pressure sensor.
Ensure it is correctly located when installed.
Open bayonet lock (3) to do this.
7
Pull filler neck through toward interior
Screw on cap again in order to avoid fuel
flowing out.
8.1
Remove fuel tank pressure sensor (B4/3)
Only USA version
AR47.10-P-8022GH
9.1
Detach bolted connection of fuel tank filler
neck/ground (X36/4) from filler neck
NOT for model 163.113/128.
10.1
Cut cable strap for retaining clips of fuel lines
at filler neck and remove retaining clips
As of VIN A289565. NOT for model
163.113/128.
Danger!
Risk of fatal accident
from vehicle slipping
or toppling off the lift platform
Align vehicle between the columns of lifting
platform and position the four support plates
below the support strongpoints specified by
the vehicle manufacturer.
AS00.00-Z-0010-01A
11
Place the vehicle on lifting platform
AR00.60-P-1000GH
12
Separate rubber seal (5) from underside of
vehicle and remove filler neck from interior
Do not damage fuel lines at filler neck.
13
Remove left rear wheel
e
Removing and installing wheels, rotating if
necessary
AP40.10-P-4050GH
14
Remove spare wheel and spare wheel carrier
complete
NOT in the case of spare wheel
holder/spare wheel, code 849.
15
Cut a large safety cable strap for filler neck at
bracket on longitudinal frame member
16
Remove bracket from longitudinal frame
member
17
Disconnect connection for regeneration (77/2)
and fresh air connection (77/4) on activated
charcoal canister (77)
Installation
: Connect up lines as per
connection diagram:
#
Engine 111
AR47.30-P-8212-01GJ
Engines 112, 113
AR47.30-P-8212-01GI
Engines 112, 113 version
I
AR47.30-P-8212-01GH
Charcoal canister and fuel tank form a
single unit.
NOT for model 163.113/128.
18
Detach vent hose
At rear differential to rear of activated
charcoal reservoir.
19
Remove rear exhaust system heat shield.
Do not damage boot at rear axle shaft.
20
Disconnect rear propeller shaft at differential
Installation:
Install new self-locking bolts.
Tie up propeller shaft e.g. using welding
wire
Heat bolts with hot air fan to facilitate
removing. Mark propeller shaft and differential
gear flange for correct installed position.
*BA41.10-P-1002-01C
Copyright DaimlerChrysler AG 28.05.2006 CD-Ausgabe G/10/04 . This WIS print-out will not be recorde
d by Modification services.
Page 2
Page 2612 of 4133
AR47.10-P-8022GH
Remove/install fuel tank pressure sensor
18.3.97
MODEL
163.154 with ENGINE 112.942 with CODE (494a) USA version
MODEL
163.157 with ENGINE 112.970 with CODE (494a) USA version
MODEL
163.172 with ENGINE 113.942 with CODE (494a) USA version
MODEL
163.174 with ENGINE 113.981 with CODE (494a) USA version
MODEL
163.175 with ENGINE 113.965 with CODE (494a) USA version
P47.10-0390-02
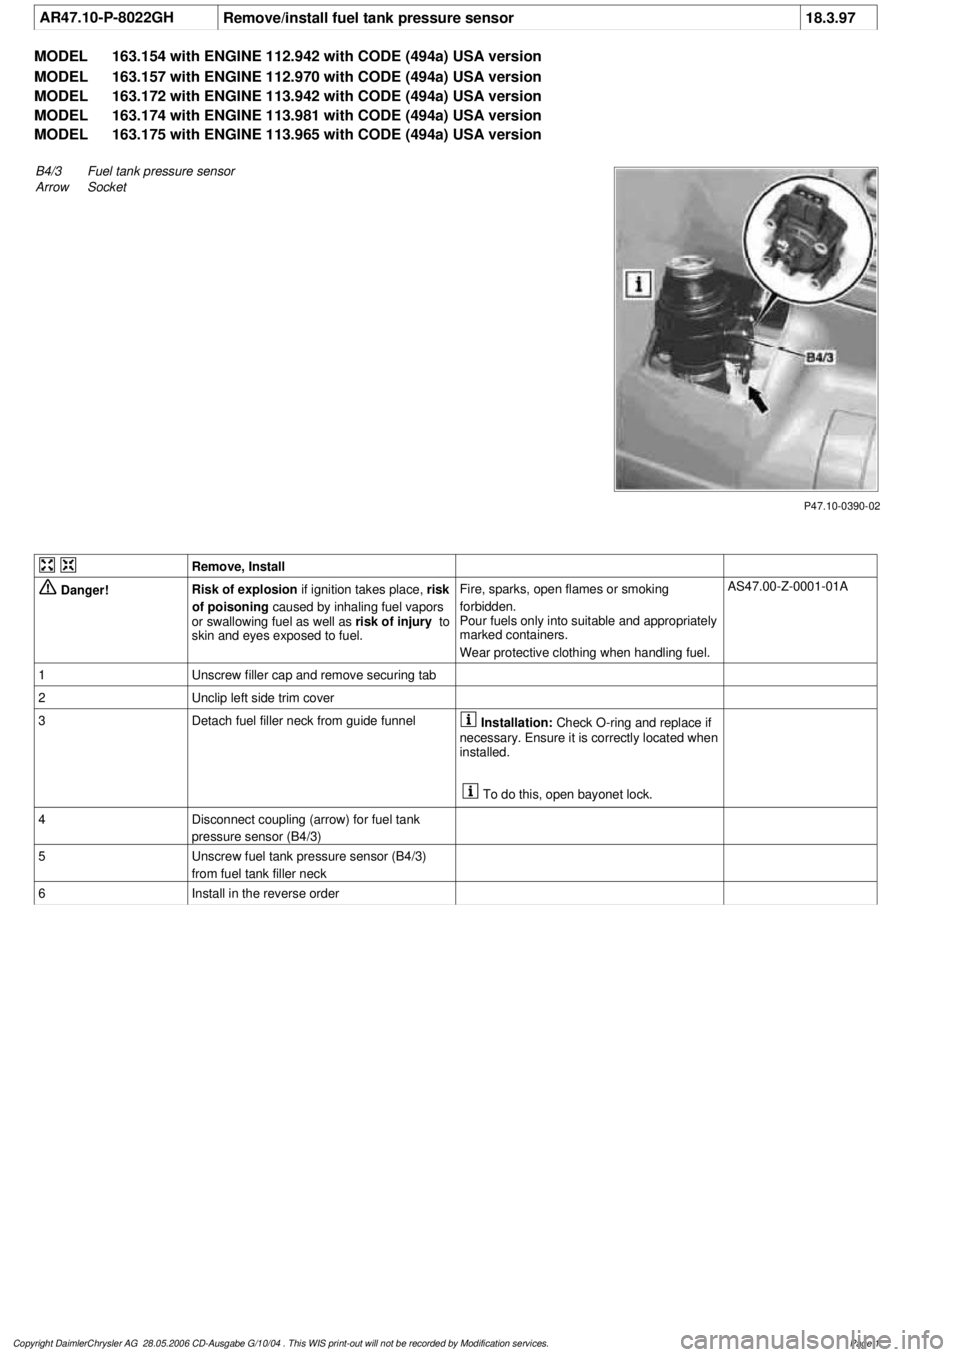
B4/3Fuel tank pressure sensor
Arrow
Socket
Remove, Install
Danger!
Risk of explosion
if ignition takes place,
risk
of poisoning
caused by inhaling fuel vapors
or swallowing fuel as well as
risk of injury
to
skin and eyes exposed to fuel.
Fire, sparks, open flames or smoking
forbidden.
Pour fuels only into suitable and appropriately
marked containers.
Wear protective clothing when handling fuel.
AS47.00-Z-0001-01A
1
Unscrew filler cap and remove securing tab
2
Unclip left side trim cover
3
Detach fuel filler neck from guide funnel
Installation:
Check O-ring and replace if
necessary. Ensure it is correctly located when
installed.
To do this, open bayonet lock.
4
Disconnect coupling (arrow) for fuel tank
pressure sensor (B4/3)
5
Unscrew fuel tank pressure sensor (B4/3)
from fuel tank filler neck
6
Install in the reverse order
Copyright DaimlerChrysler AG 28.05.2006 CD-Ausgabe G/10/04 . This WIS print-out will not be recorde
d by Modification services.
Page 1
Page 2686 of 4133
Fig. 29: Identifying Sensor Spade-Type Contact (SLC) Pin
Fig. 30: Identifying Sensor Spade
-Type Contact (SLC) Bushing
2004 Mercedes-Benz ML350
1998-2005 GENINFO Overall vehicle - 163 Chassis
me
Saturday, October 02, 2010 3:47:44 PMPage 41 © 2006 Mitchell Repair Information Company, LLC.
Page 2687 of 4133
Fig. 31: Identifying Spade-Type Sensor Contact (LSC) Pin
Fig. 32: Identifying Spade
-Type Sensor Contact (LSC) Bushing
2004 Mercedes-Benz ML350
1998-2005 GENINFO Overall vehicle - 163 Chassis
me
Saturday, October 02, 2010 3:47:44 PMPage 42 © 2006 Mitchell Repair Information Company, LLC.
Page 2696 of 4133
PLUGS AND COUPLINGS AS-BUILT CONFIGURATION - GF00.19-P-8000A
MODEL 124, 126, 129, 140, 163, 164, 168, 169, 170, 171, 199, 202, 203, 208, 209, 210, 211, 215, 216, 219,
220, 221, 230, 240, 245, 251, 414, 461, 463
245, 251, 414, 461 as of
1.4.94, 463
Notes regarding plug
connections AH00.19-P-1000-06A
Junior power timer contact
family Plugs and couplings.GF00.19-P-8106A
Standard power timer
contact family Plugs and couplings.GF00.19-P-8108A
Micro timer 3 contact
family Couplings.GF00.19-P-8105A
Maxi power timer contact
family Couplings.GF00.19-P-8110A
E95 contact family Couplings.GF00.19-P-8104A
Multi contact point contact
family Plugs and couplings.GF00.19-P-8107A
Micro quadlock system
contact familyMicro quadlock system
contact family variant 1
Plugs and couplings.GF00.19-P-8102A
Micro Quadlock System,
variant 2 contact family
Plugs and couplings.GF00.19-P-8102B
Sensor laminated contact,
connector familySensor spade-type contact
Design 97 contact family
Plugs and couplings.GF00.19-P-8101A
Sensor spade-type contact
Version 2 contact family
Plugs and couplings.GF00.19-P-8101B
Spade-type sensor contact
family Plugs and couplingsGF00.19-P-8109A
Siemens ELO contact
family Plugs and couplings.GF00.19-P-8103A
Round plug contact 2.5
variant 1 contact family Plugs and couplings.GF00.19-P-8111A
Round-type contact 2.5
solder contact family Plugs and couplings.GF00.19-P-8112A
Spade-type contact system
1.5 contact family Plugs and couplings.GF00.19-P-8113A
Mini spade-type contact
family Plugs and couplings.GF00.19-P-8115A
2004 Mercedes-Benz ML350
1998-2005 GENINFO Overall vehicle - 163 Chassis
me
Saturday, October 02, 2010 3:47:44 PMPage 51 © 2006 Mitchell Repair Information Company, LLC.
Page 2737 of 4133
CONTACT PART NUMBERS - GF00.19-P-8100CE
MODEL 124, 126, 129, 140, 163, 164, 168, 169, 170, 171, 199, 202, 203, 208, 209, 210, 211, 215, 216, 219,
220, 221, 230, 240, 245, 251, 414, 461, 463
Connector and couplings part-original-number 230
SENSOR LAMINATED CONTACT, CONNECTOR FAMILY - GF00.19-P-8101A
MODEL 124, 126, 129, 140, 163, 164, 168, 169, 170, 171, 199, 202, 203, 208, 209, 210, 211, 215, 216, 219,
220, 221, 230, 240, 245, 251, 414, 461, 463
Sensor spade-type contact, Design 97 contact family
Remove JPT female
contactAR00.19-
P-0120-
07A
220 545 99 2814-pin SLK coupling, B,
white
Remove female contactAR00.19-P-0120-02A
Part number
Designation, Coding,
Color
230 540 00 812-pin MQS coupling, C,
black
Remove female contactAR00.19-P-0120-04A
230 545 01 2847-pin MQS, MCP
coupling, A, black
Remove MQS female
contactAR00.19-
P-0120-
04B
Remove MCP female
contactAR00.19-P-0120-09A
2004 Mercedes-Benz ML350
1998-2005 GENINFO Overall vehicle - 163 Chassis
me
Saturday, October 02, 2010 3:47:45 PMPage 92 © 2006 Mitchell Repair Information Company, LLC.
Page 2749 of 4133
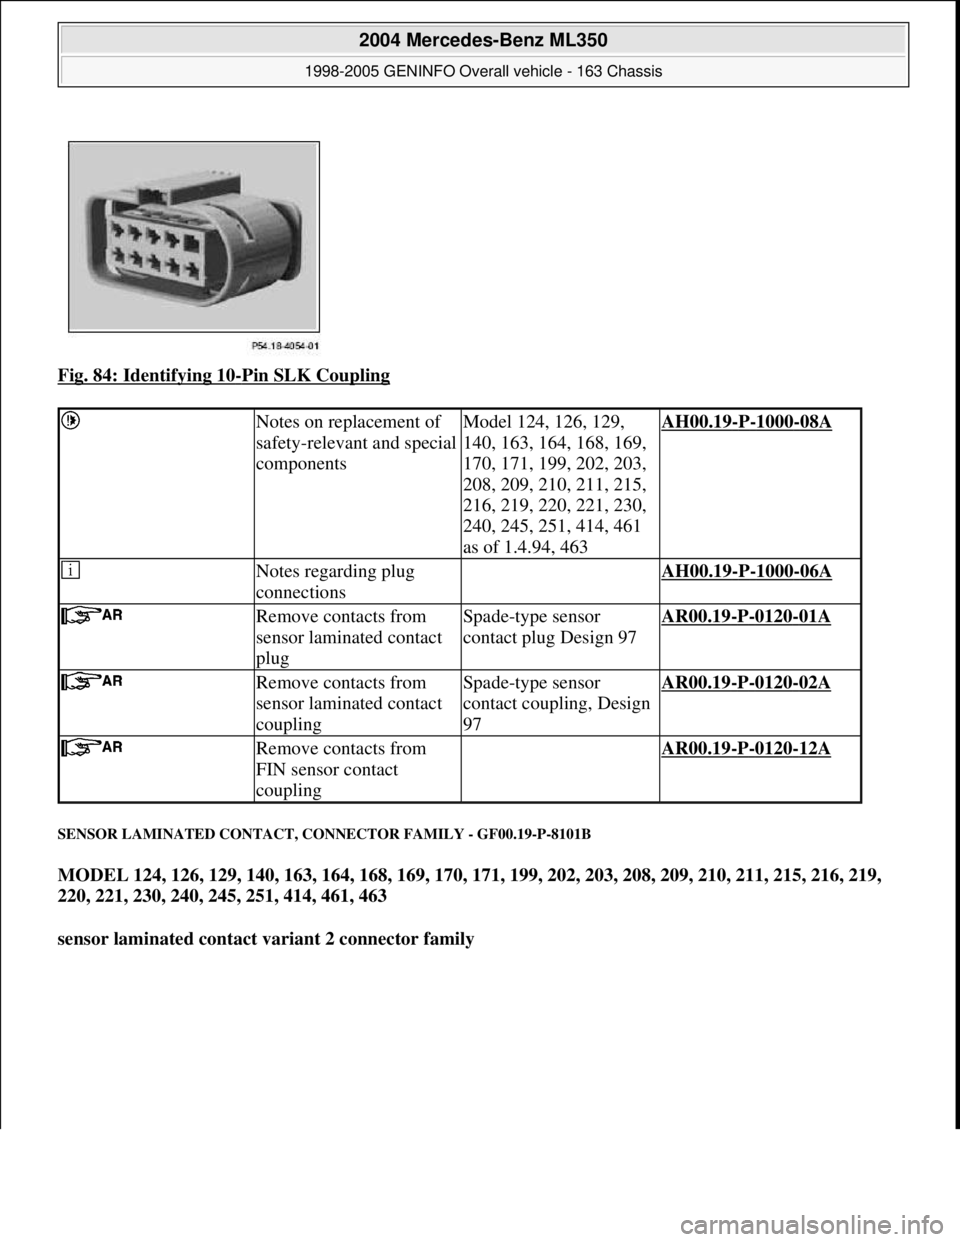
Fig. 84: Identifying 10-Pin SLK Coupling
SENSOR LAMINATED CONTACT, CONNECTOR FAMILY - GF00.19-P-8101B
MODEL 124, 126, 129, 140, 163, 164, 168, 169, 170, 171, 199, 202, 203, 208, 209, 210, 211, 215, 216, 219,
220, 221, 230, 240, 245, 251, 414, 461, 463
sensor laminated contact variant 2 connector family
Notes on replacement of
safety-relevant and special
componentsModel 124, 126, 129,
140, 163, 164, 168, 169,
170, 171, 199, 202, 203,
208, 209, 210, 211, 215,
216, 219, 220, 221, 230,
240, 245, 251, 414, 461
as of 1.4.94, 463AH00.19-P-1000-08A
Notes regarding plug
connections AH00.19-P-1000-06A
Remove contacts from
sensor laminated contact
plugSpade-type sensor
contact plug Design 97AR00.19-P-0120-01A
Remove contacts from
sensor laminated contact
couplingSpade-type sensor
contact coupling, Design
97AR00.19-P-0120-02A
Remove contacts from
FIN sensor contact
coupling AR00.19-P-0120-12A
2004 Mercedes-Benz ML350
1998-2005 GENINFO Overall vehicle - 163 Chassis
me
Saturday, October 02, 2010 3:47:45 PMPage 104 © 2006 Mitchell Repair Information Company, LLC.