Page 1777 of 4133
Wiper
Fig. 185: Identifying Puller (001 589 38 33 00)
REMOVE/INSTALL RAIN SENSOR - AR82.30-P-7700GH
MODELS 163.113 /128 /154 /157 /172 /174 /175 with CODE (345a) Rain sensor
Fig. 185
4Reinstall in opposite
order When installing:
Attach wiper arms so that
wiper arm points toward
left (driver's side)
NumberDesignationModel 163
BA82.30-P-1001-01CNut for rear window
wiper armNm15
2001 Mercedes-Benz ML320
1998-2005 ACCESSORIES & BODY, CAB Electrical System - Body - 163 Chassis
me
Saturday, October 02, 2010 3:30:09 PMPage 282 © 2006 Mitchell Repair Information Company, LLC.
Page 1778 of 4133
Fig. 186: Identifying Rain Sensor Components
Modification notes
11.4.03Disconnecting ground
lead from battery newly
includedStep 1
Remove/Install
1Disconnect ground
cable of battery AR54.10-P-0003A
2Remove rearview
mirror (1).Models 163.154/172#A up to
145272, Models 163.154/172#X up
to 708318AR68.40-P-0001GH
Models 163.154/172#A as of
145273, Models 163.154/172#X as
of 708319, Models
163.113/128/157/174/175AR68.40-P-0001GI
3Disconnect electrical
connector (2) from
rain sensor(B38)
4Press retaining lugs
(arrows) downward
5Remove rain sensor
(B38) Lens of rain sensor (B38) is
bonded to the windshield and may
2001 Mercedes-Benz ML320
1998-2005 ACCESSORIES & BODY, CAB Electrical System - Body - 163 Chassis
me
Saturday, October 02, 2010 3:30:09 PMPage 283 © 2006 Mitchell Repair Information Company, LLC.
Page 1962 of 4133

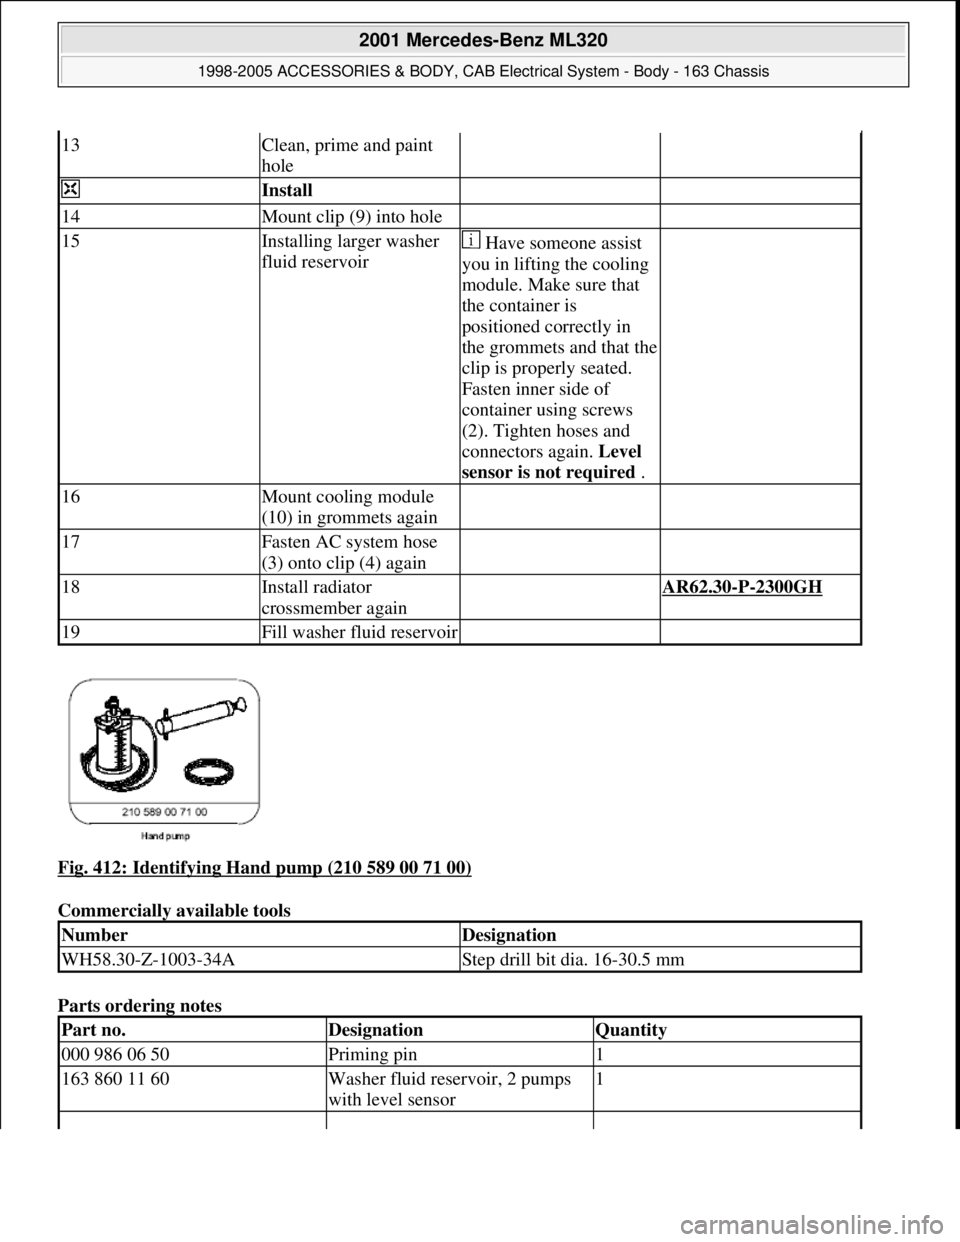
Fig. 412: Identifying Hand pump (210 589 00 71 00)
Commercially available tools
Parts ordering notes
13Clean, prime and paint
hole
Install
14Mount clip (9) into hole
15Installing larger washer
fluid reservoir Have someone assist
you in lifting the cooling
module. Make sure that
the container is
positioned correctly in
the grommets and that the
clip is properly seated.
Fasten inner side of
container using screws
(2). Tighten hoses and
connectors again. Level
sensor is not required .
16Mount cooling module
(10) in grommets again
17Fasten AC system hose
(3) onto clip (4) again
18Install radiator
crossmember again AR62.30-P-2300GH
19Fill washer fluid reservoir
NumberDesignation
WH58.30-Z-1003-34AStep drill bit dia. 16-30.5 mm
Part no.DesignationQuantity
000 986 06 50Priming pin1
163 860 11 60Washer fluid reservoir, 2 pumps
with level sensor1
2001 Mercedes-Benz ML320
1998-2005 ACCESSORIES & BODY, CAB Electrical System - Body - 163 Chassis
me
Saturday, October 02, 2010 3:30:14 PMPage 467 © 2006 Mitchell Repair Information Company, LLC.
Page 1980 of 4133

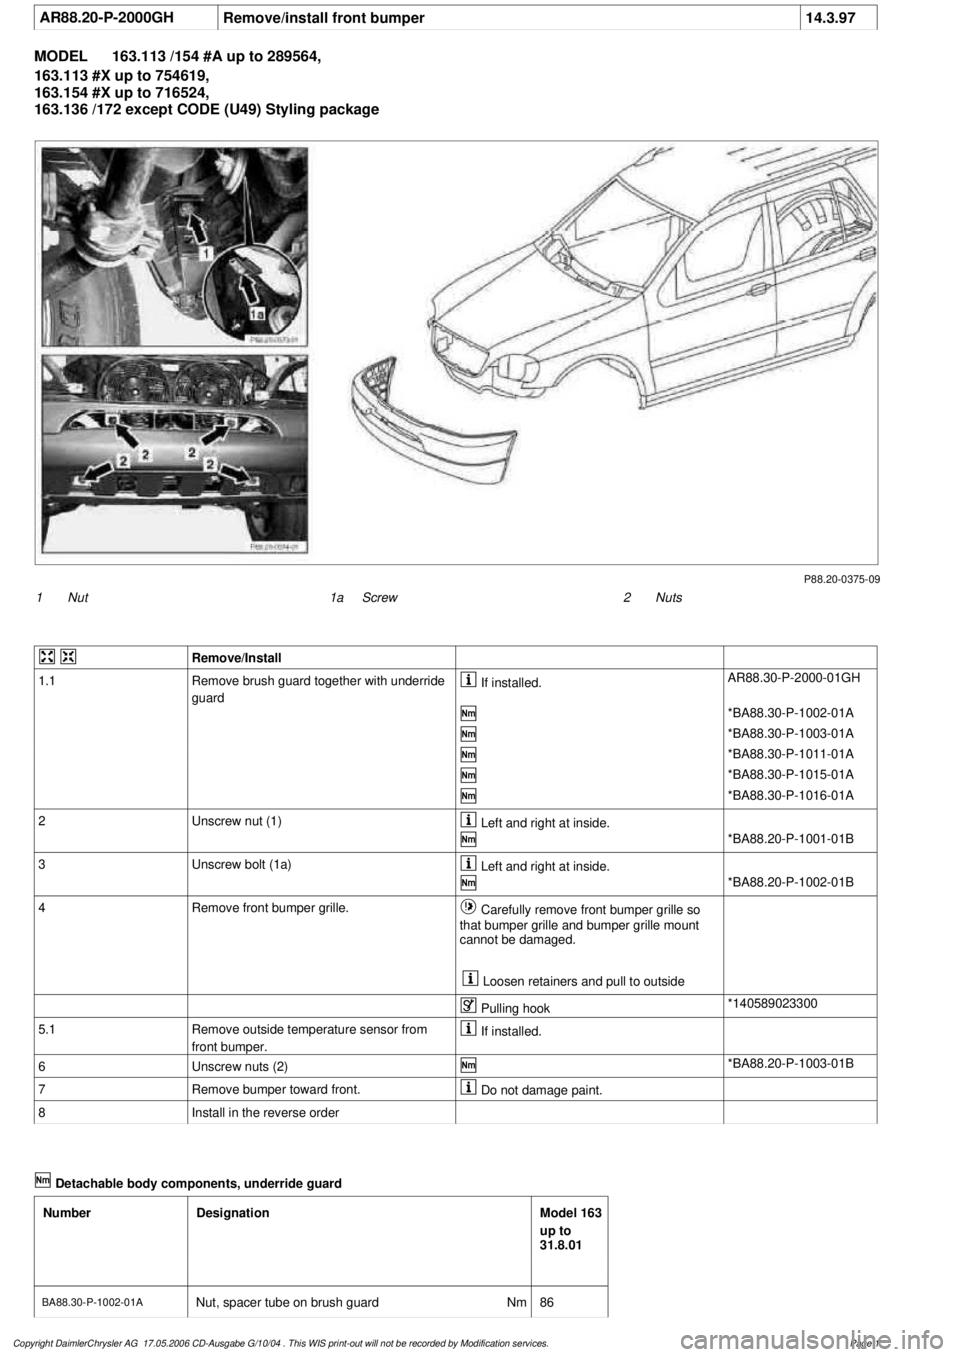
AR88.20-P-2000GH
Remove/install front bumper
14.3.97
MODEL
163.113 /154 #A up to 289564,
163.113 #X up to 754619,
163.154 #X up to 716524,
163.136 /172 except CODE (U49) Styling package
P88.20-0375-09
1
Nut
2
Nuts
1a
Screw
Remove/Install
1.1
Remove brush guard together with underride
guard
If installed.
AR88.30-P-2000-01GH
*BA88.30-P-1002-01A
*BA88.30-P-1003-01A
*BA88.30-P-1011-01A
*BA88.30-P-1015-01A
*BA88.30-P-1016-01A
2
Unscrew nut (1)
Left and right at inside.
*BA88.20-P-1001-01B
3
Unscrew bolt (1a)
Left and right at inside.
*BA88.20-P-1002-01B
4
Remove front bumper grille.
Carefully remove front bumper grille so
that bumper grille and bumper grille mount
cannot be damaged.
Loosen retainers and pull to outside
Pulling hook
*140589023300
5.1
Remove outside temperature sensor from
front bumper.
If installed.
6
Unscrew nuts (2)
*BA88.20-P-1003-01B
7
Remove bumper toward front.
Do not damage paint.
8
Install in the reverse order
Detachable body components, underride guard
Number
Designation
Model 163
up to
31.8.01
BA88.30-P-1002-01A
Nut, spacer tube on brush guard
Nm
86
Copyright DaimlerChrysler AG 17.05.2006 CD-Ausgabe G/10/04 . This WIS print-out will not be recorde
d by Modification services.
Page 1
Page 1988 of 4133
AR54.65-P-0001GH
Remove/install Parktronic system (PTS) sensors in front bumper
19.4.01
MODEL
163.113 /128 /154 /157 /174 /175 with CODE (220a) Parktronic System (PTS)
P54.65-2411-06
1
Plug connection
2
Parktronic system sensor
3
Retaining clamps
Remove/install
1
Remove front bumper
with styling package, code U49.
AR88.20-P-2000GI
As of 01.09.01.
AR88.20-P-2000GJ
2
Put down bumper safely in a suitable place
Do not damage paintwork.
3
Disconnect connector (1) from Parktronic
system sensor(2)
4
Remove Parktronic system sensor (2) from
the bumper
Bo not brake off the retaining clamps (3).
Release tool
*168589023100
5
Install in the reverse order
Release tool
168 589 02 31 00
Copyright DaimlerChrysler AG 20.05.2006 CD-Ausgabe G/10/04 . This WIS print-out will not be recorde
d by Modification services.
Page 1
Page 1989 of 4133

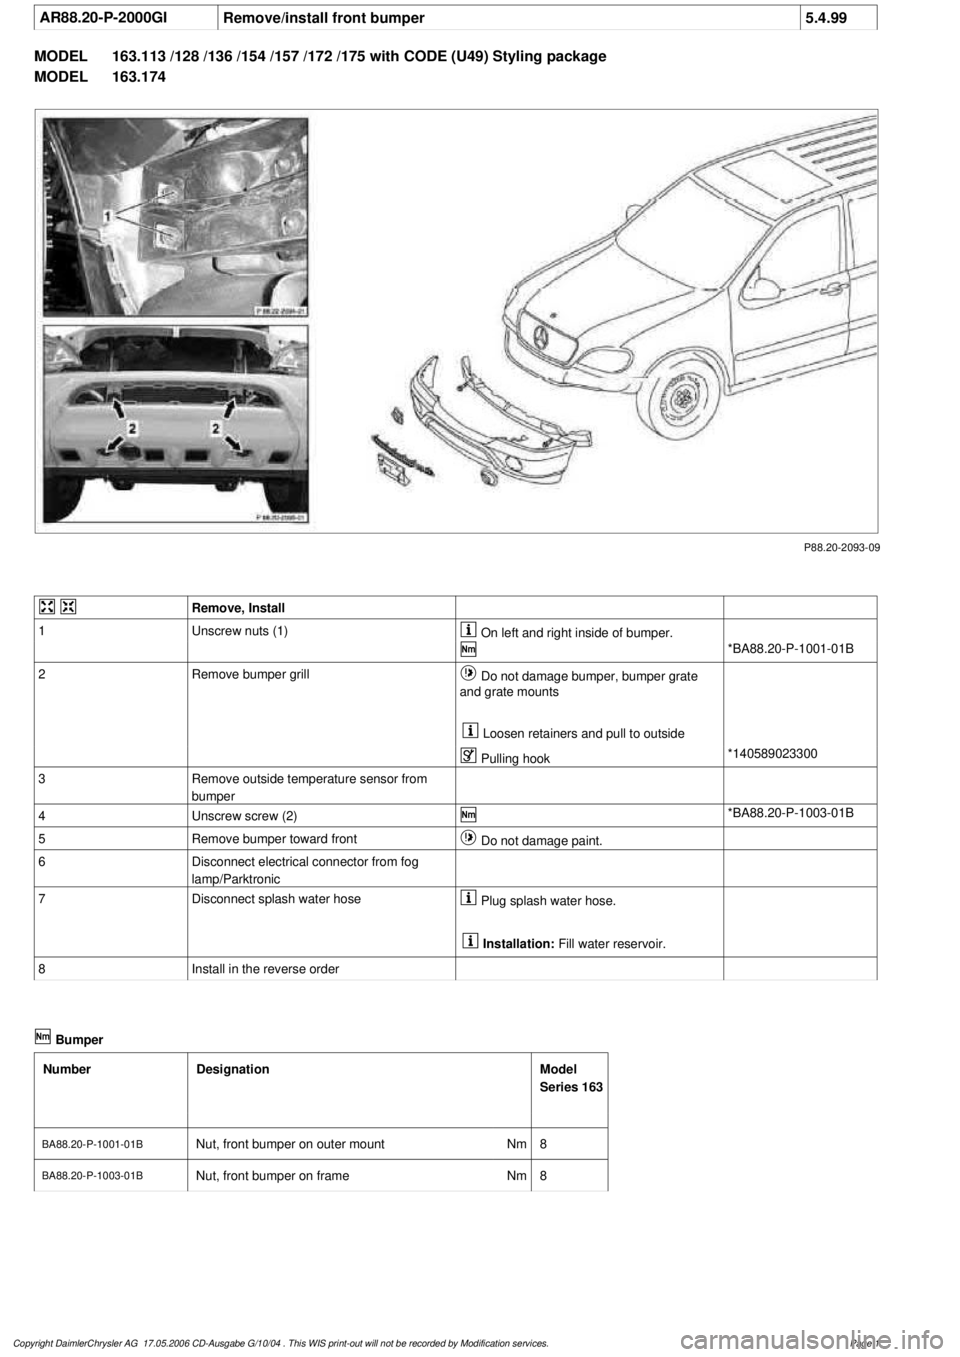
AR88.20-P-2000GI
Remove/install front bumper
5.4.99
MODEL
163.113 /128 /136 /154 /157 /172 /175 with CODE (U49) Styling package
MODEL
163.174
P88.20-2093-09
Remove, Install
1
Unscrew nuts (1)
On left and right inside of bumper.
*BA88.20-P-1001-01B
2
Remove bumper grill
Do not damage bumper, bumper grate
and grate mounts
Loosen retainers and pull to outside
Pulling hook
*140589023300
3
Remove outside temperature sensor from
bumper
4
Unscrew screw (2)
*BA88.20-P-1003-01B
5
Remove bumper toward front
Do not damage paint.
6
Disconnect electrical connector from fog
lamp/Parktronic
7
Disconnect splash water hose
Plug splash water hose.
Installation:
Fill water reservoir.
8
Install in the reverse order
Bumper
Number
Designation
Model
Series 163
BA88.20-P-1001-01B
Nut, front bumper on outer mount
Nm
8
BA88.20-P-1003-01B
Nut, front bumper on frame
Nm
8
Copyright DaimlerChrysler AG 17.05.2006 CD-Ausgabe G/10/04 . This WIS print-out will not be recorde
d by Modification services.
Page 1
Page 1991 of 4133
AR54.65-P-0002GH
Remove/install Parktronic system (PTS) sensors in rear bumper
19.4.01
MODEL
163.113 /128 /154 /157 /174 /175 with CODE (220a) Parktronic System (PTS)
P54.65-2412-06
1
Plug connection
2
Parktronic system sensor
3
Retaining clamps
Remove/install
1
Remove rear bumper
with styling package, code U49.
AR88.20-P-2200GJ
As of 01.09.01.
AR88.20-P-2200GK
2
Put down bumper safely in a suitable place
Do not damage paintwork.
3
Disconnect connector (1) from Parktronic
system sensor(2)
4
Remove Parktronic system sensor (2) from
the bumper
Bo not brake off the retaining clamps (3).
Release tool
*168589023100
5
Install in the reverse order
Release tool
168 589 02 31 00
Copyright DaimlerChrysler AG 20.05.2006 CD-Ausgabe G/10/04 . This WIS print-out will not be recorde
d by Modification services.
Page 1
Page 1994 of 4133

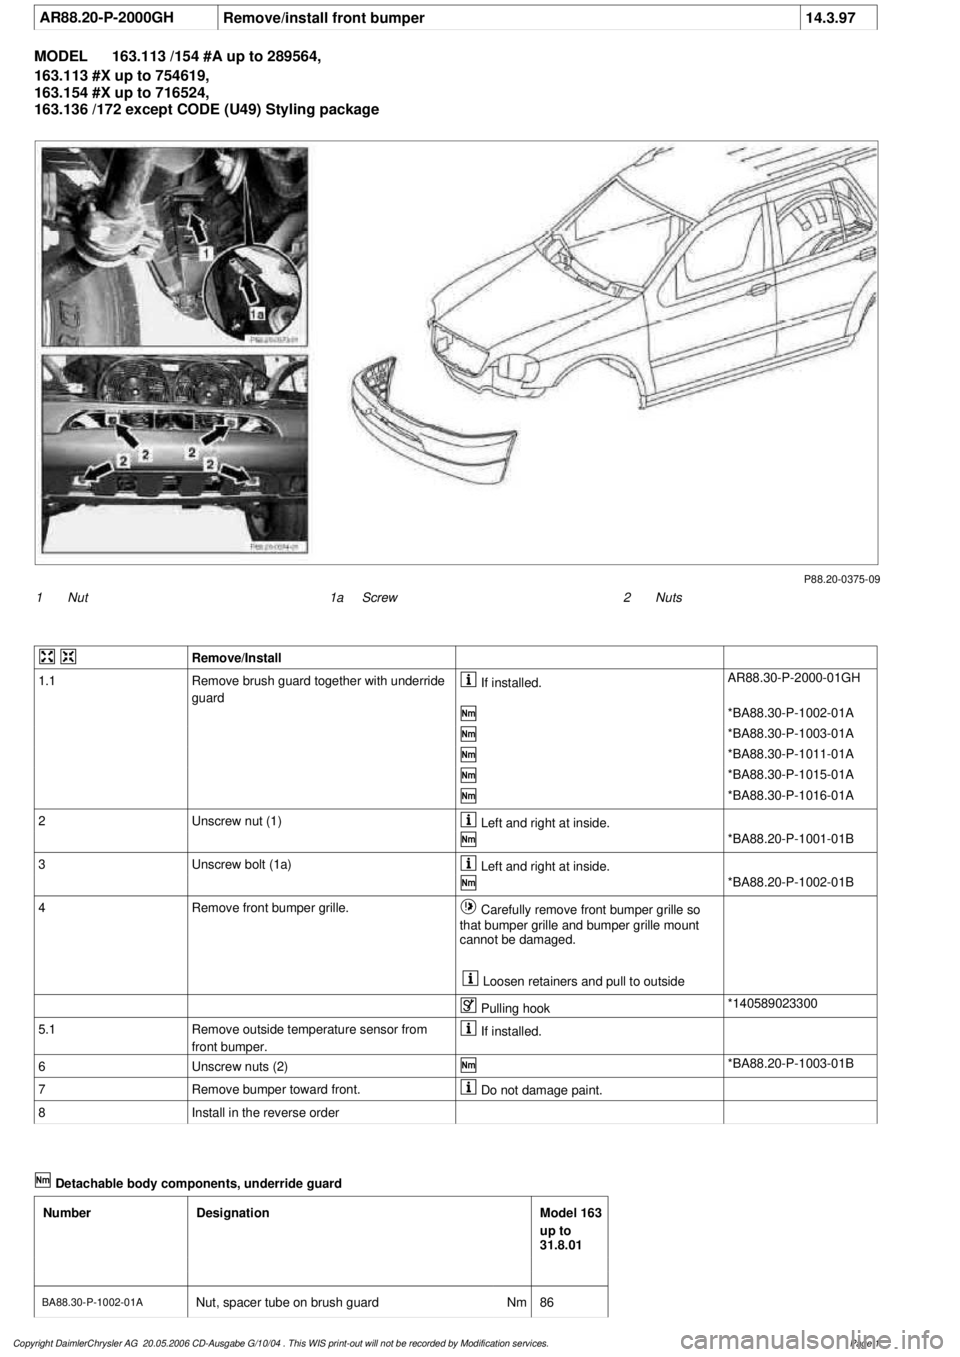
AR88.20-P-2000GH
Remove/install front bumper
14.3.97
MODEL
163.113 /154 #A up to 289564,
163.113 #X up to 754619,
163.154 #X up to 716524,
163.136 /172 except CODE (U49) Styling package
P88.20-0375-09
1
Nut
2
Nuts
1a
Screw
Remove/Install
1.1
Remove brush guard together with underride
guard
If installed.
AR88.30-P-2000-01GH
*BA88.30-P-1002-01A
*BA88.30-P-1003-01A
*BA88.30-P-1011-01A
*BA88.30-P-1015-01A
*BA88.30-P-1016-01A
2
Unscrew nut (1)
Left and right at inside.
*BA88.20-P-1001-01B
3
Unscrew bolt (1a)
Left and right at inside.
*BA88.20-P-1002-01B
4
Remove front bumper grille.
Carefully remove front bumper grille so
that bumper grille and bumper grille mount
cannot be damaged.
Loosen retainers and pull to outside
Pulling hook
*140589023300
5.1
Remove outside temperature sensor from
front bumper.
If installed.
6
Unscrew nuts (2)
*BA88.20-P-1003-01B
7
Remove bumper toward front.
Do not damage paint.
8
Install in the reverse order
Detachable body components, underride guard
Number
Designation
Model 163
up to
31.8.01
BA88.30-P-1002-01A
Nut, spacer tube on brush guard
Nm
86
Copyright DaimlerChrysler AG 20.05.2006 CD-Ausgabe G/10/04 . This WIS print-out will not be recorde
d by Modification services.
Page 1