Page 914 of 4133

110 Controls in detailLighting�
Stop the vehicle.
�
Make sure the ignition is switched on.
All the lamps in the instrument cluster
light up.
�
Turn combination switch to
positionM.
�
Press upper part1 of switch until the
clock, located in the instrument clus-
ter, displays the actual illumination
time.
�
Press upper part1 of switch again.
Each time the switch is pressed, the
illumination time increases by
15 seconds. You can set the illumina-
tion time between 0 (off) and
60 seconds.
Approximately five seconds after pressing
the switch, the illumination time is set and
the clock is displayed again.Locator lighting
During darkness, the following lamps will
come on when the vehicle is unlocked by
remote control:
�
Parking lamps
�
Tail lamps
�
License plate lamps
�
Front fog lamps
The combination switch must be set to
positionU (
�page 107).
The locator lighting switches off when the
driver’s door is opened. It switches off au-
tomatically after a period of approximately
40 seconds.Switching on high beams
�
Turn the combination switch
toõ(
�page 107).
�
Push the combination switch forward.
The high beam indicatorA in the
instrument cluster comes on.
High beam flasher
�
Pull the combination switch briefly in
direction2.
Page 920 of 4133
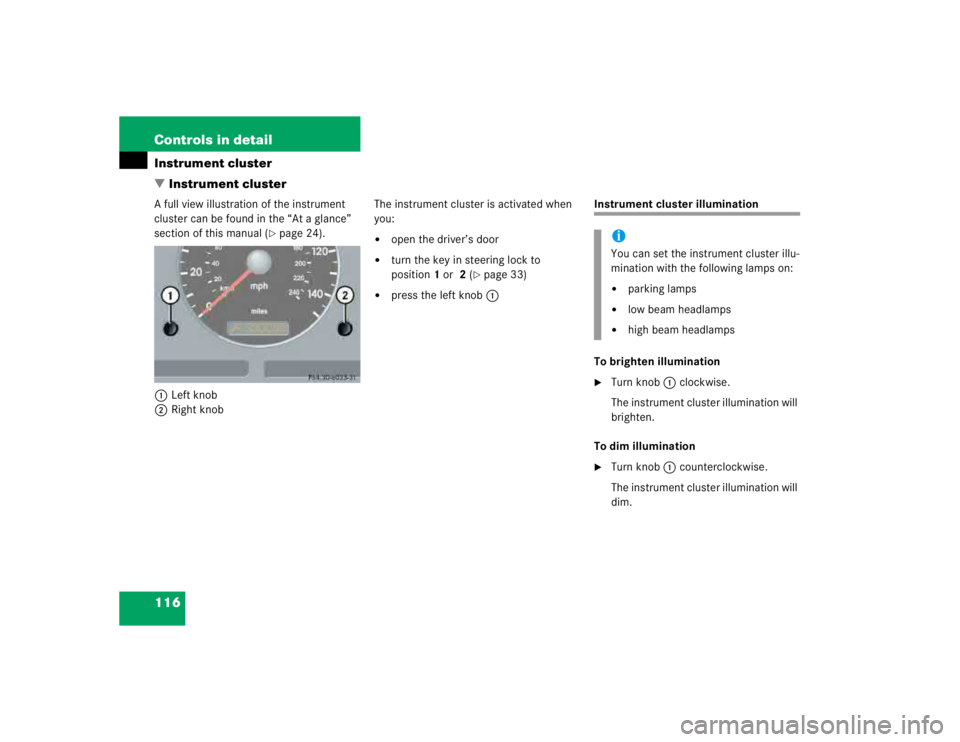
116 Controls in detailInstrument cluster
�Instrument clusterA full view illustration of the instrument
cluster can be found in the “At a glance”
section of this manual (
�page 24).
1Left knob
2Right knobThe instrument cluster is activated when
you:
�
open the driver’s door
�
turn the key in steering lock to
position1 or 2 (
�page 33)
�
press the left knob1
Instrument cluster illumination
To brighten illumination�
Turn knob1 clockwise.
The instrument cluster illumination will
brighten.
To dim illumination
�
Turn knob1 counterclockwise.
The instrument cluster illumination will
dim.iYou can set the instrument cluster illu-
mination with the following lamps on:�
parking lamps
�
low beam headlamps
�
high beam headlamps
Page 922 of 4133
 re-
peatedly until you see the trip odome-
ter display.
�
Press and hold the left knob1 until
the tr")
118 Controls in detailInstrument clusterResetting trip odometer�
Press the left knob1 (
�page 116) re-
peatedly until you see the trip odome-
ter display.
�
Press and hold the left knob1 until
the trip odometer is reset.
Tachometer
To help protect the engine, the fuel supply
is interrupted if the engine is operated
above its specified limit.
Outside temperature indicator
The outside temperature is displayed in
the instrument cluster (
�page 24).
When moving the vehicle into colder ambi-
ent temperatures (e.g. when leaving your
garage), you will notice a delay before the
lower temperature is displayed.
A delay also occurs when ambient temper-
atures rise. This prevents inaccurate tem-
perature indications caused by heat
radiated from the engine during idling or
slow driving.
Setting the clock
Hour�
Pull out the right knob2 in the instru-
ment cluster (
�page 116) and turn it
counterclockwise.
Minutes
�
Pull out the right knob2 in the instru-
ment cluster (
�page 116) and turn it
clockwise.
Warning!
G
The outside temperature indicator is not de-
signed to serve as an ice-warning device and
is therefore unsuitable for that purpose.
Indicated temperatures just above the freez-
ing point do not guarantee that the road sur-
face is free of ice. The road may still be icy,
especially in wooded areas or on bridges.
iTo set the clock by a single hour or a
few minutes, turn knob2 just a few
degrees in the direction indicated for
hours or minutes.
Page 968 of 4133

164 Controls in detailUseful features
�Useful featuresInterior storage spaces Glove box
1Glove box lid release
2Glove box lid
Opening the glove box
�
Grab in recess and pull lid release1.
The glove box lid2 opens downward.
Closing the glove box
�
Push glove box lid up to close.Storage compartment under front
passenger seat*
The storage compartment is lockable with
its separate key.
1Lock cylinder
2Handle
Locking and unlocking the storage com-
partment
�
Turn the key clockwise.
The storage compartment is locked.
�
Turn the key counterclockwise.
The storage compartment is unlocked.
Warning!
G
To help avoid personal injury during a colli-
sion or sudden maneuver, exercise care
when stowing objects in the vehicle. Put lug-
gage or cargo in the cargo compartment if
possible. Do not pile luggage or cargo higher
than the seat backs.
Always use partition net when transporting
cargo. Partition net cannot secure hard or
heavy objects.
Parcel nets cannot secure hard or heavy ob-
jects.
Keep compartment lids closed. This will help
to prevent stored objects from being thrown
about and injuring vehicle occupants during
an accident.
iThe opened glove box is illuminated
with the key in steering lock position1
(�page 33).
Page 1061 of 4133
257 Practical hints
Where will I find ...?
�Where will I find ...?
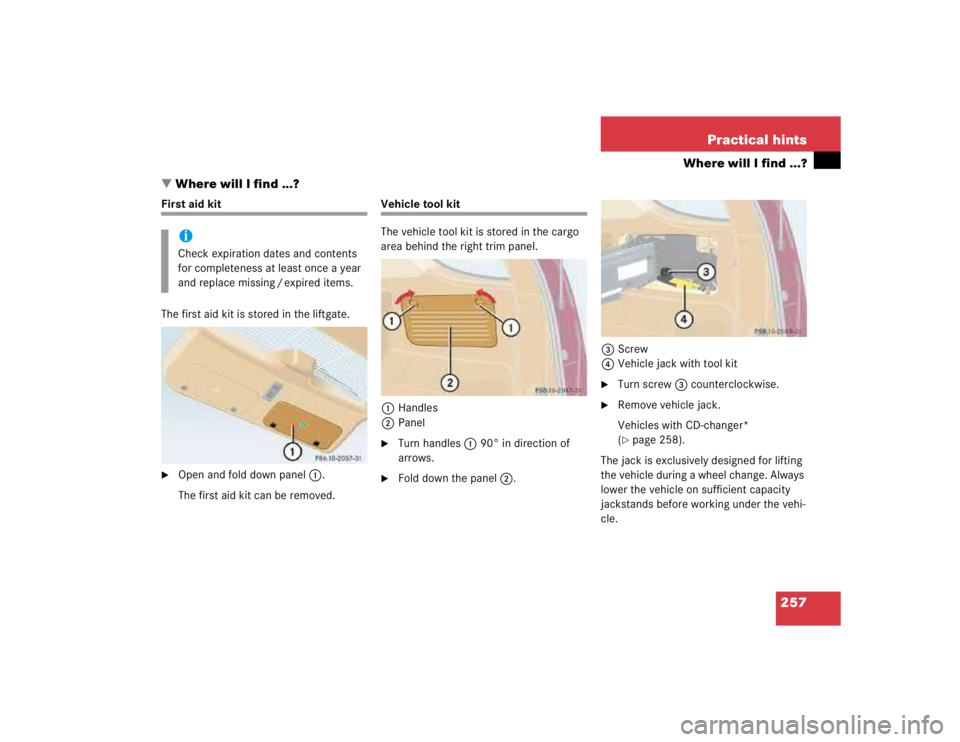
First aid kit
The first aid kit is stored in the liftgate.�
Open and fold down panel1.
The first aid kit can be removed.
Vehicle tool kit
The vehicle tool kit is stored in the cargo
area behind the right trim panel.
1Handles
2Panel�
Turn handles1 90° in direction of
arrows.
�
Fold down the panel2.3Screw
4Vehicle jack with tool kit
�
Turn screw3 counterclockwise.
�
Remove vehicle jack.
Vehicles with CD-changer*
(�page 258).
The jack is exclusively designed for lifting
the vehicle during a wheel change. Always
lower the vehicle on sufficient capacity
jackstands before working under the vehi-
cle.
iCheck expiration dates and contents
for completeness at least once a year
and replace missing / expired items.
Page 1062 of 4133

258 Practical hintsWhere will I find ...?1Vehicle jack
2Wheel bolt wrench
3Screwdriver
4Interchangeable slot
Screwdriver3 is placed inside the wheel-
bolt wrench handle.Vehicle jack
Please also observe the safety guidelines
in the “Flat tire” section (
�page 274)
when using the jack.
Vehicle with CD-changer*
To access the vehicle tool kit, swing the
CD-changer out of the panel.
1Screw
2CD-changer
�
Turn screw1 counterclockwise.
�
Swing the CD-changer2 out of the
panel.
Warning!
G
The jack is designed exclusively for jacking
up the vehicle at the jack take-up brackets
built into both sides of the vehicle. To help
avoid personal injury, use the jack only to lift
the vehicle during a wheel change. Never
get beneath the vehicle while it is supported
by the jack. Keep hands and feet away from
the area under the lifted vehicle. Always
firmly set parking brake and block wheels
before raising vehicle with jack.
Do not disengage parking brake while the
vehicle is raised. Be certain that the jack is
always vertical (plumb line) when in use, es-
pecially on hills. Always try to use the jack
on level surface.
Make sure that the jack arm is fully seated
in the jack take-up bracket. Always lower
the vehicle onto sufficient capacity jack-
stands before working under the vehicle.
Page 1063 of 4133

Use the spare wheel only temporarily,
while observing the following restrictions:�
Do not exceed vehicle speed of
50 mph (80")
259 Practical hints
Where will I find ...?
Spare wheel (space-saver tire)
Use the spare wheel only temporarily,
while observing the following restrictions:�
Do not exceed vehicle speed of
50 mph (80 km / h).
�
Drive to the nearest repair facility to
have the flat tire repaired or replaced
as appropriate.
�
Do not operate vehicle with more than
one spare wheel mounted.Removing spare wheel
The spare wheel is located behind the rear
bumper.
1Cover
�
Hold left and right side of cover1 and
pull away from bumper.2Screw
3Spare wheel carrier
4Lever
�
Turn screw2 counterclockwise using
the wrench (
�page 258).
Screw2 remains in spare wheel
carrier3.
�
Lift spare wheel carrier slightly and
push lever4 to the right using screw-
driver (
�page 257).
�
Swing spare wheel carrier3 down and
pull it out from under the bumper.
Warning!
G
The dimensions of the spare wheel are dif-
ferent from those of the road wheels. As a
result, the vehicle handling characteristics
change when driving with a mounted spare
wheel.iPlease comply with the instructions for
“Mounting the spare wheel”
(�page 274).
Warning!
G
Exercise care when removing or installing
spare wheel to prevent personal injury.
��
Page 1067 of 4133

263 Practical hints
Unlocking / locking in an emergency
�
Pull off battery cover2 in direction of
arrow.
�
Remove the batteries.
�
Using a lint-free cloth, insert new bat-
teries under the contact spring with the
plus (+) side facing up.
�
Press battery cover2 onto housing
until locked in place.
�
Push each button to assure proper op-
eration of the remote control.
If remote control does not function cor-
rectly after replacing the batteries, the
system may have to be resynchronized.Synchronizing remote control
�
Turn key in steering lock to position2
(�page 33), then to position0 and re-
move.
�
Within ten seconds, push and hold
button‹ while pushing
buttonΠfive times.
�
Release the button, and press‹,
Œ orŠ once.
The remote control is resynchronized.
�
Recheck all of the remote control func-
tions.
Fuel filler flap
1Cover
2Lock rod�
Open the tailgate.
�
Open cover1 in cargo area behind
the left trim panel.
�
Turn lock rod2 clockwise (arrow) to
the end stop.
The fuel filler flap can now be opened.
iI f i t i s n o t p o s s i b l e t o r e s y n c h r o n i z e t h e
remote control, have the system
checked at your authorized
Mercedes-Benz Light Truck Center.