Page 499 of 1202
P20489
P20548
Z07984
SST SST
SST
SSTSSTPiston
Pin
SST
- ENGINE MECHANICALCYLINDER BLOCK
EM-77
1996 TERCEL (RM440U)
23. CHECK FIT BETWEEN PISTON AND PIN
Try to move the piston back and forth on the piston pin.
If any movement is felt, replace the piston and pin as a set.
24. REMOVE PISTON RINGS
(a) Using a piston ring expander, remove the compression
rings.
(b) Remove the 2 side rails and oil ring expander by hand.
HINT:
Arrange the rings in the correct order only.
25. DISCONNECT CONNECTING ROD FROM PISTON
(a) Using SST, press out the piston pin from the piston.
(b) Remove the connecting rod.
SST 09221-25024 (09221-00020, 09221-00030,
09221-00130, 09221-00140, 09221-00150)
HINT:
�The piston and pin are a matched set.
�Arrange the pistons, pins, rings, connecting rods and
bearings in correct order.
Page 500 of 1202
P00393
EM0JR-04
Z07983
P00390
EM9429
Front
Cylinder Bore Size Mark (1,2 or 3) EM-78
- ENGINE MECHANICALCYLINDER BLOCK
1996 TERCEL (RM440U)
INSPECTION
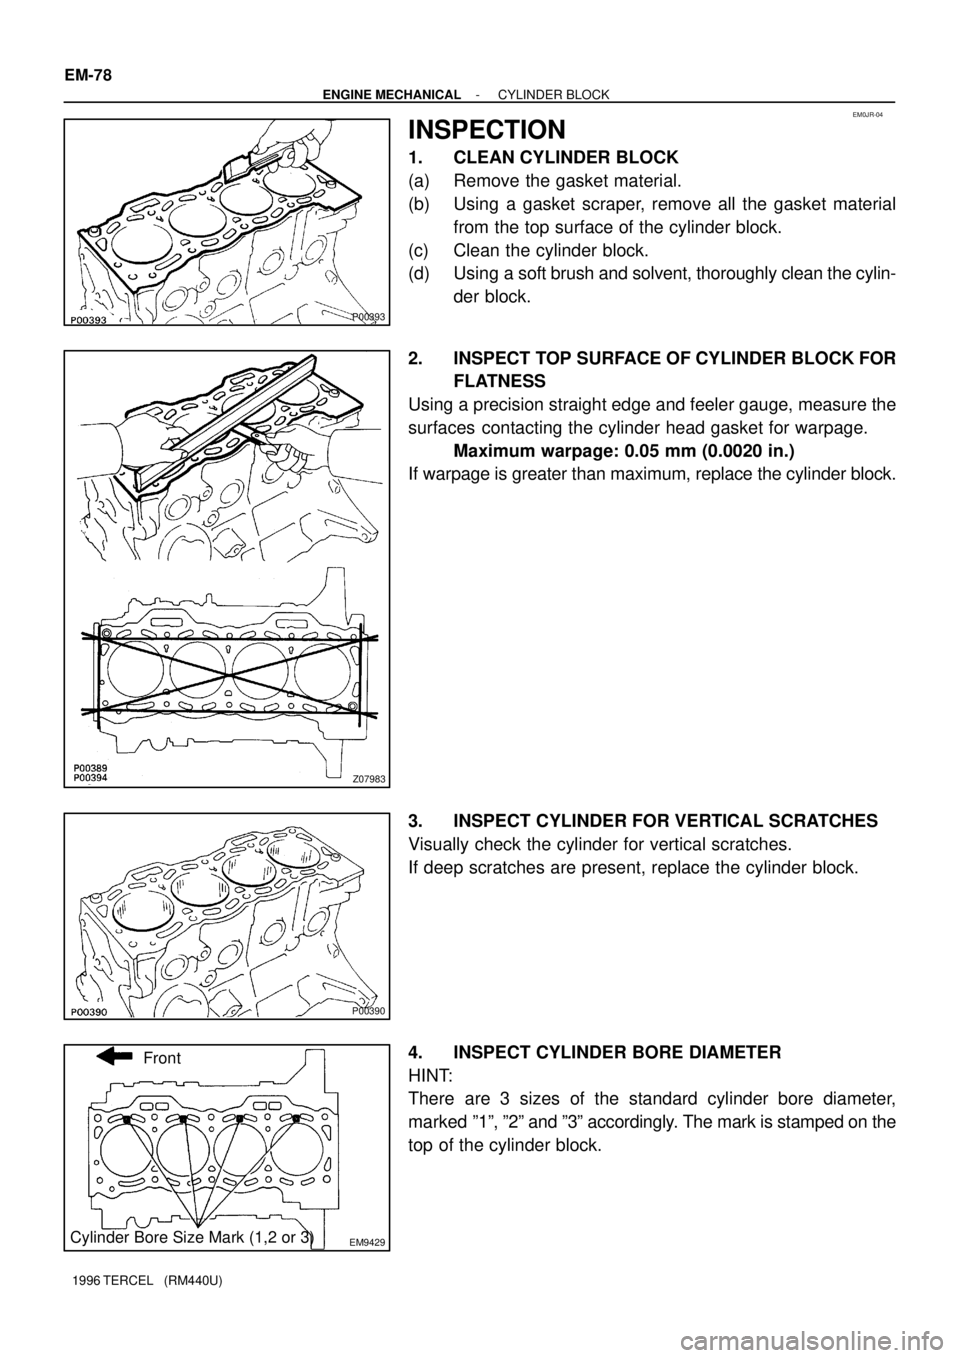
1. CLEAN CYLINDER BLOCK
(a) Remove the gasket material.
(b) Using a gasket scraper, remove all the gasket material
from the top surface of the cylinder block.
(c) Clean the cylinder block.
(d) Using a soft brush and solvent, thoroughly clean the cylin-
der block.
2. INSPECT TOP SURFACE OF CYLINDER BLOCK FOR
FLATNESS
Using a precision straight edge and feeler gauge, measure the
surfaces contacting the cylinder head gasket for warpage.
Maximum warpage: 0.05 mm (0.0020 in.)
If warpage is greater than maximum, replace the cylinder block.
3. INSPECT CYLINDER FOR VERTICAL SCRATCHES
Visually check the cylinder for vertical scratches.
If deep scratches are present, replace the cylinder block.
4. INSPECT CYLINDER BORE DIAMETER
HINT:
There are 3 sizes of the standard cylinder bore diameter,
marked º1º, º2º and º3º accordingly. The mark is stamped on the
top of the cylinder block.
Page 501 of 1202
P20484
FrontThrust
Direction
Axial
Direction
10 mm
(0.39 in.)
10 mm
(0.39 in.) A
B
C
P20491
P20541
P20542
- ENGINE MECHANICALCYLINDER BLOCK
EM-79
1996 TERCEL (RM440U)
Using a cylinder gauge, measure the cylinder bore diameter at
positions A, B and C in the thrust and axial directions.
Standard diameter:
Mark º1º74.000 - 74.010 mm (2.9134 - 2.9138 in.)
Mark º2º74.011 - 74.020 mm (2.9138 - 2.9142 in.)
Mark º3º74.021 - 74.030 mm (2.9142 - 2.9146 in.)
Maximum diameter:
74.23 mm (2.9224 in.)
If the diameter is greater than maximum, replace the cylinder
block.
5. REMOVE CYLINDER RIDGE
If the wear is less than 0.2 mm (0.008 in.), using a ridge reamer,
grind the top of the cylinder.
6. CLEAN PISTON
(a) Using a gasket scraper, remove the carbon from the pis-
ton top.
(b) Using a groove cleaning tool or broken ring, clean the ring
grooves.
Page 502 of 1202
P20539
P20561
Mark 1, 2 or 3
Front mark (Cavity)
P20474
23 mm
(0.91 in.)
P20571
Mark 1, 2 or 3
Front
Front mark (Cavity)Mark 1, 2 or 3 EM-80
- ENGINE MECHANICALCYLINDER BLOCK
1996 TERCEL (RM440U)
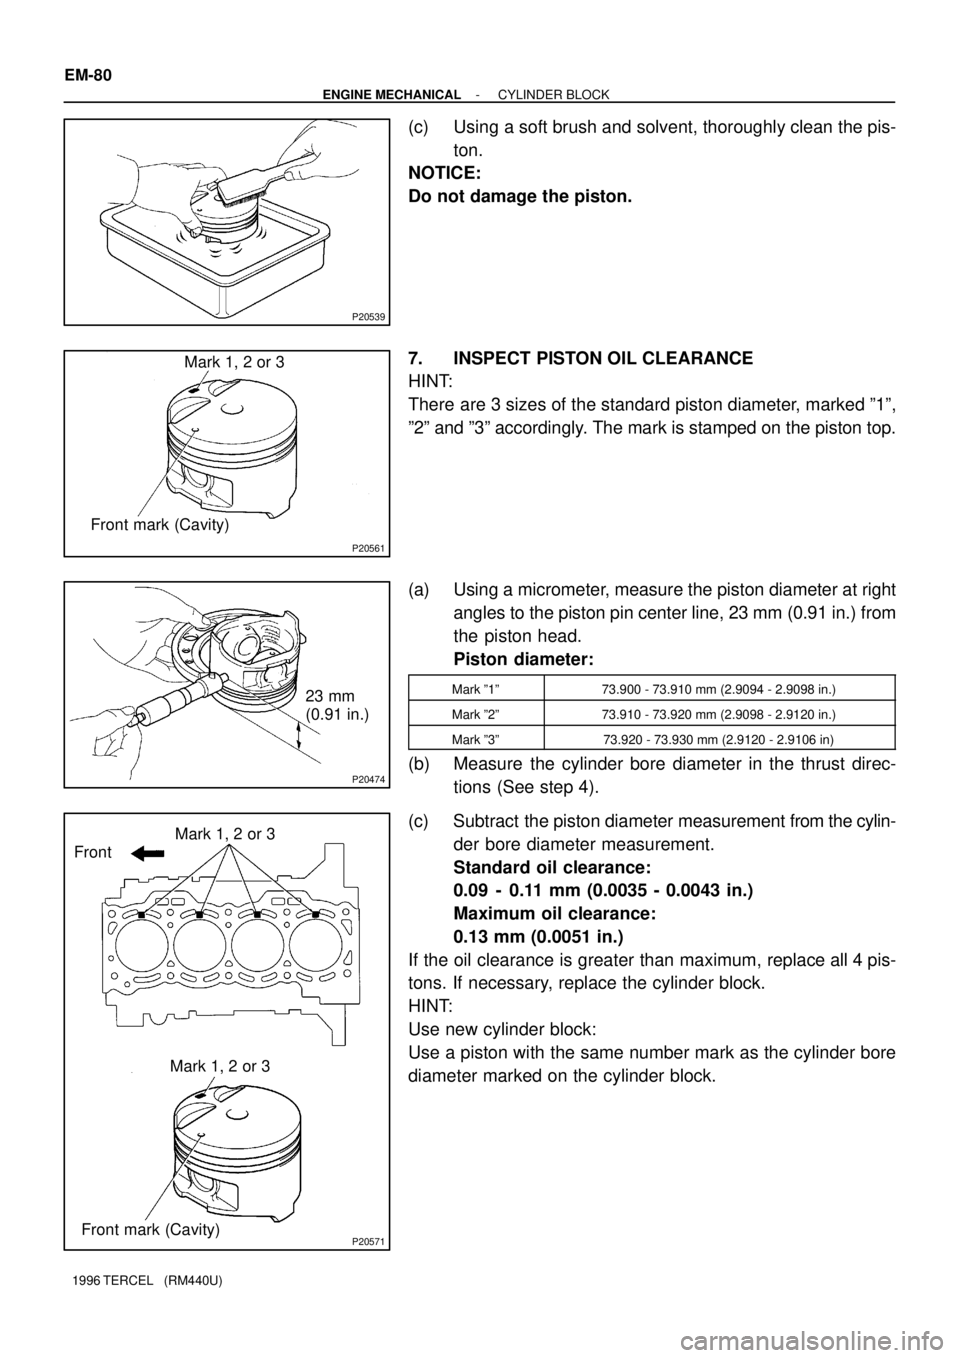
(c) Using a soft brush and solvent, thoroughly clean the pis-
ton.
NOTICE:
Do not damage the piston.
7. INSPECT PISTON OIL CLEARANCE
HINT:
There are 3 sizes of the standard piston diameter, marked º1º,
º2º and º3º accordingly. The mark is stamped on the piston top.
(a) Using a micrometer, measure the piston diameter at right
angles to the piston pin center line, 23 mm (0.91 in.) from
the piston head.
Piston diameter:
Mark º1º73.900 - 73.910 mm (2.9094 - 2.9098 in.)
Mark º2º73.910 - 73.920 mm (2.9098 - 2.9120 in.)
Mark º3º73.920 - 73.930 mm (2.9120 - 2.9106 in)
(b) Measure the cylinder bore diameter in the thrust direc-
tions (See step 4).
(c) Subtract the piston diameter measurement from the cylin-
der bore diameter measurement.
Standard oil clearance:
0.09 - 0.11 mm (0.0035 - 0.0043 in.)
Maximum oil clearance:
0.13 mm (0.0051 in.)
If the oil clearance is greater than maximum, replace all 4 pis-
tons. If necessary, replace the cylinder block.
HINT:
Use new cylinder block:
Use a piston with the same number mark as the cylinder bore
diameter marked on the cylinder block.
Page 503 of 1202
P20540
P20527
Top of Cylinder Block
110 mm
(4.33 in.,)
EM7639
N00301
- ENGINE MECHANICALCYLINDER BLOCK
EM-81
1996 TERCEL (RM440U)
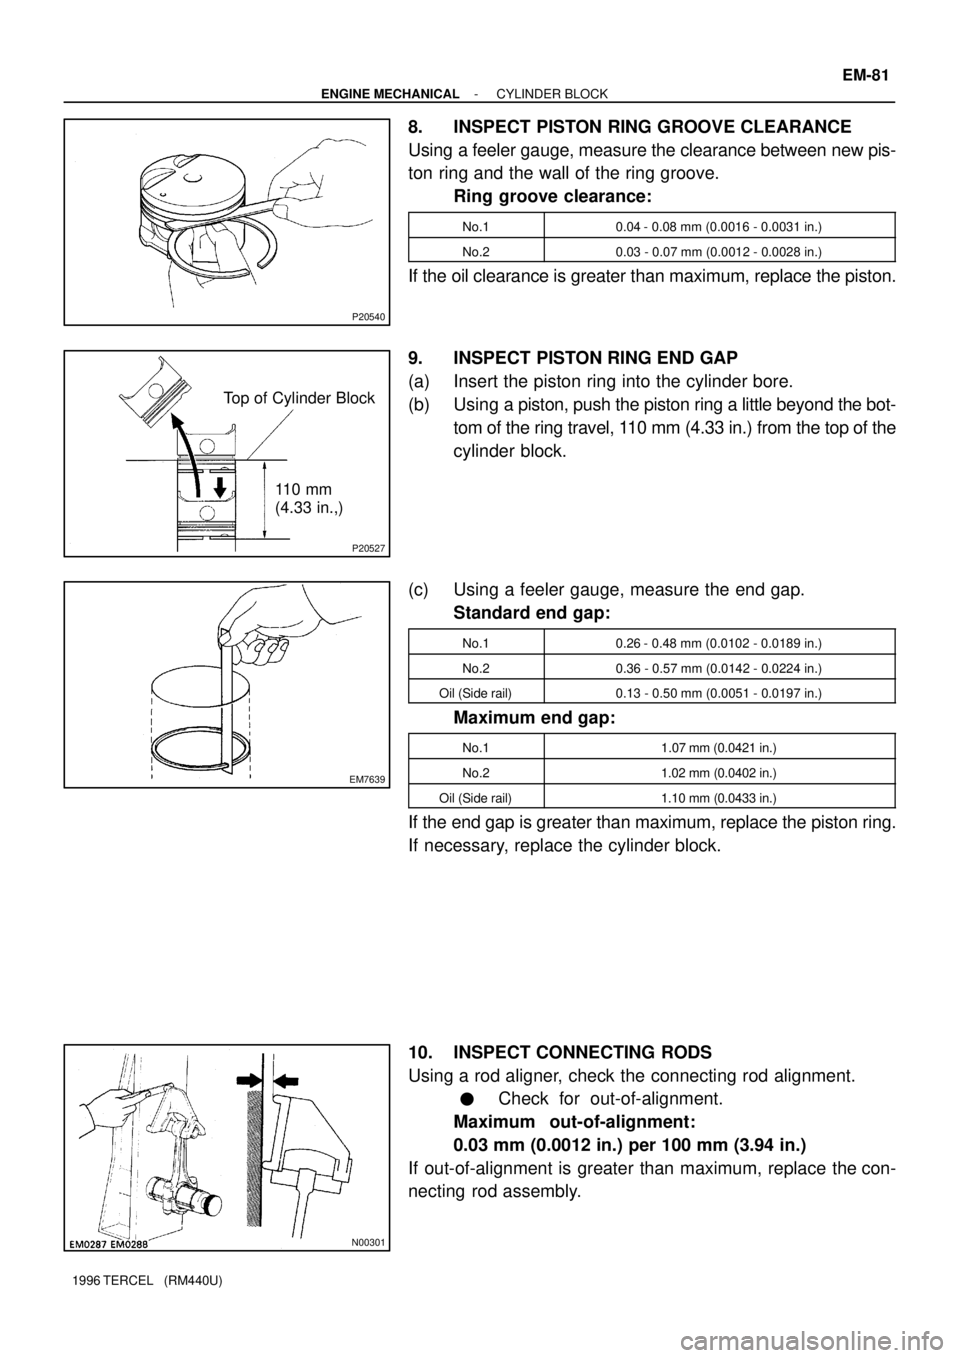
8. INSPECT PISTON RING GROOVE CLEARANCE
Using a feeler gauge, measure the clearance between new pis-
ton ring and the wall of the ring groove.
Ring groove clearance:
No.10.04 - 0.08 mm (0.0016 - 0.0031 in.)
No.20.03 - 0.07 mm (0.0012 - 0.0028 in.)
If the oil clearance is greater than maximum, replace the piston.
9. INSPECT PISTON RING END GAP
(a) Insert the piston ring into the cylinder bore.
(b) Using a piston, push the piston ring a little beyond the bot-
tom of the ring travel, 110 mm (4.33 in.) from the top of the
cylinder block.
(c) Using a feeler gauge, measure the end gap.
Standard end gap:
No.10.26 - 0.48 mm (0.0102 - 0.0189 in.)
No.20.36 - 0.57 mm (0.0142 - 0.0224 in.)
Oil (Side rail)0.13 - 0.50 mm (0.0051 - 0.0197 in.)
Maximum end gap:
No.11.07 mm (0.0421 in.)
No.21.02 mm (0.0402 in.)
Oil (Side rail)1.10 mm (0.0433 in.)
If the end gap is greater than maximum, replace the piston ring.
If necessary, replace the cylinder block.
10. INSPECT CONNECTING RODS
Using a rod aligner, check the connecting rod alignment.
�Check for out-of-alignment.
Maximum out-of-alignment:
0.03 mm (0.0012 in.) per 100 mm (3.94 in.)
If out-of-alignment is greater than maximum, replace the con-
necting rod assembly.
Page 504 of 1202
N00302
EM3208
N00295
EM-82
- ENGINE MECHANICALCYLINDER BLOCK
1996 TERCEL (RM440U)
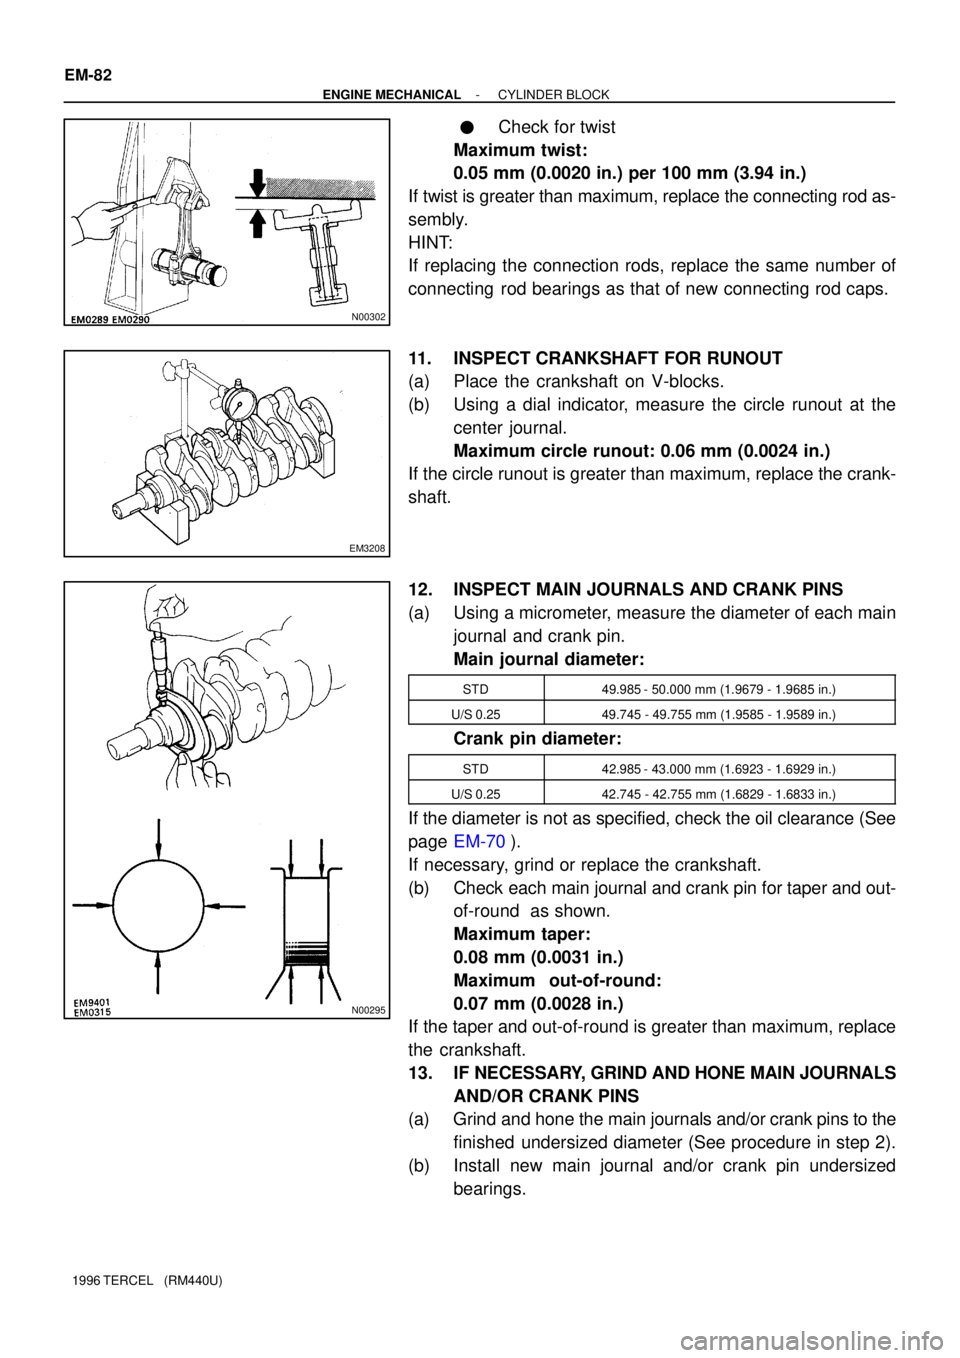
�Check for twist
Maximum twist:
0.05 mm (0.0020 in.) per 100 mm (3.94 in.)
If twist is greater than maximum, replace the connecting rod as-
sembly.
HINT:
If replacing the connection rods, replace the same number of
connecting rod bearings as that of new connecting rod caps.
11. INSPECT CRANKSHAFT FOR RUNOUT
(a) Place the crankshaft on V-blocks.
(b) Using a dial indicator, measure the circle runout at the
center journal.
Maximum circle runout: 0.06 mm (0.0024 in.)
If the circle runout is greater than maximum, replace the crank-
shaft.
12. INSPECT MAIN JOURNALS AND CRANK PINS
(a) Using a micrometer, measure the diameter of each main
journal and crank pin.
Main journal diameter:
STD49.985 - 50.000 mm (1.9679 - 1.9685 in.)
U/S 0.2549.745 - 49.755 mm (1.9585 - 1.9589 in.)
Crank pin diameter:
STD42.985 - 43.000 mm (1.6923 - 1.6929 in.)
U/S 0.2542.745 - 42.755 mm (1.6829 - 1.6833 in.)
If the diameter is not as specified, check the oil clearance (See
page EM-70).
If necessary, grind or replace the crankshaft.
(b) Check each main journal and crank pin for taper and out-
of-round as shown.
Maximum taper:
0.08 mm (0.0031 in.)
Maximum out-of-round:
0.07 mm (0.0028 in.)
If the taper and out-of-round is greater than maximum, replace
the crankshaft.
13. IF NECESSARY, GRIND AND HONE MAIN JOURNALS
AND/OR CRANK PINS
(a) Grind and hone the main journals and/or crank pins to the
finished undersized diameter (See procedure in step 2).
(b) Install new main journal and/or crank pin undersized
bearings.
Page 505 of 1202
EM0JS-04
P20490
P20482
SST
P20564
Cut PositionTape
P20563
SST
P20492
- ENGINE MECHANICALCYLINDER BLOCK
EM-83
1996 TERCEL (RM440U)
REPLACEMENT
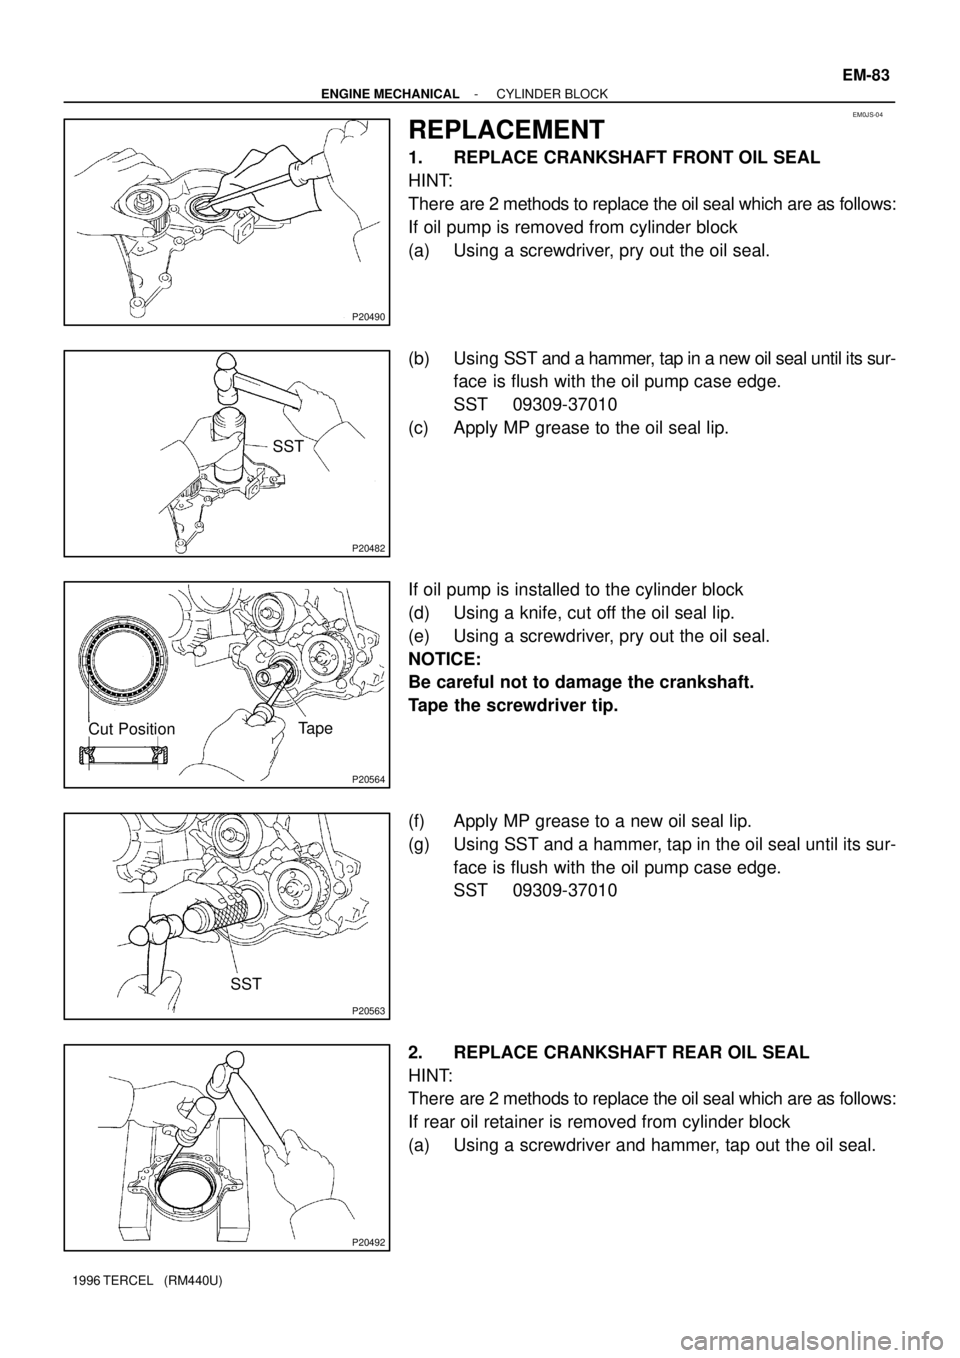
1. REPLACE CRANKSHAFT FRONT OIL SEAL
HINT:
There are 2 methods to replace the oil seal which are as follows:
If oil pump is removed from cylinder block
(a) Using a screwdriver, pry out the oil seal.
(b) Using SST and a hammer, tap in a new oil seal until its sur-
face is flush with the oil pump case edge.
SST 09309-37010
(c) Apply MP grease to the oil seal lip.
If oil pump is installed to the cylinder block
(d) Using a knife, cut off the oil seal lip.
(e) Using a screwdriver, pry out the oil seal.
NOTICE:
Be careful not to damage the crankshaft.
Tape the screwdriver tip.
(f) Apply MP grease to a new oil seal lip.
(g) Using SST and a hammer, tap in the oil seal until its sur-
face is flush with the oil pump case edge.
SST 09309-37010
2. REPLACE CRANKSHAFT REAR OIL SEAL
HINT:
There are 2 methods to replace the oil seal which are as follows:
If rear oil retainer is removed from cylinder block
(a) Using a screwdriver and hammer, tap out the oil seal.
Page 506 of 1202
N00264
Tape
Cut Position
EM-84
- ENGINE MECHANICALCYLINDER BLOCK
1996 TERCEL (RM440U)
(b) Using SST and a hammer, tap in a new oil seal until its sur-
face is flush with the rear oil seal edge.
SST 09223-15030, 09550-10012 (09552-10010)
(c) Apply MP grease to the oil seal lip.
If rear oil seal retainer is installed to cylinder block
(d) Using a knife, cut off the oil seal lip.
(e) Using a screwdriver, pry out the oil seal.
NOTICE:
Be careful not to damage the crankshaft.
Tape the screwdriver tip.
(f) Apply MP grease to a new oil seal lip.
(g) Using SST and a hammer, tap in the oil seal until its sur-
face is flush with the rear oil seal retainer edge.
SST 09223-15030, 09550-10012 (09552-10010)