Page 594 of 1202

CO18A-01
CO1242
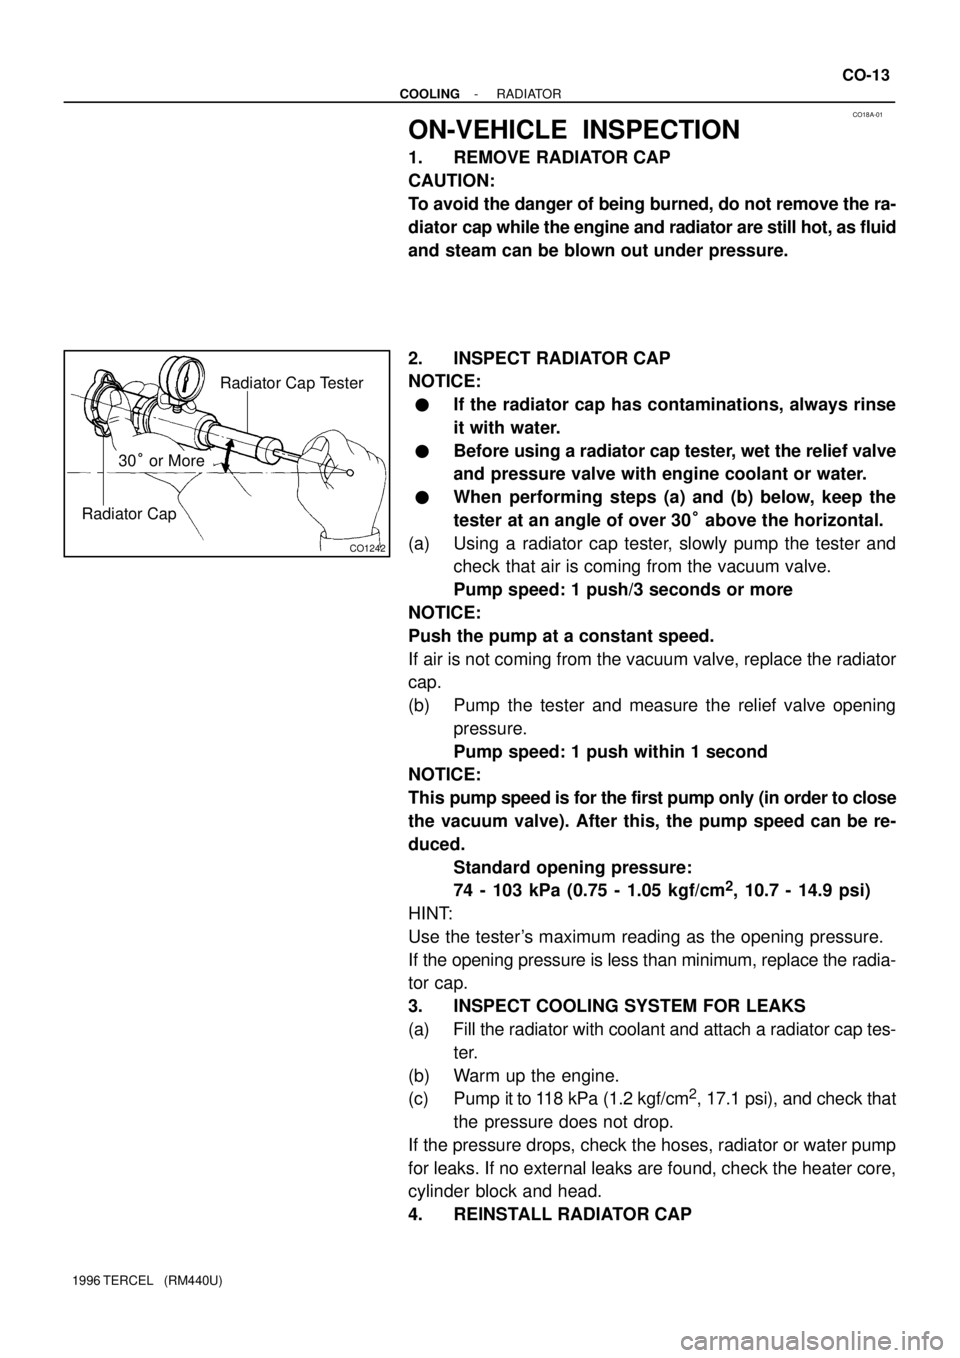
Radiator Cap Tester
Radiator Cap
30° or More
- COOLINGRADIATOR
CO-13
1996 TERCEL (RM440U)
ON-VEHICLE INSPECTION
1. REMOVE RADIATOR CAP
CAUTION:
To avoid the danger of being burned, do not remove the ra-
diator cap while the engine and radiator are still hot, as fluid
and steam can be blown out under pressure.
2. INSPECT RADIATOR CAP
NOTICE:
�If the radiator cap has contaminations, always rinse
it with water.
�Before using a radiator cap tester, wet the relief valve
and pressure valve with engine coolant or water.
�When performing steps (a) and (b) below, keep the
tester at an angle of over 30° above the horizontal.
(a) Using a radiator cap tester, slowly pump the tester and
check that air is coming from the vacuum valve.
Pump speed: 1 push/3 seconds or more
NOTICE:
Push the pump at a constant speed.
If air is not coming from the vacuum valve, replace the radiator
cap.
(b) Pump the tester and measure the relief valve opening
pressure.
Pump speed: 1 push within 1 second
NOTICE:
This pump speed is for the first pump only (in order to close
the vacuum valve). After this, the pump speed can be re-
duced.
Standard opening pressure:
74 - 103 kPa (0.75 - 1.05 kgf/cm
2, 10.7 - 14.9 psi)
HINT:
Use the tester's maximum reading as the opening pressure.
If the opening pressure is less than minimum, replace the radia-
tor cap.
3. INSPECT COOLING SYSTEM FOR LEAKS
(a) Fill the radiator with coolant and attach a radiator cap tes-
ter.
(b) Warm up the engine.
(c) Pump it to 118 kPa (1.2 kgf/cm
2, 17.1 psi), and check that
the pressure does not drop.
If the pressure drops, check the hoses, radiator or water pump
for leaks. If no external leaks are found, check the heater core,
cylinder block and head.
4. REINSTALL RADIATOR CAP
Page 617 of 1202

LU08A-06
LU1169
Oil Pressure Gauge
Oil Pressure Switch
LU1107
Adhesive
- LUBRICATIONOIL AND FILTER
LU-1
616 Author�: Date�:
1996 TERCEL (RM440U)
OIL AND FILTER
INSPECTION
1. CHECK ENGINE OIL QUALITY
Check the oil for deterioration, entry of water, discoloring or thin-
ning.
If the oil quality is visibly poor, replace it.
Oil grade:
API grade or SH Energy-Conserving II or ILSAC multi-
grade engine oil. Recommended viscosity is as
shown in the illustration, with SAE 5W-30 being the
prefferred engine oil.
2. CHECK ENGINE OIL LEVEL
The oil level should be between the ºLº and ºFº marks on the dip-
stick.
If low, check for leakage and add oil up to the ºFº mark.
3. REMOVE OIL PRESSURE SWITCH AND INSTALL OIL
PRESSURE GAUGE
(a) Remove the bolt and air intake connector.
(b) M/T only
Remove the 3 bolts, release cylinder and tube from the
transaxle.
(c) Remove the oil pressure switch.
(d) Install the oil pressure gauge.
4. WARM UP ENGINE
Allow the engine to warm up to normal operating temperature.
5. CHECK OIL PRESSURE
Oil pressure:
At idle speed
29 kPa (0.3 kgf/cm
2, 4.3 psi) or more
At 3,000 rpm
245 - 490 kPa (2.5 - 5.0 kgf/cm
2, 36 - 71 psi)
6. REMOVE OIL PRESSURE GAUGE AND REINSTALL
OIL PRESSURE SWITCH
(a) Remove the oil pressure gauge.
(b) Apply adhesive to 2 or 3 threads of the oil pressure switch.
Adhesive:
Part No. 08833-00080, THREE BOND 1344,
LOCTITE 242 or eqivalent
(c) Reinstall the oil pressure switch.
Page 618 of 1202
LU-2
- LUBRICATIONOIL AND FILTER
617 Author�: Date�:
1996 TERCEL (RM440U)
(d) M/T only
Install the release cylinder and tube with the 3 bolts.
Torque: 12 N´m (120 kgf´cm, 9 ft´lbf)
(e) Install the air intake connector with the bolt.
7. START ENGINE AND CHECK FOR LEAKS
Page 624 of 1202
P21179
N00279
SST
SST
P21172
P21103
P21100
LU-8
- LUBRICATIONOIL PUMP
1996 TERCEL (RM440U)
9. REMOVE OIL PAN
(a) Remove the 10 bolts.
(b) Insert the SST blade between the cylinder block and oil
pan, cut off applied sealer and then remove the oil pan.
SST 09032-00100
NOTICE:
�Do not use SST for the oil pump body side and rear oil
seal retainer.
�Be careful not to damage the oil pan flange.
10. REMOVE OIL STRAINER
Remove the 3 bolts and oil strainer with the O-ring.
11. REMOVE PRESSURE REGULATOR VALVE
12. REMOVE OIL PUMP AND OIL PUMP PULLY
(a) Remove the 9 bolts and tension spring bracket.
Page 630 of 1202

LU08I-05
EG0099
P21101
Marks
P21885
EG0097
Seal Diameter
2 - 3 mm
(0.08 - 0.12 in.)
A - AB -B
A
AB
B LU-14
- LUBRICATIONOIL PUMP
1996 TERCEL (RM440U)
INSTALLATION
1. INSTALL OIL PUMP
(a) Remove any old packing (FIPG) material and be careful
not to drop any oil on the contact surfaces of the oil pump
and cylinder block.
�Using a razor blade and gasket scraper, remove all
the old packing (FIPG) material from the contact
surfaces and sealing grooves.
�Thoroughly clean all components to remove all the
loose material.
�Using a non-residue solvent, clean both sealing
surfaces.
(b) Place the driven rotors into the pump body with the marks
facing the front.
(c) Align the pully and oil pump drive shaft.
(d) Using a vise, install the oil pump pully and nut.
Torque: 37 N´m (370 kgf´cm, 27 ft´lbf)
(e) Apply seal packing to the oil pump as shown in the illustra-
tion.
Seal packing:
Part No. 08826-00080 or equivalent
�Install a nozzle that has been cut to a 2 - 3 mm (0.08
- 0.12 in.) opening.
HINT:
Avoid applying an excessive amount to the surface.
Page 631 of 1202

Z14807
Oil Pump
Oil PanFIPG
A' - A
Front
Seal Diameter
a: 7mm
b: 4mm
c: 5mmB' - B C' - C ab
bc
B'
BC'
C
- LUBRICATIONOIL PUMP
LU-15
1996 TERCEL (RM440U)
�Parts must be assembled within 5 minutes of ap-
plication. Otherwise the material must be removed
and reapplied.
�Immediately remove nozzle from the tube and rein-
stall cap.
(f) Place a new O-ring into the cylinder block side groove.
(g) Install the oil pump and tension spring bracket with the 9
bolts.
Torque: 7.5 N´m (75 kgf´cm, 65 in.´lbf)
2. INSTALL PRESSURE REGULATOR VALVE
Torque: 30 N´m (300 kgf´cm, 22 ft´lbf)
3. INSTALL OIL STRAINER
(a) Apply a little engine oil to a new O-ring.
(b) Install the O-ring to the oil strainer.
(c) Install the oil strainer with the 3 bolts.
Torque: 10 N´m (100 kgf´cm, 7 ft´lbf)
4. INSTALL OIL PAN
(a) Remove any old packing (FIPG) material and be careful
not to drop any oil on the contact surfaces of the oil pan,
oil pump, rear oil seal retainer and cylinder block.
�Using a razor blade and gasket scraper, remove all
the packing (FIPG) material from the contact sur-
faces.
�Thoroughly clean all components to remove all the
loose material.
�Using a non-residue solvent, clean both sealing
surfaces.
NOTICE:
Do not use a solvent which will affect the painted surfaces.
(b) Apply seal packing to the oil pump, rear oil seal retainer
and oil pan as shown in the illustration.
Seal packing:
Part No. 08826-00080 or equivalent
Seal diameter:
7 mm ( 0.28 in.) for a
4 mm ( 0.16 in.) for b
5 mm ( 0.17 in.) for c
�Install a nozzle that has been cut to a 4 mm ( 0.16
in.) or 7 mm (0.28 in.) or 5 mm (0.17 in.) opening.
HINT:
Avoid applying an excess amount to the surface.
�Parts must be assembled within 15 minutes of ap-
plication. Otherwise, the material must be removed
and reapplied.
�Immediately remove nozzle from tube and reinstall
cap after use.
(c) Install the oil pan with the 10 bolts.
Torque: 13 N´m (130 kgf´cm, 10 ft´lbf)
5. CONNECT FRONT EXHAUST PIPE
Page 639 of 1202
IG08G-03
S06147
- IGNITIONIGNITION COIL
IG-7
1996 TERCEL (RM440U)
REMOVAL
1. DISCONNECT HIGH-TENSION CORDS FROM IGNI-
TION COILS (See page IG-1)
2. REMOVE IGNITION COILS
(a) Disconnect the 2 connectors from the ignition coils.
(b) Remove the 2 bolts and 2 ignition coils from cylinder
head.
Torque: 8.5 N´m (85 kgf´cm, 70 in.´lbf)
HINT:
Arrange the ignition coils in correct order.
Page 697 of 1202

CL05O-03
- CLUTCHTROUBLESHOOTING
CL-1
696 Author�: Date�:
1996 TERCEL (RM440U)
TROUBLESHOOTING
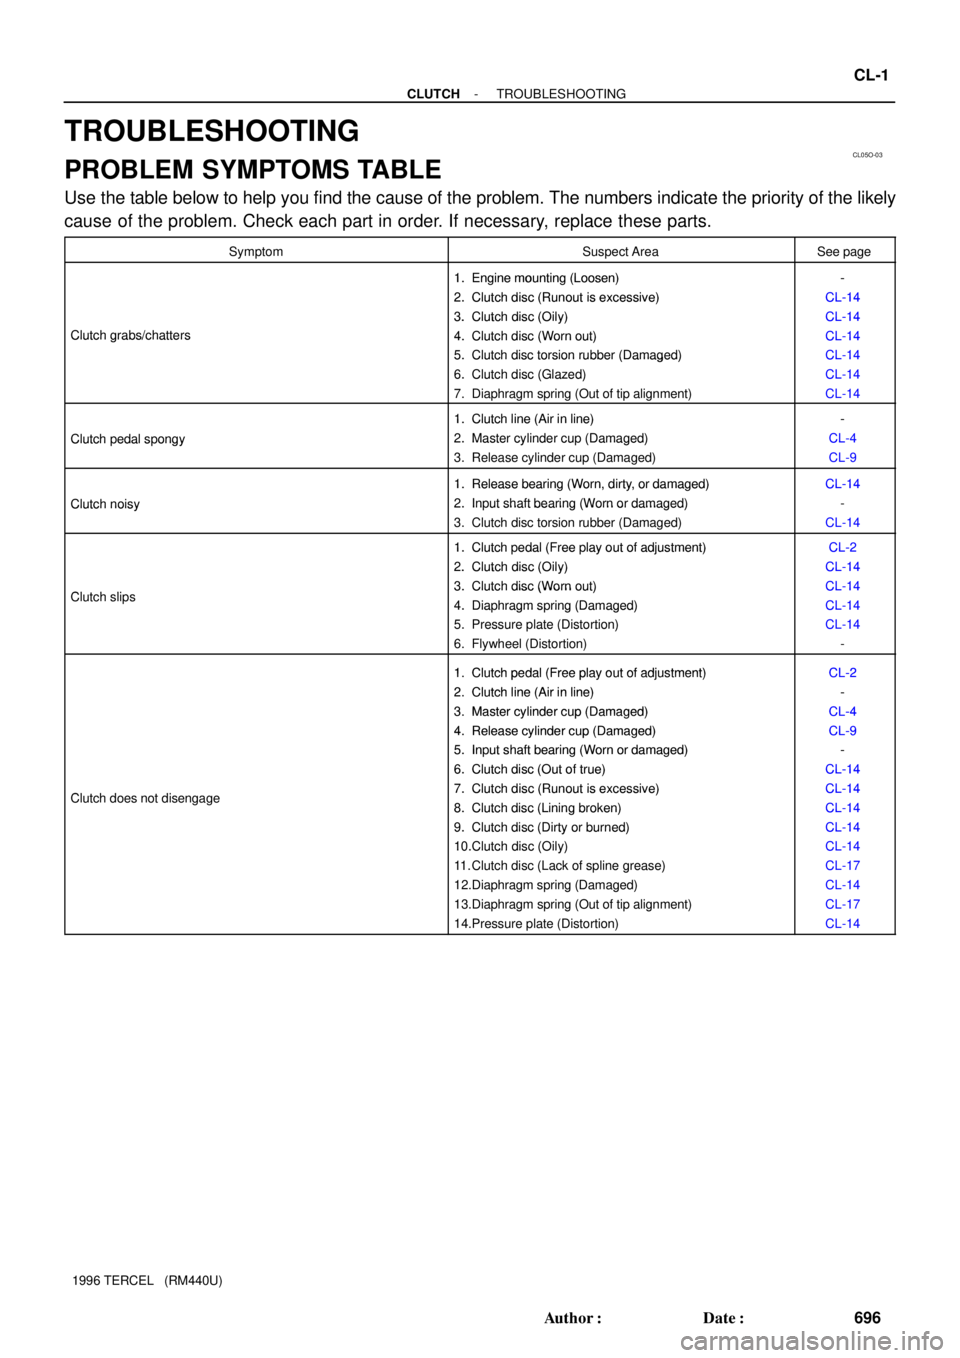
PROBLEM SYMPTOMS TABLE
Use the table below to help you find the cause of the problem. The numbers indicate the priority of the likely
cause of the problem. Check each part in order. If necessary, replace these parts.
SymptomSuspect AreaSee page
1. Engine mounting (Loosen)-1.Engine mounting (Loosen)
2. Clutch disc (Runout is excessive)
-
CL-14
2.Clutch disc (Runout is excessive)
3. Clutch disc (Oily)
CL-14
CL-14
Clutch grabs/chatters
3.Clutch disc (Oily)
4. Clutch disc (Worn out)
CL-14
CL-14Clutch grabs/chatters4.Clutch disc (Worn out)
5. Clutch disc torsion rubber (Damaged)
CL-14
CL-145.Clutch disc torsion rubber (Damaged)
6. Clutch disc (Glazed)
CL 14
CL-146.Clutch disc (Glazed)
7. Diaphragm spring (Out of tip alignment)
CL 14
CL-14
1. Clutch line (Air in line)-
Clutch pedal spongy
1.Clutch line (Air in line)
2. Master cylinder cup (Damaged)
-
CL-4
Clutch edal s ongy2.Master cylinder cu (Damaged)
3. Release cylinder cup (Damaged)
CL 4
CL-9
1. Release bearing (Worn, dirty, or damaged)CL-14
Clutch noisy
1.Release bearing (Worn, dirty, or damaged)
2. Input shaft bearing (Worn or damaged)
CL-14
-Clutch noisy2.In ut shaft bearing (Worn or damaged)
3. Clutch disc torsion rubber (Damaged)CL-14
1. Clutch pedal (Free play out of adjustment)CL-21.Clutch edal (Free lay out of adjustment)
2. Clutch disc (Oily)
CL-2
CL-14
Cl t h li
2.Clutch disc (Oily)
3. Clutch disc (Worn out)
CL-14
CL-14Clutch slips3.Clutch disc (Worn out)
4. Diaphragm spring (Damaged)
CL 14
CL-144.Dia hragm s ring (Damaged)
5. Pressure plate (Distortion)
CL 14
CL-145. Pressure late (Distortion)
6. Flywheel (Distortion)
CL 14
-
1 Clutchpedal (Freeplay out of adjustment)CL-21.Clutch pedal (Free play out of adjustment)
2 Clutch line (Air in line)CL-2
-2.Clutch line (Air in line)
3 Master cylinder cu
p(Damaged)
-
CL-43.Master cylinder cup (Damaged)
4. Release cylinder cu
p(Damaged)
CL-4
CL
-94.Release cylinder cup (Damaged)
5
. Input shaft bearing (Worn or damaged)
CL-9
-5.In ut shaft bearing (Worn or damaged)
6. Clutch disc (Out of true)
-
CL-14
Cl t h d t di
6.Clutch disc (Out of true)
7. Clutch disc (Runout is excessive)
CL-14
CL-14Clutch does not disengage7.Clutch disc (Runout is excessive)
8. Clutch disc (Lining broken)
CL-14
CL-148.Clutch disc (Lining broken)
9. Clutch disc (Dirty or burned)
CL-14
CL-149.Clutch disc (Dirty or burned)
10.Clutch disc (Oily)
CL 14
CL-1410.Clutch disc (Oily)
11. Clutch disc (Lack of spline grease)
CL 14
CL-1711. Clutch disc (Lack of s line grease)
12.Diaphragm spring (Damaged)
CL 17
CL-14gg(g)
13.Diaphragm spring (Out of tip alignment)CL-17gg( g)
14.Pressure plate (Distortion)CL-14