Page 864 of 1202
BR0RF-06
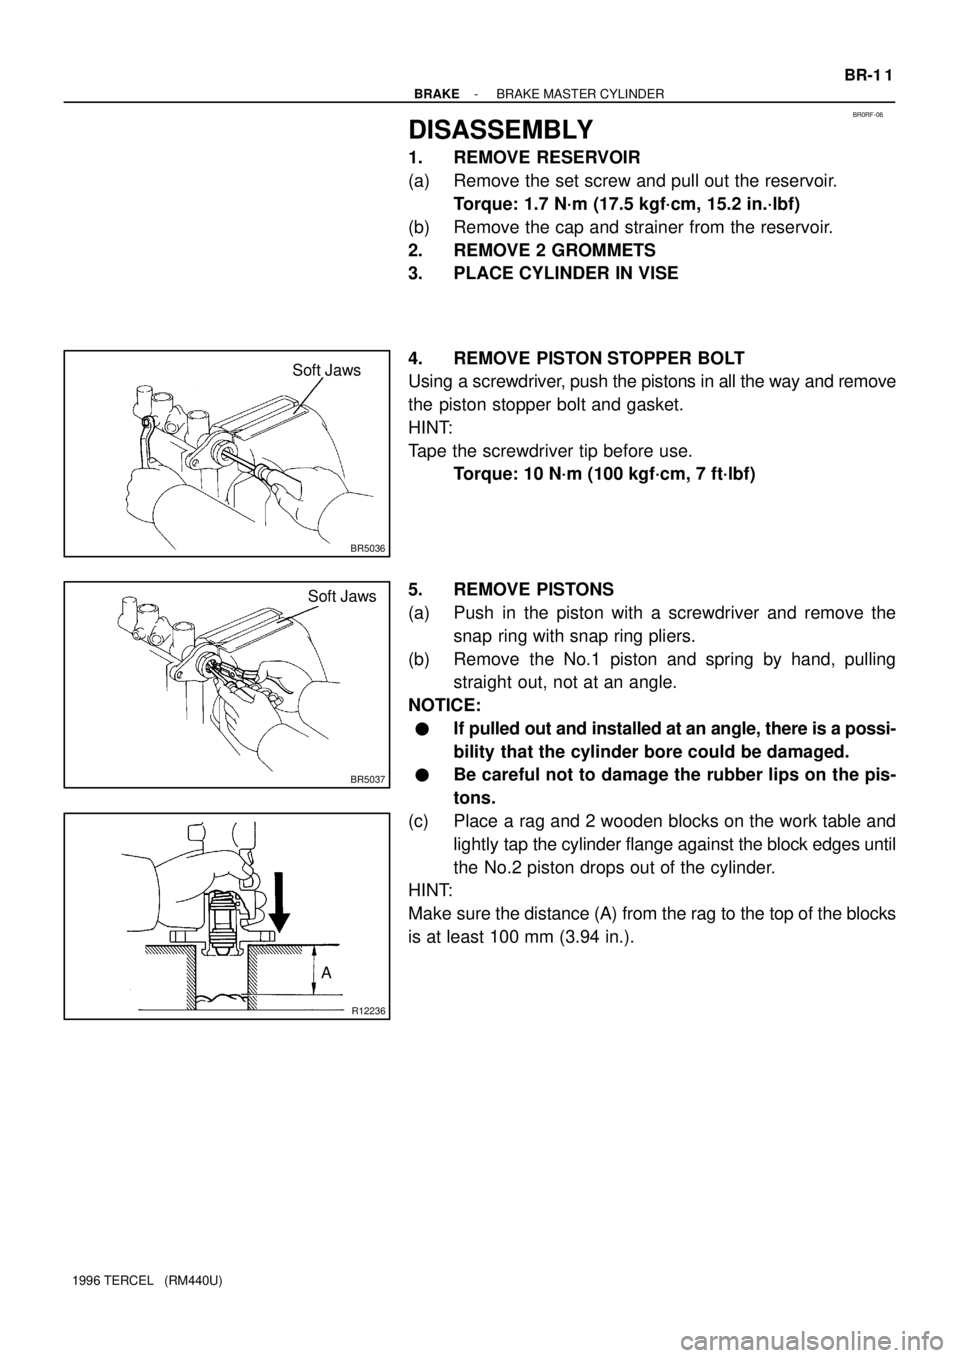
BR5036
Soft Jaws
BR5037
Soft Jaws
R12236
A
- BRAKEBRAKE MASTER CYLINDER
BR-1 1
1996 TERCEL (RM440U)
DISASSEMBLY
1. REMOVE RESERVOIR
(a) Remove the set screw and pull out the reservoir.
Torque: 1.7 N´m (17.5 kgf´cm, 15.2 in.´lbf)
(b) Remove the cap and strainer from the reservoir.
2. REMOVE 2 GROMMETS
3. PLACE CYLINDER IN VISE
4. REMOVE PISTON STOPPER BOLT
Using a screwdriver, push the pistons in all the way and remove
the piston stopper bolt and gasket.
HINT:
Tape the screwdriver tip before use.
Torque: 10 N´m (100 kgf´cm, 7 ft´lbf)
5. REMOVE PISTONS
(a) Push in the piston with a screwdriver and remove the
snap ring with snap ring pliers.
(b) Remove the No.1 piston and spring by hand, pulling
straight out, not at an angle.
NOTICE:
�If pulled out and installed at an angle, there is a possi-
bility that the cylinder bore could be damaged.
�Be careful not to damage the rubber lips on the pis-
tons.
(c) Place a rag and 2 wooden blocks on the work table and
lightly tap the cylinder flange against the block edges until
the No.2 piston drops out of the cylinder.
HINT:
Make sure the distance (A) from the rag to the top of the blocks
is at least 100 mm (3.94 in.).
Page 865 of 1202
BR0RG-01
BR-12
- BRAKEBRAKE MASTER CYLINDER
1996 TERCEL (RM440U)
INSPECTION
HINT:
Clean the disassembled parts with compressed air.
1. INSPECT CYLINDER BORE FOR RUST OR SCORING
2. INSPECT CYLINDER FOR WEAR OR DAMAGE
If necessary, clean or replace the cylinder.
Page 866 of 1202
BR0RH-02
- BRAKEBRAKE MASTER CYLINDER
BR-13
1996 TERCEL (RM440U)
REASSEMBLY
Reassembly is in the reverse order of disassembly (See page BR-1 1).
NOTICE:
Apply lithium soap base glycol grease to the rubber parts indicated by arrows (See page BR-9).
Page 867 of 1202
BR0RI-05
BR-14
- BRAKEBRAKE MASTER CYLINDER
1996 TERCEL (RM440U)
INSTALLATION
Installation is in the reverse order of removal (See page BR-10).
1. BEFORE INSTALLATION, ADJUST LENGTH OF BRAKE BOOSTER PUSH ROD (See page
BR-18)
2. AFTER INSTALLATION, FILL BRAKE RESERVOIR WITH BRAKE FLUID AND BLEED BRAKE
SYSTEM (See page BR-4)
3. CHECK FOR LEAKS, CHECK AND ADJUST BRAKE PEDAL (See page BR-6)
Page 869 of 1202
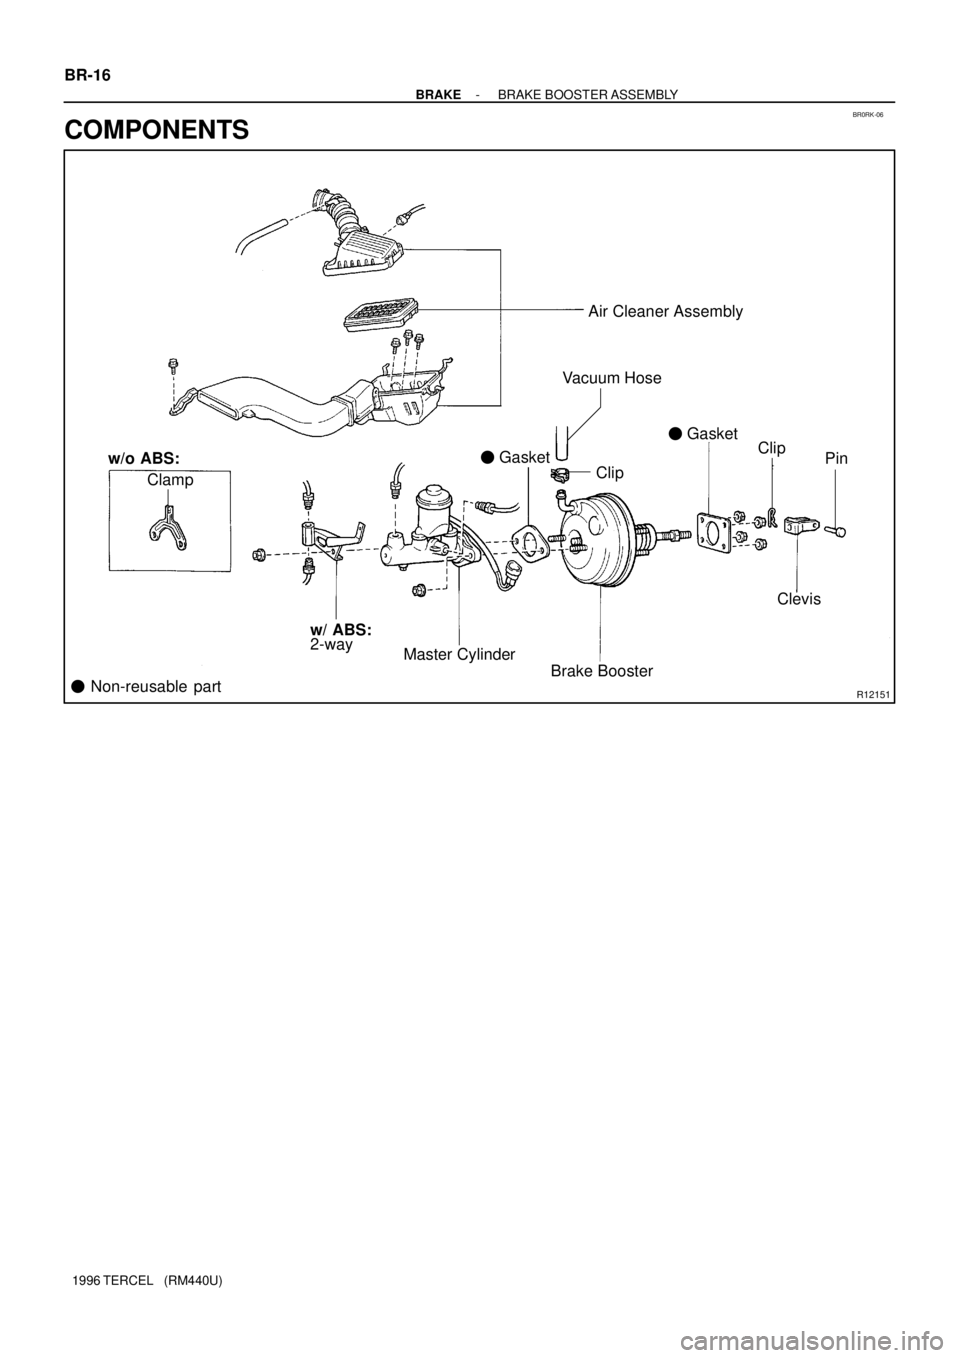
BR0RK-06
R12151
Air Cleaner Assembly
Brake Booster Master Cylinder
� Non-reusable part2-way Clamp� Gasket� Gasket
Clip
Pin
Clevis w/o ABS:
w/ ABS:Clip Vacuum Hose
BR-16
- BRAKEBRAKE BOOSTER ASSEMBLY
1996 TERCEL (RM440U)
COMPONENTS
Page 870 of 1202
BR0RL-01
F05027
BR5055
R04651
- BRAKEBRAKE BOOSTER ASSEMBLY
BR-17
1996 TERCEL (RM440U)
REMOVAL
1. REMOVE MASTER CYLINDER (See page BR-10)
2. DISCONNECT VACUUM HOSE FROM BRAKE
BOOSTER
3. REMOVE PEDAL RETURN SPRING
4. REMOVE CLIP AND CLEVIS PIN
5. REMOVE BRAKE BOOSTER
(a) Remove the No.1 brake line clamp.
(b) Remove the No.2 brake line clamp.
(c) Remove the 4 nuts and clevis.
(d) Pull out the brake booster and gasket.
Page 871 of 1202
BR0RM-04
F03521
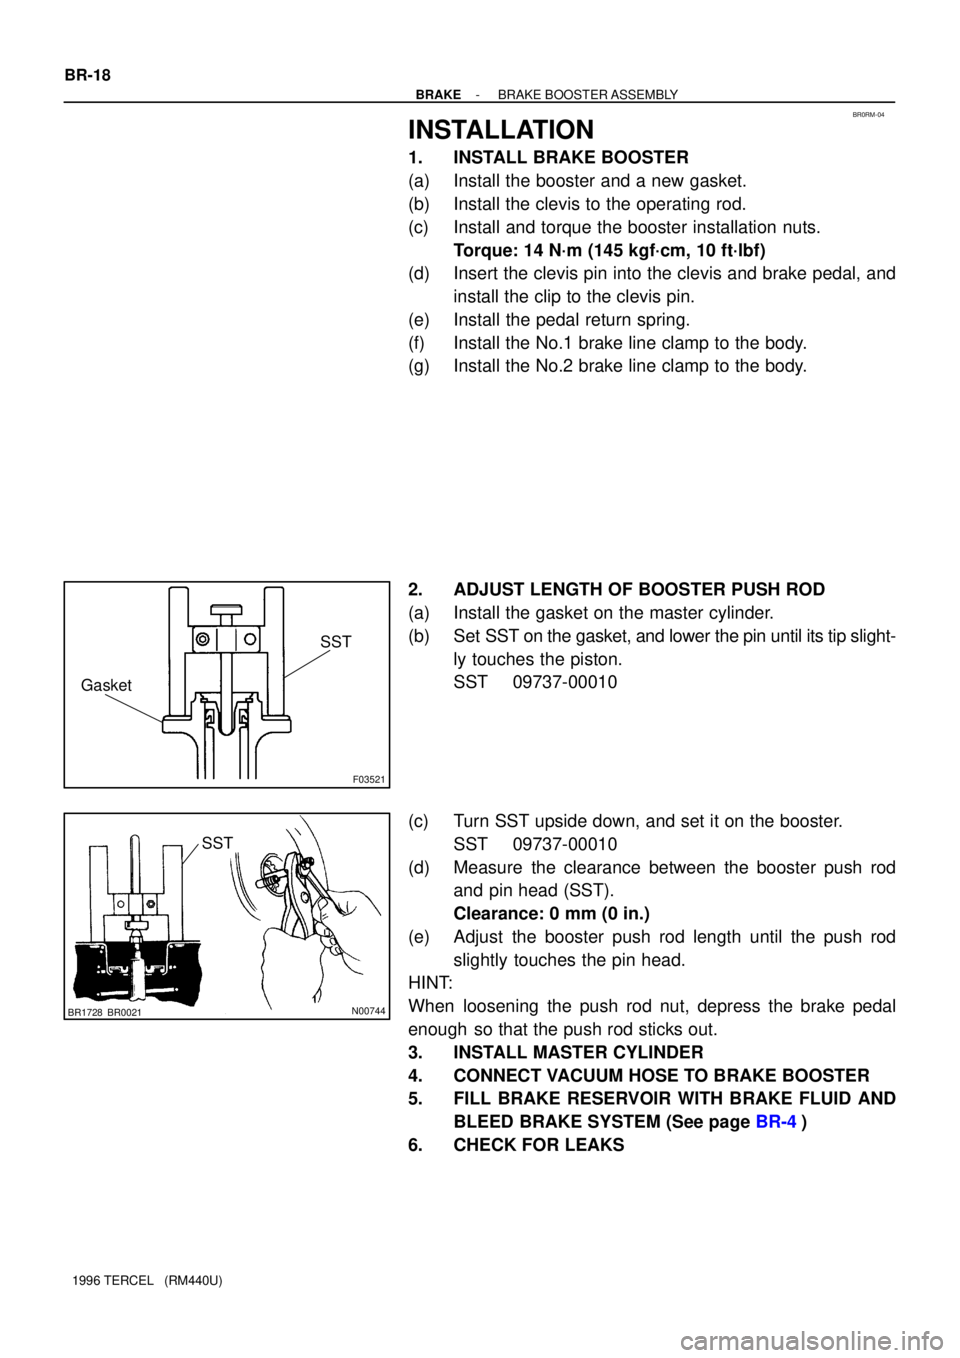
SST
Gasket
N00744
SST
BR1728 BR0021
BR-18
- BRAKEBRAKE BOOSTER ASSEMBLY
1996 TERCEL (RM440U)
INSTALLATION
1. INSTALL BRAKE BOOSTER
(a) Install the booster and a new gasket.
(b) Install the clevis to the operating rod.
(c) Install and torque the booster installation nuts.
Torque: 14 N´m (145 kgf´cm, 10 ft´lbf)
(d) Insert the clevis pin into the clevis and brake pedal, and
install the clip to the clevis pin.
(e) Install the pedal return spring.
(f) Install the No.1 brake line clamp to the body.
(g) Install the No.2 brake line clamp to the body.
2. ADJUST LENGTH OF BOOSTER PUSH ROD
(a) Install the gasket on the master cylinder.
(b) Set SST on the gasket, and lower the pin until its tip slight-
ly touches the piston.
SST 09737-00010
(c) Turn SST upside down, and set it on the booster.
SST 09737-00010
(d) Measure the clearance between the booster push rod
and pin head (SST).
Clearance: 0 mm (0 in.)
(e) Adjust the booster push rod length until the push rod
slightly touches the pin head.
HINT:
When loosening the push rod nut, depress the brake pedal
enough so that the push rod sticks out.
3. INSTALL MASTER CYLINDER
4. CONNECT VACUUM HOSE TO BRAKE BOOSTER
5. FILL BRAKE RESERVOIR WITH BRAKE FLUID AND
BLEED BRAKE SYSTEM (See page BR-4)
6. CHECK FOR LEAKS
Page 878 of 1202
BR0RR-03
N00747 BR3964 BR3965
BR3966
BR3968
BR3969
- BRAKEFRONT BRAKE CALIPER
BR-25
1996 TERCEL (RM440U)
DISASSEMBLY
1. REMOVE THESE PARTS:
(a) 2 sliding bushings.
(b) 4 dust boots.
2. REMOVE CYLINDER BOOT SET RING AND CYL-
INDER BOOT
Using a screwdriver, remove the cylinder boot set ring and cylin-
der boot from the caliper.
3. REMOVE PISTON
(a) Place a piece of cloth or similar, between the piston and
the caliper.
(b) Use compressed air to remove the piston from the cylin-
der.
CAUTION:
Do not place your fingers in front of the piston when using
compressed air.
4. REMOVE PISTON SEAL
Using a screwdriver, remove the piston seal from the cylinder.