Page 1332 of 1354

W01266
SST
Hexagon Wrench
W01267SSTFulcrum
Length
W01268
Rack Groove
W01269
SSTFulcrum
Length SR−58
− STEERINGPOWER STEERING GEAR
1996 RAV4 (RM447U)
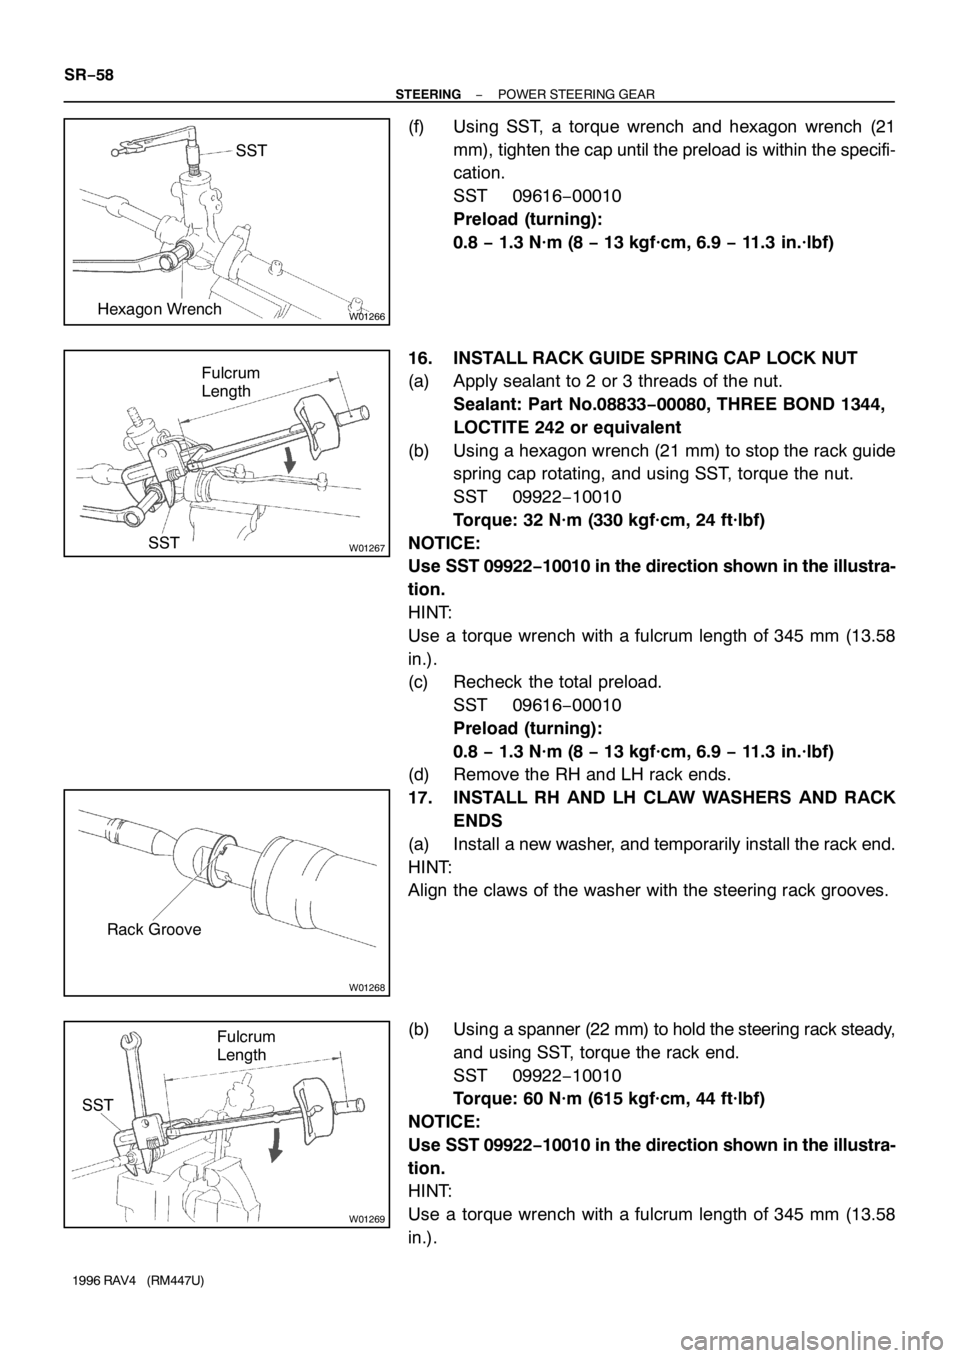
(f) Using SST, a torque wrench and hexagon wrench (21
mm), tighten the cap until the preload is within the specifi-
cation.
SST 09616−00010
Preload (turning):
0.8 − 1.3 N·m (8 − 13 kgf·cm, 6.9 − 11.3 in.·lbf)
16. INSTALL RACK GUIDE SPRING CAP LOCK NUT
(a) Apply sealant to 2 or 3 threads of the nut.
Sealant: Part No.08833−00080, THREE BOND 1344,
LOCTITE 242 or equivalent
(b) Using a hexagon wrench (21 mm) to stop the rack guide
spring cap rotating, and using SST, torque the nut.
SST 09922−10010
Torque: 32 N·m (330 kgf·cm, 24 ft·lbf)
NOTICE:
Use SST 09922−10010 in the direction shown in the illustra-
tion.
HINT:
Use a torque wrench with a fulcrum length of 345 mm (13.58
in.).
(c) Recheck the total preload.
SST 09616−00010
Preload (turning):
0.8 − 1.3 N·m (8 − 13 kgf·cm, 6.9 − 11.3 in.·lbf)
(d) Remove the RH and LH rack ends.
17. INSTALL RH AND LH CLAW WASHERS AND RACK
ENDS
(a) Install a new washer, and temporarily install the rack end.
HINT:
Align the claws of the washer with the steering rack grooves.
(b) Using a spanner (22 mm) to hold the steering rack steady,
and using SST, torque the rack end.
SST 09922−10010
Torque: 60 N·m (615 kgf·cm, 44 ft·lbf)
NOTICE:
Use SST 09922−10010 in the direction shown in the illustra-
tion.
HINT:
Use a torque wrench with a fulcrum length of 345 mm (13.58
in.).
Page 1333 of 1354

W01270
Brass Bar
W01261
W01271
2 mm
(0.08 in.)
W01272
SST
Fulcrum
Length
− STEERINGPOWER STEERING GEAR
SR−59
1996 RAV4 (RM447U)
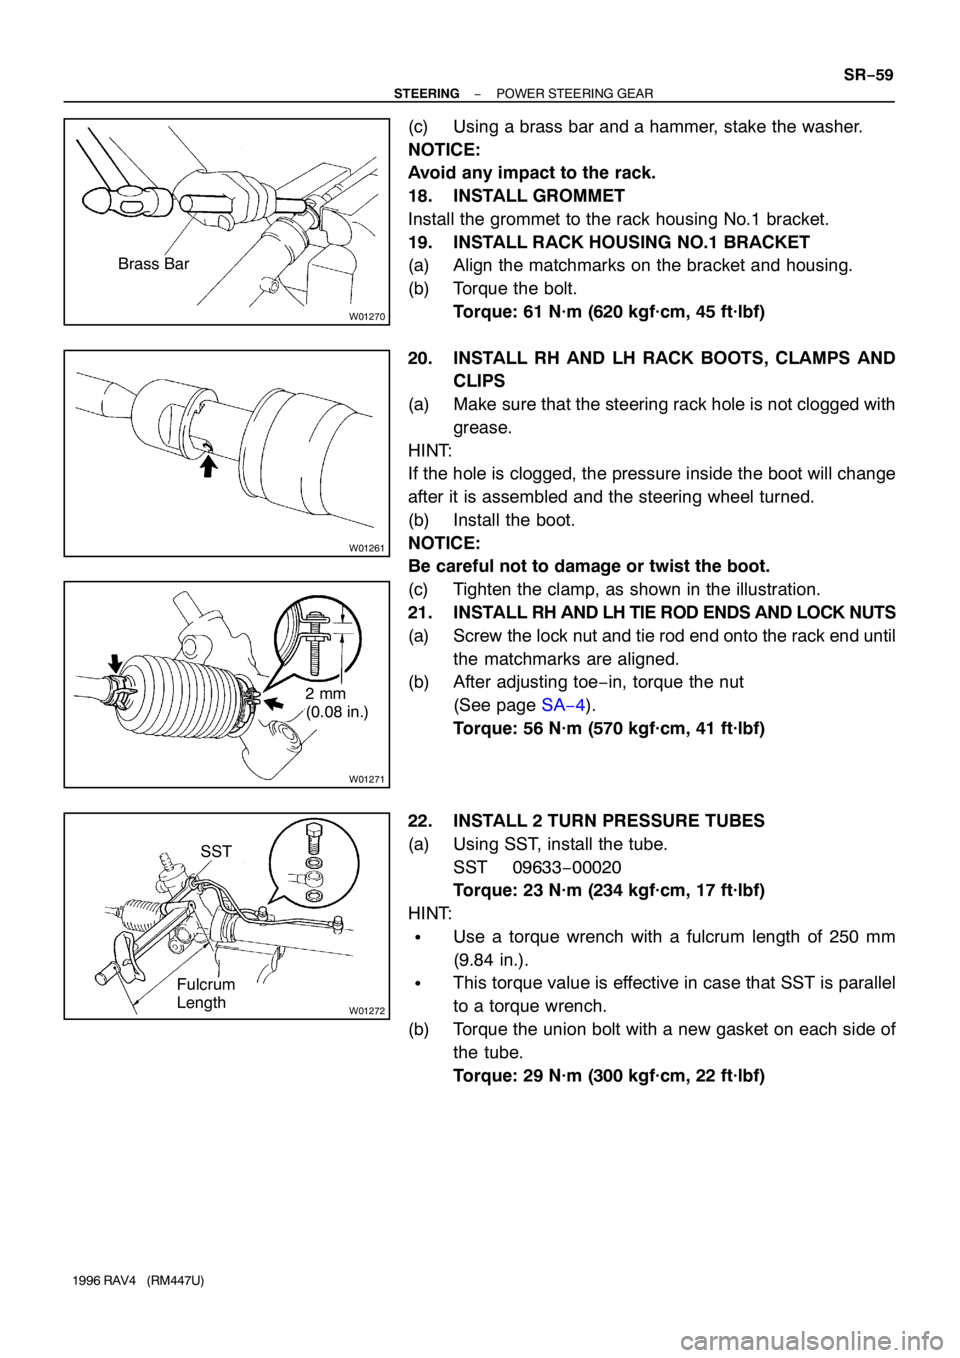
(c) Using a brass bar and a hammer, stake the washer.
NOTICE:
Avoid any impact to the rack.
18. INSTALL GROMMET
Install the grommet to the rack housing No.1 bracket.
19. INSTALL RACK HOUSING NO.1 BRACKET
(a) Align the matchmarks on the bracket and housing.
(b) Torque the bolt.
Torque: 61 N·m (620 kgf·cm, 45 ft·lbf)
20. INSTALL RH AND LH RACK BOOTS, CLAMPS AND
CLIPS
(a) Make sure that the steering rack hole is not clogged with
grease.
HINT:
If the hole is clogged, the pressure inside the boot will change
after it is assembled and the steering wheel turned.
(b) Install the boot.
NOTICE:
Be careful not to damage or twist the boot.
(c) Tighten the clamp, as shown in the illustration.
21. INSTALL RH AND LH TIE ROD ENDS AND LOCK NUTS
(a) Screw the lock nut and tie rod end onto the rack end until
the matchmarks are aligned.
(b) After adjusting toe−in, torque the nut
(See page SA−4).
Torque: 56 N·m (570 kgf·cm, 41 ft·lbf)
22. INSTALL 2 TURN PRESSURE TUBES
(a) Using SST, install the tube.
SST 09633−00020
Torque: 23 N·m (234 kgf·cm, 17 ft·lbf)
HINT:
�Use a torque wrench with a fulcrum length of 250 mm
(9.84 in.).
�This torque value is effective in case that SST is parallel
to a torque wrench.
(b) Torque the union bolt with a new gasket on each side of
the tube.
Torque: 29 N·m (300 kgf·cm, 22 ft·lbf)
Page 1334 of 1354

SR0G6−02
W01119
SST
Fulcrum Length SR−60
− STEERINGPOWER STEERING GEAR
1996 RAV4 (RM447U)
INSTALLATION
1. CONNECT PRESSURE FEED AND RETURN TUBE
CLAMPS
Torque the bolt.
Torque: 13 N·m (130 kgf·cm, 9 ft·lbf)
2. INSTALL FRONT SUSPENSION CROSSMEMBER AS-
SEMBLY (See page SA−42)
3. TORQUE 2 PS GEAR ASSEMBLY SET BOLTS AND
NUTS
Torque: 113 N·m (1,150 kgf·cm, 83 ft·lbf)
4. CONNECT RH AND LH LOWER SUSPENSION ARMS
(See page SA−42)
5. INSTALL STABILIZER BAR WITH LINK
(See page SA−50)
6. INSTALL FRONT EXHAUST PIPE
(a) Torque the 2 bolts with a new gasket.
Torque: 48 N·m (490 kgf·cm, 35 ft·lbf)
(b) Torque 3 new nuts with a new gasket.
Torque: 62 N·m (630 kgf·cm, 46 ft·lbf)
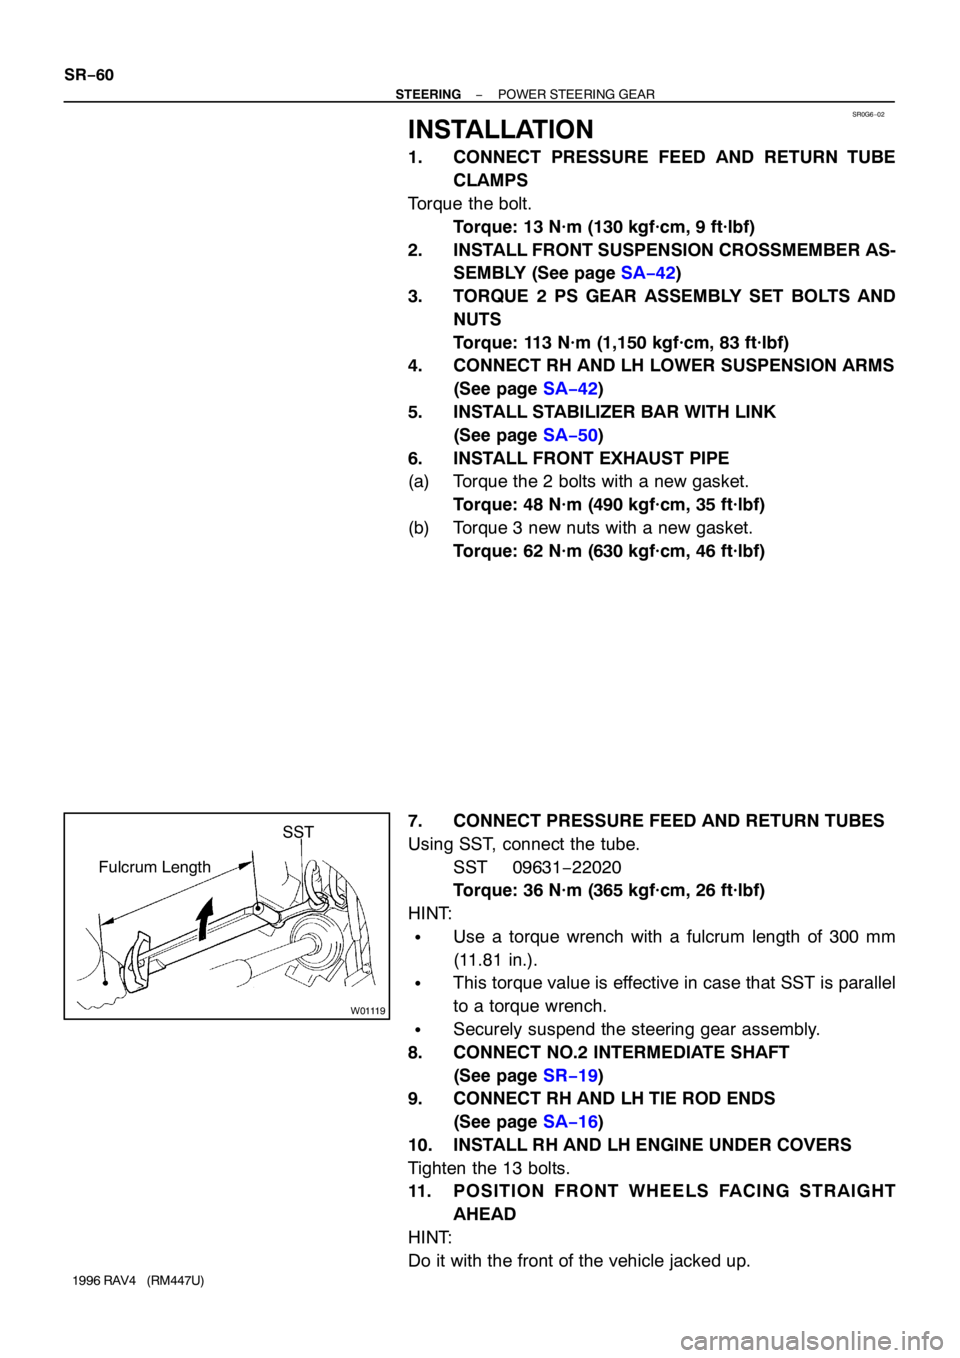
7. CONNECT PRESSURE FEED AND RETURN TUBES
Using SST, connect the tube.
SST 09631−22020
Torque: 36 N·m (365 kgf·cm, 26 ft·lbf)
HINT:
�Use a torque wrench with a fulcrum length of 300 mm
(11.81 in.).
�This torque value is effective in case that SST is parallel
to a torque wrench.
�Securely suspend the steering gear assembly.
8. CONNECT NO.2 INTERMEDIATE SHAFT
(See page SR−19)
9. CONNECT RH AND LH TIE ROD ENDS
(See page SA−16)
10. INSTALL RH AND LH ENGINE UNDER COVERS
Tighten the 13 bolts.
11. POSITION FRONT WHEELS FACING STRAIGHT
AHEAD
HINT:
Do it with the front of the vehicle jacked up.
Page 1335 of 1354
− STEERINGPOWER STEERING GEAR
SR−61
1996 RAV4 (RM447U)
12. CENTER SPIRAL CABLE (See page SR−19)
13. INSTALL STEERING WHEEL
(a) Align the matchmarks on the wheel and steering column
main shaft.
(b) Temporarily tighten the wheel set nut.
(c) Connect the connector.
14. BLEED POWER STEERING SYSTEM
(See page SR−4)
15. CHECK STEERING WHEEL CENTER POINT
16. TORQUE STEERING WHEEL SET NUT
Torque: 34 N·m (350 kgf·cm, 25 ft·lbf)
17. INSTALL STEERING WHEEL PAD (See page SR−19)
18. CHECK FRONT WHEEL ALIGNMENT
(See page SA−4)
Page 1339 of 1354

ST05J−03
S01596(1) (2)
(3)(5)
(4)
S01642
Disconnect
S01783
ST−4
− STARTINGSTARTER
1996 RAV4 (RM447U)
REMOVAL
1. REMOVE ENGINE COOLANT RESERVOIR
2. REMOVE AIR CLEANER CAP ASSEMBLY
(a) Disconnect these hoses, cord and connectors:
(1) Skid control relay connectors
(2) High−tension cord from the air cleaner hose and
resonator
(3) IAT sensor connector
(4) PCV hose from the air cleaner hose
(5) Air hose from the air cleaner cap assembly
(b) Disconnect the 4 clamps and air cleaner cap assembly
from the air cleaner case assembly.
(c) Loosen the hose clamp, and disconnect the air cleaner
hose from the throttle body.
(d) Remove the air cleaner cap assembly.
3. REMOVE AIR CLEANER CASE ASSEMBLY
(a) Disconnect the VSV from the air cleaner case assembly.
(b) Remove the 3 bolts and air cleaner case assembly.
4. REMOVE STARTER
(a) Disconnect the starter connector.
(b) Remove the nut, and disconnect the starter wire.
(c) Remove the 2 bolts and starter.
Torque: 39 N·m (400 kgf·cm, 29 ft·lbf)
Page 1340 of 1354

ST0N5−01
S02332
P13717
S02331
P13464
− STARTINGSTARTER
ST−5
1996 RAV4 (RM447U)
DISASSEMBLY
HINT:
At the time of installation, please refer to the following item.
Use high−temperature grease to lubricate the bearings,
springs, steel ball, and gears when assembling the starter.
1. REMOVE DUST PROTECTOR
2. REMOVE FIELD FRAME AND ARMATURE
(a) Remove the nut, and disconnect the lead wire from the
magnetic switch terminal.
Torque: 5.9 N·m (60 kgf·cm, 52 in.·lbf)
(b) Remove the 2 through bolts.
Torque: 5.9 N·m (60 kgf·cm, 52 in.·lbf)
(c) Pull out the field frame together with the armature.
NOTICE:
At the time of installation, please refer to the following item.
Align the protrusion of the field frame with the groove of the
magnetic switch.
(d) Remove the O−ring from the field frame.
HINT:
At the time of installation, please refer to the following item.
Use a new O−ring.
3. REMOVE STARTER HOUSING, CLUTCH ASSEMBLY
AND GEAR
(a) Remove the 2 screws.
Torque: 5.9 N·m (60 kgf·cm, 52 in.·lbf)
Page 1341 of 1354
P13527
(1)
(2)(3) (4)
P13743
P13718
P13528
P13466
ST−6
− STARTINGSTARTER
1996 RAV4 (RM447U)
(b) Remove these parts from the magnetic switch:
(1) Starter housing and clutch assembly
(2) Return spring
(3) Idler gear
(4) Bearing
4. REMOVE STEEL BALL
Using a magnetic finger, remove the steel ball from the clutch
shaft hole.
5. REMOVE BRUSH HOLDER
(a) Remove the 2 screws and end cover from the field frame.
Torque: 1.5 N·m (15 kgf·cm, 13 in.·lbf)
(b) Using a screwdriver, hold the spring back and disconnect
the brush from the brush holder.
Disconnect the 4 brushes, and remove the brush holder.
NOTICE:
Check that the positive (+) lead wires are not grounded.
6. REMOVE ARMATURE FROM FIELD FRAME
Page 1351 of 1354

S00254
40 mm
Contact Plate 20 mm
37 mmWooden
Block
(kgf/cm2) =Ram diameter (cm)
100 kgf
2x 3.14 (π)
2
(psi) =Ram diameter (in.)
221 lbf
2x 3.14 (π)
2
(kPa) = (kgf/cm2) x 98.1
(kPa) = (psi) x 6.9
P25832
SST
P25833
ST−16
− STARTINGSTARTER
1996 RAV4 (RM447U)
8. TIGHTEN TERMINAL NUT
(a) Put a wooden block on the contact plate and press it down
with a hand press.
Dimensions of wooden block:
20 x 37 x 40 mm (0.79 x 1.46 x 1.57 in.)
Press force:
981 N (100 kgf, 221 lbf)
NOTICE:
�Check the diameter of the hand press ram. Then cal-
culate the gauge pressure of the press when
981 N (100 kgf, 221 lbf) of force is applied.
Gauge pressure:
�If the contact plate is not pressed down with the spe-
cified pressure, the contact plate may tilt due to coil
deformation or the tightening of the nut.
(b) Using SST, tighten the nuts to the specified torque.
SST 09810−38140
Torque: 17 N·m (170 kgf·cm, 12 ft·lbf)
NOTICE:
If the nut is over tightened, it may cause cracks on the in-
side of the insulator.
9. CLEAN CONTACT SURFACES OF CONTACT PLATE
AND PLUNGER
Clean the contact surfaces of the remaining contact plate and
plunger with a dry shop rag.
10. REINSTALL MAGNETIC SWITCH END COVER
Install the plunger, new gasket and end cover with the 3 bolts.
Torque: 2.5 N·m (26 kgf·cm, 23 in.·lbf)