Page 1205 of 1354
SA0UP−04
R10760
R10777
− SUSPENSION AND AXLEREAR SHOCK ABSORBER
SA−91
1996 RAV4 (RM447U)
REMOVAL
1. JACK UP VEHICLE AND SUPPORT BODY WITH
STANDS
2. REMOVE REAR WHEEL AND SUPPORT NO. 1 SUS-
PENSION WITH JACK
Torque: 103 N·m (1,050 kgf·cm, 76 ft·lbf)
3. REMOVE SHOCK ABSORBER
(a) Remove the suspension cap.
(b) Remove the 2 nuts, 2 retainers and cushion.
Torque: 25 N·m (250 kgf·cm, 18 ft·lbf)
(c) Insert the wood chip between the No.1 suspension arm
made of cast iron and jack, then support the No.1 suspen-
sion arm with the jack.
(d) Remove the bolt, 2 retainers and shock absorber.
Torque: 37 N·m (380 kgf·cm, 27 ft·lbf)
(e) Remove the lower bushing from the shock absorber.
Page 1209 of 1354
SA0UT−03
W04028
Retainer Suspension Cap
Retainer Retainer Cushion
Rear
Shock
Absorber
Bushing
Brake Drum
25 (250, 18)
Cushion Retainer
Retainer
7.8 (80, 69 in.·lbf)
13 (130, 9)
18 (185, 13)
19 (195, 14)
19 (195, 14)
4WD
Lock cap
Cotter Pin
216 (2,200, 59)
80 (820, 59)
�
� Parking Brake Cable
113 (1,150, 83)
113 (1,150, 83)Upper Suspension Arm
113 (1,150, 83)Camber
Adjust
Cam
Lower Suspension Arm103 (1,050, 76)
Clip �
103 (1,050, 76)
132 (1,350, 98)
To e−adjust Cam
Attachment
Bushing
Rear No.1 Suspension Arm
Attachment �Spring Bumper
Upper Insulator
Coil Spring
Shock Absorber
Lower Pivot pin
13 (130, 9)
140 (1,430, 103)
N·m (kgf·cm, ft·lbf) : Specified torque
Non−reusable part
�
56 (570, 41)
37 (380, 27)
Rear Drive Shaft4WD: Rear Differential
13 (130, 9)
2WD
Rear Axle Shaft
− SUSPENSION AND AXLEREAR SUSPENSION ARM AND COIL SPRING
SA−95
1996 RAV4 (RM447U)
REAR SUSPENSION ARM AND COIL SPRING
COMPONENTS
Page 1210 of 1354

SA0UU−03
R10779
R10764
SST
R10765
SST SA−96
− SUSPENSION AND AXLEREAR SUSPENSION ARM AND COIL SPRING
1996 RAV4 (RM447U)
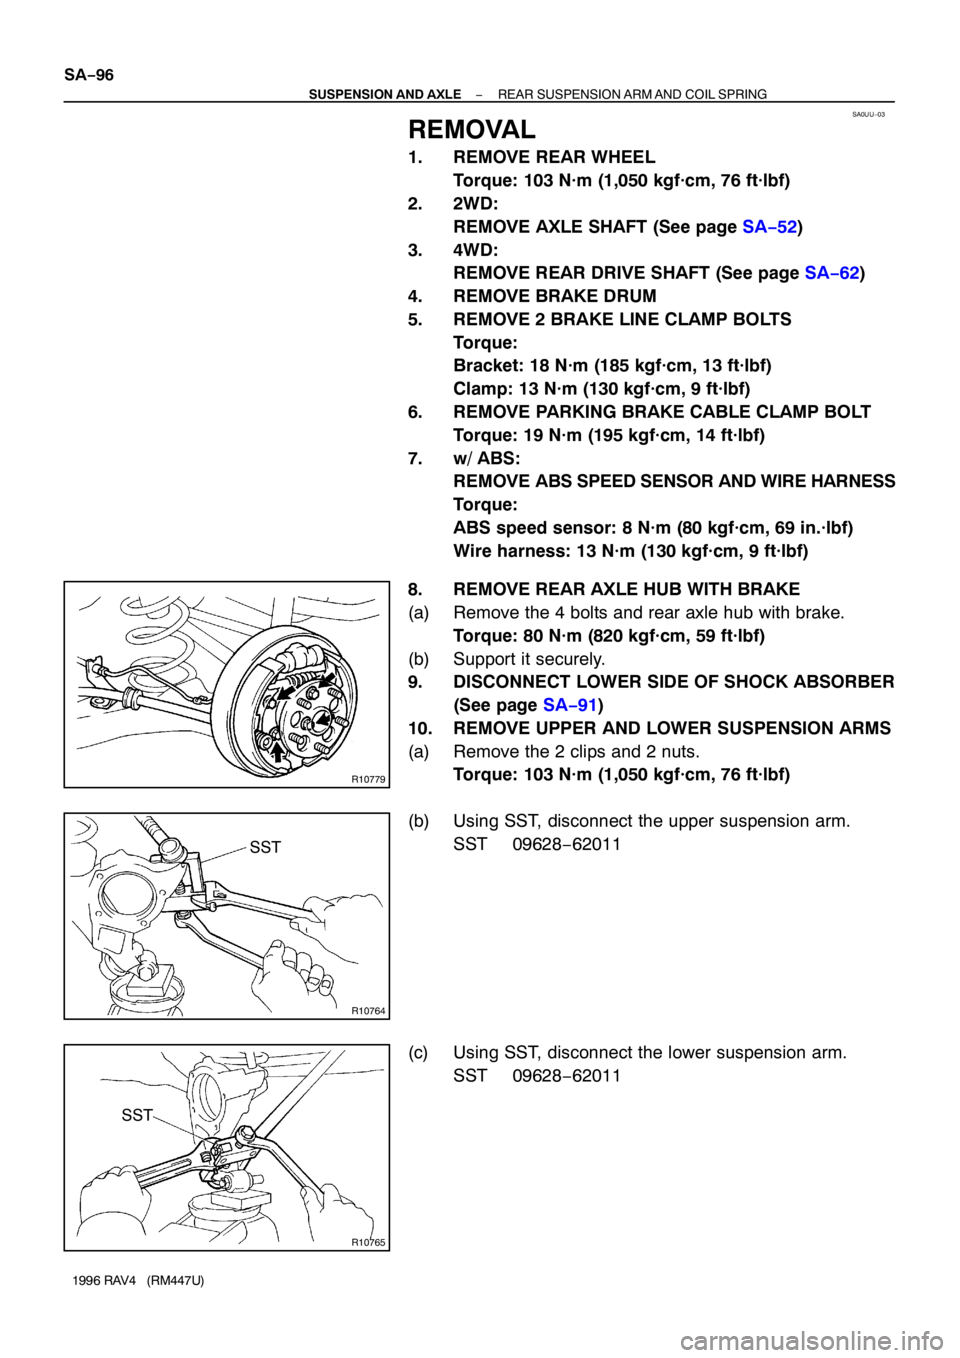
REMOVAL
1. REMOVE REAR WHEEL
Torque: 103 N·m (1,050 kgf·cm, 76 ft·lbf)
2. 2WD:
REMOVE AXLE SHAFT (See page SA−52)
3. 4WD:
REMOVE REAR DRIVE SHAFT (See page SA−62)
4. REMOVE BRAKE DRUM
5. REMOVE 2 BRAKE LINE CLAMP BOLTS
Torque:
Bracket: 18 N·m (185 kgf·cm, 13 ft·lbf)
Clamp: 13 N·m (130 kgf·cm, 9 ft·lbf)
6. REMOVE PARKING BRAKE CABLE CLAMP BOLT
Torque: 19 N·m (195 kgf·cm, 14 ft·lbf)
7. w/ ABS:
REMOVE ABS SPEED SENSOR AND WIRE HARNESS
Torque:
ABS speed sensor: 8 N·m (80 kgf·cm, 69 in.·lbf)
Wire harness: 13 N·m (130 kgf·cm, 9 ft·lbf)
8. REMOVE REAR AXLE HUB WITH BRAKE
(a) Remove the 4 bolts and rear axle hub with brake.
Torque: 80 N·m (820 kgf·cm, 59 ft·lbf)
(b) Support it securely.
9. DISCONNECT LOWER SIDE OF SHOCK ABSORBER
(See page SA−91)
10. REMOVE UPPER AND LOWER SUSPENSION ARMS
(a) Remove the 2 clips and 2 nuts.
Torque: 103 N·m (1,050 kgf·cm, 76 ft·lbf)
(b) Using SST, disconnect the upper suspension arm.
SST 09628−62011
(c) Using SST, disconnect the lower suspension arm.
SST 09628−62011
Page 1211 of 1354

W01762Matchmarks
W01764
Matchmarks
− SUSPENSION AND AXLEREAR SUSPENSION ARM AND COIL SPRING
SA−97
1996 RAV4 (RM447U)
(d) Place matchmarks on the camber adjust cam and sus-
pension member.
(e) Remove the bolt, camber adjust cam, nut and lower sus-
pension arm.
Torque: 113 N·m (1,150 kgf·cm, 83 ft·lbf)
HINT:
At the time of installation, please refer to the following item.
After stabilizing the suspension, torque the bolt.
(f) Remove the bolt, nut and upper suspension arm.
Torque: 113 N·m (1,150 kgf·cm, 83 ft·lbf)
HINT:
At the time of installaion, please refer to the following item.
After stabilizing the suspension, torque the bolt.
11. REMOVE COIL SPRING AND REAR NO.1 SUSPEN-
SION ARM
(a) Place matchmarks on the toe−adjust cam and body.
(b) Loosen the bolt and remove the coil spring and upper in-
sulator.
HINT:
At the time of installation, please refer to the following item.
Fit the lower end of the coil spring into the gap of the No.1 sus-
pension arm.
(c) Remove the bolt, toe−adjust cam, 2 attachments, nut and
lower suspension arm.
Torque: 132 N·m (1,350 kgf·cm, 98 ft·lbf)
HINT:
At the time of installation, please refer to the following item.
After stabilizing the suspension, torque the bolt.
12. REMOVE SPRING BUMPER
Remove the bolt and spring bumper.
Torque: 13 N·m (130 kgf·cm, 9 ft·lbf)
Page 1212 of 1354
SA0UV−01
R10753
SA−98
− SUSPENSION AND AXLEREAR SUSPENSION ARM AND COIL SPRING
1996 RAV4 (RM447U)
INSPECTION
INSPECT BALL JOINT FOR ROTATION CONDITION
(a) As shown in the illustration, flip the ball joint stud back and
forth 5 times, before installing the nut.
(b) Using a torque wrench, turn the nut continuously one turn
each 2 − 4 seconds and take the torque reading on the 5th
turn.
Turning Torque:
Upper suspension arm:
0.5 − 3.5 N·m (5 − 35 kgf·cm, 7 − 30 in.·lbf)
Lower suspension arm:
0.5 − 3.5 N·m (5 − 35 kgf·cm, 7 − 30 in.·lbf)
Page 1213 of 1354

SA0UW−01
W01228
R11091
SST
R11092
5°
5°SST
Horizontal Line
Press Line
Position Mark
− SUSPENSION AND AXLEREAR SUSPENSION ARM AND COIL SPRING
SA−99
1996 RAV4 (RM447U)
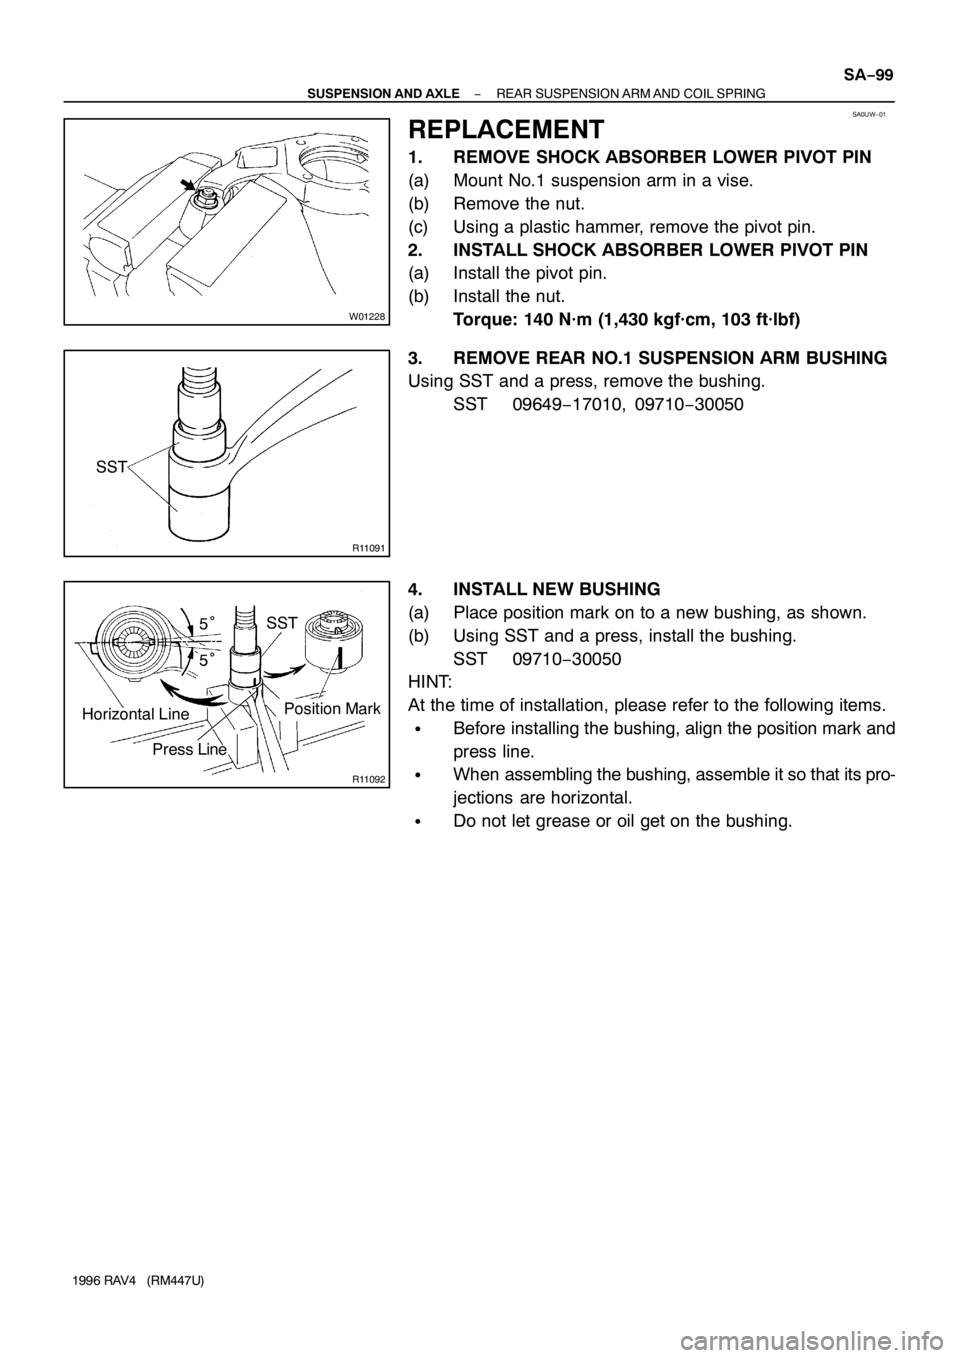
REPLACEMENT
1. REMOVE SHOCK ABSORBER LOWER PIVOT PIN
(a) Mount No.1 suspension arm in a vise.
(b) Remove the nut.
(c) Using a plastic hammer, remove the pivot pin.
2. INSTALL SHOCK ABSORBER LOWER PIVOT PIN
(a) Install the pivot pin.
(b) Install the nut.
Torque: 140 N·m (1,430 kgf·cm, 103 ft·lbf)
3. REMOVE REAR NO.1 SUSPENSION ARM BUSHING
Using SST and a press, remove the bushing.
SST 09649−17010, 09710−30050
4. INSTALL NEW BUSHING
(a) Place position mark on to a new bushing, as shown.
(b) Using SST and a press, install the bushing.
SST 09710−30050
HINT:
At the time of installation, please refer to the following items.
�Before installing the bushing, align the position mark and
press line.
�When assembling the bushing, assemble it so that its pro-
jections are horizontal.
�Do not let grease or oil get on the bushing.
Page 1217 of 1354

S01831
New Gasket
FI1654
Fulcrum Length
30 mm
SST
FI0420
O−Ring
Injector
GrommetDelivery PipeCORRECT
WRONG
P15485
O−Ring
Injector Grommet
O−Ring Insulator
− SFISFI SYSTEM
SF−3
1996 RAV4 (RM447U)
(b) When connecting the flare nut or union bolt on the high
pressure pipe union, observe the following procedures:
(1) Union Bolt Type:
Always use 2 new gaskets.
(2) Union Bolt Type:
Tighten the union bolt by hand.
(3) Union Bolt Type:
Tighten the union bolt to the specified torque.
Torque: 29 N·m (300 kgf·cm, 22 ft·lbf)
(4) Flare Nut Type:
Apply a light coat of engine oil to the flare nut, and
tighten the flare nut by hand.
(5) Flare Nut Type:
Using SST, tighten the flare nut to specified torque.
SST 09631−22020
NOTICE:
Do not rotate the fuel pipe, when tightening the flare nut.
Torque: 34 N·m (350 kgf·cm, 25 ft·lbf)
28 N·m (285 kgf·cm, 21 ft·lbf) for SST
HINT:
Use a torque wrench with a fulcrum length of 30 cm (11.81 in.).
(c) Observe the following precautions when removing and
installing the injectors.
(1) Never reuse the O−ring.
(2) When placing a new O−ring on the injector, take
care not to damage it in any way.
(3) Coat a new O−ring with spindle oil or gasoline be-
fore installing−never use engine, gear or brake oil.
(4) Install the injector to the delivery pipe and intake
manifold as shown in the illustration.
Page 1220 of 1354

S01834
Gasket
SST (Union)
SST
Fuel Inlet Hose Gasket
SST (Union)
S01835
301 − 347 kPa
S01836
For 5 Minutes After Engine has Stopped
147 kPa
or More SF−6
− SFIFUEL PUMP
1996 RAV4 (RM447U)
(f) Install the fuel inlet hose and SST (pressure gauge) to the
fuel filter outlet with the 3 gaskets and SST (union bolt).
SST 09268−45012
Torque: 29 N·m (300 kgf·cm, 22 ft·lbf)
(g) Wipe off any splattered gasoline.
(h) Connect the TOYOTA hand−held tester to the DLC3.
(i) Reconnect the negative (−) terminal cable to the battery.
(j) Turn the ignition switch ON.
(k) Measure the fuel pressure.
Fuel pressure:
301 − 347 kPa (3.1 − 3.5 kgf/cm
2, 44 − 50 psi)
If pressure is high, replace the fuel pressure regulator.
If pressure is low, check these parts:
�Fuel hoses and connections
�Fuel pump
�Fuel filter
�Fuel pressure regulator
(l) Remove the TOYOTA hand−held tester from the DLC3.
(m) Start the engine.
(n) Measure the fuel pressure at idle.
Fuel pressure:
301 − 347 kPa (3.1 − 3.5 kgf/cm
2, 44 − 50 psi)
(o) Stop the engine.
(p) Check that the fuel pressure remains as specified for 5
minutes after the engine has stopped.
Fuel pressure:
147 kPa (1.5 kgf/cm
2, 21 psi) or more
If pressure is not as specified, check the fuel pump, pressure
regulator and/or injectors.
(q) After checking fuel pressure, disconnect the negative (−)
terminal cable from the battery and carefully remove the
SST to prevent gasoline from splashing.
SST 09268−45012
(r) Reconnect the fuel inlet hose with 2 new gaskets and the
union bolt.
Torque: 29 N·m (300 kgf·cm, 21 ft·lbf)
(s) Reconnect the negative (−) terminal cable to the battery.
(t) Check for fuel leakage (See page SF−1).
(u) Reinstall the engine comportment R/B No.2 and air clean-
er assembly.
3. CHECK FUEL PUMP
(a) Remove the LH rear seat assembly.
(b) Remove the floor service hole cover.