Page 383 of 2890
G2M0084
1) Install baffle plate.
2) Install oil strainer and O-ring
3) Install oil strainer stay.
4) Apply fluid packing to matching surfaces and install oil
pan.
Fluid packing:
THREE BOND 1207C or equivalent
G2M0194
5) Apply fluid packing to matching surfaces and install oil
separator cover.
Fluid packing:
THREE BOND 1215 or equivalent
G2M0161
6) Install flywheel or drive plate.
To lock crankshaft, use ST.
ST 498497100 CRANKSHAFT STOPPER
7) Install housing cover.
G2M0076
8) Installation of oil pump
(1) Discard front oil seal after removal. Replace with a
new one by using ST.
ST 499587100 OIL SEAL INSTALLER
73
2-3SERVICE PROCEDURE
7. Cylinder Block
Page 384 of 2890
B2M0390A
(2) Apply fluid packing to matching surface of oil pump.
Fluid packing:
THREE BOND 1215 or equivalent
(3) Install oil pump on cylinder block. Be careful not to
damage oil seal during installation.
CAUTION:
�Do not forget to install O-ring and seal when install-
ing oil pump.
�Align flat surface of oil pump’s inner rotor with
crankshaft before installation.
G2M0628
9) Install engine coolant pump and gasket.
CAUTION:
�Be sure to use a new gasket.
�When installing engine coolant pump, tighten bolts
in two stages in numerical sequence as shown in Fig-
ure.
10) Install engine coolant pipe.
11) Install oil filter.
2. RELATED PARTS
1) Install cylinder head and intake manifold.
2) Install timing belt, camshaft sprocket and related parts.
74
2-3SERVICE PROCEDURE
7. Cylinder Block
Page 392 of 2890

Valve springFree length 39.8 mm (1.567 in)
Squareness 2.5°, 1.7 mm (0.067 in)
Tension/spring height228.5—261.8 N
(23.3—26.7 kg, 51.4—58.9 lb)/31.0 mm (1.220 in)
462.9—531.5 N
(47.2—54.2 kg, 104.1—119.5 lb)/23.2 mm (0.913 in)
Cylinder
blockSurface warpage limit (mating with cylinder head) 0.05 mm (0.0020 in)
Surface grinding limit 0.1 mm (0.004 in)
Cylinder bore STDA 99.505—99.515 mm (3.9175—3.9179 in)
B 99.495—99.505 mm (3.9171—3.9175 in)
TaperSTD 0.015 mm (0.0006 in)
Limit 0.050 mm (0.0020 in)
Out-of-roundnessSTD 0.010 mm (0.0004 in)
Limit 0.050 mm (0.0020 in)
Piston clearanceSTD 0.010—0.030 mm (0.0004—0.0012 in)
Limit 0.050 mm (0.0020 in)
Enlarging (boring) limit 0.5 mm (0.020 in)
Piston Outer diameterSTDA 99.485—99.495 mm (3.9167—3.9171 in)
B 99.475—99.485 mm (3.9163—3.9167 in)
0.25 mm (0.0098 in)
OS99.725—99.735 mm (3.9262—3.9266 in)
0.50 mm (0.0197 in)
OS99.975—99.985 mm (3.9360—3.9364 in)
Piston pinStandard clearance between piston
pin and hole in pistonSTD 0.004—0.010 mm (0.0002—0.0004 in)
Limit 0.020 mm (0.0008 in)
Degree of fitPiston pin must be fitted into position with thumb at 20°C
(68°F).
Piston ringPiston ring gapTop ringSTD 0.20—0.35 mm (0.0079—0.0138 in)
Limit 1.0 mm (0.039 in)
Second
ringSTD 0.37—0.52 mm (0.0146—0.0205 in)
Limit 1.0 mm (0.039 in)
Oil ringSTD 0.20—0.60 mm (0.0079—0.0236 in)
Limit 1.5 mm (0.059 in)
Clearance between piston
ring and piston ring grooveTop ringSTD 0.040—0.080mm (0.0016—0.0031 in)
Limit 0.15 mm (0.0059 in)
Second
ringSTD 0.030—0.070 mm (0.0012—0.0028 in)
Limit 0.15 mm (0.0059 in)
Connecting
rodBend twist per 100 mm (3.94 in) in
lengthLimit 0.10 mm (0.0039 in)
Side clearanceSTD 0.070—0.330 mm (0.0028—0.0130 in)
Limit 0.4 mm (0.016 in)
Connecting
rod bearingOil clearanceSTD 0.010—0.038 mm (0.0004—0.0015 in)
Limit 0.05 mm (0.0020 in)
Thickness at center portionSTD 1.492—1.501 mm (0.0587—0.0591 in)
0.03 mm
(0.0012 in)
US1.510—1.513 mm (0.0594—0.0596 in)
0.05 mm
(0.0020 in)
US1.520—1.523 mm (0.0598—0.0600 in)
0.25 mm
(0.0098 in)
US1.620—1.623 mm (0.0638—0.0639 in)
Connecting
rod bushingClearance between piston pin and
bushingSTD 0—0.022 mm (0—0.0009 in)
Limit 0.030 mm (0.0012 in)
STD: Standard OS: Oversize US: Undersize
4
2-3bSPECIFICATIONS AND SERVICE DATA
1. Engine
Page 397 of 2890
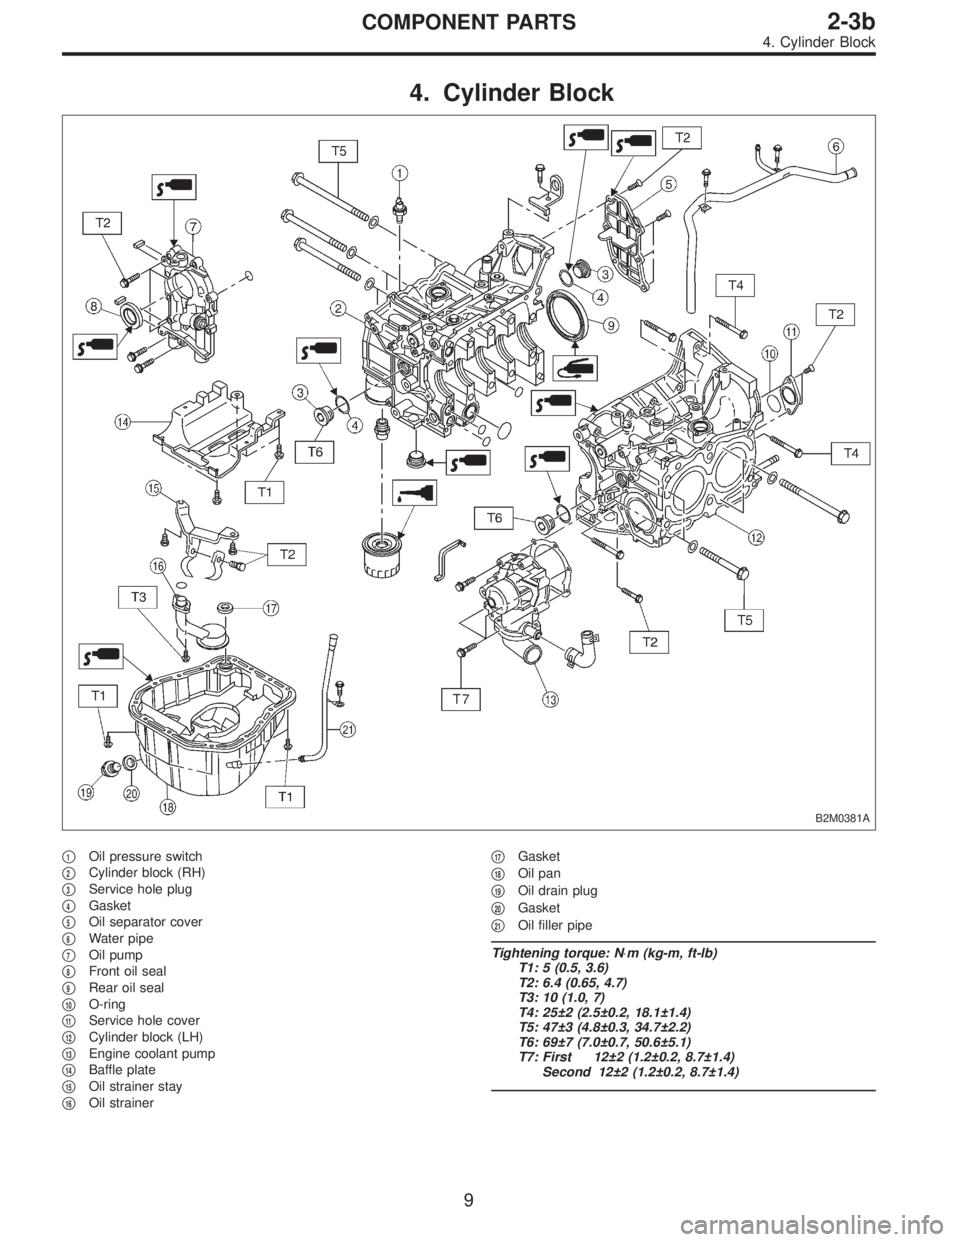
4. Cylinder Block
B2M0381A
�1Oil pressure switch
�
2Cylinder block (RH)
�
3Service hole plug
�
4Gasket
�
5Oil separator cover
�
6Water pipe
�
7Oil pump
�
8Front oil seal
�
9Rear oil seal
�
10O-ring
�
11Service hole cover
�
12Cylinder block (LH)
�
13Engine coolant pump
�
14Baffle plate
�
15Oil strainer stay
�
16Oil strainer�
17Gasket
�
18Oil pan
�
19Oil drain plug
�
20Gasket
�
21Oil filler pipe
Tightening torque: N⋅m (kg-m, ft-lb)
T1: 5 (0.5, 3.6)
T2: 6.4 (0.65, 4.7)
T3: 10 (1.0, 7)
T4: 25±2 (2.5±0.2, 18.1±1.4)
T5: 47±3 (4.8±0.3, 34.7±2.2)
T6: 69±7 (7.0±0.7, 50.6±5.1)
T7: First 12±2 (1.2±0.2, 8.7±1.4)
Second 12±2 (1.2±0.2, 8.7±1.4)
9
2-3bCOMPONENT PARTS
4. Cylinder Block
Page 399 of 2890
G2M0709
1. General Precautions
1) Before disassembling engine, place it on ST3.
ST1 498457000 ENGINE STAND ADAPTER RH
ST2 498457100 ENGINE STAND ADAPTER LH
ST3 499817000 ENGINE STAND
2) All parts should be thoroughly cleaned, paying special
attention to the engine oil passages, pistons and bearings.
3) Rotating parts and sliding parts such as piston, bearing
and gear should be coated with oil prior to assembly.
4) Be careful not to let oil, grease or coolant contact the
timing belt, clutch disc and flywheel.
5) All removed parts, if to be reused, should be reinstalled
in the original positions and directions.
6) Gaskets and lock washers must be replaced with new
ones. Liquid gasket should be used where specified to
prevent leakage.
7) Bolts, nuts and washers should be replaced with new
ones as required.
8) Even if necessary inspections have been made in
advance, proceed with assembly work while making
rechecks.
11
2-3bSERVICE PROCEDURE
1. General Precautions
Page 400 of 2890
2. Timing Belt
A: REMOVAL
1. CRANKSHAFT PULLEY AND BELT COVER
B2M0684A
G2M0711
1) Remove V-belt cover, V-belt and air conditioning com-
pressor drive belt tensioner.
2) Remove pulley bolt. To lock crankshaft, use ST.
ST 499977000 CRANKSHAFT PULLEY WRENCH
3) Remove crankshaft pulley.
B2M0729
4) Remove left-hand belt cover.
12
2-3bSERVICE PROCEDURE
2. Timing Belt
Page 402 of 2890
2. TIMING BELT
B2M0685A
G2M0713
B2M0686A
1) If alignment mark and/or arrow mark (which indicates
rotation direction) on timing belt fade away, put new marks
before removing timing belt as follows:
(1) Turn crankshaft using ST, and align alignment
marks on crankshaft sprocket, left-hand intake cam-
shaft sprocket, left-hand exhaust camshaft sprocket,
right-hand intake camshaft sprocket and right hand
exhaust camshaft sprocket with notches of belt cover
and cylinder block.
ST 499987500 CRANKSHAFT SOCKET
14
2-3bSERVICE PROCEDURE
2. Timing Belt
Page 409 of 2890
B2M0737
2) Install left-hand belt cover No. 2.
B2M0736
3) Install tensioner bracket.
4) Install crankshaft sprocket.
H2M1294A
5) Install right-hand exhaust camshaft sprocket. To lock
camshaft, use ST.
6) Install right-hand intake camshaft sprocket using ST.
7) Install left-hand exhaust camshaft sprocket using ST.
8) Install left-hand intake camshaft sprocket using ST.
ST 499207300 CAMSHAFT SPROCKET WRENCH
21
2-3bSERVICE PROCEDURE
2. Timing Belt