Page 1125 of 2890
G4M0106
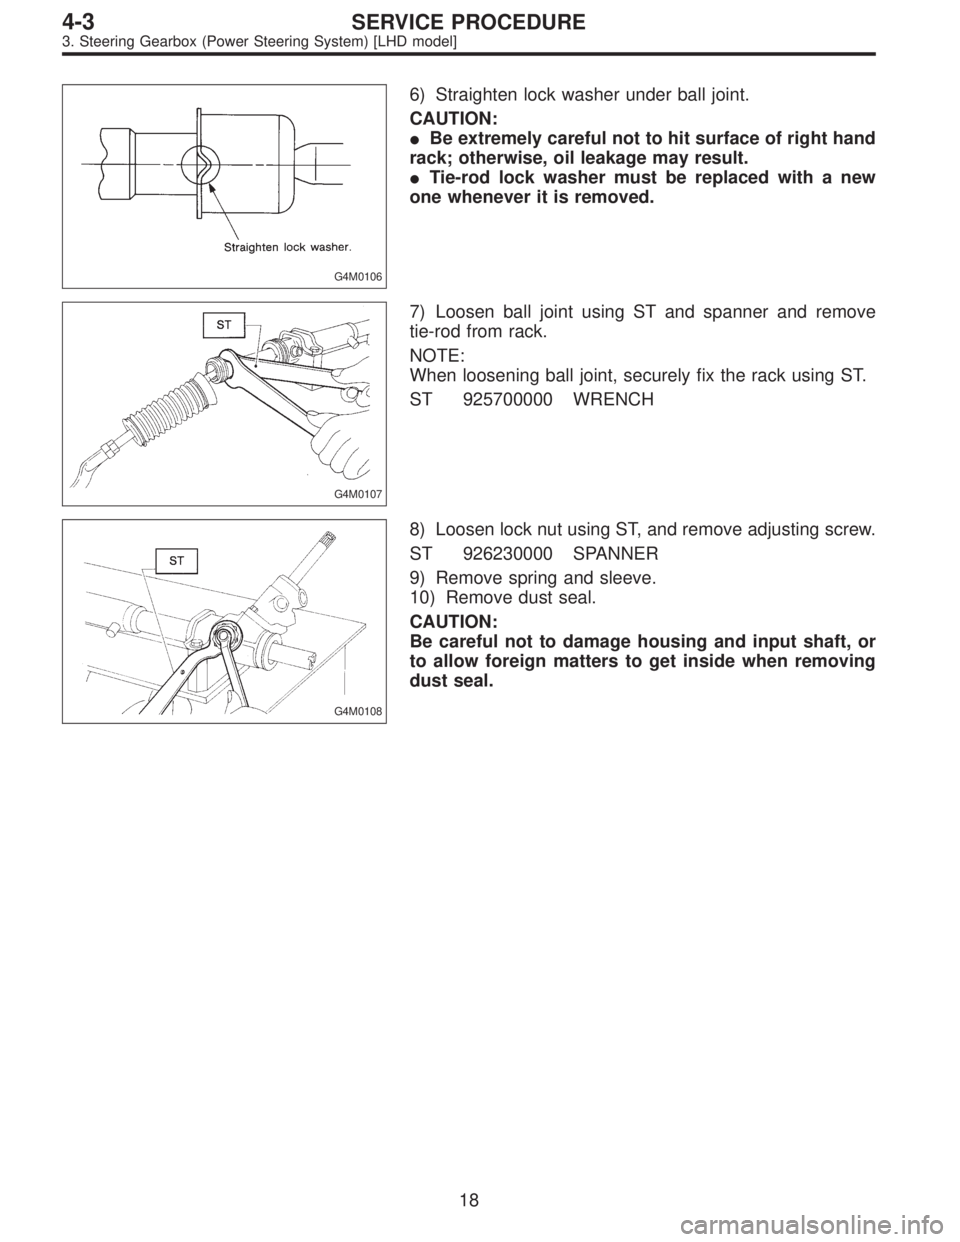
6) Straighten lock washer under ball joint.
CAUTION:
�Be extremely careful not to hit surface of right hand
rack; otherwise, oil leakage may result.
�Tie-rod lock washer must be replaced with a new
one whenever it is removed.
G4M0107
7) Loosen ball joint using ST and spanner and remove
tie-rod from rack.
NOTE:
When loosening ball joint, securely fix the rack using ST.
ST 925700000 WRENCH
G4M0108
8) Loosen lock nut using ST, and remove adjusting screw.
ST 926230000 SPANNER
9) Remove spring and sleeve.
10) Remove dust seal.
CAUTION:
Be careful not to damage housing and input shaft, or
to allow foreign matters to get inside when removing
dust seal.
18
4-3SERVICE PROCEDURE
3. Steering Gearbox (Power Steering System) [LHD model]
Page 1126 of 2890
 Clean all disassembled parts, and check for wear,
damage, or any other faults, then repair or replace as nec-
essary.
2) When disassembling, check inside of gearbox for water.
If any")
C: INSPECTION
1) Clean all disassembled parts, and check for wear,
damage, or any other faults, then repair or replace as nec-
essary.
2) When disassembling, check inside of gearbox for water.
If any water is found, carefully check boot for damage,
input shaft dust seal, adjusting screw and boot clips for
poor sealing. If faulty, replace with new parts.
No. Parts Inspection Corrective action
1 Input shaft(1) Bend of input shaft
(2) Damage on serrationIf bend or damage is excessive, replace
entire gearbox.
2 Dust seal(1) Crack or damage
(2) WearIf outer wall slips, lip is worn out or
damage is found, replace it with new one.
3 Rack and pinion Poor mating of rack with pinion(1) Adjust backlash properly.
By measuring turning torque of
gearbox and sliding resistance of rack,
check if rack and pinion engage
uniformly and smoothly with each
other.
(Refer to“Service limit”.)
(2) Keeping rack pulled out all the way so
that all teeth emerge, check teeth for
damage.
Even if abnormality is found in either
(1) or (2), replace entire gearbox.
4 Gearbox unit(1) Bend of rack shaft
(2) Bend of cylinder portion
(3) Crack or damage on cast iron portionReplace gearbox with new one.
(4) Wear or damage on rack bushIf free play of rack shaft in radial direction
is out of the specified range, replace
gearbox with new one. (Refer to“Service
limit”.)
(5) Wear on input shaft bearingIf free plays of input shaft in radial and
axial directions are out of the specified
ranges, replace gearbox with new one.
(Refer to“Service limit”.)
5 Boot Crack, damage or deterioration Replace.
6 Tie-rod(1) Looseness of ball joint
(2) Bend of tie-rodReplace.
7 Tie-rod end Damage or deterioration on dust seal Replace.
8 Adjusting screw spring Deterioration Replace.
9 Boot clip Deterioration Replace.
10 Sleeve Damage Replace.
11 Pipes(1) Damage to flared surface
(2) Damage to flare nut
(3) Damage to pipe
(4) Damage to O-ringReplace.
19
4-3SERVICE PROCEDURE
3. Steering Gearbox (Power Steering System) [LHD model]
Page 1127 of 2890
G4M0109
G4M0110
1. SERVICE LIMIT
Make a measurement as shown in the figures. If it exceeds
the specified service limit, adjust or replace.
NOTE:
When making a measurement, vise gearbox by using ST.
Never vise gearbox by inserting aluminum plates, etc.
between vise and gearbox.
ST 926200000 STAND
Sliding resistance of rack shaft:
Service limit
240.3 N (24.5 kg, 54.0 lb) or less
G4M0111
2. RACK SHAFT PLAY IN RADIAL DIRECTION
Right-turn steering:
Service limit
0.15 mm (0.0059 in) or less
On condition
L: 5 mm (0.20 in)
P: 98 N (10 kg, 22 lb)
G4M0887
Left-turn steering:
Service limit
Direction
0.3 mm (0.012 in) or less
Direction
0.15 mm (0.0059 in) or less
On condition
L: 5 mm (0.20 in)
P: 98 N (10 kg, 22 lb)
G4M0113
3. INPUT SHAFT PLAY
In radial direction:
Service limit
0.18 mm (0.0071 in) or less
On condition
P: 98 N (10 kg, 22 lb)
20
4-3SERVICE PROCEDURE
3. Steering Gearbox (Power Steering System) [LHD model]
Page 1128 of 2890
 or less
On condition
P: 20—49N (2—5 kg, 4—11 lb)
G4M0115
4. TURNING RESISTANCE OF GEARBOX
Using ST, measure gearbox turning resistance")
G4M0114
In axial direction:
Service limit
0.1 mm (0.004 in) or less
On condition
P: 20—49N (2—5 kg, 4—11 lb)
G4M0115
4. TURNING RESISTANCE OF GEARBOX
Using ST, measure gearbox turning resistance.
ST 926230000 SPANNER
Service limit:
Straight-ahead position within 30 mm (1.18 in)
from rack center
Less than 11.18 N (1.14 kg, 2.51 lb)
Maximum allowable resistance
12.7 N (1.3 kg, 2.9 lb)
D: ASSEMBLY
CAUTION:
Use only SUBARU genuine grease for gearbox.
Specified grease for gearbox:
VALIANT GREASE M2 (Part No. 003608001)
1) Apply grease to teeth of rack so that grease applied is
about as high as teeth, and also apply a thin film of grease
to sliding portion of rack shaft.
CAUTION:
�When moving rack to stroke end without tie-rod
attached, prevent shocks from being applied at the
end.
�Do not apply grease to threaded portion at end of
rack shaft.
�Move rack shaft to stroke end two or three times to
squeeze grease which accumulates on both ends.
Remove grease to prevent it from choking air passage
hole.
2) Apply grease to sleeve insertion hole.
3) Apply grease to dust seal insertion hole.
CAUTION:
Apply clean grease with clean hands. If material hav-
ing a sharp edge is used for applying grease, oil seal
at the inside might be damaged.
21
4-3SERVICE PROCEDURE
3. Steering Gearbox (Power Steering System) [LHD model]
Page 1129 of 2890
 Press-fit dust seal into gearbox housing while tapping it
via a spanner or the like so that stepping between gearbox
and dust seal is normally 2 mm (0.08 in).
G4M0117
Depth: A
2 mm (0.08 in")
G4M0116
4) Press-fit dust seal into gearbox housing while tapping it
via a spanner or the like so that stepping between gearbox
and dust seal is normally 2 mm (0.08 in).
G4M0117
Depth: A
2 mm (0.08 in)
G4M0118
5) Apply grease to sliding surface of sleeve and spring
seat, then insert sleeve into pinion housing. Fit spring into
sleeve screw, pack grease inside of screw, then install the
screw.
�
1Sleeve
�
2Spring
�
3Adjusting screw
G4M0107
6) Fit new lock washer on screwed portion of rack end.
Aligning cut portion of rack and nail of washer, screw in and
tighten ball joint by using ST and spanner.
ST 925700000 WRENCH
Tightening torque (Ball joint):
78±10 N⋅m (8.0±1.0 kg-m, 58±7 ft-lb)
CAUTION:
Pay attention to prevent rack surface on the right side
from being damaged by a tool or the like, otherwise oil
leakage might be caused.
NOTE:
While tightening ball joint, hold rack with ST to prevent it
from revolving.
22
4-3SERVICE PROCEDURE
3. Steering Gearbox (Power Steering System) [LHD model]
Page 1130 of 2890
G4M0120
7) Bend lock washer using a chisel.
CAUTION:
Be careful not to scratch rack when bending lock
washer.
G4M0122
8) Rack and pinion backlash adjustment
(1) Loosen adjusting screw.
(2) Rotate input shaft so that rack is in the straight
ahead direction.
(3) Apply grease to sleeve.
�
1Sleeve
�
2Spring
�
3Lock nut
�
4Adjusting screw
G4M0121
(4) Tighten adjusting screw by two threads.
G4M0662
(5) Apply liquid packing to at least 1/3 of entire perim-
eter of adjusting screw thread.
Liquid packing:
THREE BOND 1141
(6) Tighten adjusting screw to 15 N⋅m (1.5 kg-m, 11
ft-lb) and back off 26°.
(7) Install lock nut. While holding adjusting screw with
a wrench, tighten lock nut using ST.
ST 926230000 SPANNER
Tightening torque (Lock nut):
39±10 N⋅m (4.0±1.0 kg-m, 29±7 ft-lb)
NOTE:
�Hold adjusting screw with a wrench to prevent it from
turning while tightening lock nut.
23
4-3SERVICE PROCEDURE
3. Steering Gearbox (Power Steering System) [LHD model]
Page 1131 of 2890
![SUBARU LEGACY 1996 Service Repair Manual �Make adjustment so that steering wheel can be rotated
fully from lock to lock without binding.
9) Check for service limit as per article of“Service limit”.
<Ref. to 4-3 [W3C1].> Make replacement](/manual-img/17/57433/w960_57433-1130.png "SUBARU LEGACY 1996 Service Repair Manual �Make adjustment so that steering wheel can be rotated
fully from lock to lock without binding.
9) Check for service limit as per article of“Service limit”.
<Ref. to 4-3 [W3C1].> Make replacement")
�Make adjustment so that steering wheel can be rotated
fully from lock to lock without binding.
9) Check for service limit as per article of“Service limit”.
Make replacement and adjustment
if necessary.
10) Install boot and mounting rubber to housing.
NOTE:
Apply grease through small hole in boot.
G4M0123
11) Fit clip (large) to boot, and then install boot to gearbox
while holding boot flange.
After installing boot, fold back boot flange to the extent that
large clip can not be seen.
NOTE:
�Before installing boot, be sure to apply grease to the
groove of tie-rod.
�Install fitting portions of boots to the following portions in
both sides of assembled steering gearbox.
1. The groove on gearbox
2. The groove on the rod
�Make sure that boot is installed without unusual inflation
or deflation.
G4M0124
12) Turn boot until it seats well on gearbox and rubber
mounting, then bend boot flange back.
G4M0125
13) Fix boot end with clip (small).
CAUTION:
Use screwdriver with blunted tip to prevent boot from
damage, when installing.
NOTE:
After installing, check boot end is positioned into groove on
tie-rod.
24
4-3SERVICE PROCEDURE
3. Steering Gearbox (Power Steering System) [LHD model]
Page 1132 of 2890
 If tie-rod end was removed, screw in lock nut and tie-
rod end to screwed portion of tie-rod, and tighten lock nut
temporarily in a position as shown in figure.
Installed tie-rod length: L")
G4M0126
14) If tie-rod end was removed, screw in lock nut and tie-
rod end to screwed portion of tie-rod, and tighten lock nut
temporarily in a position as shown in figure.
Installed tie-rod length: L
15 mm (0.59 in)
NOTE:
Pay attention to difference between right and left tie-rod
ends.
G4M0127
15) Inspect gearbox as follows:
A. Holding tie-rod end, repeat lock to lock two or three
times as quickly as possible.
B. Holding tie-rod end, turn it slowly at a radius one or two
times as large as possible.
After all, make sure that boot is installed in the specified
position without deflation.
16) Remove gearbox from ST.
ST 926200000 STAND
17) Install four pipes on gearbox.
(1) Connect pipes A and B to four pipe joints of gear-
box. Connect upper pipe B first, and lower pipe A.
Tightening torque:
13±3 N⋅m (1.3±0.3 kg-m, 9.4±2.2 ft-lb)
G4M0101
(2) Connect pipes C and D to gearbox.
Connect lower pipe C first, and upper pipe D second.
Tightening torque:
15±5 N⋅m (1.5±0.5 kg-m, 10.8±3.6 ft-lb)
G4M0102
E: INSTALLATION
1) Insert gearbox into crossmember, being careful not to
damage gearbox boot.
2) Tighten gearbox to crossmember bracket via clamp with
bolt to the specified torque.
Tightening torque:
59±12 N⋅m (6.0±1.2 kg-m, 43±9 ft-lb)
25
4-3SERVICE PROCEDURE
3. Steering Gearbox (Power Steering System) [LHD model]

 Bend lock washer using a chisel.
CAUTION:
Be careful not to scratch rack when bending lock
washer.
G4M0122
8) Rack and pinion backlash adjustment
(1) Loosen adjusting screw.
(2) Rotate inpu")