Page 1648 of 2890
 Re-insert the tools disconnected in step 3) into plug
hole, and set them again over the spark plug.
7) Set extension and ratchet in turn onto the connected
tools in plug hole, and tighten s")
B6M0574
6) Re-insert the tools disconnected in step 3) into plug
hole, and set them again over the spark plug.
7) Set extension and ratchet in turn onto the connected
tools in plug hole, and tighten spark plug to the specified
torque.
Tightening torque (spark plug):
20.6±2.9 N⋅m (2.10±0.30 kg-m, 15.19±2.14 ft-lb)
CAUTION:
The above torque should be only applied to new spark
plugs without oil on their threads.
In case their threads are lubricated, the torque should
be reduced by approximately 1/3 of the specified
torque in order to avoid over-stressing.
8) The subsequent procedures are in reverse order of #1
spark plug removal.
2. #2 SPARK PLUG
CAUTION:
When installing spark plug, cover the ATF cooling
pipes with a rag to prevent damage.
1) Carry out steps 1), 2), 3), 4), 6) and 7) of #1 spark plug
installation procedure.
2) Proceed in reverse order of #2 spark plug removal.
3. #3 SPARK PLUG
1) Carry out steps 1) through 7) of #1 spark plug installa-
tion procedure.
2) Proceed in reverse order of #3 spark plug removal.
4. #4 SPARK PLUG
CAUTION:
When installing spark plug, cover the ATF cooling
pipes with a rag to prevent damage.
1) Carry out steps 1), 2), 3), 4), 6) and 7) of #1 spark plug
installation procedure.
2) Proceed in reverse order of #4 spark plug removal.
B6M0160
4. Ignition Coil
A: REMOVAL AND INSTALLATION
1) Disconnect battery ground cable.
2) Disconnect connector from ignition coil.
3) Remove ignition coil.
4) Installation is in the reverse order of removal.
CAUTION:
Be sure to connect wires to their proper positions.
Failure to do so will damage unit.
34
6-1SERVICE PROCEDURE
3. Spark Plug - 4. Ignition Coil
Page 1649 of 2890
 Re-insert the tools disconnected in step 3) into plug
hole, and set them again over the spark plug.
7) Set extension and ratchet in turn onto the connected
tools in plug hole, and tighten s")
B6M0574
6) Re-insert the tools disconnected in step 3) into plug
hole, and set them again over the spark plug.
7) Set extension and ratchet in turn onto the connected
tools in plug hole, and tighten spark plug to the specified
torque.
Tightening torque (spark plug):
20.6±2.9 N⋅m (2.10±0.30 kg-m, 15.19±2.14 ft-lb)
CAUTION:
The above torque should be only applied to new spark
plugs without oil on their threads.
In case their threads are lubricated, the torque should
be reduced by approximately 1/3 of the specified
torque in order to avoid over-stressing.
8) The subsequent procedures are in reverse order of #1
spark plug removal.
2. #2 SPARK PLUG
CAUTION:
When installing spark plug, cover the ATF cooling
pipes with a rag to prevent damage.
1) Carry out steps 1), 2), 3), 4), 6) and 7) of #1 spark plug
installation procedure.
2) Proceed in reverse order of #2 spark plug removal.
3. #3 SPARK PLUG
1) Carry out steps 1) through 7) of #1 spark plug installa-
tion procedure.
2) Proceed in reverse order of #3 spark plug removal.
4. #4 SPARK PLUG
CAUTION:
When installing spark plug, cover the ATF cooling
pipes with a rag to prevent damage.
1) Carry out steps 1), 2), 3), 4), 6) and 7) of #1 spark plug
installation procedure.
2) Proceed in reverse order of #4 spark plug removal.
B6M0160
4. Ignition Coil
A: REMOVAL AND INSTALLATION
1) Disconnect battery ground cable.
2) Disconnect connector from ignition coil.
3) Remove ignition coil.
4) Installation is in the reverse order of removal.
CAUTION:
Be sure to connect wires to their proper positions.
Failure to do so will damage unit.
34
6-1SERVICE PROCEDURE
3. Spark Plug - 4. Ignition Coil
Page 1845 of 2890
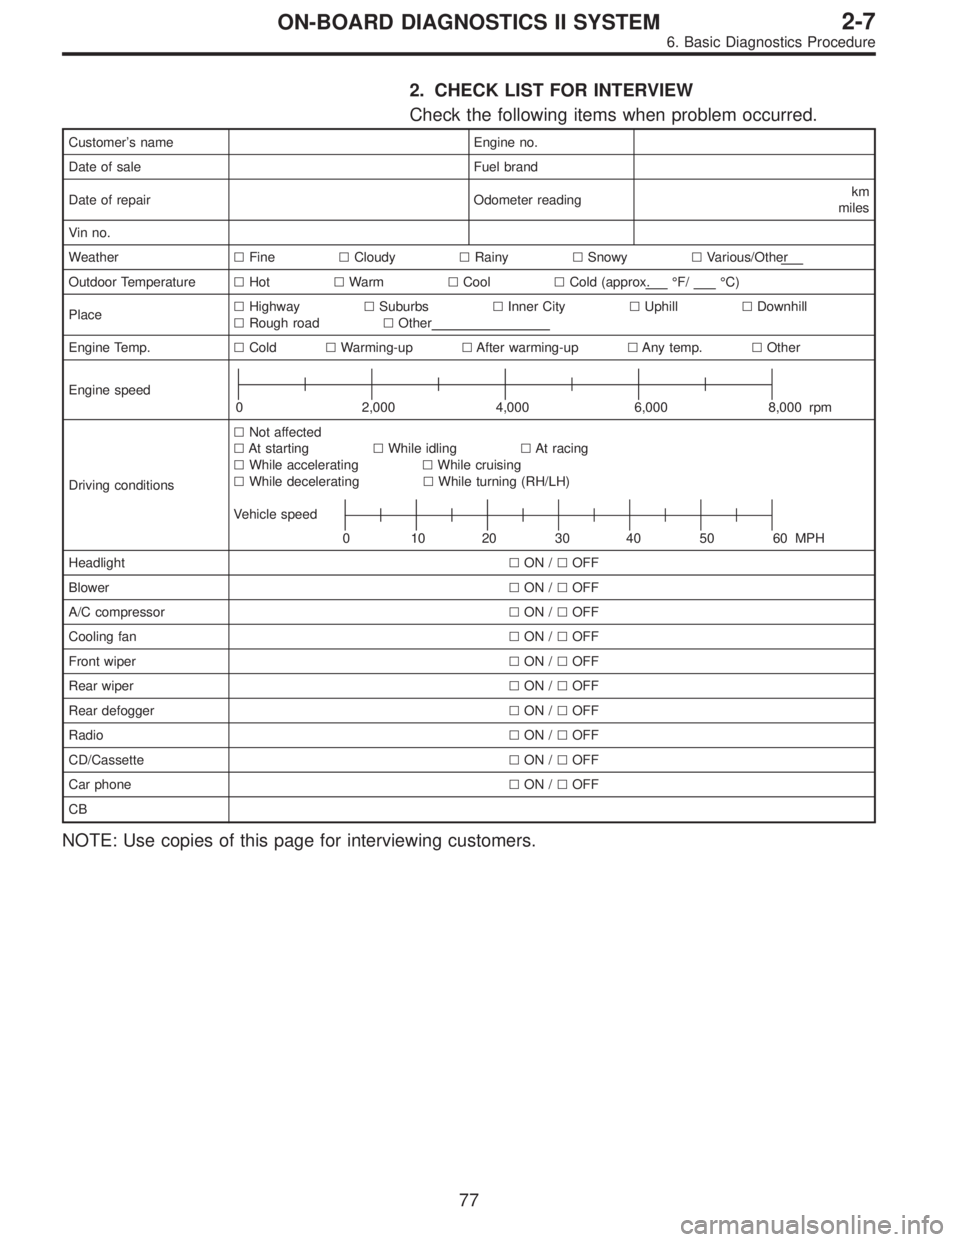
2. CHECK LIST FOR INTERVIEW
Check the following items when problem occurred.
Customer’s name Engine no.
Date of sale Fuel brand
Date of repair Odometer readingkm
miles
Vin no.
Weather�Fine�Cloudy�Rainy�Snowy�Various/Other
Outdoor Temperature�Hot�Warm�Cool�Cold (approx.°F/°C)
Place�Highway�Suburbs�Inner City�Uphill�Downhill
�Rough road�Other
Engine Temp.�Cold�Warming-up�After warming-up�Any temp.�Other
Engine speed
0 2,000 4,000 6,000 8,000 rpm
Driving conditions�Not affected
�At starting�While idling�At racing
�While accelerating�While cruising
�While decelerating�While turning (RH/LH)
Vehicle speed
0 102030405060MPH
Headlight�ON /�OFF
Blower�ON /�OFF
A/C compressor�ON /�OFF
Cooling fan�ON /�OFF
Front wiper�ON /�OFF
Rear wiper�ON /�OFF
Rear defogger�ON /�OFF
Radio�ON /�OFF
CD/Cassette�ON /�OFF
Car phone�ON /�OFF
CB
NOTE: Use copies of this page for interviewing customers.
77
2-7ON-BOARD DIAGNOSTICS II SYSTEM
6. Basic Diagnostics Procedure
Page 2126 of 2890
OBD0538
BR: DTC P1502
—RADIATOR FAN FUNCTION PROBLEM
(FAN
—F)—
DTC DETECTING CONDITION:
�Two consecutive trips with fault
TROUBLE SYMPTOM:
�Occurrence of noise
�Overheating
10BR1Check any other DTC (beside DTC P1502) on
display.
CAUTION:
After repair or replacement of faulty parts, conduct
CLEAR MEMORY and INSPECTION MODES.
NOTE:
If the vehicle, with the engine idling, is placed very close to
a wall or another vehicle, preventing normal cooling
function, the OBD system may detect malfunction.
358
2-7ON-BOARD DIAGNOSTICS II SYSTEM
10. Diagnostics Chart with Trouble Code
Page 2128 of 2890
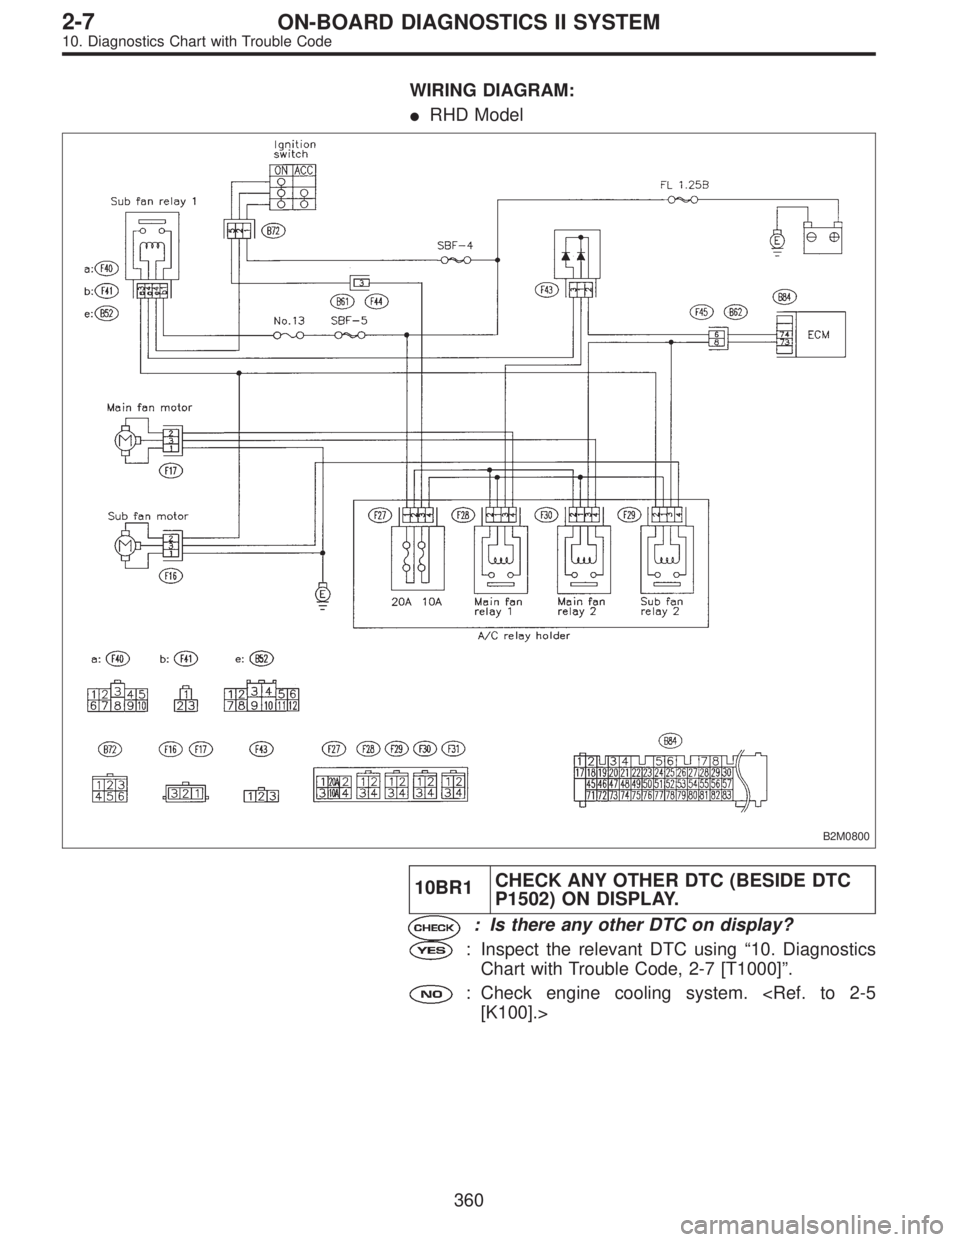
WIRING DIAGRAM:
�RHD Model
B2M0800
10BR1CHECK ANY OTHER DTC (BESIDE DTC
P1502) ON DISPLAY.
: Is there any other DTC on display?
: Inspect the relevant DTC using“10. Diagnostics
Chart with Trouble Code, 2-7 [T1000]”.
: Check engine cooling system.
[K100].>
360
2-7ON-BOARD DIAGNOSTICS II SYSTEM
10. Diagnostics Chart with Trouble Code