1996 HONDA ODYSSEY fuel
[x] Cancel search: fuelPage 1 of 240

1996 Odyssey Online Reference Owner's Manual
Use these links (and links throughout this manual) to navigate through this reference.
For a printed owner's manual, click on authorized manuals or go to www.helminc.com.
Contents
Introduction........................................................................\
........................................................................... i
A Few Words About Safety ........................................................................\
................................................ ii
Driver and Passenger Safety ........................................................................\
............................................. 3
Proper use and care of your vehicle's seat belts, and Supplemental Restraint System.
Instruments and Controls........................................................................\
...................................................31
Instrument panel in
dicator and gauge, and how to use dashboard and steering column controls.
Comfort and Convenience Features........................................................................\
.................................73
How t o
op
erate the climate control system, the audio system, and other convenience features.
Before Driving ........................................................................\
.................................................................... 107
What gasoli n
e to u
se, how to break-in your new vehicle, and how to load luggage and other cargo.
Driving........................................................................\
.................................................................................. 117
The proper way t o
start the engine, shift the tr ansmission, and park, plus towing a trailer.
Maintenance........................................................................\
........................................................................ 135
T h
e Ma
intenance Schedule shows you when you need to take your vehicle to the dealer.
Appearance Care........................................................................\
................................................................ 183
T i
ps on cl
eaning and protecting your vehicle. Things to look for if your car ever needs body repairs.
Taking Care of the Unexpected........................................................................\
...................................... 191
This section covers sever
a
l problems motorists someti mes experience, and how to handle them.
Technical Information........................................................................\
...................................................... 215
ID numbers, dimens ions, capacities, and techn
ical information.
Warranty and Customer Relations (U.S. and Canada)..................................................................... 227
A summary of th
e warr
anties covering your new Honda, and how to contact us.
Authorized Manuals (U.S. only)........................................................................\
...................................... 233
How t o
order
manuals and other technical literature.
Index ........................................................................\
......................................................................................... I
Gas Station Information
Information you need when you pull up to the fuel pump.
Owner's Identification Form
ProCarManuals.com
Page 32 of 240
Instruments and Controls
This section gives information about the controls and displays thatcontribute to the daily operation of
your Honda. All the essential controls are within easy reach.
Control Locations............................ 32
Indicator Lights................................ 33
Gauges.............................................. 37
Speedometer................................ 37
Trip Meter.................................... 37
Odometer......................................
37
Temperature Gauge................... .
38
Fuel Gauge.................................. 38
Maintenanc
e Required
Indicator...................................
38
Controls Nea r
the Steering
Wheel........................................ 39
Headlights.................................... 40
Daytime Running Lights............. 40
Instrument Panel Brightness..... 41
Turn Signals................................. 41
Windshield Wipers...................... 42
Windshield Washers................... 42 Rear Window Wiper and Washer...................................... 43
Hazard Warning........................... 43
Rear Window Defogger.............. 43
Steering Wheel Adjustment....... 44
Steering Wheel Controls................ 46 Cruise Control.............................. 46
Keys and Locks................................ 49
Keys............................................... 49
Ignition Switch............................. 49
Power Door Locks....................... 50
Remote Transmitter.................... 51Childproof Door Locks............... 52
Tailgate......................................... 52
Glove Box..................................... 53
Seats.................................................. 54
Passenger Seating....................... 54
Seat Adjustments......................... 54
Driver's Seat Power Height Adjustment............................... 55
Head Restraints........................... 56 Third Seat Access........................ 56
Removing the Second Seats in the Six-Passenger Model.... 57
Folding the Second Seats in the Seven-Passenger
Model....................................
58
Reclining th e
Second Seat.......... 59
Folding the Third Seat
in All Models............................ 60
Power Windows............................... 62
Sunroof.............................................. 63
Mirrors.............................................. 64
Adjusting the Power Mirrors..... 64
Parking Brake..................................
65
Digital Clock.................................... .
66
Beverage Holder.............................. 66
Dashboard Compartment............... 68 Center Pocket.................................. 68
Vanity Mirror................................... 68 Cigarette Lighter............................. 69
Ashtrays............................................ 69 Interior Lights.................................. 70
Ceiling Lights............................... 70
Spotlights...................................... 70
Tailgate Light............................... 71 Courtesy Lights........................... 71
Instruments and ControlsProCarManuals.comMain Menu s t
Page 33 of 240
Control Locations
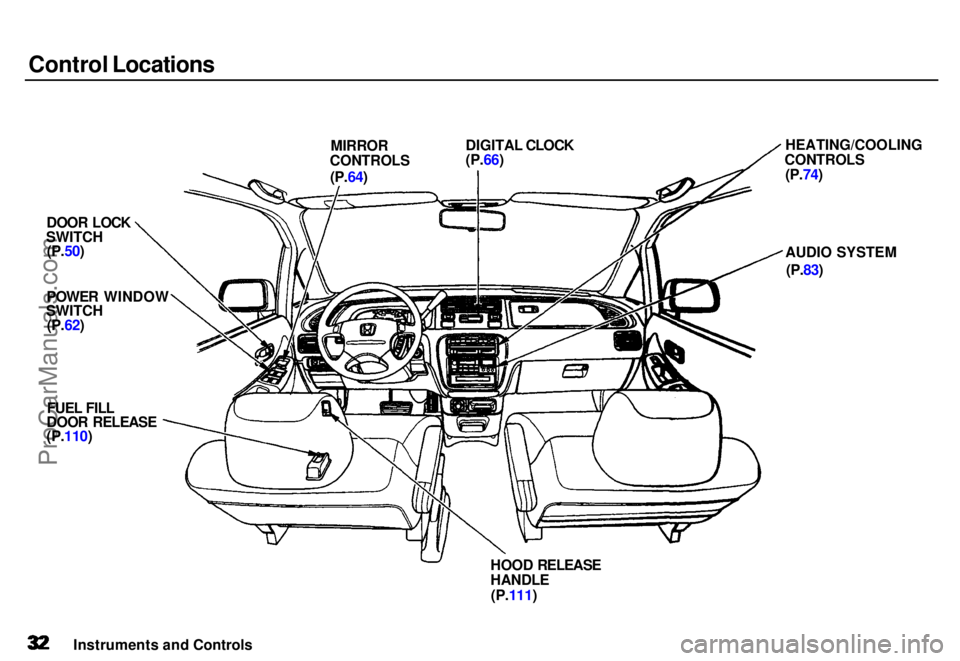
MIRROR
CONTROLS DIGITAL CLOCK
(P.66)
DOOR LOCK
SWITCH
(P.50)
POWER WINDO
W
SWITCH
(P.62)
FUEL FILL
DOOR RELEASE
(P.110)
HEATING/COOLIN
G
CONTROLS (P.74)
AUDIO SYSTEM
(P.83)
HOOD
RELEASE
HANDLE
(P.111)
Instruments and Controls
(P.64)
ProCarManuals.comMain Menu s t Table of Contents
Page 34 of 240
Indicator Lights
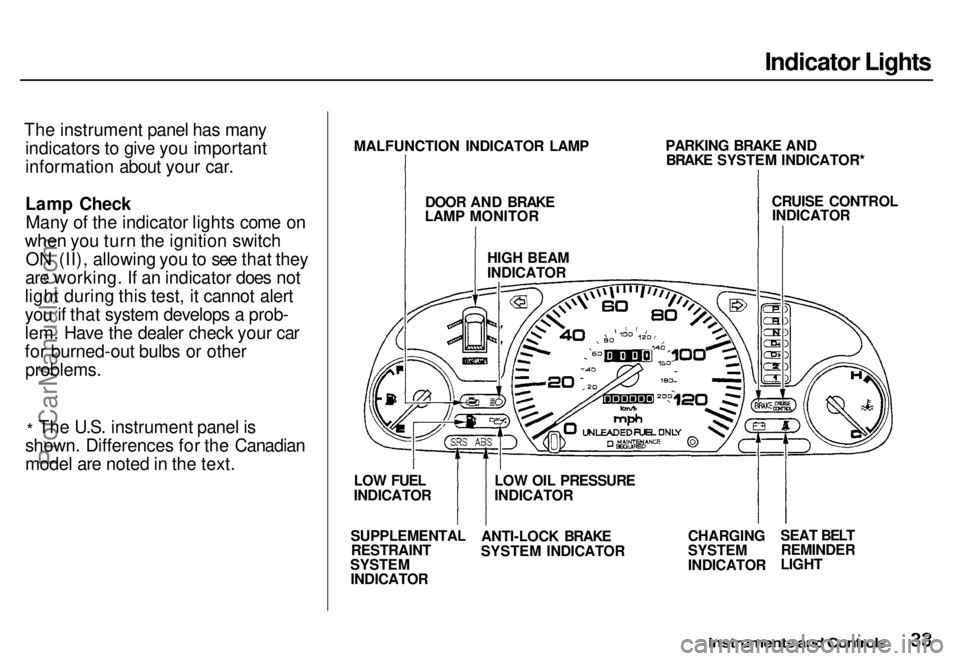
The instrument panel has many indicators to give you important
information about your car.
Lamp CheckMany of the indicator lights come on
when you turn the ignition switch ON (II), allowing you to see that they
are working. If an indicator does not
light during this test, it cannot alert
you if that system develops a prob-
lem. Have the dealer check your car
for burned-out bulbs or other
problems.
* The U.S. instrument panel is
shown. Differences for the Canadian
model are noted in the text.
Instruments and Controls
MALFUNCTION INDICATOR LAMP
DOOR AND BRAKE
LAMP MONITOR
HIGH BEAM
INDICATOR
PARKING BRAKE AND
BRAKE SYSTEM INDICATOR*
CRUISE CONTROL
INDICATOR
CHARGING
SYSTEM
INDICATOR
SEAT BELT
REMINDER
LIGHT
LOW OIL PRESSURE
INDICATOR
ANTI-LOCK BRAKE
SYSTEM INDICATOR
SUPPLEMENTAL
RESTRAINT
SYSTEM
INDICATOR
LOW FUEL
INDICATORProCarManuals.comMain Menu s t Table of Contents
Page 37 of 240
Indicator Lights
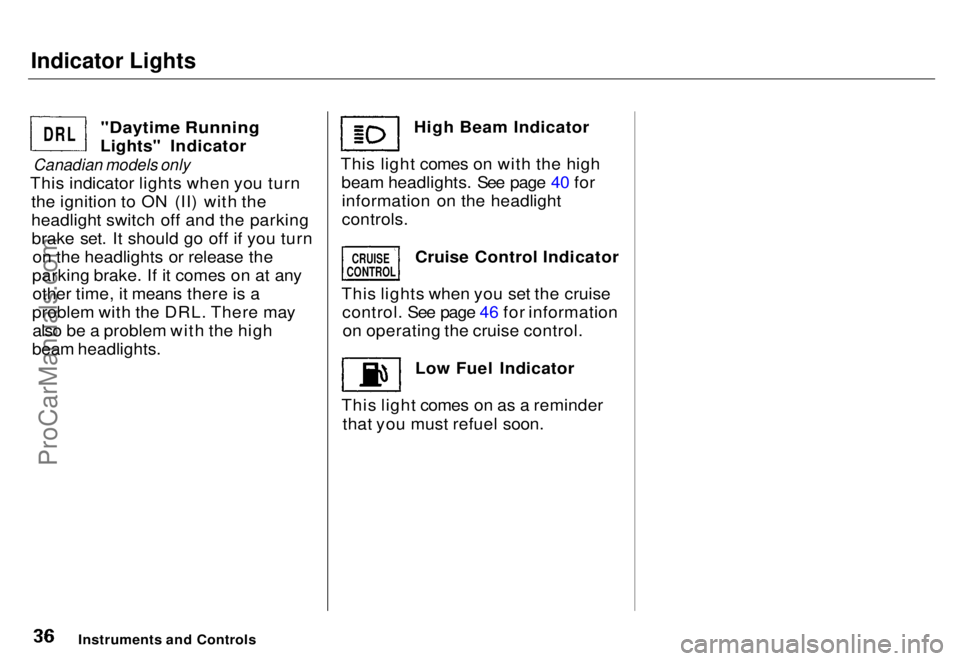
"Daytime Running
Lights" Indicator
Canadian models only
This indicator lights when you turn the ignition to ON (II) with the
headlight switch off and the parkingbrake set. It should go off if you turn on the headlights or release the
parking brake. If it comes on at any other time, it means there is a
problem with the DRL. There may also be a problem with the high
beam headlights. High Beam Indicator
This light comes on with the high beam headlights. See page 40 forinformation on the headlight
controls.
Cruise Control Indicator
This lights when you set the cruise control. See page 46 for informationon operating the cruise control.
Low Fuel Indicator
This light comes on as a reminder that you must refuel soon.
Instruments and Controls
DRL
CRUISE
CONTROL
ProCarManuals.comMain Menu s t Table of Contents
Page 38 of 240
Gauges
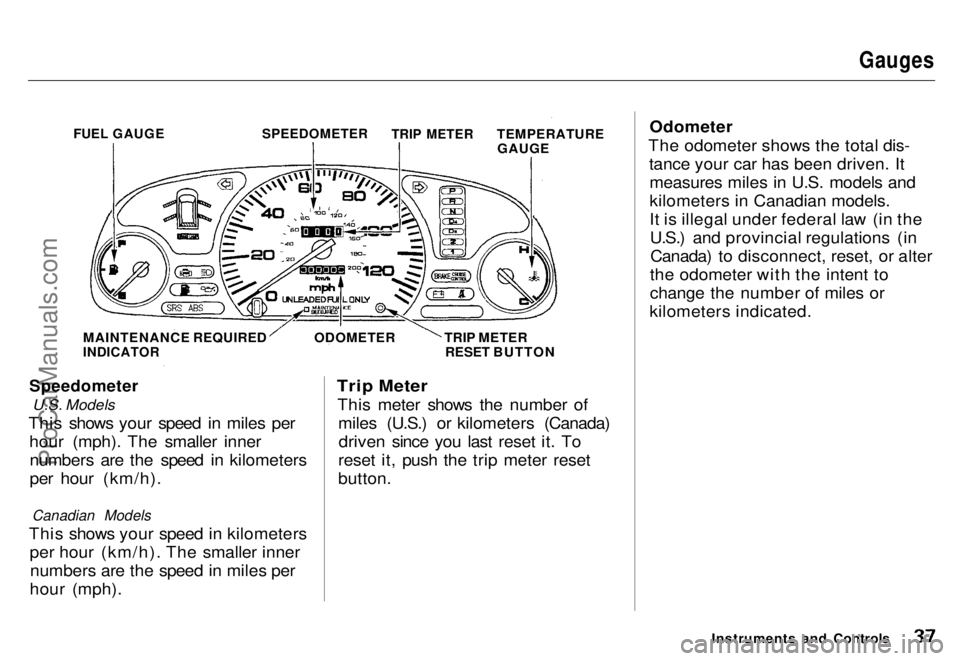
Speedometer
U.S. Models
This shows your speed in miles per hour (mph). The smaller innernumbers are the speed in kilometers
per hour (km/h).
Canadian Models
This shows your speed in kilometers per hour (km/h). The smaller innernumbers are the speed in miles per
hour (mph).
Trip Meter
This meter shows the number of miles (U.S.) or kilometers (Canada)driven since you last reset it. To
reset it, push the trip meter reset
button. Odometer
The odometer shows the total dis- tance your car has been driven. Itmeasures miles in U.S. models and
kilometers in Canadian models.
It is illegal under federal law (in theU.S.) and provincial regulations (inCanada) to disconnect, reset, or alter
the odometer with the intent to
change the number of miles or
kilometers indicated.
Instruments and Controls
FUEL GAUGE
SPEEDOMETER
TRIP METER
TEMPERATURE
GAUGE
MAINTENANCE REQUIRED
INDICATOR
ODOMETER
TRIP METER
RESET BUTTONProCarManuals.comMain Menu s t Table of Contents
Page 39 of 240

Gauges
Temperature Gauge This shows the temperature of the engine's coolant. During normal
operation, the pointer should rise
from the bottom white mark to about
the middle of the gauge. In severe driving conditions, such as very hot
weather or a long period of uphill driving, the pointer may rise to the
upper white mark. If it reaches the
red "H" (Hot) mark, pull safely to
the side of the road. Turn to page 202 for instructions and precautions
on checking the engine's cooling
system.
Fuel Gauge
This shows how much fuel you have. It is most accurate when the car is on
level ground. It may show slightly
more or less than the actual amount
when you are driving on curvy or hilly roads. The gauge stays at the same fuel
level reading after you turn off theignition. When you add fuel, thegauge slowly changes to the new
reading after you turn the ignition
back ON (II).
Maintenance Required Indicator
This indicator reminds you that it is nearing 12,000 km (7,500 miles)since the last scheduled maintenance.
Refer to the Maintenance Schedules
for Normal and Severe driving conditions on page 140 . When the distance driven since the
last scheduled maintenance nears 12,000 km (7,500 miles), the
indicator will turn yellow. If you
exceed 12,000 km (7,500 miles), the indicator will turn red.
Your dealer will reset the indicator when he performs the scheduledmaintenance. If someone else
performs the maintenance, reset the indicator by inserting your key in theslot beside the indicator.
Instruments and Controls SLOT
INDICATORProCarManuals.comMain Menu s t Table of Contents
Page 107 of 240
Before Driving
Before you begin driving your Honda,
you should know what gasoline to use, and how to check the levels ofimportant fluids. You also need to
know how to properly stow luggage
or packages. This section will help
you. If you plan to add any accesso- ries to your car, please read theinformation in this section first. Break-in Period.............................. 108
Gasoline.......................................... 108
Oxygenated Fuels...................... 108
Driving in Foreign Countries... 109
Service Station Procedures .......... 110 Filling the Fuel Tank................. 110Opening the Hood..................... 111
Fuel Economy................................ 114
Vehicle Condition...................... 114Driving Habits............................ 114
Accessories..................................... 115
Loading Cargo................................ 116
Before DrivingProCarManuals.comMain Menu s t