1996 HONDA ODYSSEY turn signal
[x] Cancel search: turn signalPage 32 of 240

Instruments and Controls
This section gives information about the controls and displays thatcontribute to the daily operation of
your Honda. All the essential controls are within easy reach.
Control Locations............................ 32
Indicator Lights................................ 33
Gauges.............................................. 37
Speedometer................................ 37
Trip Meter.................................... 37
Odometer......................................
37
Temperature Gauge................... .
38
Fuel Gauge.................................. 38
Maintenanc
e Required
Indicator...................................
38
Controls Nea r
the Steering
Wheel........................................ 39
Headlights.................................... 40
Daytime Running Lights............. 40
Instrument Panel Brightness..... 41
Turn Signals................................. 41
Windshield Wipers...................... 42
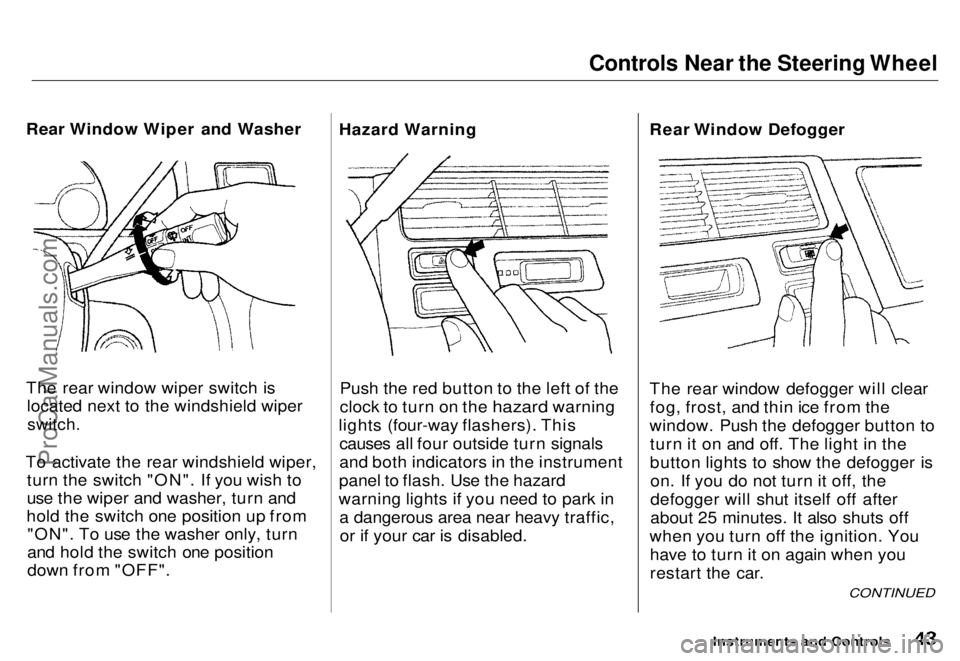
Windshield Washers................... 42 Rear Window Wiper and Washer...................................... 43
Hazard Warning........................... 43
Rear Window Defogger.............. 43
Steering Wheel Adjustment....... 44
Steering Wheel Controls................ 46 Cruise Control.............................. 46
Keys and Locks................................ 49
Keys............................................... 49
Ignition Switch............................. 49
Power Door Locks....................... 50
Remote Transmitter.................... 51Childproof Door Locks............... 52
Tailgate......................................... 52
Glove Box..................................... 53
Seats.................................................. 54
Passenger Seating....................... 54
Seat Adjustments......................... 54
Driver's Seat Power Height Adjustment............................... 55
Head Restraints........................... 56 Third Seat Access........................ 56
Removing the Second Seats in the Six-Passenger Model.... 57
Folding the Second Seats in the Seven-Passenger
Model....................................
58
Reclining th e
Second Seat.......... 59
Folding the Third Seat
in All Models............................ 60
Power Windows............................... 62
Sunroof.............................................. 63
Mirrors.............................................. 64
Adjusting the Power Mirrors..... 64
Parking Brake..................................
65
Digital Clock.................................... .
66
Beverage Holder.............................. 66
Dashboard Compartment............... 68 Center Pocket.................................. 68
Vanity Mirror................................... 68 Cigarette Lighter............................. 69
Ashtrays............................................ 69 Interior Lights.................................. 70
Ceiling Lights............................... 70
Spotlights...................................... 70
Tailgate Light............................... 71 Courtesy Lights........................... 71
Instruments and ControlsProCarManuals.comMain Menu s t
Page 36 of 240
 Indicator
Canada
Only on cars equipped with ABS (see
page 125)
This light normally comes on when you turn the ignition ON (II) andgoes off afte")
Indicator Lights
U.S.
Anti-lock Brake System
(ABS) Indicator
Canada
Only on cars equipped with ABS (see
page 125)
This light normally comes on when you turn the ignition ON (II) andgoes off after the engine starts. If itcomes on at any other time, there is
a problem in the ABS. If this happens,
take the car to your dealer to have it checked. With the light on, your car
still has normal braking ability but no
anti-lock.
Turn Signal and
Hazard WarningIndicators
The left or right turn signal light
blinks when you signal a lane change
or turn. If the light does not blink or
blinks rapidly, it usually means one
of the turn signal bulbs is burned out (see page 178). Replace the bulb as
soon as possible, since other drivers
cannot see that you are signalling.
When you turn on the Hazard
Warning switch, both turn signal lights blink. All turn signals on theoutside of the car should flash. Door and Brake Lamp Monitor
The appropriate light comes on in this display if the tailgate or any dooris not closed tightly. If a brake lightdoes not work, the BRAKE LAMP
indicator comes on when you push
the brake pedal with the ignition switch ON (II).
A burned out brake light is a hazard when drivers behind you cannot tell
you are braking. Have your brake lights repaired right away.
All the lights in the monitor display come on for a few seconds when you
turn the ignition switch ON (II).
Instruments and Controls
ABSProCarManuals.comMain Menu s t Table of Contents
Page 40 of 240

Controls Near the Steering Wheel
The two levers on the steering column contain controls for driving
features you use most often. The left lever controls the turn signals,
headlights, and high beams. The right lever controls the windshield
wipers.
The rear window defogger switch and hazard warning switch are on
the dashboard under the center air
vent.
The controls near the left air vent are for the sunroof, cruise control
and instrument panel brightness.
The lever on the underside of the steering column allows you to tilt the
steering wheel.
Instruments and Controls
HAZARD WARNING LIGHT
SHIFT LEVER
REAR WINDOW
DEFOGGER
HORN
BUTTONS
SUNROOF
SWITCH
CRUISE
CONTROL
INSTRUMENT
BRIGHTNESS
HEADLIGHTS/
TURN SIGNALS
TILT
ADJUSTMENT
WINDSHIELD
WIPERS/WASHERSProCarManuals.comMain Menu s t Table of Contents
Page 41 of 240

Controls Near the Steering Wheel
Headlights
The rotating switch on the left lever controls the lights. Turning this switch to the first position
turns on the parking lights, taillights, instrument panel lights, side-marker
lights, and rear license plate lights.
Turning the switch to the second position turns on the
headlights. If you leave the lights on with the
ignition switch in ACCESSORY (I)
or LOCK (0), you will hear a
reminder chime when you open the
driver's door.
To change between low beams and high beams, pull back on the turnsignal lever until you hear a click,
then let go. The blue high beam indicator will light (see page 36). To flash the high beams, pull back
and hold the turn signal lever.
Release the lever and the high
beams will go off.
The high beams will stay on for as long as you hold the lever, no matter
what position the headlight switch is
in.
Daytime Running Lights (Canadian Models)
With the headlight switch off, the high beam headlights come on with
reduced brightness when you turn
the ignition switch to ON (II) and release the parking brake. They
remain on until you turn the ignition
off, even if you set the parking brake
The headlights revert to normal operation when you turn them on
with the switch.
Instruments and ControlsProCarManuals.comMain Menu s t Table of Contents
Page 42 of 240

Controls Near the Steering Wheel
Instrument Panel Brightness
The knob on the dashboard to the left of the steering column controlsthe brightness of the instrument panel lights. Push the knob to get it
to pop out. Turn the knob to adjust the brightness. Turn Signals
Signal a turn or lane change with this
lever. Push down on the lever tosignal a left turn, and up to signal aright turn. If you push it up or down
all the way, the turn signal continues
to blink even when you release the
lever. It shuts off automatically as
you complete the turn. To signal a lane change, push lightly
on the turn signal lever in the proper
direction and hold it. The lever will
return to the center position as soon as you release it.
Instruments and Controls
TURN SIGNAL LEVERProCarManuals.comMain Menu s t Table of Contents
Page 44 of 240
Controls Near the Steering Wheel
Rear Window Wiper and Washer
The rear window wiper switch is located next to the windshield wiper
switch.
To activate the rear windshield wiper, turn the switch "ON". If you wish to
use the wiper and washer, turn and
hold the switch one position up from "ON". To use the washer only, turn
and hold the switch one position
down from "OFF". Hazard Warning
Push the red button to the left of the
clock to turn on the hazard warning
lights (four-way flashers). This causes all four outside turn signals
and both indicators in the instrument
panel to flash. Use the hazard
warning lights if you need to park in a dangerous area near heavy traffic,or if your car is disabled. Rear Window Defogger
The rear window defogger will clear
fog, frost, and thin ice from the
window. Push the defogger button to turn it on and off. The light in the
button lights to show the defogger ison. If you do not turn it off, the
defogger will shut itself off after
about 25 minutes. It also shuts off
when you turn off the ignition. You have to turn it on again when you
restart the car.
Instruments and Controls
CONTINUED
ProCarManuals.comMain Menu s t Table of Contents
Page 93 of 240
 or ON (II). Turn the system on by pushing the PWR/
VOL knob.
Adjust the volume by turning the PWR/VOL knob.
The band and")
Audio System
Operating the Radio
The ignition switch must be in
ACCESSORY (I) or ON (II). Turn the system on by pushing the PWR/
VOL knob.
Adjust the volume by turning the PWR/VOL knob.
The band and frequency that the radio was last tuned to is displayed.
To change bands, press the AM or FM1/FM2 button. On the FM band,ST will be displayed if the station is
broadcasting in stereo. Stereo reproduction on AM is not available.
You can use any of three methods to find radio stations on the selectedband: TUNE, SEEK, or the Preset
buttons.
TUNE — Use the TUNE/SEEK
switch to tune the radio to a desired
frequency. Push the switch up to
tune to a higher frequency, and push the switch down to tune to a lower
frequency. The frequency numbers
will start to change rapidly. Release the switch when the display reaches
the desired frequency. To change
the frequency in small increments,push and release the TUNE/SEEKswitch quickly. SEEK — The SEEK function
searches the band for a station with
a strong signal. To activate it, push
the TUNE/SEEK switch until you
hear a beep, then release it. Depending on which way you pushed
the switch, the system scans upwardor downward from the current
frequency. It stops when it finds a
station with a strong signal.
Preset — You can store the fre- quencies of your favorite radio
stations in the six preset buttons.
Each button will store one frequency
on the AM band, and two on the FM
band.
CONTINUED
Comfort and Convenience FeaturesProCarManuals.comMain Menu s t Table of Contents
Page 95 of 240

Audio System
AUTO SELECT — If you are traveling far from home and can no longer receive the stations youpreset, you can use the Auto Select
feature to find stations in the local
area.
To activate Auto Select, press the A. SEL button. A. SEL will appear in
the display, and the system will go
into scan mode for several seconds.It automatically scans both bands,
looking for stations with strong
signals. It stores the frequencies of
six AM stations and twelve FM
stations in the preset buttons. You
can then use the preset buttons to select those stations.
If you are in a remote area, Auto
Select may not find six strong AM
stations or twelve strong FM stations. If this happens, you will see a "0"
displayed when you press any preset
button that does not have a station
stored.
A. SEL BUTTON
TUNE/SEEK SWITCH
PRESET
BUTTONS AUTO SELECT LIGHT
With Auto Select on, you cannot manually store any frequencies in
the preset buttons. If you do not like
the stations found by Auto Select,
you can use the TUNE and SEEK functions to find other stations. Auto Select does not erase the
frequencies that you preset pre-
viously. When you return home, turn
off Auto Select by pressing the
A. SEL button. The preset buttons will then select the frequencies you
originally set.
Comfort and Convenience FeaturesProCarManuals.comMain Menu s t Table of Contents