Page 41 of 240

Controls Near the Steering Wheel
Headlights
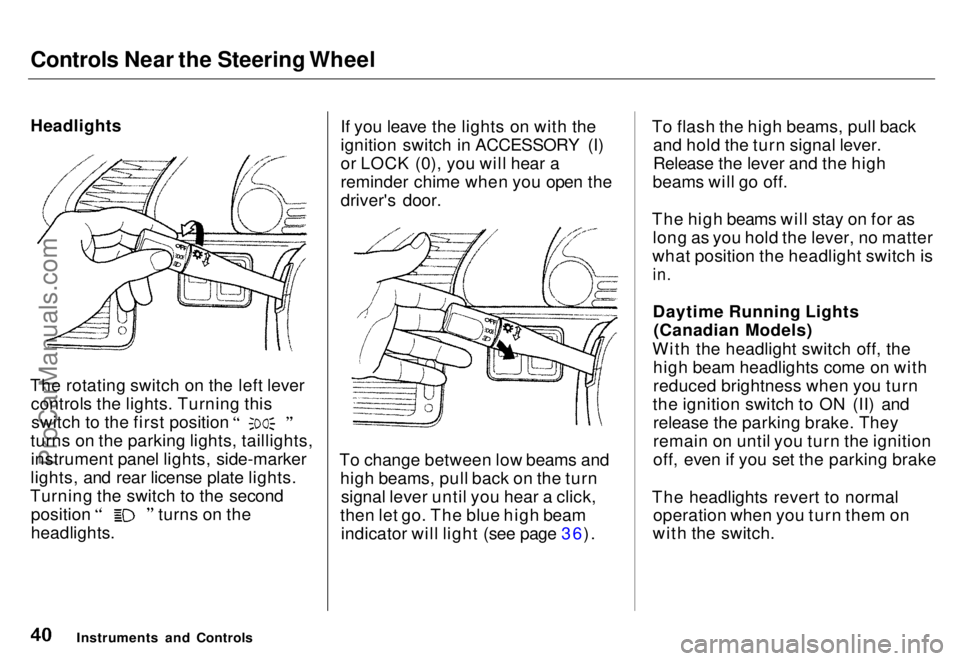
The rotating switch on the left lever controls the lights. Turning this switch to the first position
turns on the parking lights, taillights, instrument panel lights, side-marker
lights, and rear license plate lights.
Turning the switch to the second position turns on the
headlights. If you leave the lights on with the
ignition switch in ACCESSORY (I)
or LOCK (0), you will hear a
reminder chime when you open the
driver's door.
To change between low beams and high beams, pull back on the turnsignal lever until you hear a click,
then let go. The blue high beam indicator will light (see page 36). To flash the high beams, pull back
and hold the turn signal lever.
Release the lever and the high
beams will go off.
The high beams will stay on for as long as you hold the lever, no matter
what position the headlight switch is
in.
Daytime Running Lights (Canadian Models)
With the headlight switch off, the high beam headlights come on with
reduced brightness when you turn
the ignition switch to ON (II) and release the parking brake. They
remain on until you turn the ignition
off, even if you set the parking brake
The headlights revert to normal operation when you turn them on
with the switch.
Instruments and ControlsProCarManuals.comMain Menu s t Table of Contents
Page 131 of 240

Towing a Trailer
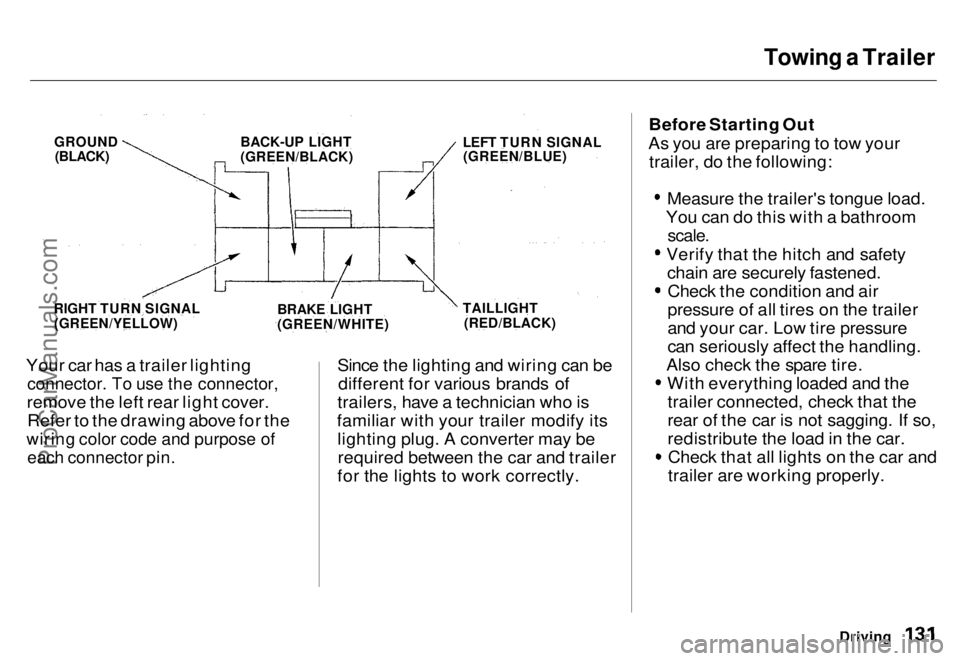
Your car has a trailer lighting
connector. To use the connector,
remove the left rear light cover. Refer to the drawing above for the
wiring color code and purpose of
each connector pin.
Since the lighting and wiring can be
different for various brands of
trailers, have a technician who is
familiar with your trailer modify its lighting plug. A converter may berequired between the car and trailer
for the lights to work correctly. Before Starting Out
As you are preparing to tow your trailer, do the following:
Measure the trailer's tongue load.
You can do this with a bathroom
scale.
Verify that the hitch and safety chain are securely fastened.Check the condition and air
pressure of all tires on the trailer
and your car. Low tire pressure
can seriously affect the handling.
Also check the spare tire. With everything loaded and thetrailer connected, check that the
rear of the car is not sagging. If so,
redistribute the load in the car.Check that all lights on the car and
trailer are working properly.
Driving
GROUND
(BLACK) BACK-UP LIGHT
(GREEN/BLACK) LEFT TURN SIGNAL
(GREEN/BLUE)
RIGHT TURN SIGNAL
(GREEN/YELLOW)
BRAKE LIGHT
(GREEN/WHITE)
TAILLIGHT
(RED/BLACK)ProCarManuals.comMain Menu s t Table of Contents
Page 144 of 240
Fluid Locations
Maintenance
BRAKE FLUID
(Gray cap)
ENGINE OIL
FILL CAP
COOLANT
RESERVOIR
AUTOMATIC
TRANSMISSION
FLUID DIPSTICK
(Yellow loop)
ENGINE OIL DIPSTICK
(Orange loop)
ANTI-LOCK BRAKE
RESERVOIR
(Gray cap)
POWER STEERING
FLUID (Red cap)
WASHER FLUID (Blue cap)ProCarManuals.comMain Menu s t Table of Contents
Page 162 of 240
Battery
TEST INDICATOR WINDOW
Check the battery condition by
looking at the test indicator window on the battery:
Blue — Good conditionRed — Add distilled water
White — Charging necessary Check the battery terminals for
corrosion (a white or yellowish
powder). To remove it, cover the terminals with a solution of bakingsoda and water. It will bubble up and
turn brown. When this stops, wash it off with plain water. Dry off the
battery with a cloth or paper towel. Coat the terminals with grease to
help prevent future corrosion.
If the terminals are severely cor-
roded, clean them with baking soda and water. Then use a wrench to
loosen and remove the cables from the terminals. Always disconnect the
negative (—) cable first and recon-nect it last. Clean the battery termi-
nals with a terminal cleaning tool or
wire brush. Reconnect and tighten
the cables, then coat the terminals
with grease.
Maintenance
CONTINUEDProCarManuals.comMain Menu s t Table of Contents