1996 HONDA ODYSSEY service
[x] Cancel search: servicePage 4 of 240

Driver and Passenger Safety
This section gives you important
information about occupant protec-
tion. It shows how to use seat belts
properly. It explains the Supple-
mental Restraint System. And it
gives useful information about how
to protect infants and children in
your car.
Your Occupant Protection System.. 4
The Seat Belt System
and How It Works...................... 5
Why Wear Seat Belts.................... 5
Important Safety Reminders........ 5
Seat Belt System Components..... 6
Lap/Shoulder Belt......................... 6
Lap Belt........................................... 7
Wearing Seat Belts Properly........ 7
Wearing a Lap/Shoulder Belt...... 7
Wearing the Lap Belt.................... 9
Advice for Pregnant Women...... 10
Seat Belt Maintenance................ 11
Supplemental Restraint System..... 12
SRS Components......................... 12
What Happens In a Crash........... 12
Important Facts About
Airbags...................................... 13
How the Driver's Airbag Works........................................ 14
How the Passenger's Airbag Works........................................ 15
How the SRS Indicator Light Works........................................ 16
System Service............................. 16
System Service Precautions....... 17
Additional Safety Information........ 18 Seat-back Position........................ 18
Head Restraint Position.............. 18 Door Locks................................... 19
Storing Cargo Safely................... 19
Driving with Pets......................... 19
Child Safety...................................... 20 Where Should Children Sit?....... 20Important Safety Reminders...... 21General Guidelines for Restraining Children Under 18 kg (40 Ibs) ............... 22
Restraining
an Infant Who WeighsLess Than 9 kg (20 Ibs).......... 22
Restraining
a Child Who Weighs Between9 and 18 kg (20 and 40 Ibs)..... 23
Restraining a Child Who Weighs Over 18 kg (40 Ibs).................. 24
Securing a Child Seat with a Lap/Shoulder Belt................... 25
Using Child Restraints with Tethers............................. 26
Storing a Child Seat..................... 27
Alcohol and Drugs........................... 28 Carbon Monoxide Hazard.............. 29
Safety Labels.................................... 30
Driver and Passenger SafetyProCarManuals.comMain Menu s t
Page 17 of 240

Supplemental Restraint System
The passenger's airbag is stored near the top of the dashboard, undera lid marked SRS. Do not place any
objects on top of this lid. If the airbag
inflates, those objects can be
propelled inside the car and possibly hurt someone. How the SRS Indicator
Light Works
The purpose of the SRS light on your instrument panel is to alert you of apotential problem with your supple-
mental restraint system.
Have the system checked if: The light does not come on when
you turn the ignition ON (II). The light stays on after the engine
starts. The light comes on or flashes
while you are driving.
If you see any of these indications,
the airbag may not work when
needed in an accident. Take the car
to your dealer promptly for diagnosis
and service.
System Service
Your supplemental restraint system is virtually maintenance-free. There
are no parts you can safely service.
You must have the system serviced by an authorized Honda dealer:
If your airbags ever inflate, the
airbags and control unit must be
replaced. Do not try to remove or discard the airbags by yourself.
This must be done by a Honda
dealer.
If the SRS indicator light alerts
you of a problem. Have the supplemental restraint systemchecked as soon as possible.Otherwise, your airbags might not
inflate when you need them.
When the car is ten years old. Have the dealer inspect thesystem. The production date is on
the driver's doorjamb for your
convenience.
Driver and Passenger Safety
S R S
ProCarManuals.comMain Menu s t Table of Contents
Page 18 of 240

Supplemental Restraint System
System Service Precautions
Do not modify your steering wheel
or any other part of the supplementalrestraint system. Modifications could
make the system ineffective.
Do not tamper with the system's
components or wiring. This could cause the airbags to inflate inadver-
tently, possibly injuring someone
very seriously.
Tell anyone who works on your car that you have a supplementalrestraint system. Failure to follow
the procedures and precautions in
the official Honda service manualcould result in personal injury ordamage to the system. Scrapping an entire car that has an
uninflated airbag can be dangerous.
Get assistance from a Honda dealer
if your car must be scrapped.
If you sell your car, please be sure to
tell the new owner that the car has asupplemental restraint system. Alert
them to the information and precau- tions in this part of the owner's
manual.
Driver and Passenger SafetyProCarManuals.comMain Menu s t Table of Contents
Page 29 of 240

Alcohol and Drugs
Driving a car requires your full at-
tention and alertness. Traffic condi-
tions change rapidly. You must beable to react just as rapidly. Alcoholor drugs directly affect your alert-
ness and ability to react. Even pre-scription and non-prescription medi-
cines can have this effect.
There are laws that deal with drunken driving. These laws define
how much alcohol it takes in your system to be legally "drunk." How-ever, your judgment and reaction
time get worse with every drink— even the first one. The safest thing you can do is never
drink and drive. This can be done if
you plan ahead. If you know you are going to be drinking, make plans toride with a friend who will not be drinking.
What if you find that you've been drinking and cannot get a ride from a
friend? Find alternative transpor- tation. Call a taxi. Take a bus. Many communities have transportation
services devoted to shuttling people
who have been drinking. If you have no choice but to drive,
stop drinking and give yourself lots
of time to sober up. Time is the only
thing that can make you sober.
Things like coffee or a cold shower don't speed up the process.
If you see friends trying to get
behind the wheel after drinking, stop
them. Drive them yourself or arrange other transportation. If you
think you are interfering, remember
that your interference will keep them
from sharing the road with you.
Driver and Passenger SafetyProCarManuals.comMain Menu s t Table of Contents
Page 107 of 240

Before Driving
Before you begin driving your Honda,
you should know what gasoline to use, and how to check the levels ofimportant fluids. You also need to
know how to properly stow luggage
or packages. This section will help
you. If you plan to add any accesso- ries to your car, please read theinformation in this section first. Break-in Period.............................. 108
Gasoline.......................................... 108
Oxygenated Fuels...................... 108
Driving in Foreign Countries... 109
Service Station Procedures .......... 110 Filling the Fuel Tank................. 110Opening the Hood..................... 111
Fuel Economy................................ 114
Vehicle Condition...................... 114Driving Habits............................ 114
Accessories..................................... 115
Loading Cargo................................ 116
Before DrivingProCarManuals.comMain Menu s t
Page 109 of 240

Gasoline
The following are the EPA-approved percentages of oxygenates:
ETHANOL (ethyl or grain alcohol)
You may use gasoline containing up to 10% ethanol by volume. Gasoline containing ethanol may be marketed
under the name "Gasohol."
MTBE (Methyl Tertiary Butyl
Ether)
You may use gasoline containing up to 15% MTBE by volume. METHANOL (methyl or wood
alcohol)
You may use gasoline containing up to 5% methanol by volume as long asit also contains cosolvents andcorrosion inhibitors to protect the
fuel system. Gasoline containing more than 5% methanol by volume
may cause starting and/or perform-ance problems. It may also damage
metal, rubber and plastic parts of
your fuel system.
If you notice any undesirableoperating symptoms, try another
service station or switch to another
brand of gasoline.
Fuel system damage or performance
problems resulting from the use of an oxygenated fuel containing morethan the percentages of oxygenates
given above are not covered under
warranty.
Driving in Foreign Countries
If you are planning to take your
Honda outside the U.S. or Canada,
contact the tourist bureaus in the areas you will be traveling in to find
out about the availability of unleaded
gasoline with the proper octane
rating.
If unleaded gasoline is not available,
be aware that using leaded gasoline in your Honda will affect perfor-
mance and fuel mileage, and damage its emissions controls. It will nolonger comply with U.S. andCanadian emissions regulations, and
will be illegal to operate in North
America. To bring your car back into compliance will require the replace-
ment of several components, such as
the oxygen sensor and the three way catalytic converter. These replace-
ments are not covered under
warranty.
Before DrivingProCarManuals.comMain Menu s t Table of Contents
Page 110 of 240

Service Station Procedures
Filling the Fuel Tank
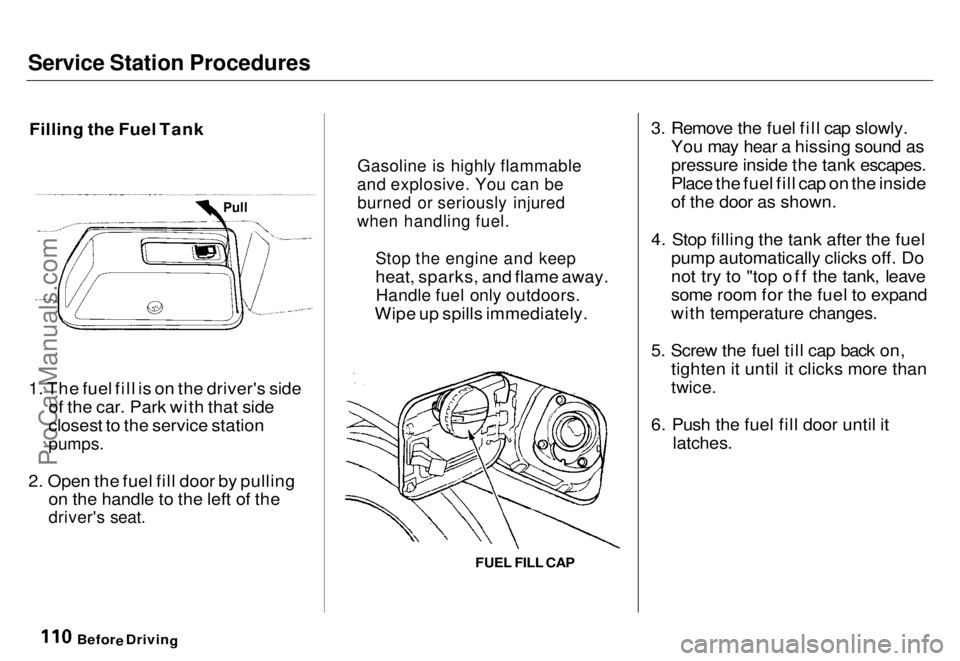
1. The fuel fill is on the driver's side of the car. Park with that side
closest to the service station
pumps.
2. Open the fuel fill door by pulling on the handle to the left of the
driver's seat.
3. Remove the fuel fill cap slowly.
You may hear a hissing sound as
pressure inside the tank escapes.
Place the fuel fill cap on the inside
of the door as shown.
4. Stop filling the tank after the fuel pump automatically clicks off. Do
not try to "top off the tank, leave
some room for the fuel to expand
with temperature changes.
5. Screw the fuel till cap back on, tighten it until it clicks more than
twice.
6. Push the fuel fill door until it
latches.
Befor
e
Drivin
g
Gasoline i
s highly flammable
and explosive. You can be
burned or seriously injured
when handling fuel.
Stop the engine and keep
heat, sparks, and flame away.
Handle fuel only outdoors.
Wipe up spills immediately.
Pull
FUEL FILL CAPProCarManuals.comMain Menu s t Table of Contents
Page 111 of 240

Service Station Procedures
Opening the Hood
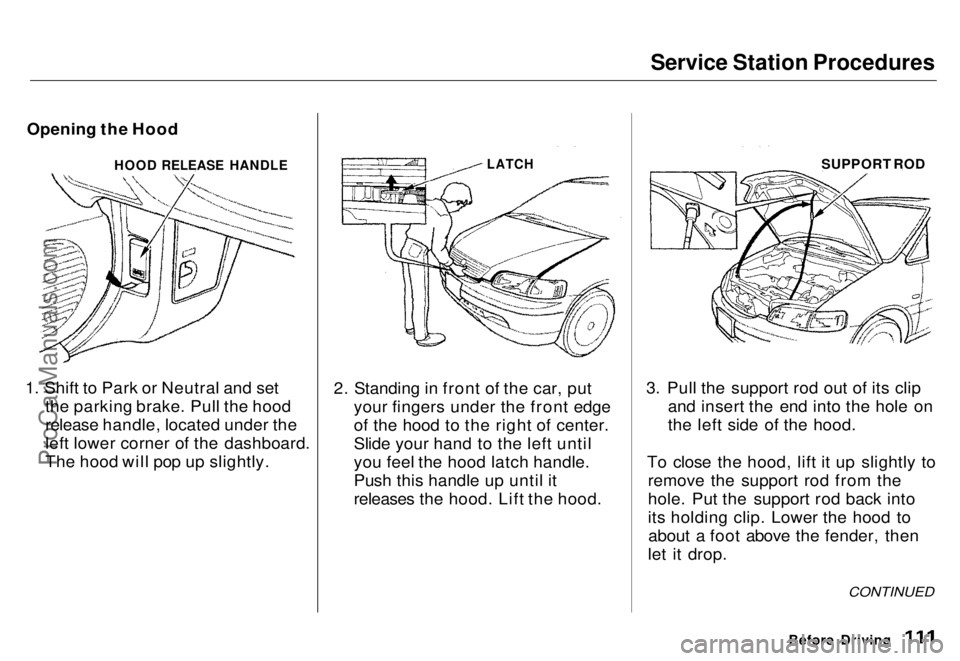
1. Shift to Park or Neutral and set the parking brake. Pull the hood
release handle, located under the
left lower corner of the dashboard.
The hood will pop up slightly. 2. Standing in front of the car, put
your fingers under the front edge
of the hood to the right of center.
Slide your hand to the left until
you feel the hood latch handle.
Push this handle up until it
releases the hood. Lift the hood. 3. Pull the support rod out of its clip
and insert the end into the hole on
the left side of the hood.
To close the hood, lift it up slightly to remove the support rod from the
hole. Put the support rod back into
its holding clip. Lower the hood toabout a foot above the fender, then
let it drop.
Before Driving
CONTINUED
HOOD RELEASE HANDLE
LATCH
SUPPORT RODProCarManuals.comMain Menu s t Table of Contents