1996 HONDA ODYSSEY power steering
[x] Cancel search: power steeringPage 13 of 240

Supplemental Restraint System
Your car is equipped with a Supple- mental Restraint System (SRS) to
help protect the head and chest ofthe driver and front seat passenger during a severe frontal collision.
This system does not replace your seat
belts. It supplements, or adds to, the
protection offered by seat belts and other occupant protection features. SRS Components
Your supplemental restraint system includes: One airbag in the steering wheel
for the driver and another in the dashboard for the passenger.
Sensors that can detect a severe frontal collision.
A sophisticated electronic systemthat continually monitors thesensors, control unit, airbag
activators, and all related wiringwhen the ignition is ON (II).
An indicator light on the instru- ment panel to alert you to a possi-
ble problem with the system.
Emergency backup power in case
your car's electrical system is disconnected in a crash. What Happens In a Crash
If you ever have a severe frontal
collision, the sensors will detect rapid deceleration and signal the
control unit to instantly inflate the
airbags.
During a crash, your seat belts will
help to restrain your lower body andtorso. The airbags will provide a
cushion to absorb crash energy and
help keep the head and chest of thedriver and front passenger from
striking the interior of the car.
After inflating, the airbags will immediately deflate. The entire
process, from detection to deflation, takes a fraction of a second. This
process occurs so quickly that youmay not hear the loud noise created
by the airbag inflators, or realize
what has happened.
Driver and Passenger Safety
Not wearing seat belts
increases the chance of serious
injury or death in a crash, evenif you have airbags.
Be sure you and your
passengers always wear seat
belts and wear them properly.ProCarManuals.comMain Menu s t Table of Contents
Page 32 of 240
Instruments and Controls
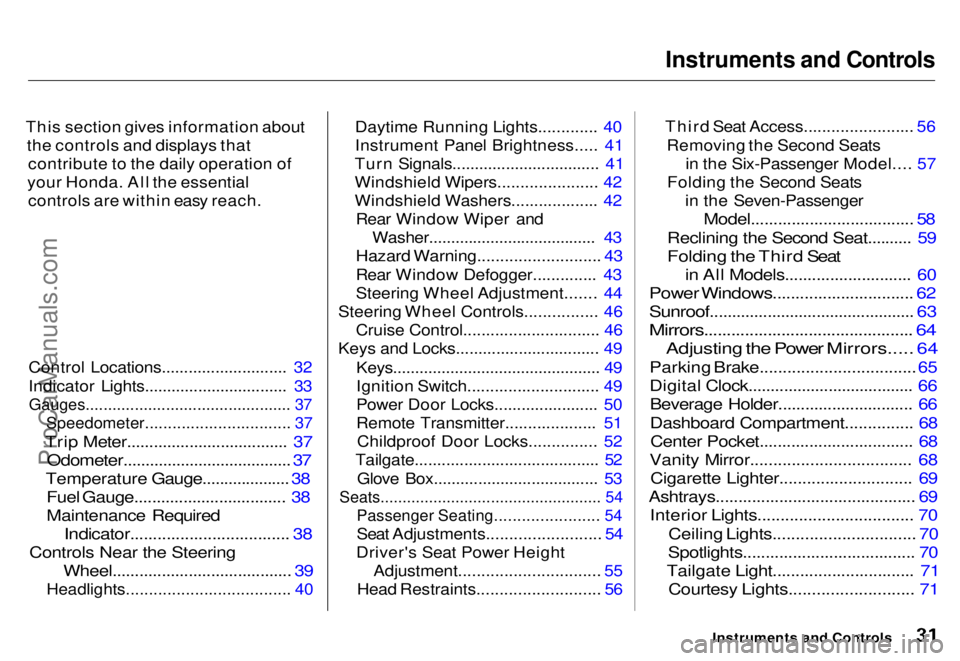
This section gives information about the controls and displays thatcontribute to the daily operation of
your Honda. All the essential controls are within easy reach.
Control Locations............................ 32
Indicator Lights................................ 33
Gauges.............................................. 37
Speedometer................................ 37
Trip Meter.................................... 37
Odometer......................................
37
Temperature Gauge................... .
38
Fuel Gauge.................................. 38
Maintenanc
e Required
Indicator...................................
38
Controls Nea r
the Steering
Wheel........................................ 39
Headlights.................................... 40
Daytime Running Lights............. 40
Instrument Panel Brightness..... 41
Turn Signals................................. 41
Windshield Wipers...................... 42
Windshield Washers................... 42 Rear Window Wiper and Washer...................................... 43
Hazard Warning........................... 43
Rear Window Defogger.............. 43
Steering Wheel Adjustment....... 44
Steering Wheel Controls................ 46 Cruise Control.............................. 46
Keys and Locks................................ 49
Keys............................................... 49
Ignition Switch............................. 49
Power Door Locks....................... 50
Remote Transmitter.................... 51Childproof Door Locks............... 52
Tailgate......................................... 52
Glove Box..................................... 53
Seats.................................................. 54
Passenger Seating....................... 54
Seat Adjustments......................... 54
Driver's Seat Power Height Adjustment............................... 55
Head Restraints........................... 56 Third Seat Access........................ 56
Removing the Second Seats in the Six-Passenger Model.... 57
Folding the Second Seats in the Seven-Passenger
Model....................................
58
Reclining th e
Second Seat.......... 59
Folding the Third Seat
in All Models............................ 60
Power Windows............................... 62
Sunroof.............................................. 63
Mirrors.............................................. 64
Adjusting the Power Mirrors..... 64
Parking Brake..................................
65
Digital Clock.................................... .
66
Beverage Holder.............................. 66
Dashboard Compartment............... 68 Center Pocket.................................. 68
Vanity Mirror................................... 68 Cigarette Lighter............................. 69
Ashtrays............................................ 69 Interior Lights.................................. 70
Ceiling Lights............................... 70
Spotlights...................................... 70
Tailgate Light............................... 71 Courtesy Lights........................... 71
Instruments and ControlsProCarManuals.comMain Menu s t
Page 51 of 240
Keys and Locks
LOCK (0) — You can insert or
remove the key only in this position.
When you turn the key from LOCK to ACCESSORY, you may have to
turn the steering wheel to release the anti-theft lock. To switch from
ACCESSORY to LOCK, you must push the key in slightly as you turn it.
The shift lever must also be in Park. The anti-theft lock will lock the steering column when you remove
the key.
ACCESSORY (I) — In this position, you can operate the audio systemand cigarette lighter.
ON (II) — This is the normal key
position when driving. All features and accessories on the car are usable.
Several of the lights on the instru-
ment panel come on as a test when
you turn the ignition switch from
ACCESSORY to ON (see page 35 ). START (III) — Use this position
only to start the engine. The switch
returns to ON when you let go of the
key.
You will hear a reminder beeper if
you open the driver's door with the key in the LOCK or ACCESSORYposition. Remove the key to turn itoff. Power Door Locks
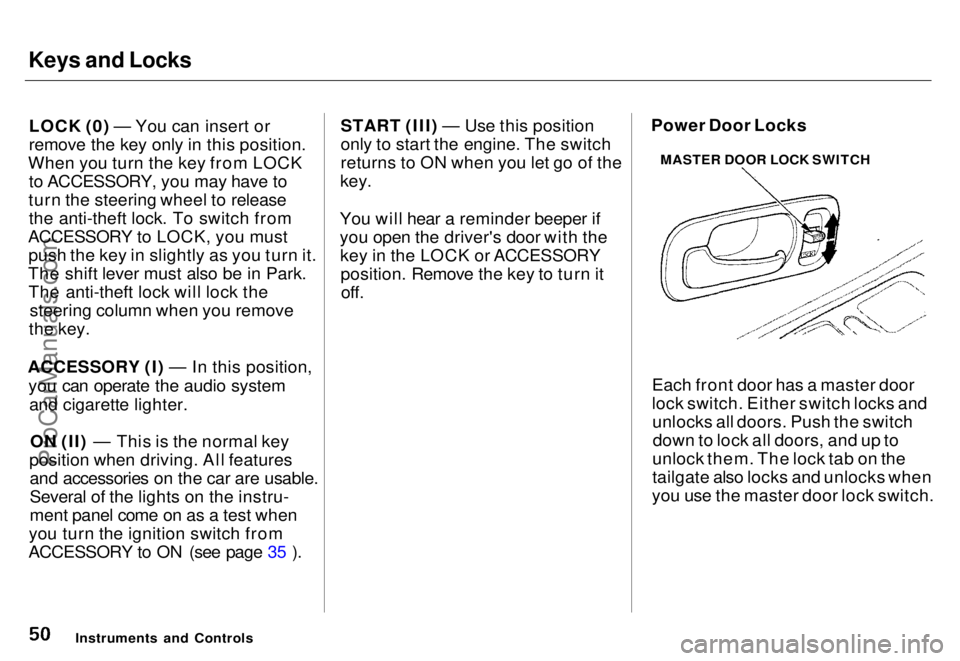
Each front door has a master door
lock switch. Either switch locks andunlocks all doors. Push the switchdown to lock all doors, and up to
unlock them. The lock tab on the
tailgate also locks and unlocks when
you use the master door lock switch.
Instruments and Controls MASTER DOOR LOCK SWITCHProCarManuals.comMain Menu s t Table of Contents
Page 134 of 240

Maintenance
This section explains why it is important to keep your car well
maintained and to follow basic
maintenance safety precautions.
This section also includes Maintenance Schedules for normaldriving and severe driving conditions,
a Maintenance Record, and instruc-
tions for simple maintenance tasks
you may want to take care of
yourself.
If you have the skills and tools
required to perform more complex
maintenance tasks on your Honda,
you may want to purchase the Service Manual. See page 233 for
information on how to obtain a copy,or see your Honda dealer.
Maintenance Safety....................... 136
Important Safety Precautions.. 137
Maintenance Schedule.................. 138
Maintenance Record..................... 142
Periodic Checks............................. 144
Fluid Locations............................... 145
Engine Oil....................................... 146
Checking Engine Oil................. 146
Adding Oil................................... 146 Recommended Oil..................... 147
Synthetic Oil............................... 148
Additives..................................... 148
Oil and Filter Changes.............. 148
Cooling System.............................. 150
Checking the Engine Coolant
Level........................................ 150
Adding Engine Coolant............. 151 Replacing Engine Coolant........ 152
Windshield Washers..................... 154
Automatic Transmission Fluid..... 155
Brake Fluid..................................... 156
Brake System............................. 156
Anti-lock Brake System............ 157
Power Steering............................... 157
Air Cleaner..................................... 158 Spark Plugs..................................... 160
Replacement............................... 160
Specifications............................. 161
Battery............................................ 162
Windshield Wipers........................ 165
Air Conditioning............................. 168 Drive Belts...................................... 169
Tires................................................ 169 Inflation....................................... 170
Inspection................................... 171
Maintenance............................... 171
Tire Rotation.............................. 172 Replacing Tires and Wheels .... 172
Wheels and Tires....................... 173
Winter Driving........................... 173 Snow Tires.............................. 174
Tire Chains............................. 174
Lights.............................................. 175 Headlight Aiming...................... 175Replacing Bulbs......................... 177
Storing Your Car............................ 182
MaintenanceProCarManuals.comMain Menu s t
Page 143 of 240
Periodic Checks
You should check the following items at the specified intervals. If
you are unsure of how to perform any check, turn to the page given. Engine oil level — Check every
time you fill the fuel tank. See
page 112.
Engine coolant level — Check the
radiator reserve tank every time
you fill the fuel tank. See page 113 .
Windshield washer fluid — Check the level in the reservoir monthly.If weather conditions cause you to
use the washers frequently, check
the reservoir each time you stop
for fuel. See page 154 .
Automatic transmission — Check the fluid level monthly. See page 155.
Brakes and power steering — Check the fluid level monthly. See
page 156. Tires — Check the tire pressure
monthly. Examine the tread for
wear and foreign objects. See page
169 .
Battery — Check its condition and
the terminals for corrosion monthly. See page 162 .
Air conditioning — Check its operation weekly. See page 168 .
Lights — Check the operation of
the headlights, parking lights,
taillights, high-mount brake light,
turn signals, brake lights, and
license plate lights monthly. See
page 175.
MaintenanceProCarManuals.comMain Menu s t Table of Contents
Page 144 of 240
Fluid Locations
Maintenance
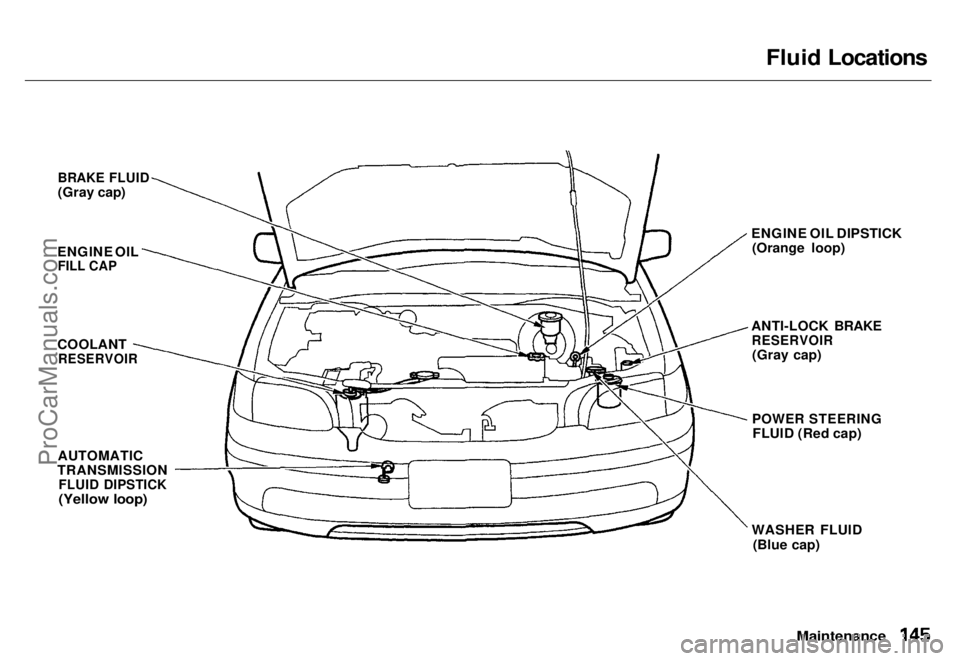
BRAKE FLUID
(Gray cap)
ENGINE OIL
FILL CAP
COOLANT
RESERVOIR
AUTOMATIC
TRANSMISSION
FLUID DIPSTICK
(Yellow loop)
ENGINE OIL DIPSTICK
(Orange loop)
ANTI-LOCK BRAKE
RESERVOIR
(Gray cap)
POWER STEERING
FLUID (Red cap)
WASHER FLUID (Blue cap)ProCarManuals.comMain Menu s t Table of Contents
Page 156 of 240
Brake Fluid, Power Steering
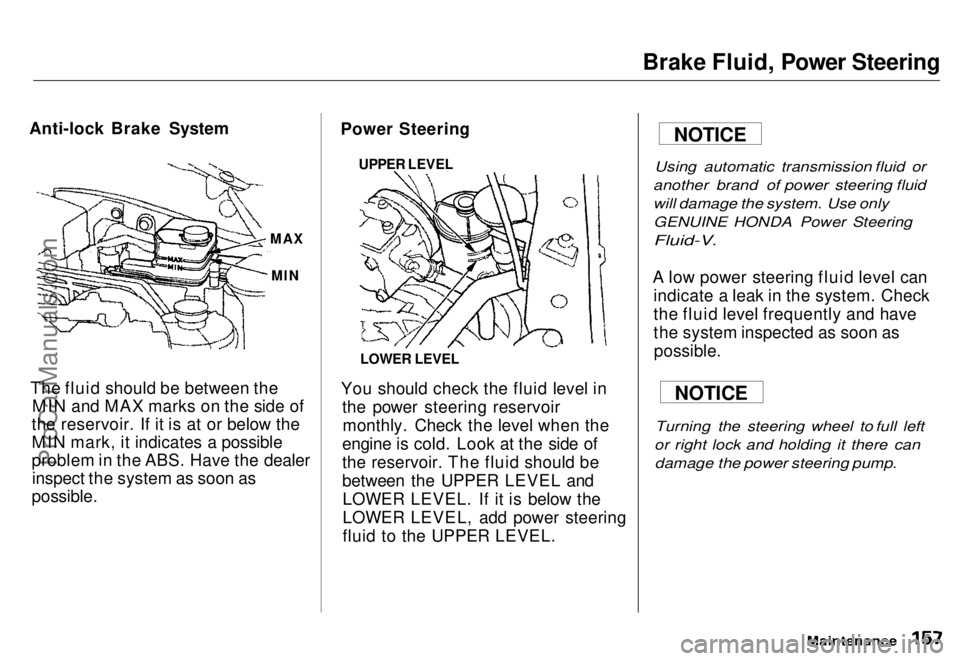
Anti-lock Brake System
The fluid should be between the MIN and MAX marks on the side of
the reservoir. If it is at or below the
MIN mark, it indicates a possible
problem in the ABS. Have the dealer inspect the system as soon as
possible.
Power Steering
LOWER LEVEL
You should check the fluid level in the power steering reservoirmonthly. Check the level when the
engine is cold. Look at the side of
the reservoir. The fluid should be
between the UPPER LEVEL and LOWER LEVEL. If it is below the
LOWER LEVEL, add power steering
fluid to the UPPER LEVEL.
Using automatic transmission fluid or
another brand of power steering fluid
will damage the system. Use only GENUINE HONDA Power Steering
Fluid-V.
A low power steering fluid level can indicate a leak in the system. Check
the fluid level frequently and have
the system inspected as soon aspossible.
Turning the steering wheel to full left
or right lock and holding it there can damage the power steering pump.
Maintenance
MAX
MIN
UPPER LEVEL
NOTICE
NOTICEProCarManuals.comMain Menu s t Table of Contents
Page 168 of 240
Drive Belts, Tires
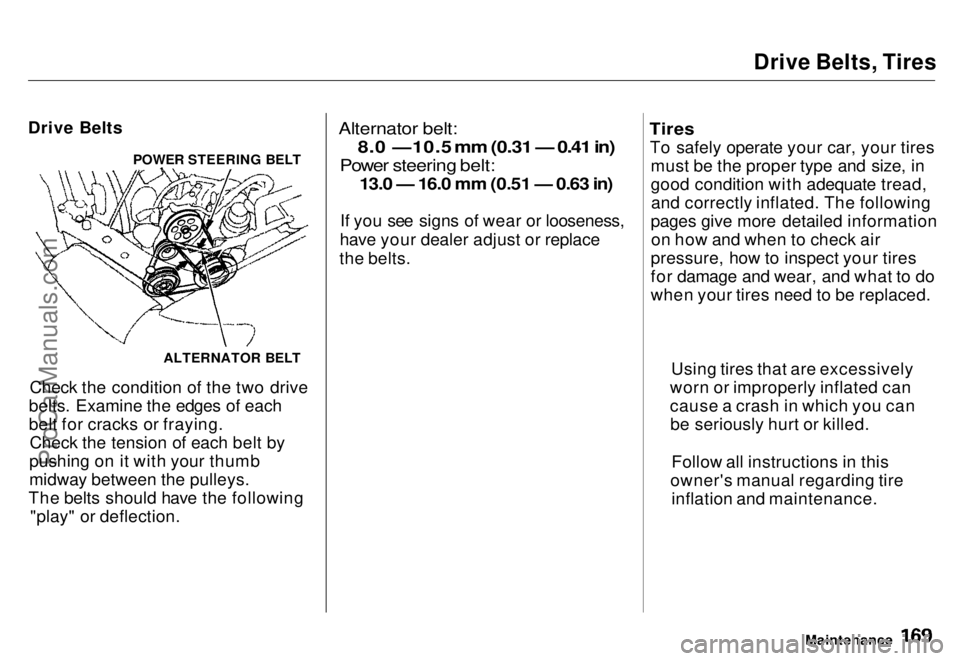
Drive Belts
Check the condition of the two drive
belts. Examine the edges of each
belt for cracks or fraying. Check the tension of each belt by
pushing on it with your thumb
midway between the pulleys.
The belts should have the following "play" or deflection.
Alternator belt:
8.0 —10.5 mm (0.31 — 0.41 in)
Power steering belt:
13.0 — 16.0 mm (0.51 — 0.63 in)
If you see signs of wear or looseness,
have your dealer adjust or replace
the belts.
Tires
To safely operate your car, your tires must be the proper type and size, in
good condition with adequate tread,and correctly inflated. The following
pages give more detailed information on how and when to check air
pressure, how to inspect your tires
for damage and wear, and what to do
when your tires need to be replaced.
Maintenance
POWER STEERING BELT
ALTERNATOR BELT Using tires that are excessively
worn or improperly inflated can
cause a crash in which you can be seriously hurt or killed.
Follow all instructions in this
owner's manual regarding tire inflation and maintenance.ProCarManuals.comMain Menu s t Table of Contents