1995 NISSAN ALMERA N15 Color
[x] Cancel search: ColorPage 1326 of 1701
![NISSAN ALMERA N15 1995 Service Manual CYLINDERBLOCK
@[]
Inspection (Cont'd)
• Ifeither bearing, crankshaft orcylinder blockisreplaced
with anew one, select mainbearing according tothe fol-
lowing table.These numbers arepunched in NISSAN ALMERA N15 1995 Service Manual CYLINDERBLOCK
@[]
Inspection (Cont'd)
• Ifeither bearing, crankshaft orcylinder blockisreplaced
with anew one, select mainbearing according tothe fol-
lowing table.These numbers arepunched in](/manual-img/5/57349/w960_57349-1325.png)
CYLINDERBLOCK
@[]
Inspection (Cont'd)
• Ifeither bearing, crankshaft orcylinder blockisreplaced
with anew one, select mainbearing according tothe fol-
lowing table.These numbers arepunched ineither Arabic
or Roman numerals.
Mainbearing housing gradenumber
0 1
2
Main bearing gradenumber
0 0 12
Crankshaft mainjour-
1
1
2
3
nal grade number
22
3
4
•
~NO'1 mainjournal gradenumber
NO.2 No.4
"" No. 3/ No.5
~'S"bci~
0000 "')N1
~ o.
- Counterweight
"\ /i
SEM706DAIdentification
color:
Grade 0
Grade 1
Grade 2
Grade 3
Grade 4 Yellow
Green
Brown
BlackBlue
No. 1journal gradenumber
~No.5
Q
Front
0
SEM706A
For
example:
Main journal gradenumber: 1
Crankshaft journalgradenumber: 2
Main bearing gradenumber
=
1
+
2
Main bearing thickness:
Refer toSOS (EM-175).
3
SEM507A CONNECTING
RODBEARING CLEARANCE (Bigend)
1. Install connecting rodbearing toconnecting rodand cap.
2. Install connecting rodcap with bearing toconnecting rod.
Apply oiltothe thread portion ofbolts andseating surface of
nuts.
toJ:
37-45 N'm (3.8-4.6 kg-m, 27-33 ft-Ib)
3. Measure insidediameter "C"ofbearing.
EM-147
Page 1327 of 1701
![NISSAN ALMERA N15 1995 Service Manual CYLINDERBLOCK [][]
Inspection (Cont'd)
4. Measure outsidediameter "Dp"ofcrankshaft pinjournal.
5. Calculate connecting rodbearing clearance.
Connecting rodbearing clearance
=
C-Op
Standa NISSAN ALMERA N15 1995 Service Manual CYLINDERBLOCK [][]
Inspection (Cont'd)
4. Measure outsidediameter "Dp"ofcrankshaft pinjournal.
5. Calculate connecting rodbearing clearance.
Connecting rodbearing clearance
=
C-Op
Standa](/manual-img/5/57349/w960_57349-1326.png)
CYLINDERBLOCK [][]
Inspection (Cont'd)
4. Measure outsidediameter "Dp"ofcrankshaft pinjournal.
5. Calculate connecting rodbearing clearance.
Connecting rodbearing clearance
=
C-Op
Standard:
0.031 -0.055
mm
(0.0012 -0.0022
in)
• Ifitexceeds thelimit, replace thebearing.
• Ifcrankshaft pinjournal isworn orshows anyabnormality,
regrind crankpinand useundersized bearingstomaintain
the specified oilclearance.
• Refer toSOS forregrinding diameterofcrankshaft pinand
available serviceparts(EM-174).
• When regrinding crankshaft pin,donot grind fillet-roll.
Pin
jOUrnal~
Maintain morethan0.13mm(0.0051 in)
SEM361D
~NO' 1pin journal gradenumber
~NO' 2No.3
__ NO.4
,/
o
J
0 0 ~ NO.1
~ C,"'''ffl.;ghl
SEM705D
Selective
connecting rodbearing
• Ifeither bearings orcrankshaft arebeing replaced withnew
ones, select connecting rodbearings according tothe fol-
lowing table.Grade numbers arepunched ineither Arabic
or Roman numerals.
Crankshaftpinjournal gradenumber
0 1
2
Connecting rodbaring gradenum-
0 12
ber
Identification color
Grade 0:Black
Grade 1:Yellow
Grade 2:Blue
CONNECTING RODANDPISTON PINCLEARANCE
(Small end)
Clearance
(0-
d):
0.025 -0.044
mm
(0.0010 -0.0017
in)
• Ifclearance exceedsthespecifications, replacethebearing.
Clearance
=
0 -d
SEM575B
EM-148
Page 1341 of 1701
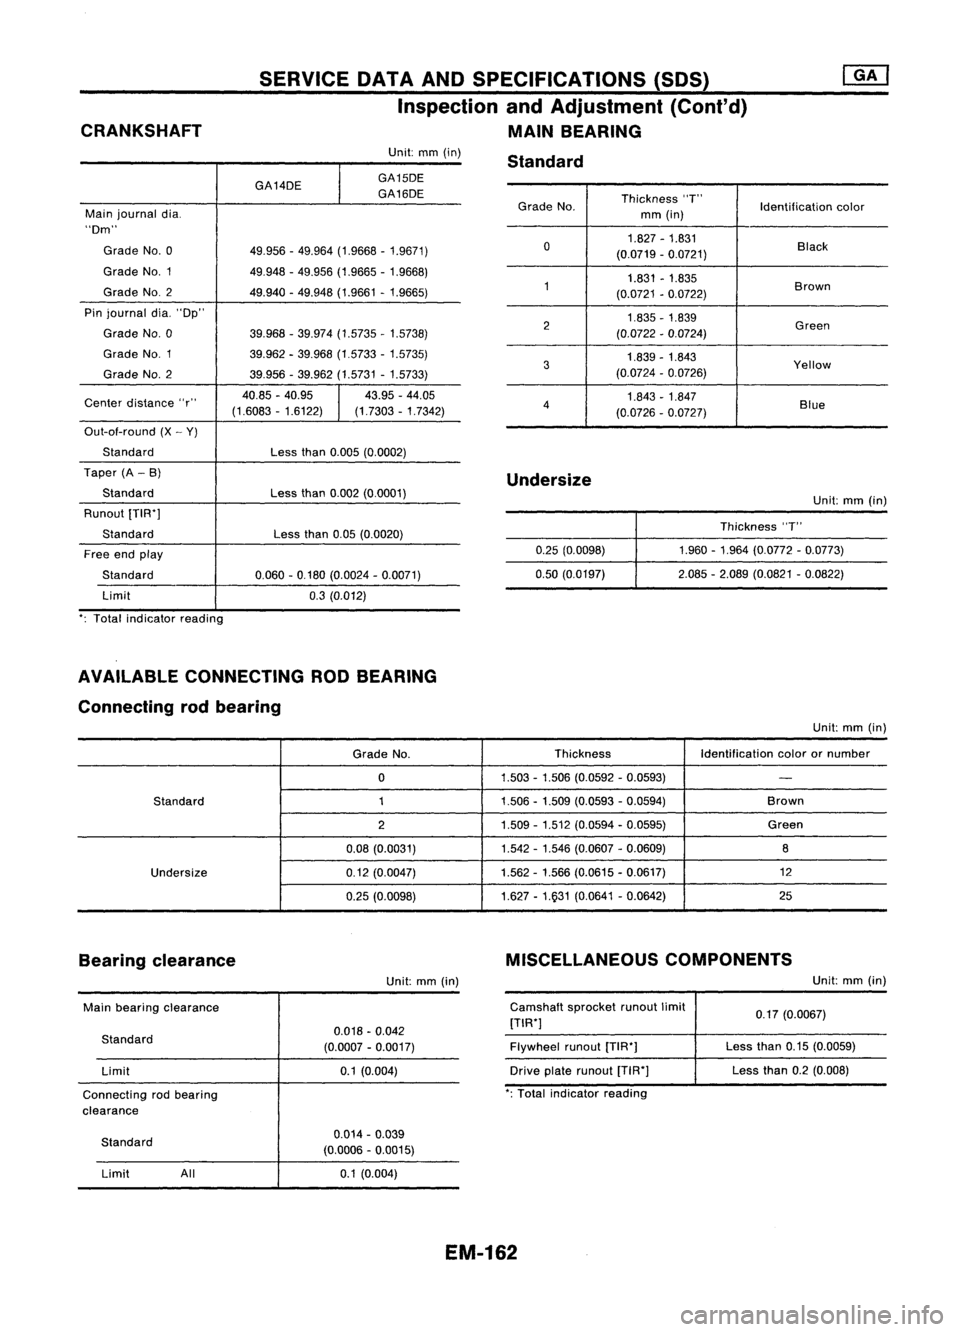
CRANKSHAFT SERVICE
DATAANDSPECIFICATIONS (SOS)
Inspection andAdjustment (Cont'd)
MAIN BEARING
Grade No. Thickness
"T"
Identificationcolor
mm (in)
0 1.827
-1.831
Black
(0.0719 -0.0721)
1 1.831
-1.835
Brown
(0.0721 -0.0722)
2 1.835
-1.839
Green
(0.0722 -0.0724)
3 1.839
-1.843
Yellow
(0.0724 -0.0726)
4 1.843
-1.847
Blue
(0.0726 -0.0727)
Unit:
mm(in)
GA14DE
I
GA15DE
GA16DE
Main journal dia.
"Dm"
Grade No.0 49.956-49.964 (1.9668 -1.9671)
Grade NO.1 49.948-49.956 (1.9665 -1.9668)
Grade NO.2
49.940-49.948 (1.9661 -1.9665)
Pin journal dia."Dp"
Grade No.0 39.968-39.974 (1.5735 -1.5738)
Grade NO.1
39.962-39.968 (1.5733 -1.5735)
Grade No.2 39.956-39.962 (1.5731 -1.5733)
Center distance "r" 40.85
-40.95
I
43.95
-44.05
(1.6083 -1.6122) (1.7303-1.7342)
Out-ot-round (X-Y)
Standard Lessthan0.005 (0.0002)
Taper (A-B)
Standard Lessthan0.002 (0.0001)
Runout [TIW]
Standard Lessthan0.05(0.0020)
Free endplay
Standard 0.060-0.180 (0.0024 -0.0071)
Limit 0.3(0.012)
': Total indicator reading Standard
Undersize 0.25(0.0098)
0.50 (0.0197) Unit:
mm(in)
Thickness "T"
1.960 -1.964 (0.0772 -0.0773)
2.085 -2.089 (0.0821 -0.0822)
AVAILABLE CONNECTING RODBEARING
Connecting rodbearing
Unit:mm(in)
Grade No. Thickness
Identificationcolorornumber
0 1.503
-1.506 (0.0592 -0.0593)
-
Standard 11.506-1.509 (0.0593 -0.0594) Brown
2 1.509
-1.512 (0.0594 -0.0595) Green
0.08 (0.0031) 1.542
-1.546 (0.0607 -0.0609)
8
Undersize 0.12(0.0047) 1.562
-1.566 (0.0615 -0.0617) 12
0.25 (0.0098) 1.627
-1.931 (0.0641 -0.0642) 25
Bearing clearance
Unit:mm(in) MISCELLANEOUS
COMPONENTS
Unit:mm(in)
Main bearing clearance
Standard Limit
Connecting rodbearing
clearance 0.018
-0.042
(0.0007 -0.0017)
0.1 (0.004) Camshaft
sprocketrunoutlimit
[TIW]
Flywheel runout[TIW]
Drive platerunout [T1R']
': Total indicator reading 0.17
(0.0067)
Less than0.15(0.0059)
Less than0.2(0.008)
Standard Limit All 0.014
-0.039
(0.0006 -0.0015)
0.1 (0.004)
EM-162
Page 1349 of 1701
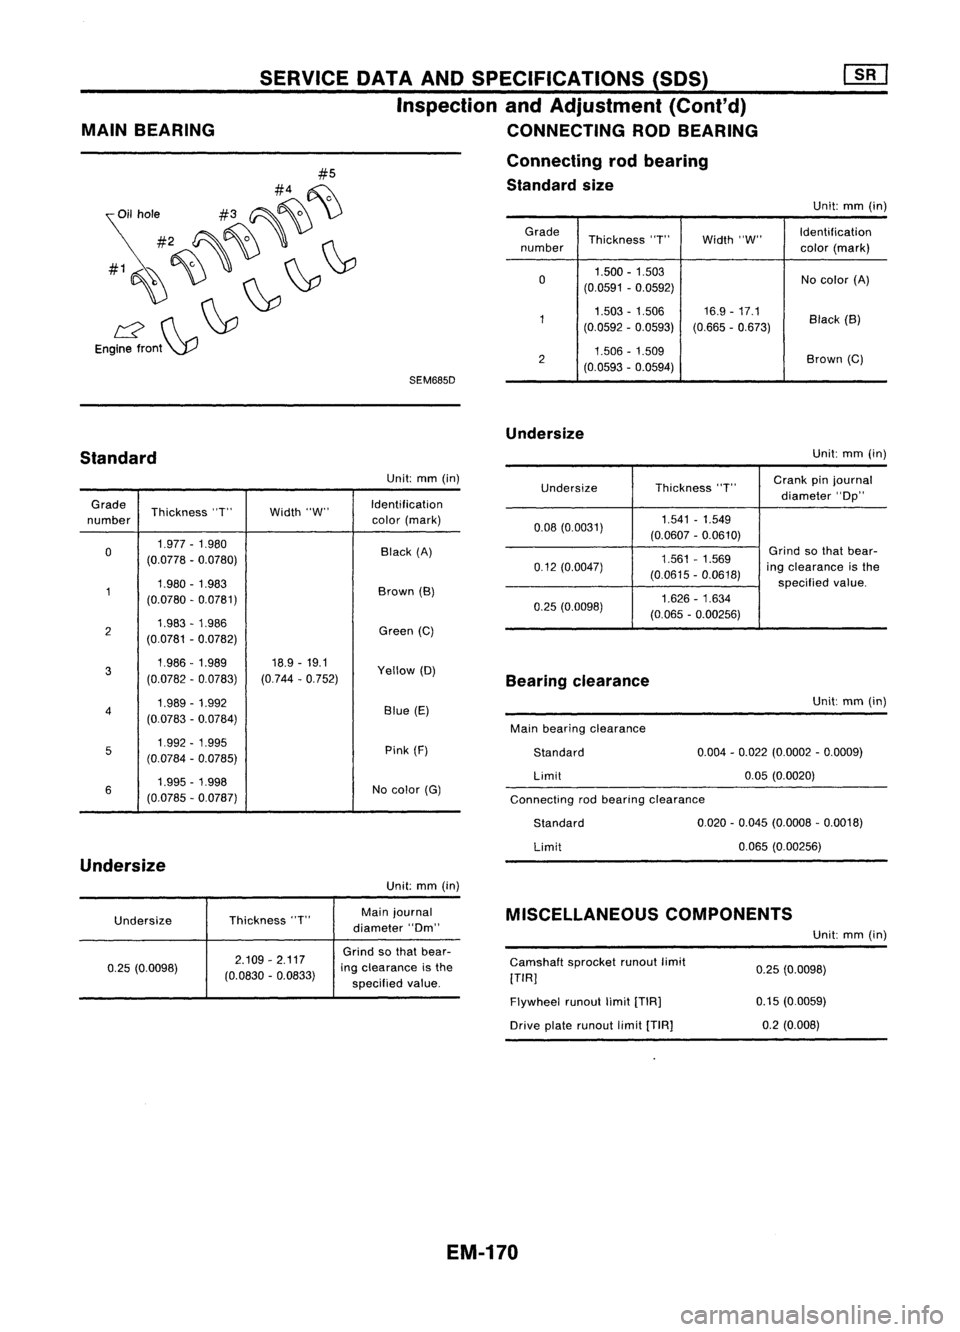
SEM685D
#5
#4 ~
~il hole #3~~ \)
#2 ~~'
#1~~~ ~~
L2 ~~
Engine front~
MAIN
BEARING SERVICE
DATAANDSPECIFICATIONS (SOS)
Inspection andAdjustment (Cont'd)
CONNECTING RODBEARING
Connecting rodbearing
Standard size
Unit:mm(in)
Grade Thickness"T"Width"W" Identification
number color(mark)
0 1.500
-1.503
Nocolor (A)
(0.0591 -0.0592)
1 1.503
-1.506 16.9-17.1
Black(B)
(0.0592 -0.0593) (0.665-0.673)
2 1.506
-1.509
Brown(C)
(0.0593 -0.0594)
Undersize
Standard
Unit:
mm(in)
Connecting rodbearing clearance
Undersize
Thickness
"T"
Crank
pinjournal
diameter "Op"
0.08 (0.0031) 1.541
-1.549
(0.0607 -0.0610)
1.561 -1.569
Grind
sothat bear-
0.12 (0.0047)
(0.0615-0.0618)
ing
clearance isthe
specified value.
0.25 (0.0098) 1.626
-1.634
(0.065 -0.00256)
Unit:
mm(in)
Grade Thickness "T"Width"W" Identification
number color
(mark)
0 1.977
-1.980
Black(A)
(0.0778 -0.0780)
1 1.980
-1.983
Brown(B)
(0.0780 -0.0781)
2 1.983
-1.986
Green(C)
(0.0781 -0.0782)
3 1.986-1.989
18.9-19.1
Yellow(D)
(0.0782 -0.0783) (0.744
-0.752)
4 1.989
-1.992
Blue(E)
(0.0783 -0.0784)
5 1.992
-1.995
Pink(F)
(0.0784 -0.0785)
6 1.995
-1.998
Nocolor (G)
(0.0785 -0.Q787)
Undersize
Unit:mm(in)
Bearing
clearance
Main bearing clearance
Standard
Limit
Standard
Limit Unit:
mm(in)
0.004 -0.022 (0.0002 -0.0009)
0.05 (0.0020)
0.020 -0.045 (0.0008 -0.0018)
0.065 (0.00256)
Undersize Thickness
"T" Main
journal
diameter "Om"
MISCELLANEOUS
COMPONENTS
Unit:mm(in)
0.25 (0.0098) 2.109
-2.117
(0.0830 -0.0833)
Grind
sothat bear-
ing clearance isthe
specified value. Camshaft
sprocketrunoutlimit
[TIR]
Flywheel runoutlimit[TIR]
Drive platerunout limit[TIA]
0.25
(0.0098)
0.15 (0.0059)
0.2 (0.008)
EM-170
Page 1354 of 1701
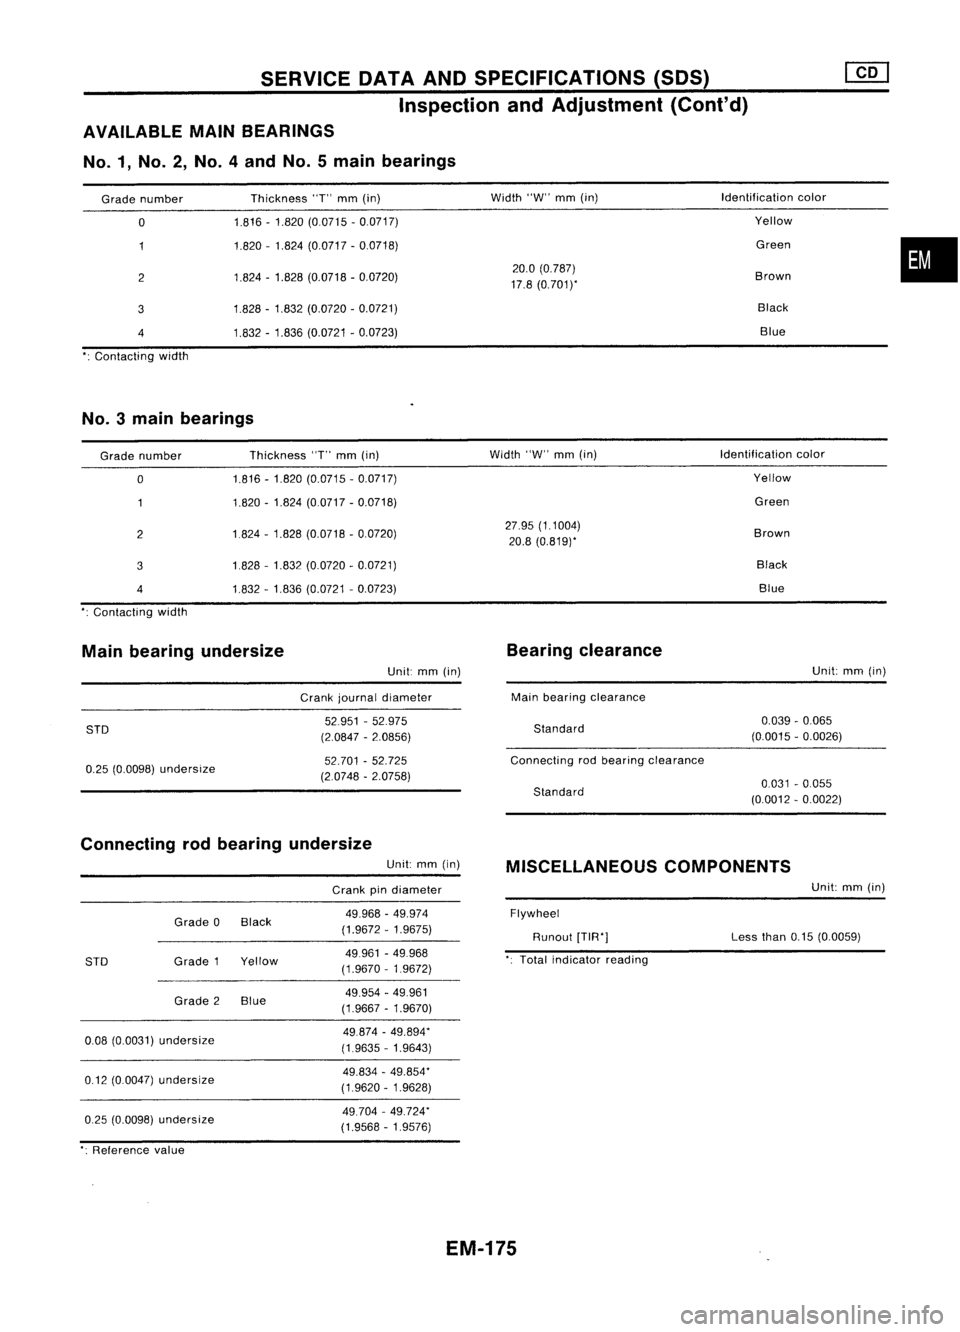
SERVICEOATAAND SPECIFICATIONS (SOS)
Inspection andAdjustment (Cont'd)
AVAILABLE MAINBEARINGS
No.1, No.2, No.4andNo.5main bearings
Grade number
o
2
3
4
Contacting width Thickness
"T"
mm
(in)
1.816 -1.820 (0.0715 -0.0717)
1.820 -1.824 (0.0717 -0.0718)
1.824 -1.828 (0.0718 -0.0720)
1.828 -1.832 (0.0720 -0.0721)
1.832 -1.836 (0.0721 -0.0723)
Width
"W"
mm
(in)
20.0 (0.787)
17.8 (0.7011'
Identification
color
Yellow
Green
Brown Black Blue
•
No.3 mainbearings
Grade number
o
2
3
4
Contacting width Thickness
"T"
mm
(in)
1.816 -1.820 (0.0715 -0.0717)
1.820 -1.824 (0.0717 -0.0718)
1.824 -1.828 (0.0718 -0.0720)
1828 -1.832 (0.0720 -0.0721)
1.832 -1.836 (0.0721 -0.0723)
Width
"W"
mm
(in)
27.95 (1.1004)
20.8 (0.819)'
Identification
color
Yellow
Green
Brown BlackBlue
Main bearing undersize
Unit:
mm
(in)
Crank journal diameter
Bearing
clearance
Main bearing clearance Unit:
mm
(in)
STD
0.25 (0.0098)
undersize
52951
-52.975
(2.0847 -2.0856)
52.701 -52.725
(2.0748 -2.0758)
Standard
Connecting rodbearing clearance
Standard
0.039
-0.065
(0.0015 -0.0026)
0.031 -0.055
(0.0012 -0.0022)
Connecting rodbearing undersize
Unit:
mm
(in)
Crank pindiameter
MISCELLANEOUS
COMPONENTS
Unit:
mm
(in)
0.25 (0.0098)
undersize
0.08
(0.0031)
undersize
0.12 (0.0047)
undersize
STD
Grade
0Black
Grade 1Yellow
Grade 2Blue
49.968
-49.974
(1.9672 -1.9675)
49961 -49.968
(1.9670 -1.9672)
49.954 -49.961
(1.9667 -1.9670)
49.874 -49.894"
(1.9635 -1.9643)
49.834 -49.854"
(1.9620 -1.9628)
49.704 -49.724"
(1.9568 -1.9576)
Flywheel
Runout
[TIR"]
Total indicator reading Less
than
0.15(0.0059)
": Reference value
EM-175
Page 1365 of 1701
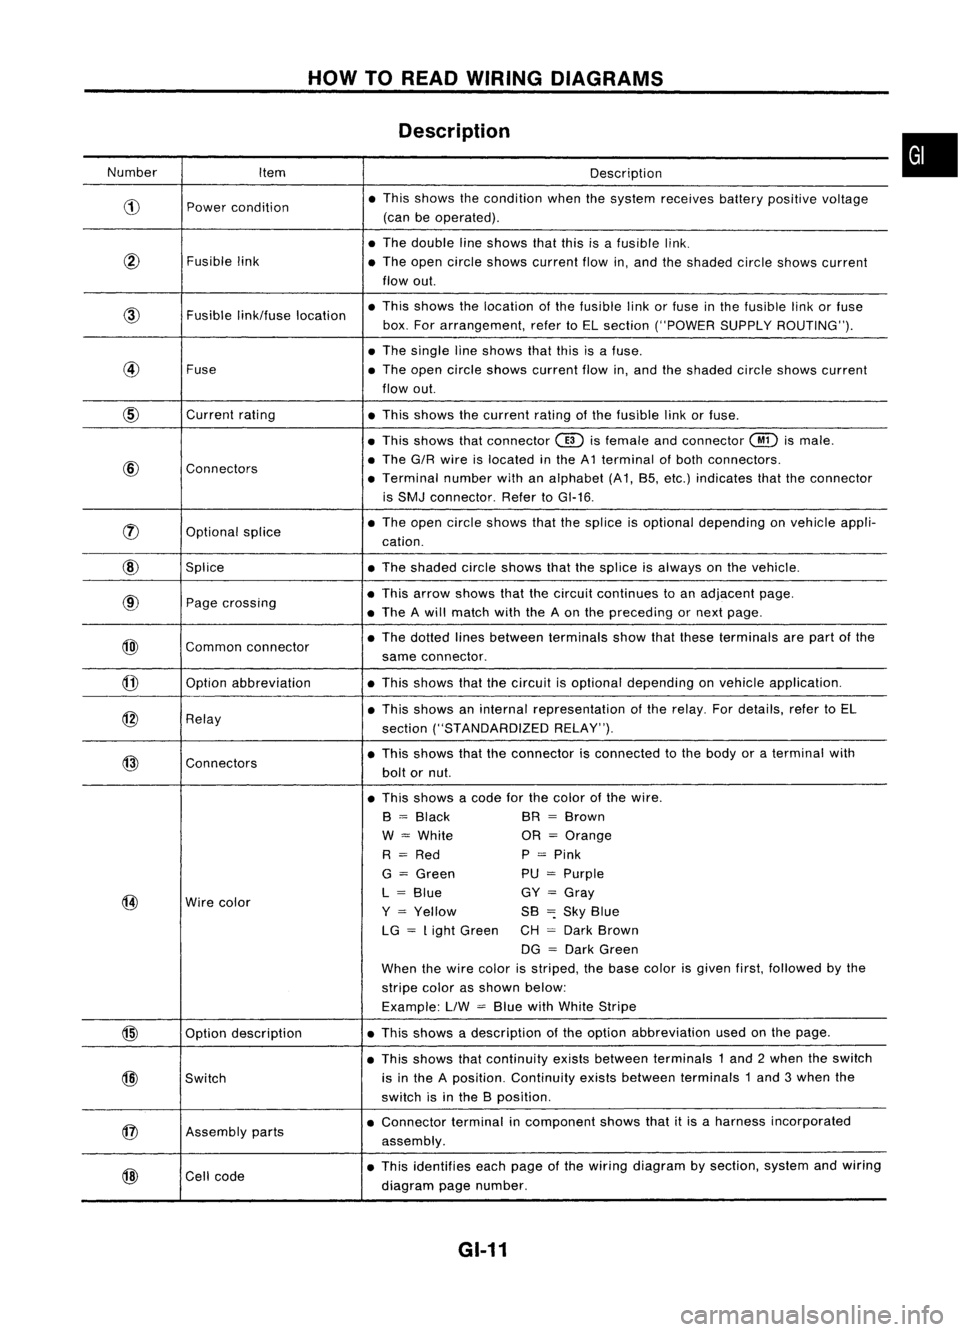
HOWTOREAD WIRING DIAGRAMS
Description
Number Item Description
CD
Power
condition •
This shows thecondition whenthesystem receives batterypositive voltage
(can beoperated) .
• The double lineshows thatthisisafusible link.
@
Fusiblelink
•The open circle shows current flowin,and theshaded circleshows current
flow out.
link/fuse location •
This shows thelocation ofthe fusible linkorfuse inthe fusible linkorfuse
box. Forarrangement, refertoEL section ("POWER SUPPLYROUTING") .
• The single lineshows thatthisisafuse.
@
Fuse
•The open circle shows current flowin,and theshaded circleshows current
flow out.
CID
Current
rating
•This shows thecurrent ratingofthe fusible linkorfuse .
• This shows thatconnector
@)
isfemale andconnector
@
ismale .
@
Connectors •
The G/R wire islocated inthe A1 terminal ofboth connectors.
• Terminal numberwithanalphabet (A1, B5, etc.) indicates thattheconnector
is SMJ connector. RefertoGI-16 .
rJ)
Optionalsplice •
The open circle shows thatthesplice isoptional depending onvehicle appli-
cation.
@
Splice •The shaded circleshows thatthesplice isalways onthe vehicle.
@
Page
crossing •
This arrow shows thatthecircuit continues toan adjacent page.
• The Awill match withtheAon the preceding ornext page .
@)
Commonconnector •
The dotted linesbetween terminals showthatthese terminals arepart ofthe
same connector.
@
Option
abbreviation •This shows thatthecircuit isoptional depending onvehicle application.
@
Relay •
This shows aninternal representation ofthe relay. Fordetails, refertoEL
section ("STANDARDIZED RELAY").
@
Connectors •
This shows thattheconnector isconnected tothe body oraterminal with
bolt ornut.
• This shows acode forthe color ofthe wire.
B
=
Black BR
=
Brown
W
=
White OR
=
Orange
R
=
Red P
=
Pink
G
=
Green PU
=
Purple
@
Wire
color L
=
Blue GY
=
Gray
Y
=
Yellow SB
=:
Sky Blue
LG
=
Light Green CH
=
Dark Brown
DG
=
Dark Green
When thewire color isstriped, thebase color isgiven first,followed bythe
stripe colorasshown below:
Example: LlW
=
Blue withWhite Stripe
@
Optiondescription •
This shows adescription ofthe option abbreviation usedonthe page.
• This shows thatcontinuity existsbetween terminals 1and 2when theswitch
@)
Switch is
inthe Aposition. Continuity existsbetween terminals 1and 3when the
switch isinthe Bposition .
@
Assembly
parts •
Connector terminalincomponent showsthatitis aharness incorporated
assembly .
@
Cell
code •
This identifies eachpage ofthe wiring diagram bysection, systemandwiring
diagram pagenumber.
GI-11
•
Page 1366 of 1701
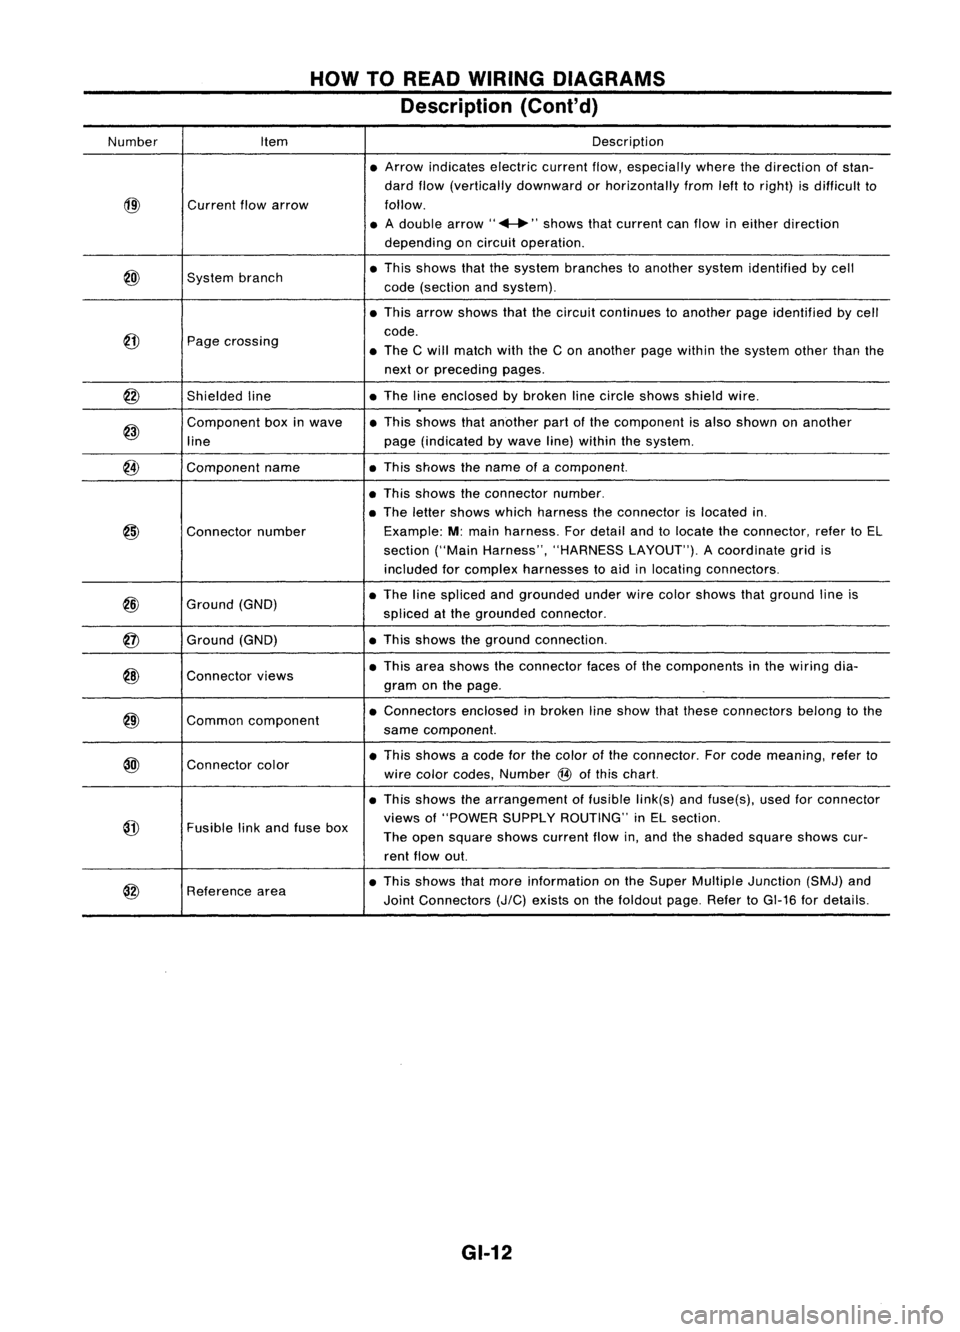
HOWTOREAD WIRING DIAGRAMS
Description (Cont'd)
Number Item Description
• Arrow indicates electriccurrentflow,especially wherethedirection ofstan-
dard flow(vertically downward orhorizontally fromlefttoright) isdifficult to
@)
Current
flowarrow follow.
• Adouble arrow" ...."shows thatcurrent canflow ineither direction
depending oncircuit operation .
@)
System
branch •
This shows thatthesystem branches toanother systemidentified bycell
code (section andsystem) .
• This arrow shows thatthecircuit continues toanother pageidentified bycell
@
code.
Page crossing
•The Cwill match withtheCon another pagewithin thesystem otherthanthe
next orpreceding pages.
@
Shieldedline •
The lineenclosed bybroken linecircle shows shieldwire.
@)
Component
boxinwave •
This shows thatanother partofthe component isalso shown onanother
line page
(indicated bywave line)within thesystem.
@
Component
name •This shows thename ofacomponent.
• This shows theconnector number.
• The letter shows whichharness theconnector islocated in.
@)
Connector
number Example:
M:main harness. Fordetail andtolocate theconnector, refertoEL
section ("MainHarness", "HARNESS LAYOUT").Acoordinate gridis
included forcomplex harnesses toaid inlocating connectors .
@
Ground
(GND) •
The linespliced andgrounded underwirecolor shows thatground lineis
spliced atthe grounded connector.
@
Ground
(GND) •
This shows theground connection.
@)
Connector
views •
This area shows theconnector facesofthe components inthe wiring dia-
gram onthe page .
@)
Common
component •
Connectors enclosedinbroken lineshow thatthese connectors belongtothe
same component.
@l
Connector
color •
This shows acode forthe color ofthe connector. Forcode meaning, referto
wire color codes, Number
@
ofthis chart.
• This shows thearrangement offusible link(s)andfuse(s), usedforconnector
@
views
of"POWER SUPPLYROUTING" inEL section.
Fusible linkand fuse box
Theopen square showscurrent flowin,and theshaded squareshowscur-
rent flow out.
@
Reference
area •
This shows thatmore information onthe Super Multiple Junction (SMJ)and
Joint Connectors
(J/C)
exists onthe foldout page.RefertoGI-16 fordetails.
GI-12
Page 1392 of 1701
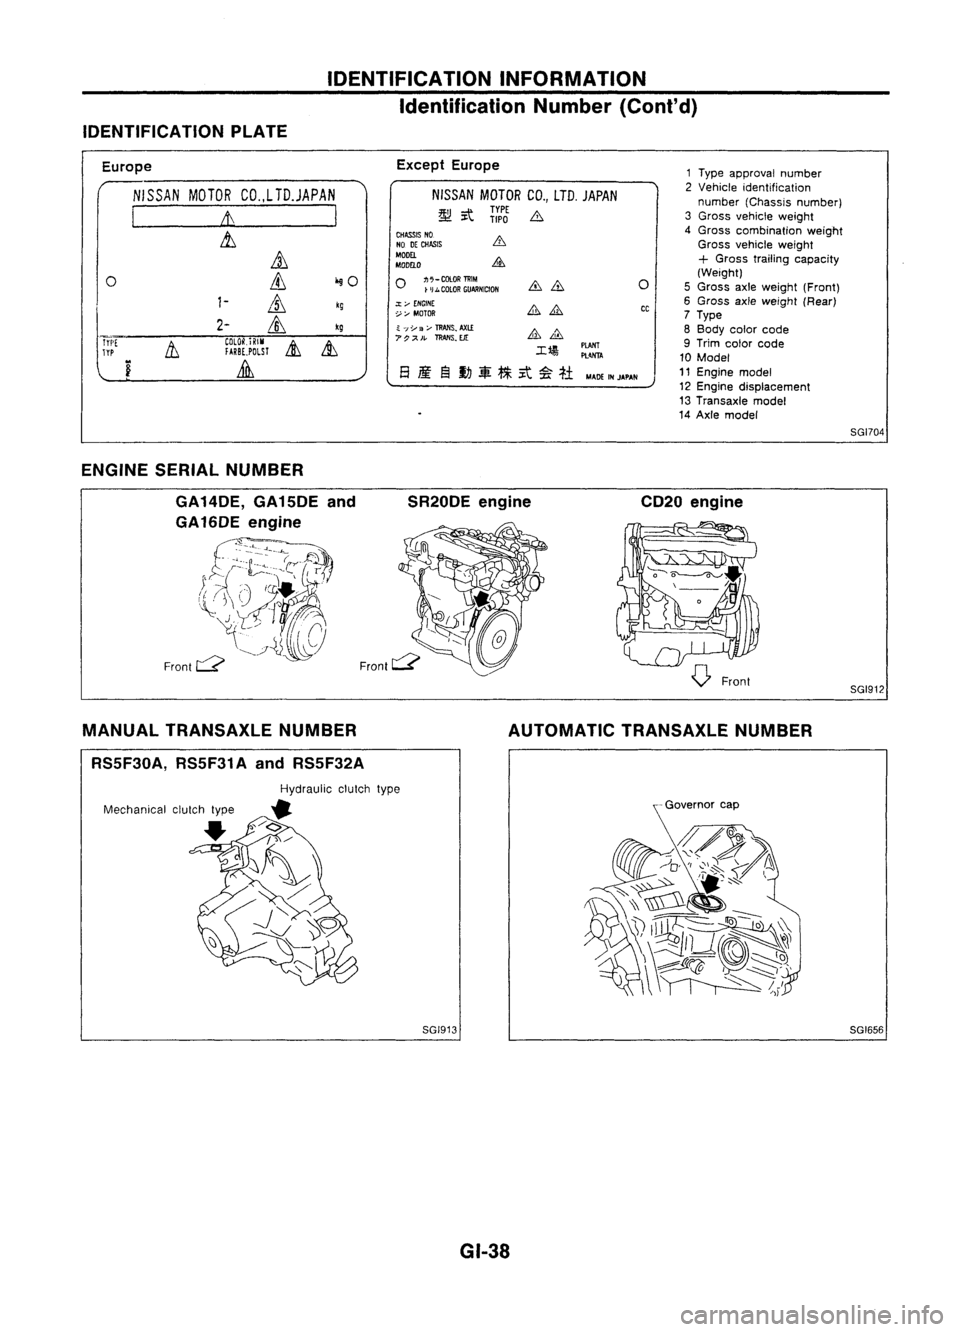
IDENTIFICATIONINFORMATION
Identification Number(Cont'd)
IDENTIFICATION PLATE
Europe
NISSAN MOTORCO.,LTD.JAPAN
I
It
I
&,
it
0
ill
iliO
1-
ill
kg
2-
&,
kg
Tri'[
11
COlOR.iRIM
&
&,
TYP
fARBE,POLSl
i
Lilli
Except
Europe
NISSAN MOTORCO.,LTD. JAPAN
~ it
ii:J
b
CHASS~ NO
NO DECHASIS
MODEL
MDDELO
o
~;::~:~~NlctDN
.:t;..-
ENGINE
~:,... MOTOR
~ ';;Y
3;..-
TRANS~
AXl.£
7P;;<'.
ll!AIIS.EJt:
M4DEINJAPAN
o
CC
1
Type approval number
2 Vehicle identification
number (Chassis number)
3 Gross vehicle weight
4 Gross combination weight
Gross vehicle weight
+
Gross trailing capacity
(Weight)
5 Gross axleweight (Front)
6 Gross axleweight (Rear)
7 Type
8 Body colorcode
9 Trim color code
10 Model
11 Engine model
12 Engine displacement
13 Transaxle model
14 Axle model
SGI704
ENGINE SERIALNUMBER
GA 14DE, GA15DE and
GA16DE engine
£~b-=~~rrf~)
(J~~~6
Front
c:::?
SR20DE
engine CD20engine
SGI912
MANUAL TRANSAXLE NUMBER
RS5F30A, RS5F31AandRS5F32A AUTOMATIC
TRANSAXLE NUMBER
SGI913 GI-38 SGI656