1995 NISSAN ALMERA N15 coolant level
[x] Cancel search: coolant levelPage 1109 of 1701
TROUBLEDIAGNOSES
Quick-glow System
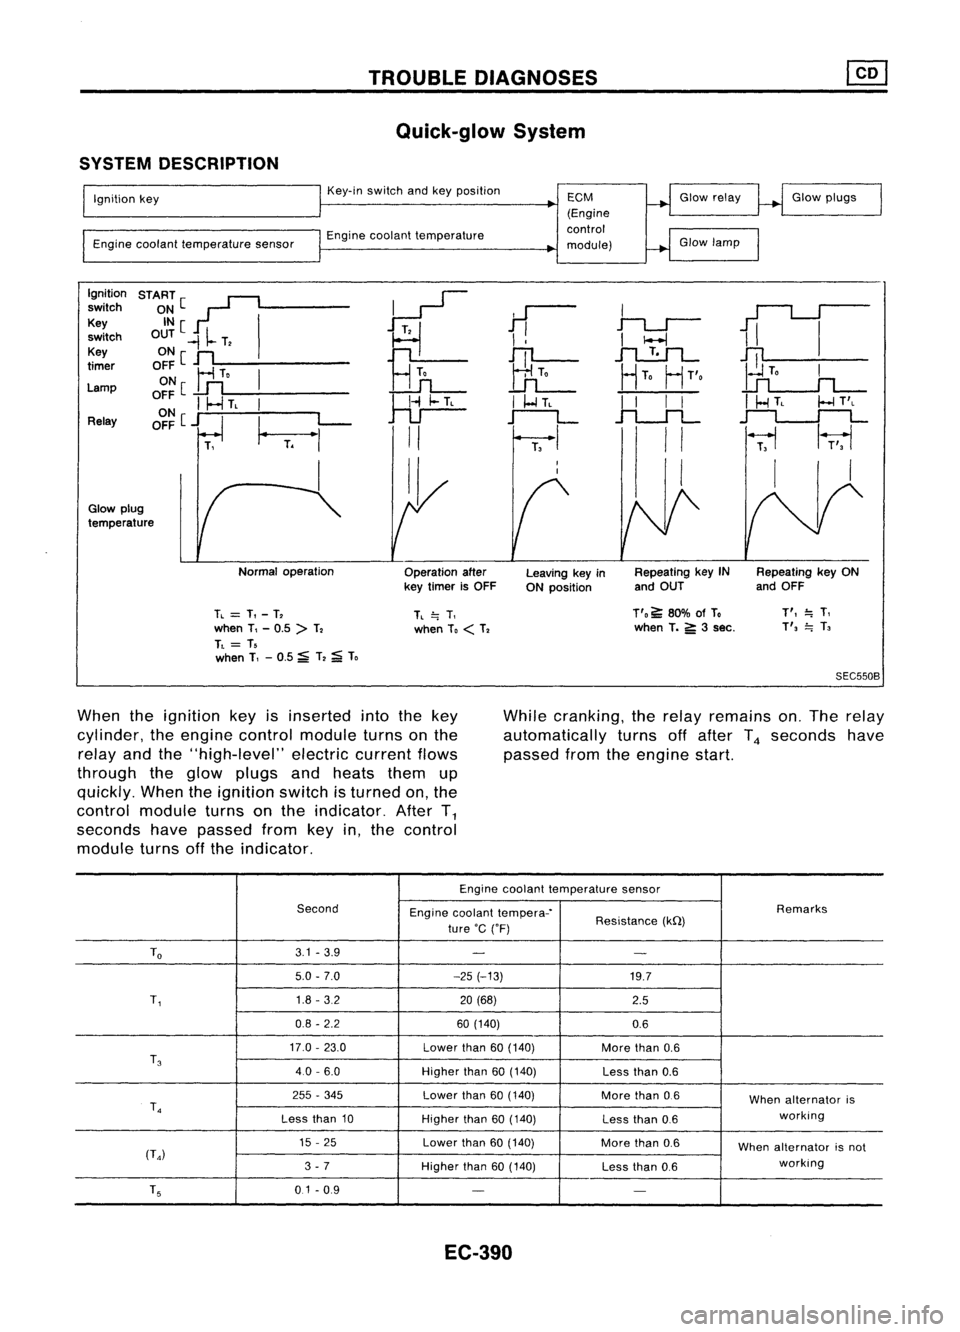
SYSTEM DESCRIPTION
Ignition key
Engine coolant temperature sensorKey-in
switch andkeyposition
Engine coolant temperature
ECM
(Engine
control
module) Glow
relay
Glow lamp Glow
plugs
Ignition START[~
~
switch
~~[ I
11
I
1iI
Key
~
switch OUT
-II-
T,
I
!
I
I-l
Key ONe
n
Hn
JTl-
.1"l....!:.1L-
~
timer
OFF
Ir1
To
I
UL
HTo
HT'o
Lamp ON
[
..Lfl
o~~
I
I-.J
TL
I
~
I
I-l
TL
I
I
I
I
I
HTL
I-l
T'L
Relay OFF
[j
I_
L-
r--L
.f"l.-.JL
~
T.
"'
II
I
II
~
1r;,1
I II I
I,
Glow plug
temperature
Normaloperation
Operationafter
key timer isOFF Leaving
keyin
ON position Repeating
keyIN
and OUT Repeating
keyON
and OFF
TL
=
T,-T,
when T,-0.5 >T,
TL
= T,
when T,-0.5 ~T,
;a;
To
TL
=.
T,
when To
<
T, T'o
~80% ofTo
when T.
5':
3sec.
T',
=.
T,
T',
=.
T,
SEC550B
When theignition keyisinserted intothekey
cylinder, theengine control module turnsonthe
relay andthe"high-level" electriccurrentflows
through theglow plugs andheats themup
quickly. Whentheignition switchisturned on,the
control module turnsonthe indicator. AfterT
1
seconds havepassed fromkeyin,the control
module turnsoffthe indicator. While
cranking, therelay remains on.The relay
automatically turnsoffafter T
4
seconds have
passed fromtheengine start.
Engine coolant temperature sensor
Second Enginecoolant tempera-' Remarks
ture 'C('F) Resistance
(kQ)
To
3.1
-3.9
- -
5.0 -7.0 -25(-13)
19.7
T,
1.8
-3.2
20(68)
2.5
0.8 -2.2 60(140)
0.6
17.0 -23.0
Lowerthan
60(140)
Morethan
0.6
T
3
40-6.0
Higherthan
60(140)
Lessthan
0.6
255 -345
Lowerthan
60(140)
Morethan
0.6
Whenalternator is
T
4
working
Less than
10
Higherthan
60(140)
Lessthan
0.6
15 -25
Lowerthan
60(140)
Morethan
0.6
Whenalternator isnot
(T
4)
working
3 -7
Higherthan
60(140)
Lessthan
0.6
T
5
0.1-0.9
- -
EC-390
Page 1165 of 1701
ENGINELUBRICATION SYSTEM
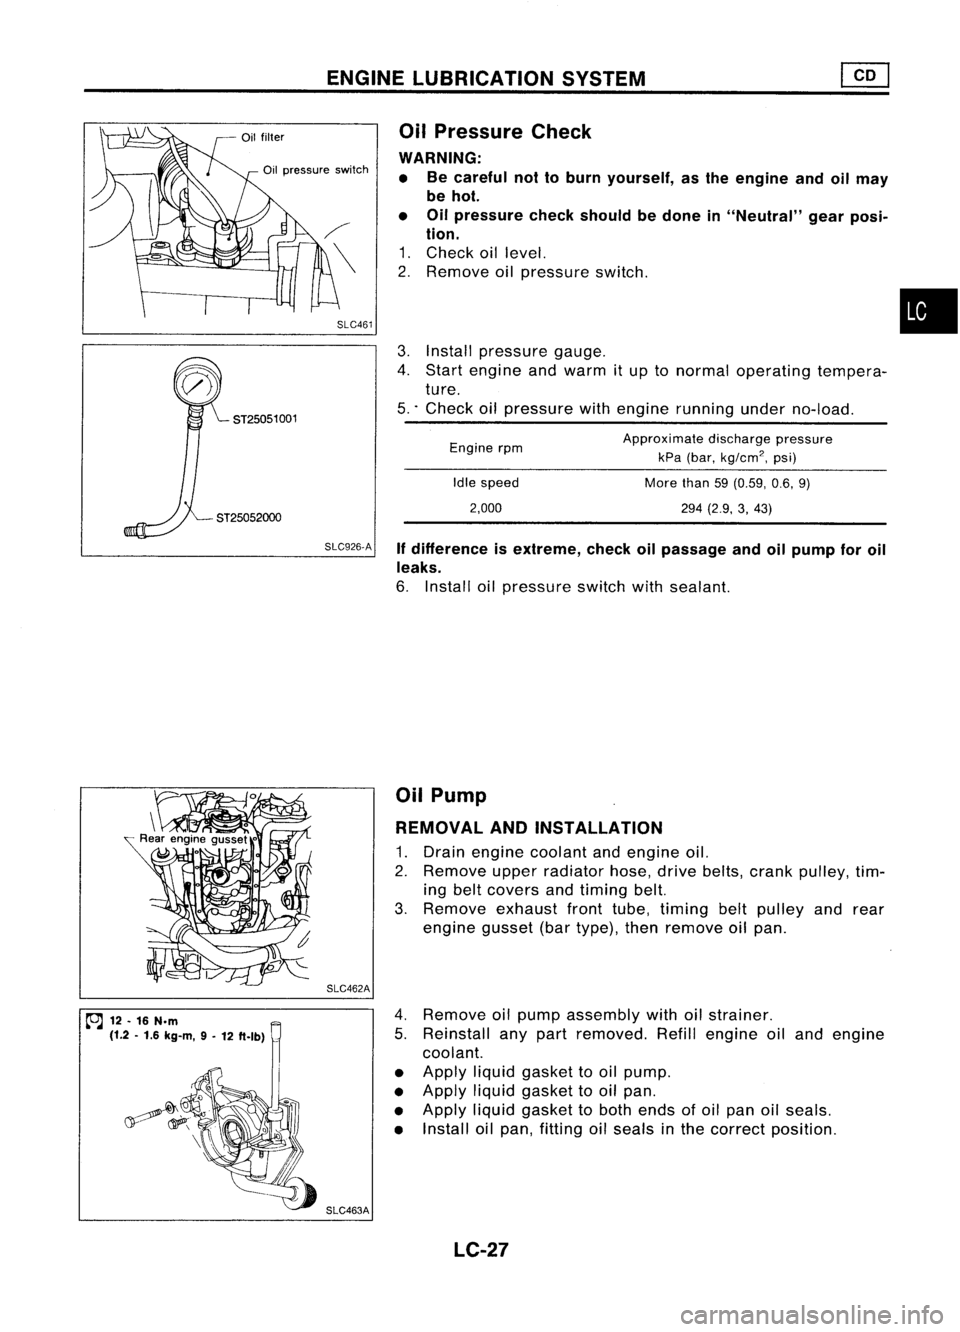
SLC926.A Ifdifference isextreme, checkoilpassage andoilpump foroil
leaks.
6. Install oilpressure switchwithsealant.
ST25052000
3.
Install pressure gauge.
4. Start engine andwarm itup tonormal operating tempera-
ture.
5 .. Check oilpressure withengine running underno-load.
•
Approximate dischargepressure
kPa (bar,
kg/cm
2,
psi)
More than59(0.59, 0.6,9)
294 (2.9, 3,43)
Idle
speed
2,000
Engine
rpm
Oil
Pressure Check
WARNING: • Becareful nottoburn yourself, asthe engine andoilmay
be hot.
• Oilpressure checkshould bedone in"Neutral" gearposi-
tion.
1. Check oillevel.
2. Remove oilpressure switch.
SLC461
Oil
pressure switch
ST25051 001
~ 12.16 N.m
(1.2 .1.6 kg-m, 9-
12 ft.lb) SLC462A
SLC463A Oil
Pump
REMOVAL ANDINSTAllATION
1. Drain engine coolant andengine oil.
2. Remove upperradiator hose,drivebelts, crank pulley, tim-
ing belt covers andtiming belt.
3. Remove exhaustfronttube, timing beltpulley andrear
engine gusset(bartype), thenremove oilpan.
4. Remove oilpump assembly withoilstrainer.
5. Reinstall anypart removed. Refillengine oiland engine
coolant.
• Apply liquidgasket tooil pump.
• Apply liquidgasket tooil pan.
• Apply liquidgasket toboth ends ofoil pan oilseals.
• Install oilpan, fitting oilseals inthe correct position.
LC-27
Page 1425 of 1701
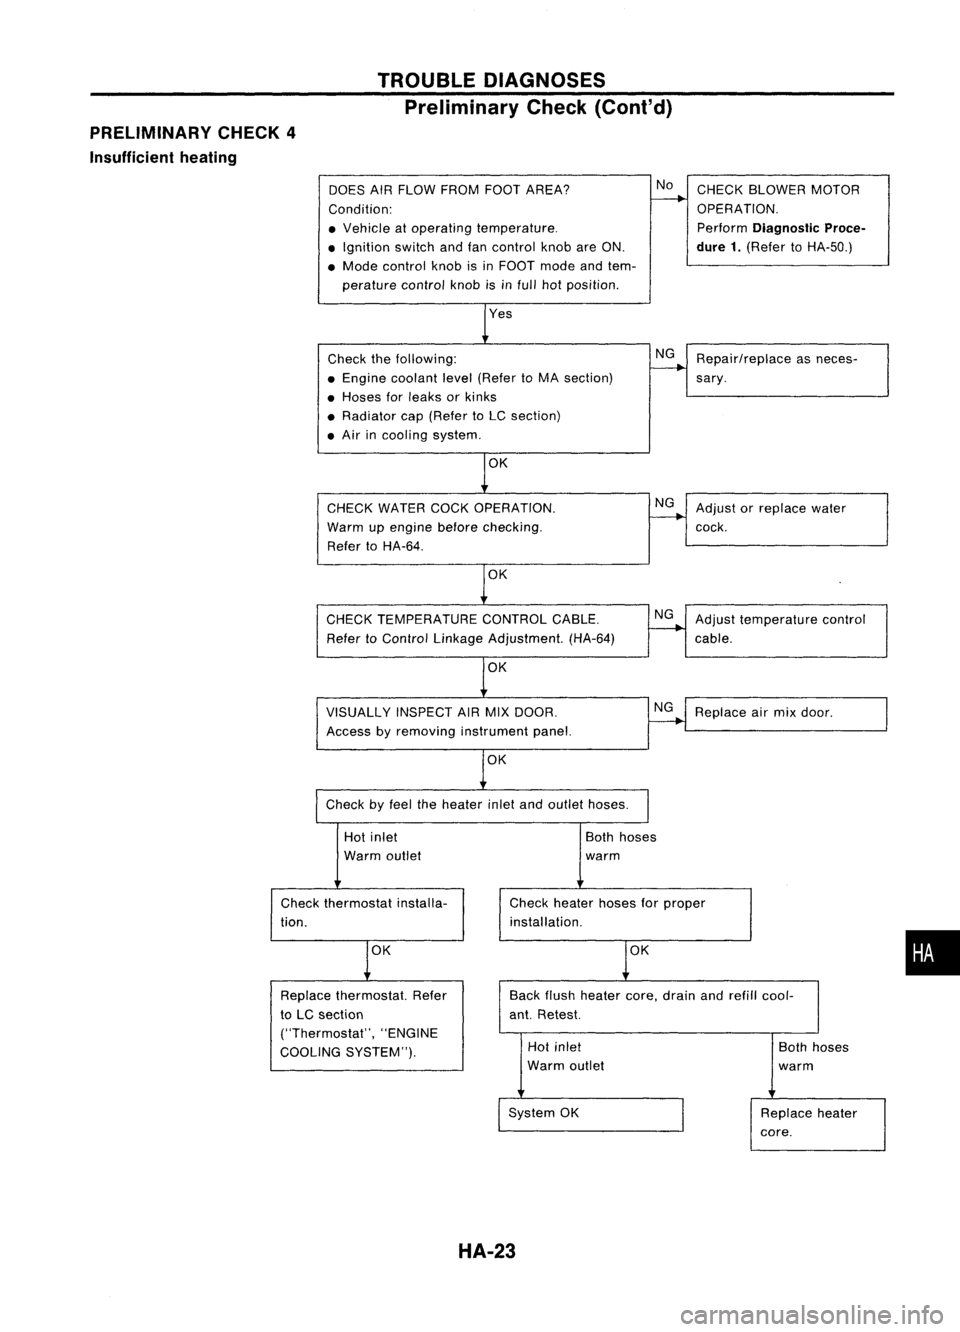
PRELIMINARY CHECK4
Insufficient heating TROUBLE
DIAGNOSES
Preliminary Check(Cont'd)
DOES AIRFLOW FROM FOOTAREA?
Condition:
• Vehicle atoperating temperature .
• Ignition switchandfancontrol knobareON.
• Mode control knobisin FOOT modeandtem-
perature controlknobisinfull hotposition.
Check thefollowing:
• Engine coolant level(Refer toMA section)
• Hoses forleaks orkinks
• Radiator cap(Refer toLC section)
• Air incooling system.
CHECK WATER COCKOPERATION.
Warm upengine before
checking.
Refer toHA-64.
OK
CHECK TEMPERATURE CONTROLCABLE.
Refer toControl Linkage Adjustment. (HA-64)
VISUALLY INSPECTAIRMIX DOOR.
Access byremoving instrument panel.
OK
Check byfeel theheater inletandoutlet hoses.
No
NG
NG
NG
NG
CHECK
BLOWER MOTOR
OPERATION.
Perform
Diagnostic Proce-
dure 1.
(Refer toHA-50.)
Repair/replace asneces-
sary .
Adjust orreplace water
cock.
Adjust temperature control
cable.
Replace airmix door.
Hot inlet
Warm outlet
Check thermostat installa-
tion.
OK
Both
hoses
warm
Check heater hosesforproper
installation.
OK
•
Back
flush heater core,drain andrefill cool-
ant. Retest.
Replace
thermostat. Refer
to LC section
("Thermostat", "ENGINE
COOLING SYSTEM"). Hot
inlet
Warm outlet
System OK
HA-23
Both
hoses
warm
Replace heater
core.
Page 1491 of 1701
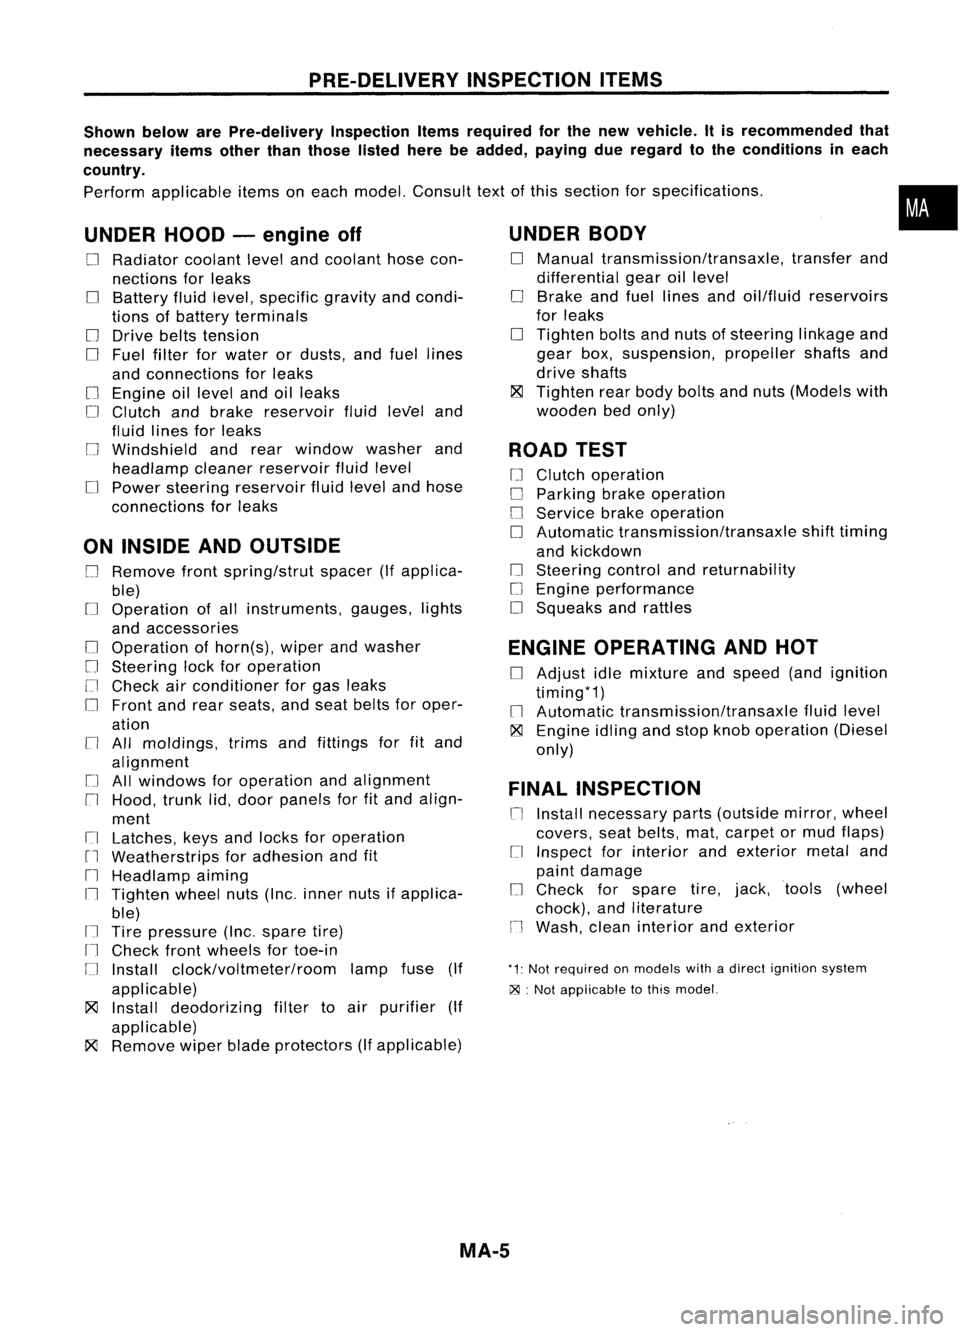
PRE-DELIVERYINSPECTIONITEMS
Shown belowarePre-delivery InspectionItemsrequired forthe new vehicle. Itis recommended that
necessary itemsotherthanthose listedherebeadded, payingdueregard tothe conditions ineach
country.
Perform applicable itemsoneach model. Consult textofthis section forspecifications .
UNDER HOOD-engine off
o
Radiator coolantlevelandcoolant hosecon-
nections forleaks
o
Battery fluidlevel, specific gravityandcondi-
tions ofbattery terminals
o
Drive beltstension
D
Fuel filter forwater ordusts, andfuel lines
and connections forleaks
[] Engine oillevel andoilleaks
D
Clutch andbrake reservoir fluidlevel and
fluid lines forleaks
o
Windshield andrear window washerand
headlamp cleanerreservoir fluidlevel
D
Power steering reservoir fluidlevel andhose
connections forleaks
ON INSIDE ANDOUTSIDE
D
Remove frontspring/strut spacer(Ifapplica-
ble)
D
Operation ofall instruments, gauges,lights
and accessories
o
Operation ofhorn(s), wiperandwasher
[] Steering lockforoperation
[] Check airconditioner forgas leaks
o
Front andrear seats, andseat belts foroper-
ation
n
All moldings, trimsandfittings forfitand
alignment
[J
Allwindows foroperation andalignment
n
Hood, trunklid,door panels forfitand align-
ment
[1
Latches, keysandlocks foroperation
rl
Weatherstrips foradhesion andfit
[l
Headlamp aiming
I~ Tighten wheelnuts(Inc. inner nutsifapplica-
ble)
IJ Tire pressure (Inc.spare tire)
Il
Check frontwheels fortoe-in
IJ Install clock/voltmeter/room lampfuse(If
applicable)
~ Install deodorizing filtertoair purifier (If
applicable)
~ Remove wiperbladeprotectors (Ifapplicable)
UNDER
BODY
o
Manual transmission/transaxle, transferand
differential gearoillevel
D
Brake andfuel lines andoil/fluid reservoirs
for leaks
D
Tighten boltsandnuts ofsteering linkageand
gear box,suspension, propellershaftsand
drive shafts
~ Tighten rearbody boltsandnuts (Models with
wooden bedonly)
ROAD TEST
D
Clutch operation
D
Parking brakeoperation
[J
Service brakeoperation
D
Automatic transmission/transaxle shifttiming
and kickdown
[] Steering controlandreturnability
o
Engine performance
D
Squeaks andrattles
ENGINE OPERATING ANDHOT
D
Adjust idlemixture andspeed (andignition
timing*1)
n
Automatic transmission/transaxle fluidlevel
~ Engine idlingandstop knob operation (Diesel
only)
FINAL INSPECTION
n
Install necessary parts(outside mirror,wheel
covers, seatbelts, mat,carpet ormud flaps)
[1
Inspect forinterior andexterior metaland
paint damage
[] Check forspare tire,jack, tools (wheel
chock), andliterature
n
Wash, cleaninterior andexterior
"1: Not required onmodels withadirect ignition system
~ :Not appiicable tothis model.
•
MA-5
Page 1492 of 1701
GENERALMAINTENANCE
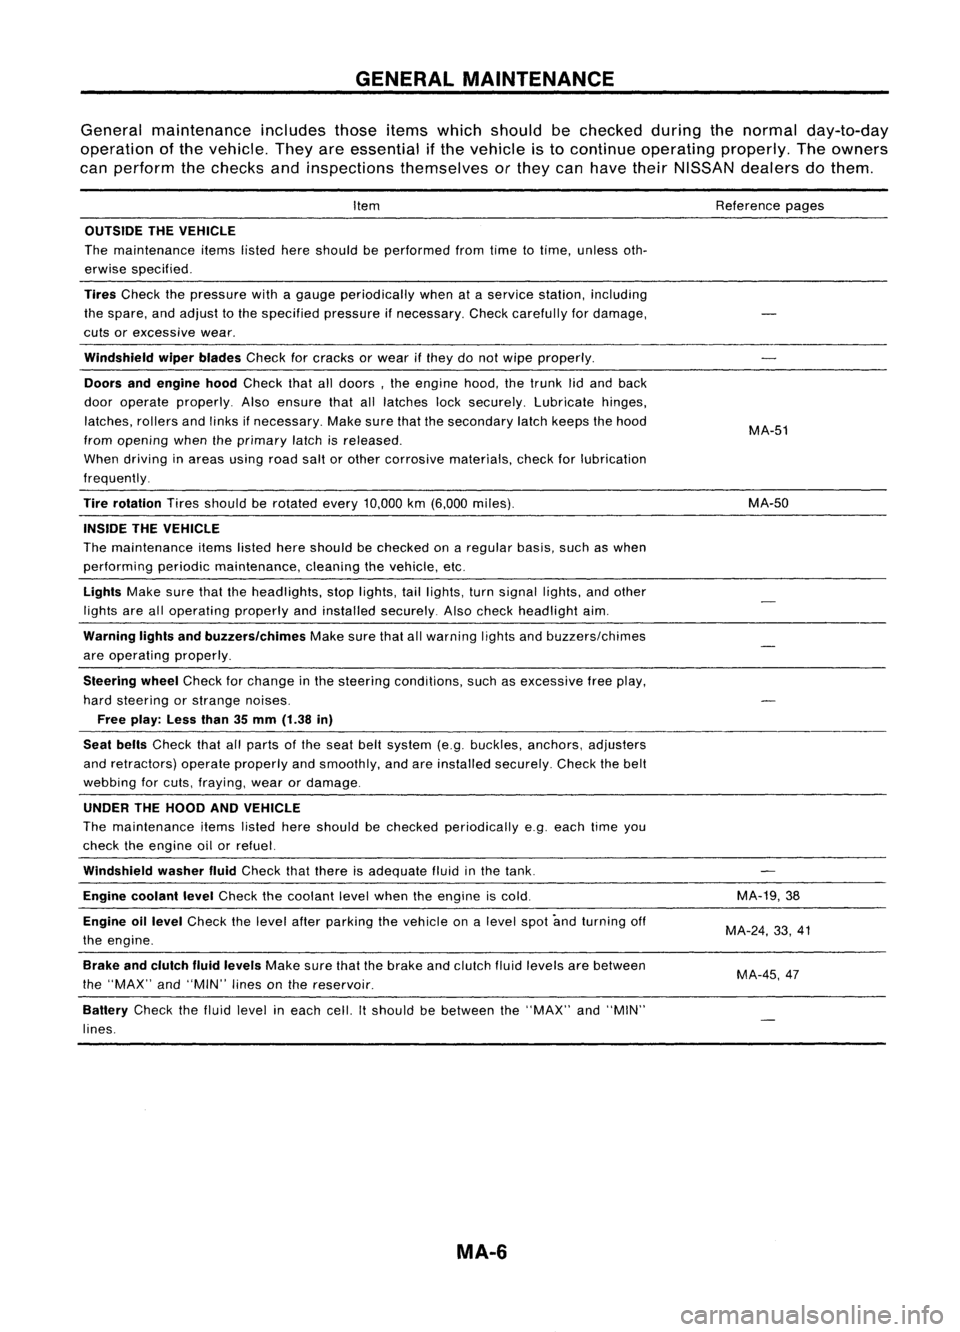
General maintenance includesthoseitemswhich should bechecked duringthenormal day-to-day
operation ofthe vehicle. Theyareessential ifthe vehicle isto continue operating properly.Theowners
can perform thechecks andinspections themselves orthey canhave theirNISSAN dealersdothem.
Item
OUTSIDE THEVEHICLE
The maintenance itemslistedhereshould beperformed fromtimetotime, unless oth-
erwise specified.
Tires
Check thepressure withagauge periodically whenataservice station, including
the spare, andadjust tothe specified pressureifnecessary. Checkcarefully fordamage,
cuts orexcessive wear.
Windshield wiperblades
Checkforcracks orwear ifthey donot wipe properly.
Doors andengine hood
Check thatalldoors, theengine hood,thetrunk lidand back
door operate properly. Alsoensure thatalllatches locksecurely. Lubricate hinges,
latches, rollersandlinks ifnecessary. Makesurethatthesecondary latchkeeps thehood
from opening whentheprimary latchisreleased.
When driving inareas usingroadsaltorother corrosive materials, checkforlubrication
frequently.
Tire rotation
Tiresshould berotated every
10,000
km
(6,000
miles).
INSIDE THEVEHICLE
The maintenance itemslistedhereshould bechecked onaregular basis,suchaswhen
performing periodicmaintenance, cleaningthevehicle, etc.
Lights
Makesurethattheheadlights, stoplights, taillights, turnsignal lights,andother
lights arealloperating properlyandinstalled securely. Alsocheck headlight aim.
Warning lightsandbuzzers/chimes
Makesurethatallwarning lightsandbuzzers/chimes
are operating properly.
Steering wheel
Check forchange inthe steering conditions, suchasexcessive freeplay,
hard steering orstrange noises.
Free play: Lessthan35mm (1.38 in)
Seat belts
Check thatallparts ofthe seat beltsystem (e.g.buckles, anchors, adjusters
and retractors) operateproperly andsmoothly, andareinstalled securely. Checkthebelt
webbing forcuts, fraying, wearordamage.
UNDER THEHOOD ANDVEHICLE
The maintenance itemslisted hereshould bechecked periodically e.g.each timeyou
check theengine oilorrefuel.
Windshield washerfluid
Check thatthere isadequate fluidinthe tank.
Engine coolant level
Check thecoolant levelwhen theengine iscold.
Engine oillevel
Check thelevel afterparking thevehicle onalevel spotandturning off
the engine.
Brake andclutch fluidlevels
Makesurethatthebrake andclutch fluidlevels arebetween
the "MAX" and"MIN" linesonthe reservoir.
Battery
Checkthefluid level ineach cell.Itshould bebetween the"MAX" and"MIN"
lines.
MA-6
Reference
pages
MA-51
MA-50
MA-19,38
MA-24, 33,41
MA-45,47
Page 1506 of 1701
![NISSAN ALMERA N15 1995 Service Manual
MAX,
MIN.
ENGINE
MAINTENANCE [QK]
Changing EngineCoolant (Cont'd)
7. Warm upengine untilcooling fanoperates, thenrace
engine 2or 3times under no-load.
8. Stop engine andwait until itcools down NISSAN ALMERA N15 1995 Service Manual
MAX,
MIN.
ENGINE
MAINTENANCE [QK]
Changing EngineCoolant (Cont'd)
7. Warm upengine untilcooling fanoperates, thenrace
engine 2or 3times under no-load.
8. Stop engine andwait until itcools down](/manual-img/5/57349/w960_57349-1505.png)
MAX,
MIN.
ENGINE
MAINTENANCE [QK]
Changing EngineCoolant (Cont'd)
7. Warm upengine untilcooling fanoperates, thenrace
engine 2or 3times under no-load.
8. Stop engine andwait until itcools down.
9. Drain water.
10. Repeat steps2through 9until clear water begins todrain
from radiator.
-REFILLING ENGINECOOLANT-
11. Install reservoir tank,radiator drainplug,cylinder block
drain plugandairrelief plug
@.
• Apply sealant tothe thread ofcylinder blockdrainplug.
toJ:
34-44 N.m (3.5-4.5 kg-m, 25-33 ft-Ib)
12. Fill radiator withcoolant untilcoolant spillsfromtheair
relief plug
@
hole, theninstall airrelief plug
@.
13. Fill radiator andreservoir tankwithcoolant uptospecified
level andinstall radiator cap.
Air relief plug:
~: 7-8 N.m (0.7-0.8 kg-m, 61-69 in-Ib)
For coolant mixture ratio,refertoMA-16.
Coolant capacity (Withreservoir tank):
Unit:f(Imp qt)
With heater
Withoutheater
M/T 5.9(5-1/4) 5.6(4-7/8)
AIT 6.4(5-5/8) 6.1(5-3/8)
Reservoir tankcapacity (forMAX level):
o.n
(5/8Impqt)
Pour coolant through coolantfillerneckslowly toallow airin
system toescape.
14. Warm upengine tonormal operating temperature.
15. Run engine at2,500 rpmfor10seconds andreturn toidle
speed.
• Repeat 2or 3times.
Watch coolant temperature gaugesoas not tooverheat the
engine.
SMA4128
MA-20
Page 1507 of 1701
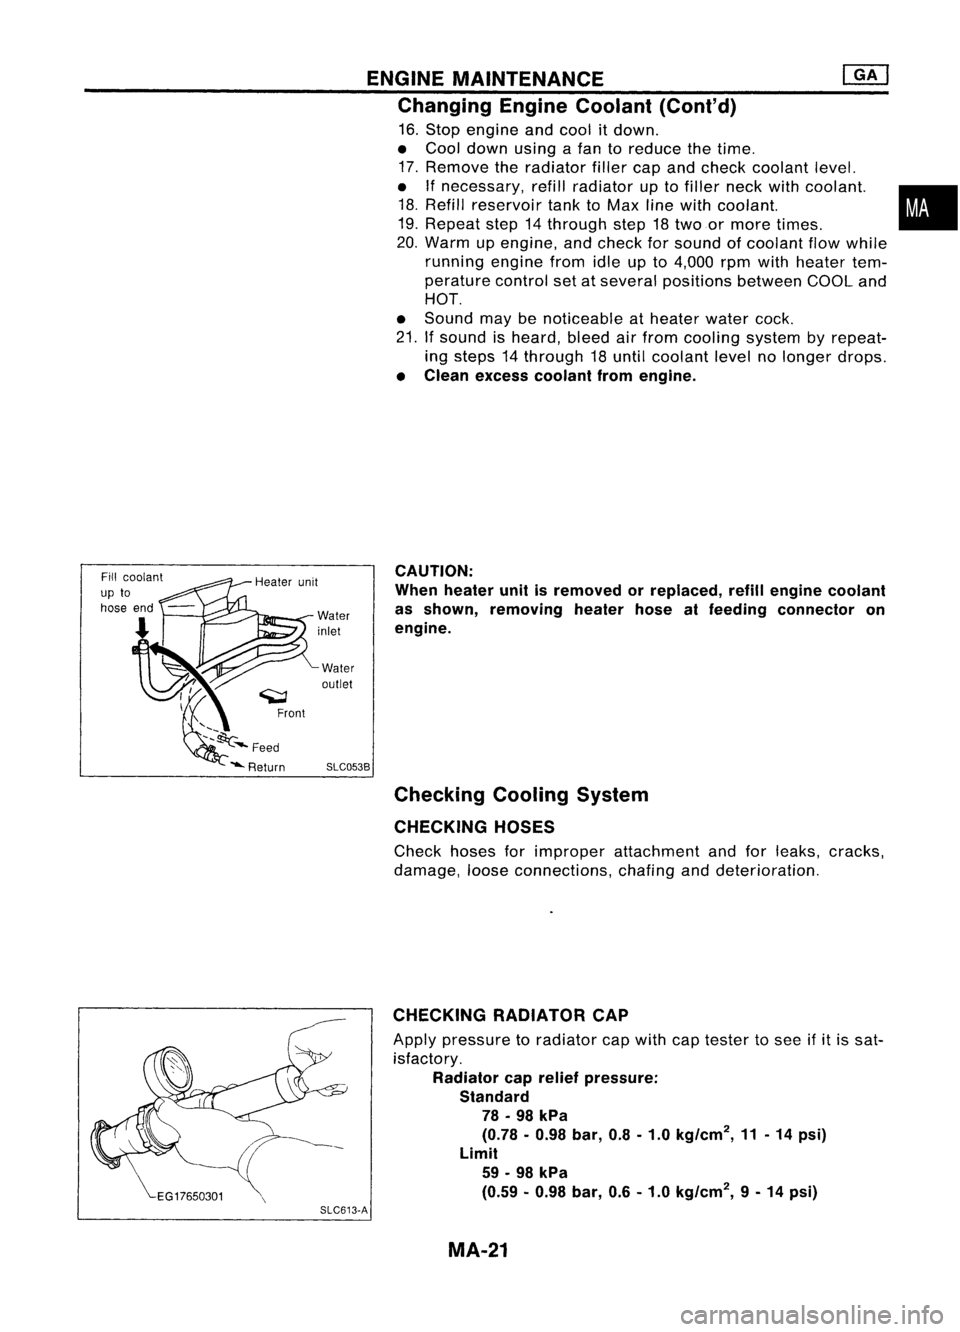
SLC053B
Water
inlet
Wateroutlet ENGINE
MAINTENANCE
@KJ
Changing EngineCoolant (Cont'd)
16. Stop engine andcool itdown.
• Cool down usingafan toreduce thetime.
17. Remove theradiator fillercapand check coolant level.
• If
necessary, refillradiator uptofiller neckwithcoolant. •
18. Refill reservoir tanktoMax linewith coolant. •
19. Repeat step14through step18two ormore times.
20. Warm upengine, andcheck forsound ofcoolant flowwhile
running enginefromidleupto4,000 rpmwith heater tem-
perature controlsetatseveral positions betweenCOOLand
HOT.
• Sound maybenoticeable atheater watercock.
21. Ifsound isheard, bleedairfrom cooling systembyrepeat-
ing steps 14through 18until coolant levelnolonger drops.
• Clean excess coolant fromengine.
CAUTION:
When heater unitisremoved orreplaced, refillengine coolant
as shown, removing heaterhoseatfeeding connector on
engine.
Checking CoolingSystem
CHECKING HOSES
Check hosesforimproper attachment andforleaks, cracks,
damage, looseconnections, chafinganddeterioration.
CHECKING RADIATORCAP
Apply pressure toradiator capwith captester tosee if
it
is sat-
isfactory.
Radiator caprelief pressure:
Standard 78 -98 kPa
(0.78 •0.98 bar,0.8-1.0 kg/cm
2,
11.14 psi)
Limit
59 -98 kPa
(0.59 -0.98 bar,0.6-1.0 kg/cm
2,
9-14 psi)
SLC613-A
MA-21
Page 1510 of 1701
ENGINEMAINTENANCE
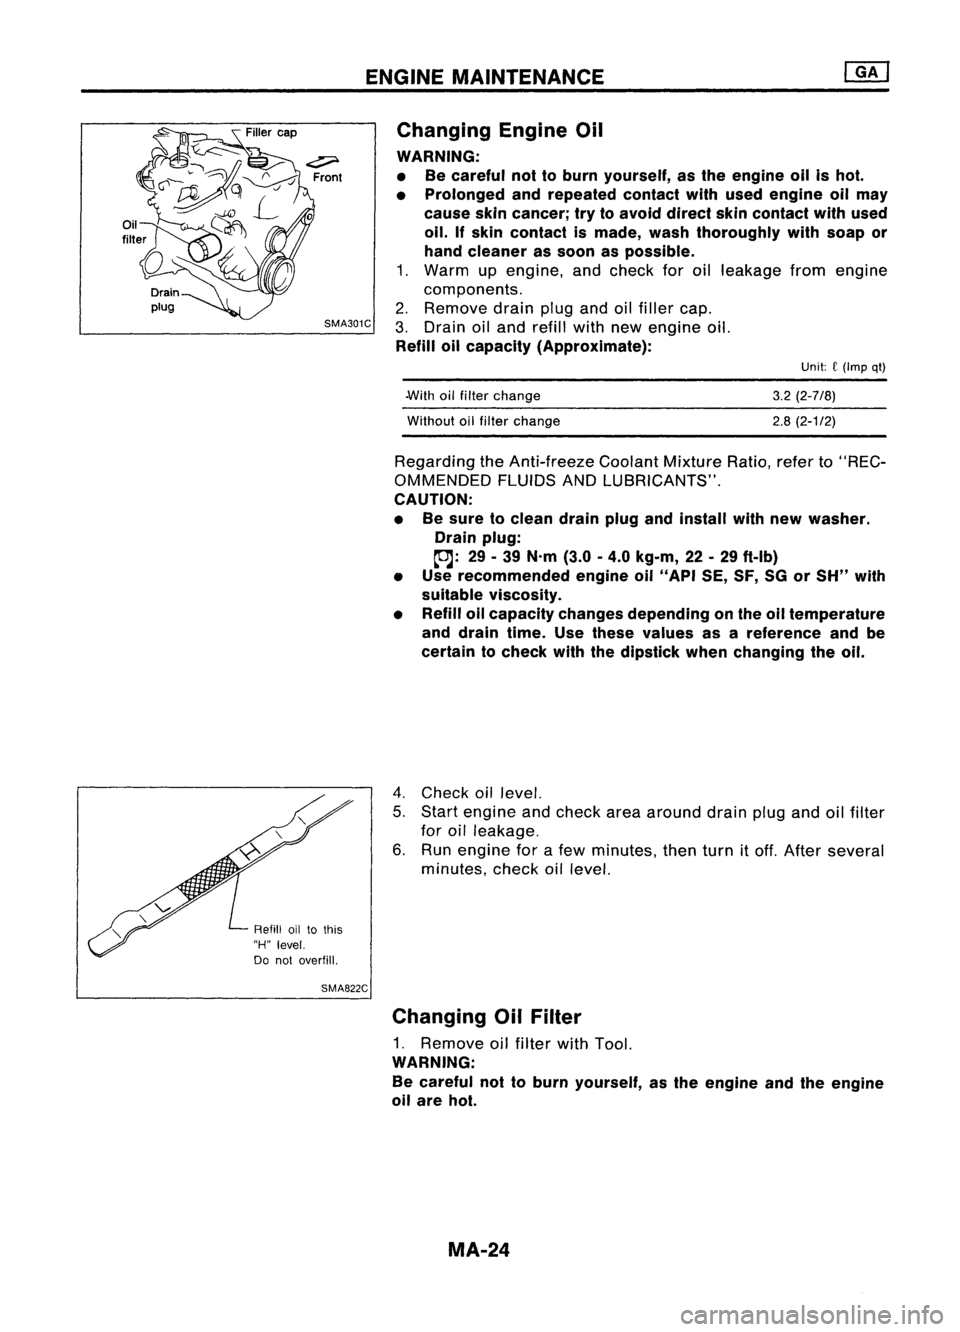
Changing EngineOil
WARNING:
• Becareful nottoburn yourself, asthe engine oilishot.
• Prolonged andrepeated contactwithused engine oilmay
cause skincancer; trytoavoid direct skincontact withused
oil.
If
skin contact ismade, washthoroughly withsoap or
hand cleaner assoon aspossible.
1. Warm upengine, andcheck foroilleakage fromengine
components.
2. Remove drainplugandoilfiller cap.
3. Drain oiland refill withnewengine oil.
Refill oilcapacity (Approximate):
Unit:
f
(Imp qt)
.With oilfilter change
Without oilfilter change
3.2
(2-7/8)
2.8 (2-1/2)
Regarding theAnti-freeze CoolantMixtureRatio,referto"REC-
OMMENDED FLUIDSANDLUBRICANTS".
CAUTION:
• Besure toclean drainplugandinstall withnew washer.
Drain plug:
~: 29-39 N'm (3.0-4.0 kg-m, 22-29 ft-Ib)
• Use recommended engineoil"API SE,SF,SGorSH" with
suitable viscosity.
• Refill oilcapacity changesdepending onthe oiltemperature
and drain time.Usethese values asareference andbe
certain tocheck withthedipstick whenchanging theoil.
4. Check oillevel.
5. Start engine andcheck areaaround drainplugandoilfilter
for oilleakage.
6. Run engine forafew minutes, thenturnitoff. After several
minutes, checkoillevel.
Refill oiltothis
"H" level.
Do not overfill.
SMA822C
Changing OilFilter
1. Remove oilfilter withTool.
WARNING:
Be careful nottoburn yourself, asthe engine andtheengine
oil are hot.
MA-24