1995 CHEVROLET CORVETTE light
[x] Cancel search: lightPage 229 of 386
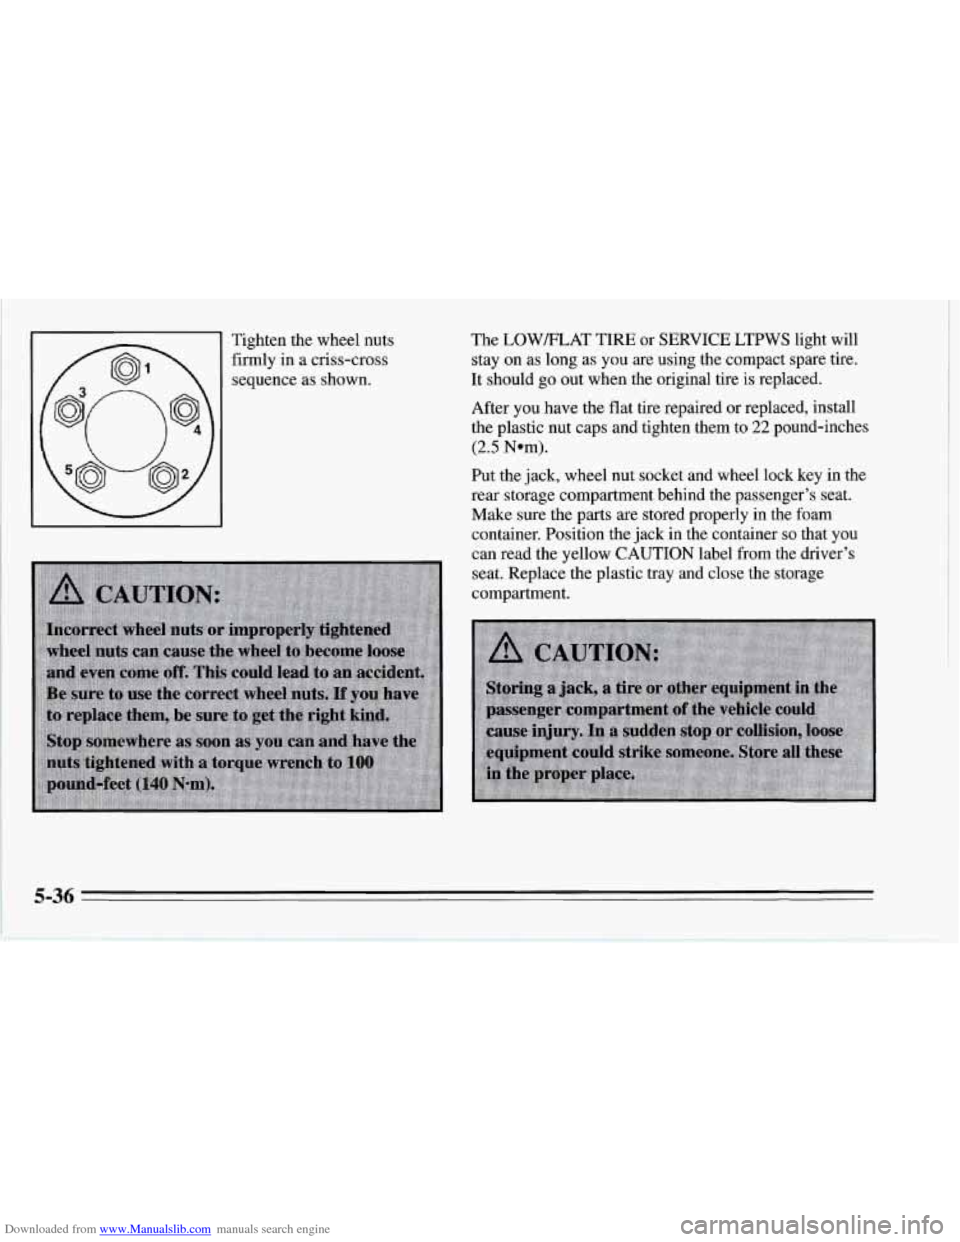
Downloaded from www.Manualslib.com manuals search engine Tighten the wheel nuts firmly in a criss-cross
sequence as shown. The
LOWELAT TIRE or SERVICE LTPWS light will
stay on as long as you are using the compact spare tire.
It should go out when the original tire is replaced.
After you have the flat tire repaired or replaced, install
the plastic nut caps and tighten them to
22 pound-inches
(2.5 Nem).
Put the jack, wheel nut socket and wheel lock key in the
rear storage compartment behind
the passenger’s seat.
Make sure the parts are stored properly in the foam
container. Position the jack in the container
so that you
can read the yellow CAUTION label from the driver’s
seat. Replace the plastic tray and close the storage
compartment.
5-36
Page 235 of 386
Downloaded from www.Manualslib.com manuals search engine I NOTICE:
Spinning your wheels can destroy parts of your
vehicle as well as the tires. If you spin the wheels
too fast while shifting your transmission back
and forth, you can destroy your transmission.
For information about using tire chains on your vehicle,
see “Tire Chains” in the Index.
Rocking your vehicle to get it out:
First, turn your steering wheel left and right. That will
clear the area around your front wheels. You should turn
your ASR system off. (See
“ASR System” in the Index.)
Then shift back and forth between REVERSE (R) and a
forward gear (or with a manual transmission, between
FIRST
(1) or SECOND (2) gear and REVERSE (R)),
spinning the wheels as little as possible. Release the
accelerator pedal while you shift, and press lightly on
the accelerator pedal when the transmission is in gear.
If
that doesn’t get you out after a few tries, you may need
to be towed out. If you do need to be towed out, see
“Towing Your Vehicle” in the Index.
5-42
Page 262 of 386
Downloaded from www.Manualslib.com manuals search engine What to Use What to Use
To add lubricant when the level is low, use Axle
Lubricant (GM Part
No. 12345977) or SAE SOW-90
GL-5 gear lubricant.
To completely refill after draining,
add
4 ounces (1 18 ml) of Limited-Slip Differential
Lubricant Additive (GM Part
No. 1052358). Then fill to
the bottom of the filler plug hole with Axle Lubricant
(GM Part
No. 12345977) or SAE 8OW-90 GL-5 gear
lubricant.
Engine Coolant
The following explains your cooling system and how to
add coolant when it is low.
If you have a problem with
engine overheating or if you need to add coolant to your
high fill reservoir, see “Engine Overheating” in the
Index.
The proper coolant for your Corvette will:
Give freezing protection down to -34°F (-37°C).
Give boiling protection up to 262 “F (128 ” C).
Protect against rust and corrosion.
Help keep the proper engine temperature.
Let the warning lights work as they should. Use a mixture
of one-half
clean water (preferably
distilled) and one-half antifreeze that meets
“GM
Specification 1825M,” which won’t damage aluminum
parts.
You can also use a recycled coolant conforming to
GM Specification 1825M with a complete coolant flush
and refill. Use GM Engine Coolant Supplement (sealer)
with any complete coolant flush and refill. If
you use
this mixture, you don’t need to add anything else.
6-27
Page 268 of 386
Downloaded from www.Manualslib.com manuals search engine your brake fluid. Adding brake fluid won’t correct a
leak. If you add fluid when your linings
are worn, then
you’ll have too much fluid when
you get new brake
linings. You should add (or remove) brake fluid, as
necessary, only when work is done on the brake
hydraulic system. On
vehicles equipped with the
LT5 (Code J) engine, the
brake warning light will come on when your brake fluid
falls to a low level. See “Brake System Warning Light”
in the Index.
For vehicles equipped with the
LT1 (Code P) engine,
refer to the Maintenance Schedule to determine when to
check your brake fluid. See “Periodic Maintenance
Inspections” in the Index.
To Check Brake Fluid
You can check the brake fluid without taking off the cap.
Just look at the brake fluid reservoir.
The fluid level
should be above the MIN mark on the reservoir. If it
isn’t, have your brake system checked to see
if there is
a leak.
After work is done on the brake hydraulic system, make
sure the level is between the MIN and MAX
marks.
6-33
Page 270 of 386
Downloaded from www.Manualslib.com manuals search engine NOTICE:
Replacing Brake System Parts
The braking system on a modem vehicle is complex. Its
I
Continuing to drive with worn-out brake pads
could result in costly brake repair.
I
Some driving conditions or climates may cause a brake
squeal when the brakes are first applied or lightly
applied. This does not mean something is wrong with
your brakes.
Brake linings should always be replaced as complete
axle sets.
Brake Pedal Travel
See your dealer if the brake pedal does not return to
normal height, or if there is a rapid increase in pedal
travel. This could be
a sign of brake trouble.
Brake Adjustment
As you make brake stops, your disc brakes
automatically adjust for wear. many
parts have to be
of top quality and work well
together if the vehicle is to have really good braking.
Vehicles we design and test have top-quality
GM brake
parts in them, as your Corvette does when
it is new.
When you replace parts of your braking system
-- for
example, when your brake linings wear down and you
have to have new ones put in
-- be sure you get new
genuine
GM replacement parts. If you don’t, your
brakes may no longer work properly. For example, if
someone puts in brake linings that are wrong for your
vehicle, the balance between your front and rear brakes
can change
-- for the worse. The braking performance
you’ve come to expect can change
in many other ways if
someone puts
in the wrong replacement brake parts.
Battery
Every new Corvette has a Delco Freedom@ battery. You
never have to add water to one of these. When it’s time
for a new battery, we recommend a Delco Freedom@
battery. Get one that has the replacement number shown
on the original battery’s label. For battery replacement,
see your dealer or the Corvette Service Manual.
To
purchase a service manual, see “Service Publications” in
the Index.
6-35
Page 284 of 386
Downloaded from www.Manualslib.com manuals search engine Extended Mobility Tires (Option)
If your Corvette has optional Goodyear Extended
Mobility Tires (EMT’s), the tires will have “EMT”
molded on the sidewalls. Your vehicle may also have a
spare tire delete option. With the spare tire delete option,
there’s no spare tire, no tire changing equipment and no
place to store a tire in the vehicle. Extended Mobility
Tires perform
so well without any air that a Low Tire
Pressure Warning System (LTPWS) is used to alert you if
a tire has lost pressure.
A LOWELAT TIRE light will
appear on your Driver Information Center
if a tire’s
inflation pressure is less than
25 psi (170 kPa). If the
LOW/FLAT
TIRE light comes on, check your tire
pressures as soon as you can. See “Low Tire Pressure
Warning System” in the Index for additional information. If a
tire goes flat,
you won’t need to stop on the side of
the road to change the tire. You can just keep on driving.
The shorter the distance
you drive and the slower the
speed, the greater the chance that the tire will not have
to be replaced. If
you drive on a deflated EMT for
distances
of 50 miles (80 km) or less and at speeds of
55 mph (90 km/h) or less, there is a good chance that the
tire can be repaired. The tire can operate effectively with
no air pressure for up to 200 miles (320 km) at speeds
up to
55 mph (90 kmk), but the tire would then have to
be replaced. Also remember: When a tire is filled with
air, it provides a cushion between the road and the
wheel. Because you do not have this cushion when
driving on a deflated tire, try to avoid potholes that
could damage your wheel and require replacement of it.
Some road hazards can damage a tire beyond repair. This
damage could occur before you’ve driven on the tire
in a
deflated condition. Whenever a tire has been damaged, or
if you’ve driven any distance on a deflated EMT, check
with a Goodyear EMT Service Center to determine
whether
the tire can be repaired or should be replaced.
To maintain your vehicle’s extended mobility feature,
all replacement tires must be Extended Mobility Tires.
See the Goodyear Extended Mobility Tire Owner’s
Manual and Limited Warranty supplied with your
Corvette for additional information.
6-49
Page 291 of 386
Downloaded from www.Manualslib.com manuals search engine Don’t use any of these unless this manual says you can.
In many uses, these will damage your vehicle:
0 Alcohol
0 Laundry Soap
Bleach
Reducing Agents
Cleaning the Inside of Your Corvette
Use a vacuum cleaner often to get rid of dust and loose
dirt. Wipe vinyl or leather with a clean, damp cloth.
Your Chevrolet dealer has two GM cleaners, a
solvent-type spot lifter and a foam-type powdered
cleaner. They will clean normal spots and stains very
well.
Do not use them on vinyl or leather.
Here
are some cleaning tips:
0 Always read the instructions on the cleaner label.
Clean up stains as soon as you can -- before they set.
Use a clean cloth or sponge, and change to a clean area
0 Use solvent-type cleaners in a well-ventilated area
If a ring forms after spot cleaning, clean the entire
often.
A soft brush may
be used if stains are stubborn.
only. If you use them, don’t saturate the stained area.
area immediately or it will set.
Using Foam-Type Cleaner on Fabric
0
0
0
0
0
0
0
0
0
0
Vacuum and brush the area to remove any loose dirt.
Always clean a whole trim panel or section. Mask
surrounding trim along stitch or welt lines.
Mix Multi-Purpose Powdered Cleaner following the
directions on the container label.
Use suds only and apply with a clean sponge.
Don’t saturate the material.
Don’t rub it roughly.
As soon as you’ve cleaned the section, use a sponge
to remove the suds.
Rinse the section with a clean, wet sponge.
Wipe
off what’s left with a slightly damp paper towel
or cloth.
Then
dry it immediately with a blow dryer or a heat lamp.
NOTICE:
Be careful. A blow dryer or a heat lamp may
scorch the fabric.
0 Wipe with a clean cloth.
6-56
Page 292 of 386
Downloaded from www.Manualslib.com manuals search engine Using Solvent-Type Cleaner on Fabric
First, see if you have to use solvent-type cleaner at all.
Some spots and stains will clean off better with just
water and mild soap.
If
you need to use a solvent:
0 Gently scrape excess soil from the trim material with
a clean, dull knife or scraper. Use very little cleaner,
light pressure and clean cloths (preferably
cheesecloth). Cleaning should start at the outside of
the stain, “feathering” toward the center. Keep
changing to a clean section of the cloth.
When you clean a stain from fabric, immediately dry
the area with a blow dryer to help prevent a cleaning
ring. (See the previous NOTICE.)
Fabric Protection
Your Corvette has upholstery and carpet that has been
treated with Scotchgard” Fabric Protector, a 3M
product. Scotchgard
TM protects fabrics by repelling oil
and water, which are the carriers of most stains. Even
with this protection, you still need to clean your
upholstery and carpet often to keep it looking new.
Further information on cleaning is available by calling
1-800-433-3296 (in Minnesota, 1-800-642-6167).
Special Cleaning Problems
Greasy or Oily Stains
Stains caused by grease, oil, butter, margarine, shoe
polish, coffee with cream, chewing gum, cosmetic
creams, vegetable oils, wax crayon, tar and asphalt can
be removed as follows:
a
0
0
Carefully scrape off excess stain.
Follow the solvent-type instructions described
earlier.
Shoe polish, wax crayon, tar and asphalt will stain
if
left on a vehicle seat fabric. They should be removed
as soon as possible. Be careful, because the cleaner
will dissolve them and may cause them to spread.
Non-Greasy Stains
Stains caused by catsup, coffee (black), egg, fruit,
fruit juice, milk, soft drinks, wine, vomit, urine and
blood can be removed as follows:
Carefully scrape off excess stain, then sponge the
soiled area with cool water.
If a stain remains, follow the foam-type instructions
described earlier.
6-57