1995 CHEVROLET CORVETTE light
[x] Cancel search: lightPage 293 of 386
Downloaded from www.Manualslib.com manuals search engine If an odor lingers after cleaning vomit or urine,
treat the area with a waterhaking soda solution:
1 teaspoon (5 ml) of baking soda to 1 cup (250 ml)
of lukewarm water.
If needed, clean lightly with solvent-type cleaner.
Combination Stains
Stains caused by candy, ice cream, mayonnaise, chili
sauce and unknown stains can be removed as follows:
Carefully scrape off excess stain, then clean with
cool water and allow to dry.
If a stain remains, clean it with solvent-type cleaner.
Cleaning Vinyl
Use warm water and a clean cloth.
Rub with a clean, damp cloth to remove dirt. You
may have to do it more than once.
Things like tar, asphalt and shoe polish will stain if
you don’t get them off quickly. Use a clean cloth and
a
GM VinylLeather Cleaner or equivalent product.
Cleaning Leather
Use a soft cloth with lukewarm water and a mild soap or
saddle soap.
0 For stubborn stains, use a GM Vinylkeather Cleaner
or equivalent product.
cleaners, furniture polish or shoe polish on leather.
0 Soiled leather should be cleaned immediately. If dirt
0 Never use oils, varnishes, solvent-based or abrasive
is allowed to work into finish, it can harm the
leather.
Cleaning Soft-Touch Surfaces
Use only mild soap and water to clean the Soft-Touch
paint surfaces in your Corvette.
Cleaning Dulso-Coated Moldings
These moldings are around the hatch opening in your
Corvette’s rear area.
0 When lightly soiled, wipe with a sponge or soft
lint-free cloth dampened with water.
0 When heavily soiled, use warm soapy water.
6-58
Page 297 of 386
Downloaded from www.Manualslib.com manuals search engine Your Corvette has a “basecoatklearcoat” paint finish.
The clearcoat gives more depth and gloss to the colored
basecoat. Always use waxes and polishes that are
non-abrasive and made for a basecoatklearcoat paint
finish.
Machine compounding or aggressive polishing on
a basecoatlclearcoat paint finish
may dull the
finish or leave swirl marks.
Foreign materials such as calcium chloride and other
salts,
ice melting agents, road oil and tar, tree sap, bird
droppings, chemicals from industrial chimneys, etc. can
damage your vehicle’s finish if they remain on painted
surfaces. Wash the vehicle as soon as possible.
If
necessary, use non-abrasive cleaners that are marked
safe for painted surfaces to remove foreign matter.
Exterior painted surfaces are subject to aging, weather
and chemical fallout that can take their toll over a period
of years. You can help to keep the paint finish looking
new
by keeping your Corvette garaged or covered
whenever possible.
Cleaning Your Convertible Top
Your convertible top should be cleaned often. If you use
an automatic car wash, use one with water jets and
hanging cloths.
When you hand wash the top, do it in partial shade.
Vacuum away any dust and other material. Use a mild
soap, lukewarm water and a soft sponge.
A chamois or
cloth may leave lint on the top, and a brush can chafe
the threads in the top fabric. Don’t use detergents, harsh
cleaners, solvents or bleaching agents.
When you clean the top, put one hand under it to
support it. Wet the entire vehicle and wash the top
evenly to avoid spots or rings. Let the soap remain on
the fabric for a few minutes. When the top is really dirty,
use a mild foam-type cleaner. Thoroughly rinse the
entire vehicle, then let the top dry in direct sunlight.
To protect the convertible top:
0 After you wash the vehicle, make sure the top is
completely dry before you lower it.
0 Don’t get any cleaner on the vehicle’s painted finish;
it could leave streaks.
0 If you decide to go through an automatic car wash,
ask the manager if the equipment could damage your
top.
6-62
Page 303 of 386
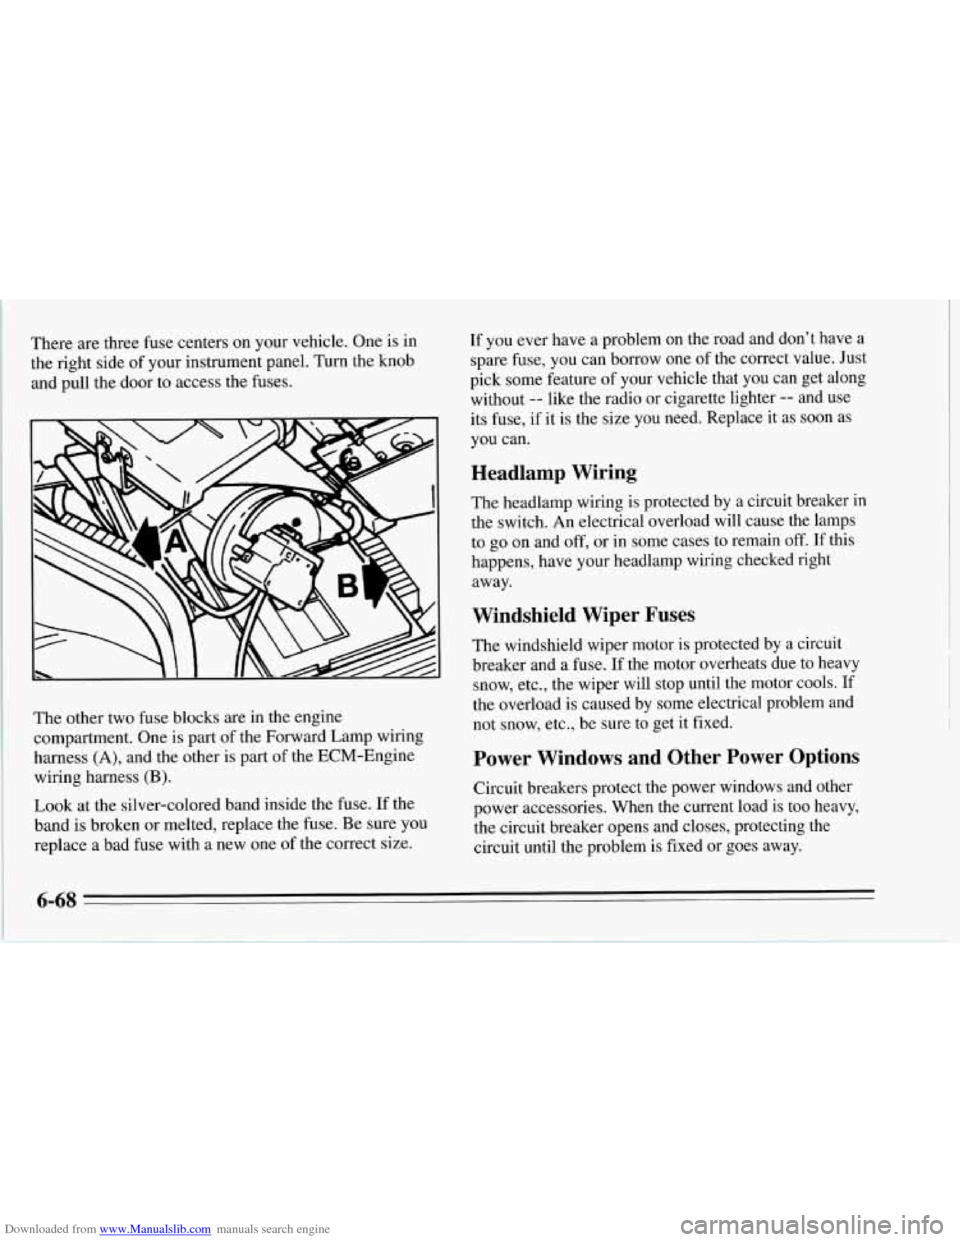
Downloaded from www.Manualslib.com manuals search engine There are three fuse centers on your vehicle. One is in
the right side of your instrument panel. Turn the knob
and pull the door to access the fuses.
The other two fuse blocks are in the engine
compartment. One
is part of the Forward Lamp wiring
harness
(A), and the other is part of the ECM-Engine
wiring harness
(B).
Look at the silver-colored band inside the fuse. If the
band
is broken or melted, replace the fuse. Be sure you
replace a bad fuse with a new one
of the correct size.
If you ever have a problem on the road and don’t have a
spare fuse, you can borrow one of the correct value. Just
pick some feature
of your vehicle that you can get along
without
-- like the radio or cigarette lighter -- and use
its fuse, if it is the size you need. Replace it as soon as
you can.
Headlamp Wiring
The headlamp wiring is protected by a circuit breaker in
the switch. An electrical overload will cause the lamps
to
go on and off, or in some cases to remain off. If this
happens, have your headlamp wiring checked right
away.
Windshield Wiper Fuses
The windshield wiper motor is protected by a circuit
breaker and a
fuse. If the motor overheats due to heavy
snow, etc., the wiper will stop until the motor cools. If
the overload is caused by some electrical problem and
not snow, etc., be sure to get it fixed.
Power Windows and Other Power Options
Circuit breakers protect the power windows and other
power accessories. When the current load is too heavy,
the circuit breaker opens and closes, protecting the
circuit until the problem is fixed or goes away.
6-68
Page 305 of 386
Downloaded from www.Manualslib.com manuals search engine 1. Heater, A/C Programmer
2. Bl@k
3. Windshield Wipermasher Switch Assembly
4, Radio Receiver (Ignition)
5. Heated Mirrors, Heater and A/C Control Head,
Heater and NC Programmer
6. Light Switch, Daytime Running Lamps Module
7. Horn Relay
8. Hazard Flashers; Brake Switch
9. Crank-Air Bag
10. Crank-ParWNeutral Switch (Automatic); Clutch
Switch (Manual)
1 1. RH Illumination
12. LH Illumination
13. Console Illumination
14. Fuel Pump 1
15. Fuel Pump 2 (LT5)
16. Central Control Module; Daytime R
Module unning Lamps 17. Generator;
Automatic Transmission Vacuum Pump
(LT5); Valet Mode (LT5); EGR Circuit (LT5);
Oxygen Sensors (LT5)
18. A/C Compressor Clutch; Heater and A/C Control
Head; Heater and NC Programmer; Rear Defog
Relay
19. Accessory Plug
20. Heated Oxygen Sensors (LT1)
21. Fuel Pump Relay #2 (LT5); Selective Ride Control
Module; ABS Module; Brake Switch (Automatic);
Air Pump Relay; Air Bypass Valve (LT5)
22. Injectors #1,4,6,7 (LTl); Primary Injectors #1-8
(LT5); Ignition Coil (LT5)
23. Injectors #2,3,5, 8 (LTl); Secondary SF1 Control
Modules (LT5)
24. Turn Signal Flashers
25. Ignition Coil and Ignition Coil Module (LT1)
26. Passive Keyless Entry Module
27. Instrument Cluster; Driver Information Center;
Air Bag Denn; Acceleration Slip Regulation
Switch (LT5)
Page 306 of 386
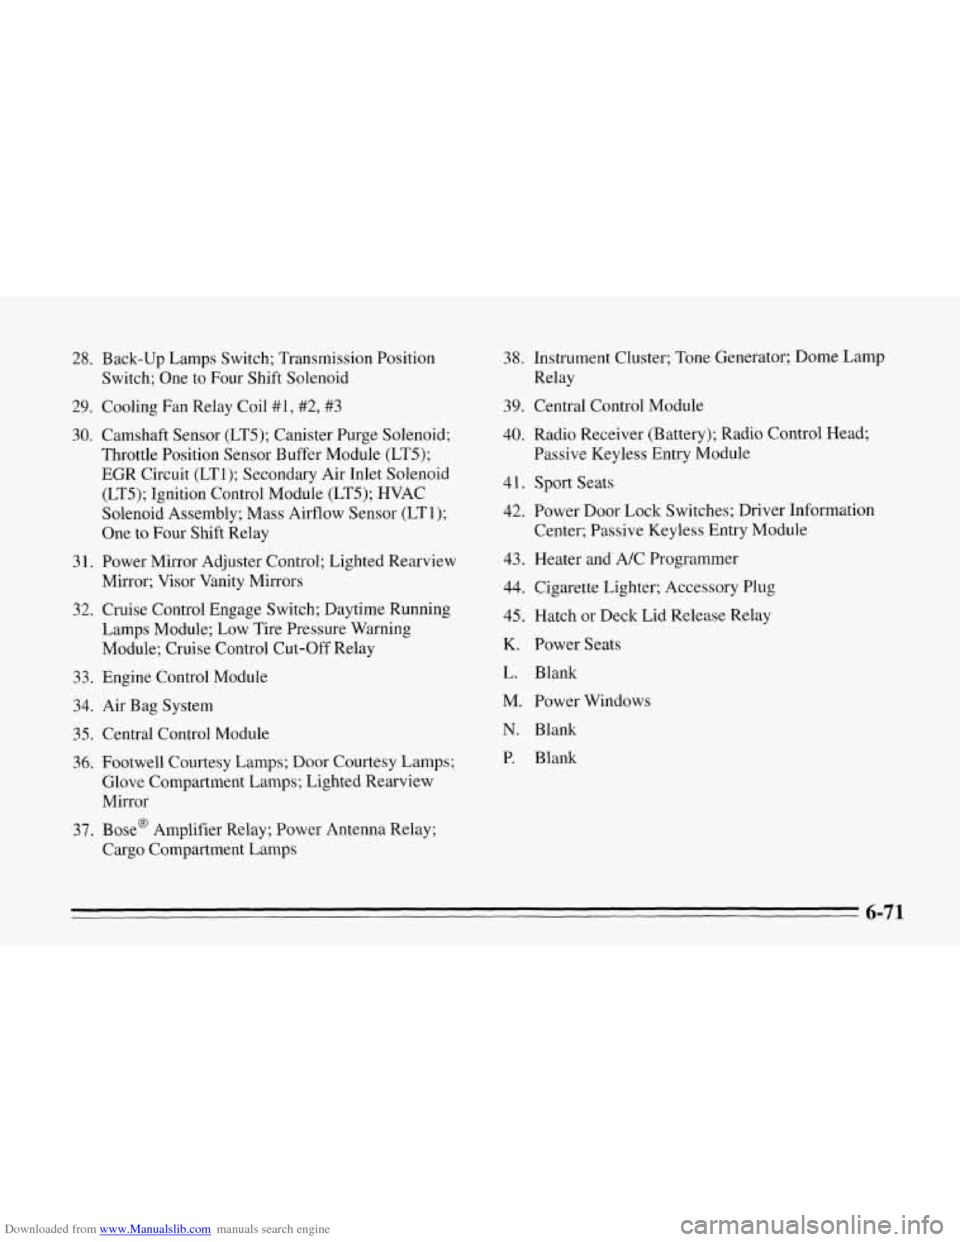
Downloaded from www.Manualslib.com manuals search engine 28. Back-up Lamps Switch; Transmission Position
Switch; One to Four Shift Solenoid
29. Cooling Fan Relay Coil
#I, #2, #3
30. Camshaft Sensor (LT5); Canister Purge Solenoid;
Throttle Position Sensor Buffer Module (LT5);
EGR Circuit (LT1); Secondary Air Inlet Solenoid
(LT5); Ignition Control Module (LT5); HVAC
Solenoid Assembly; Mass Airflow Sensor (LT 1);
One
to Four Shift Relay
3 1. Power Mirror Adjuster Control; Lighted Rearview
Mirror; Visor Vanity Mirrors
32. Cruise Control Engage Switch; Daytime Running
Lamps Module; Low Tire Pressure Warning
Module; Cruise Control Cut-Off Relay
33. Engine Control Module
34. Air Bag System
35. Central Control Module
36. Footwell Courtesy Lamps; Door Courtesy Lamps;
Glove Compartment Lamps; Lighted Rearview
Mirror
37, Bose@ Amplifier Relay; Power Antenna Relay;
Cargo Compartment Lamps
38. Instrument Cluster; Tone Generator; Dome Lamp
Relay
39. Central Control Module
40, Radio Receiver (Battery); Radio Control Head;
Passive Keyless Entry Module
41. Sport Seats
42. Power Door Lock Switches; Driver Information
Center; Passive Keyless Entry Module
43. Heater and A/C Programmer
44. Cigarette Lighter; Accessory Plug
45. Hatch or Deck Lid Release Relay
K. Power Seats
L. Blank
M. Power Windows
N. Blank
P. Blank
6-71
Page 307 of 386
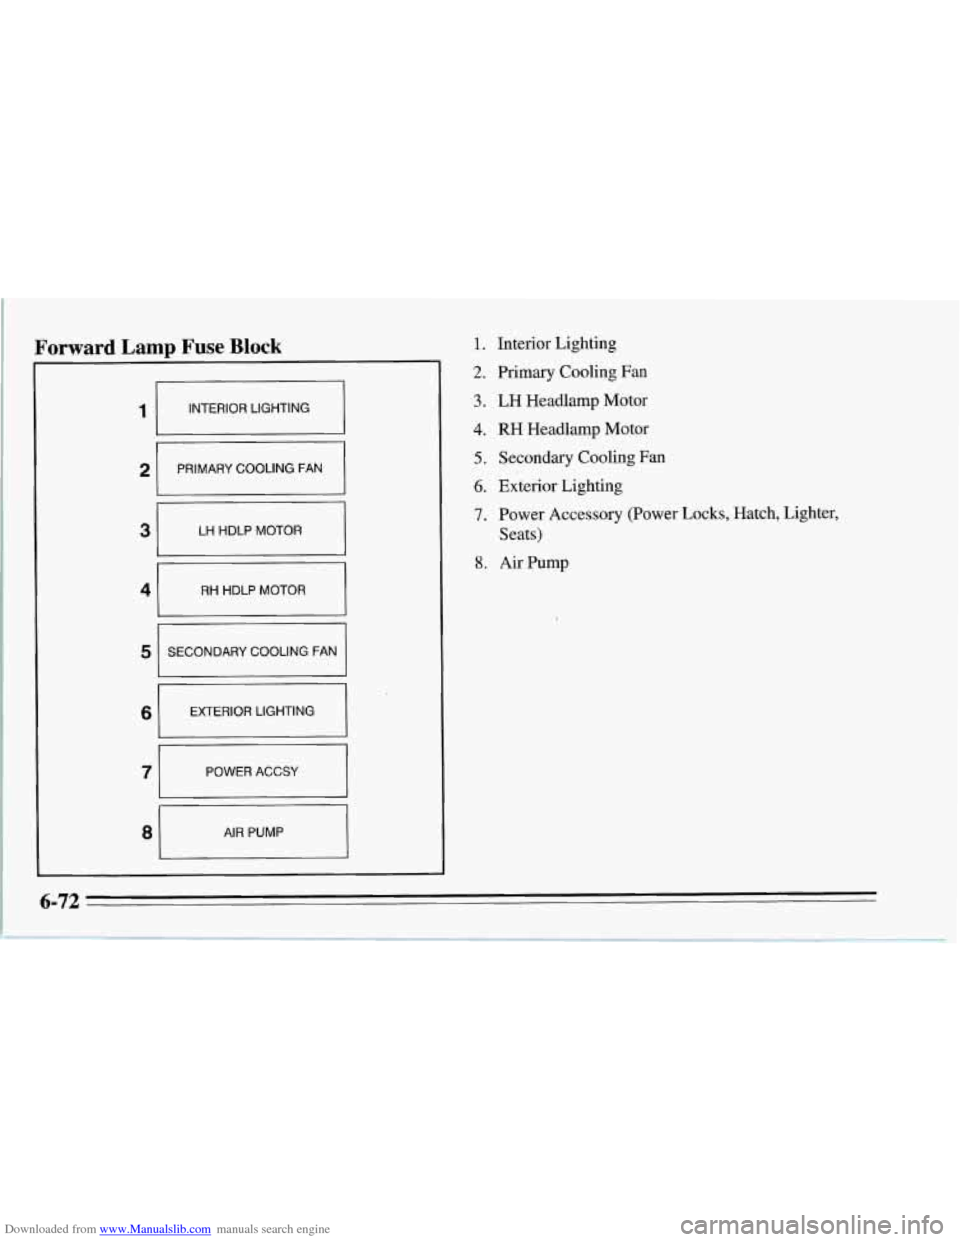
Downloaded from www.Manualslib.com manuals search engine Forward Lamp Fuse Block -
INTERIOR LIGHTING
PRIMARY COOLING FAN
LH HDLP
MOTOR
RH HDLP MOTOR
EXTERIOR LIGHTING
POWER
ACCSY
AIR PUMP
1. Interior Lighting
2. Primary Cooling Fan
3. LH Headlamp Motor
4. RH Headlamp Motor
5. Secondary Cooling Fan
6. Exterior Lighting
7. Power Accessory (Power Locks, Hatch, Lighter,
Seats)
8. Air Pump
6-72
Page 321 of 386
Downloaded from www.Manualslib.com manuals search engine Maintenance Schedule I
The services shown in this schedule up to 100,000 miles
(166 000 km) should be performed after 100,000 miles
(166
000 km) at the same intervals.
Footnotes
3- The U.S. Environmental Protection Agency or the
California Air Resources Board has determined that the
failure to perform this maintenance item will not nullify
the emission warranty or limit recall liability prior to the
completion of vehicle useful life. We, however, urge that
all recommended maintenance services be performed at
the indicated intervals and the maintenance be recorded.
I
* Your vehicle has an Engine Oil Life Monitor. This
monitor will
show you when to change the oil -- usually
between
3,000 miles (5 000 km) and 7,500 miles
(12
500 km) since your last oil change. Under severe
conditions the indicator may come on before
3,000 miles
(5 000 km). Never drive your vehicle more than
7,500 miles (12 500 km) or 12 months without an oil
change.
The system won’t detect dust in the oil.
So if you
drive in a dusty area be sure to change your oil every
3,000 miles (5 000 km) or sooner if the CHANGE OIL
light comes on. Remember to reset the Oil Life Monitor
when the oil has been changed.
For more information,
see “Engine Oil Life Monitor” in the Index.
7-6
Page 344 of 386
Downloaded from www.Manualslib.com manuals search engine The services shown in this schedule up to 100,000 miles
(166 000 km) should be performed after 100,000 miles
(1 66 000 km) at the same intervals.
Footnotes
The U.S. Environmental Protection Agency or the
California Air Resources Board has determined that the
fdilure to perform this maintenance item will not nullify
the emission warranty or limit recall liability prior to the
completion of vehicle useful life. We, however, urge that
all recommended maintenance services be performed at
the indicated intervals and the maintenance be recorded.
‘$ Your vehicle has an Engine Oil Life Monitor. This
monitor
will show you when to change the oil -- usually
between
3,000 miles (5 000 kin) and 7,500 miles
(I 2 500 km) since your last oil change. Under severe
conditions, the indicator may come
on before 3,000 miles
(5 000 km). Never drive your vehicle more than 7,500
miles (1 2 500 km) or 12 months without an oil change.
The system won’t detect dust
in the oil. So if you
drive in
a dusty area, be sure to change your oil every
3,000 miles (5 000 km) or sooner if the CHANGE OIL
light comes on. Remember
to reset the Oil Life Monitor
when the oil has been changed. For more information,
see “Engine Oil Life Monitor” in the Index.
7,500 Miles (12 500 km)
Cl Change engine oil and filter (or every
12 months, whichever occurs first).
An Emission Control Service. *
0 Lubricate the suspension, steering and
transmission shift linkage, parking brake
cable guides, underbody contact points and
linkage (or every
12 months, whichever
occurs first).
DATE SERVICED BY ACTUAL MILEAGE
7-29