Page 1407 of 1771
Interior Tri m
Replacemen t (cont'd )
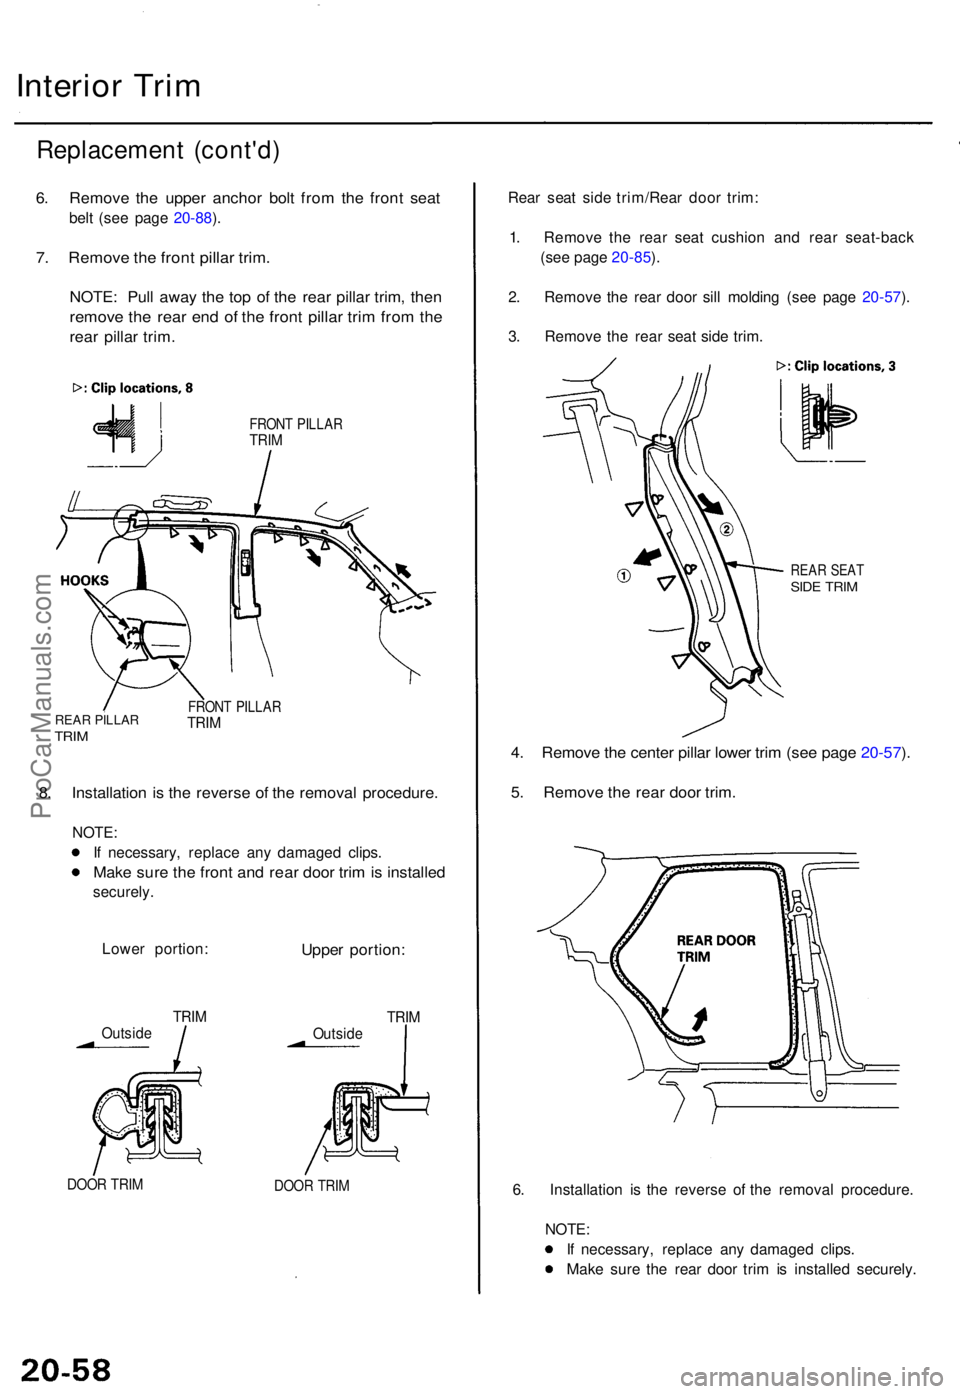
6. Remov e th e uppe r ancho r bol t fro m th e fron t sea t
belt (se e pag e 20-88 ).
7 . Remov e th e fron t pilla r trim .
NOTE : Pul l awa y th e to p o f th e rea r pilla r trim , the n
remov e th e rea r en d o f th e fron t pilla r tri m fro m th e
rea r pilla r trim .
FRON T PILLA RTRIM
REA R PILLA RTRIM
FRON T PILLA RTRIM
8. Installatio n i s th e revers e o f th e remova l procedure .
NOTE:
I f necessary , replac e an y damage d clips .
Make sur e th e fron t an d rea r doo r tri m is installe d
securely .
Lowe r portion :
Upper portion :
TRIMOutsid e
DOOR TRI MDOO R TRI M
Rear sea t sid e trim/Rear door trim :
1 . Remov e th e rea r sea t cushio n an d rea r seat-bac k
(se e pag e 20-85 ).
2 . Remov e th e rea r doo r sil l moldin g (se e pag e 20-57 ).
3 . Remov e th e rea r sea t sid e trim .
REA R SEA TSIDE TRI M
4. Remov e th e cente r pilla r lowe r tri m (se e pag e 20-57 ).
5 . Remov e th e rea r doo r trim .
6. Installatio n i s th e revers e o f th e remova l procedure .
NOTE :
I f necessary , replac e an y damage d clips .
Mak e sur e th e rea r doo r tri m is installe d securely .
TRIMOutsid e
ProCarManuals.com
Page 1408 of 1771
Rear pilla r trim/Rea r shelf :
1 . Remov e th e rea r sea t cushio n an d rea r seat-bac k
(se e pag e 20-85 ).
2 . Pul l awa y th e rea r doo r tri m a s o n eac h sid e neces -
sary .
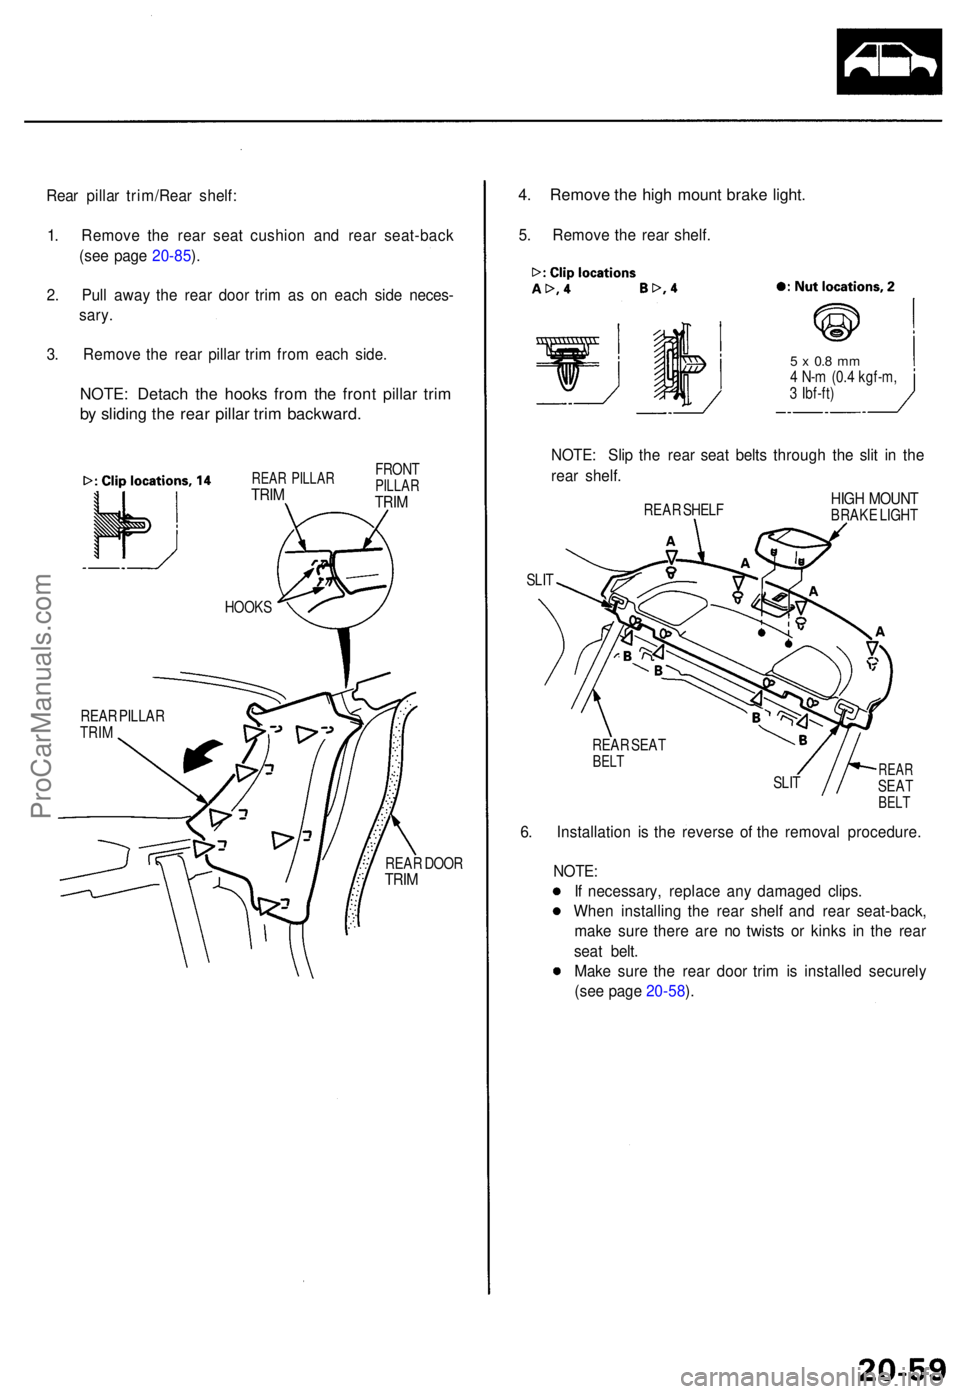
3 . Remov e th e rea r pilla r tri m fro m eac h side .
NOTE : Detac h th e hook s fro m th e fron t pilla r tri m
by slidin g th e rea r pilla r tri m backward .
REAR DOO RTRIM
4. Remov e th e hig h moun t brak e light .
5. Remov e th e rea r shelf .
5 x 0. 8 m m4 N- m (0. 4 kgf-m ,
3 Ibf-ft )
NOTE : Sli p th e rea r sea t belt s throug h th e sli t i n th e
rea r shelf .
HIGH MOUN TBRAKE LIGH T
SLI T
REAR SEA T
BELT
SLITREA RSEATBELT
6. Installatio n i s th e revers e o f th e remova l procedure .
NOTE :
I f necessary , replac e an y damage d clips .
Whe n installin g th e rea r shel f an d rea r seat-back,
mak e sur e ther e ar e n o twist s o r kink s i n th e rea r
sea t belt .
Mak e sur e th e rea r doo r tri m is installe d securel y
(se e pag e 20-58 ).
REA R SHEL F
FRON
T
PILLA RTRIM
REA R PILLA RTRIM
REA R PILLA R
TRI M HOOK
S
ProCarManuals.com
Page 1422 of 1771
Seats/Seat Belt s
Componen t Locatio n Inde x
REAR SEA T BEL TReplacement , pag e 20-9 0
Inspection , pag e 20-9 2
FRON T SEA T BEL T
Replacement , pag e 20-8 8Inspection , pag e 20-9 2 SHOULDE
R
ANCHO R ADJUSTE R
(se e pag e 20-88 ) REA
R SEA T BEL T BUCKLE /
CENTE R BEL T TONGU E
(se e pag e 20-91 )
FRON T SEAT S
Removal , pag e 20-7 1
Seat-bac k Replacement , pag e 20-7 2
Sea t Cushio n Replacement , pag e 20-7 4
Sea t Cove r Replacement , pag e 20-7 6
Sea t Track s (Manuall y adjustable )
Replacement , pag e 20-7 8
Seat Linkag e (Full y powe r adjustable )Index, pag e 20-7 9
REA R SEAT-BAC KRemoval, pag e 20-8 5
Sea t Cove r Replacement ,
pag e 20-8 7
REA R SEA T CUSHIO N
Removal , pag e 20-8 5
Sea t Cove r Replacement , pag e 20-8 6
FRON T SEA T
BEL T BUCKLE S
(se e pag e 20-89 )
ProCarManuals.com
Page 1423 of 1771
Front Seat
Removal
CAUTION: When prying with a flat tip screwdriver, wrap
it with protective tape to prevent damage.
NOTE: Take care not to scratch the seat covers and body.
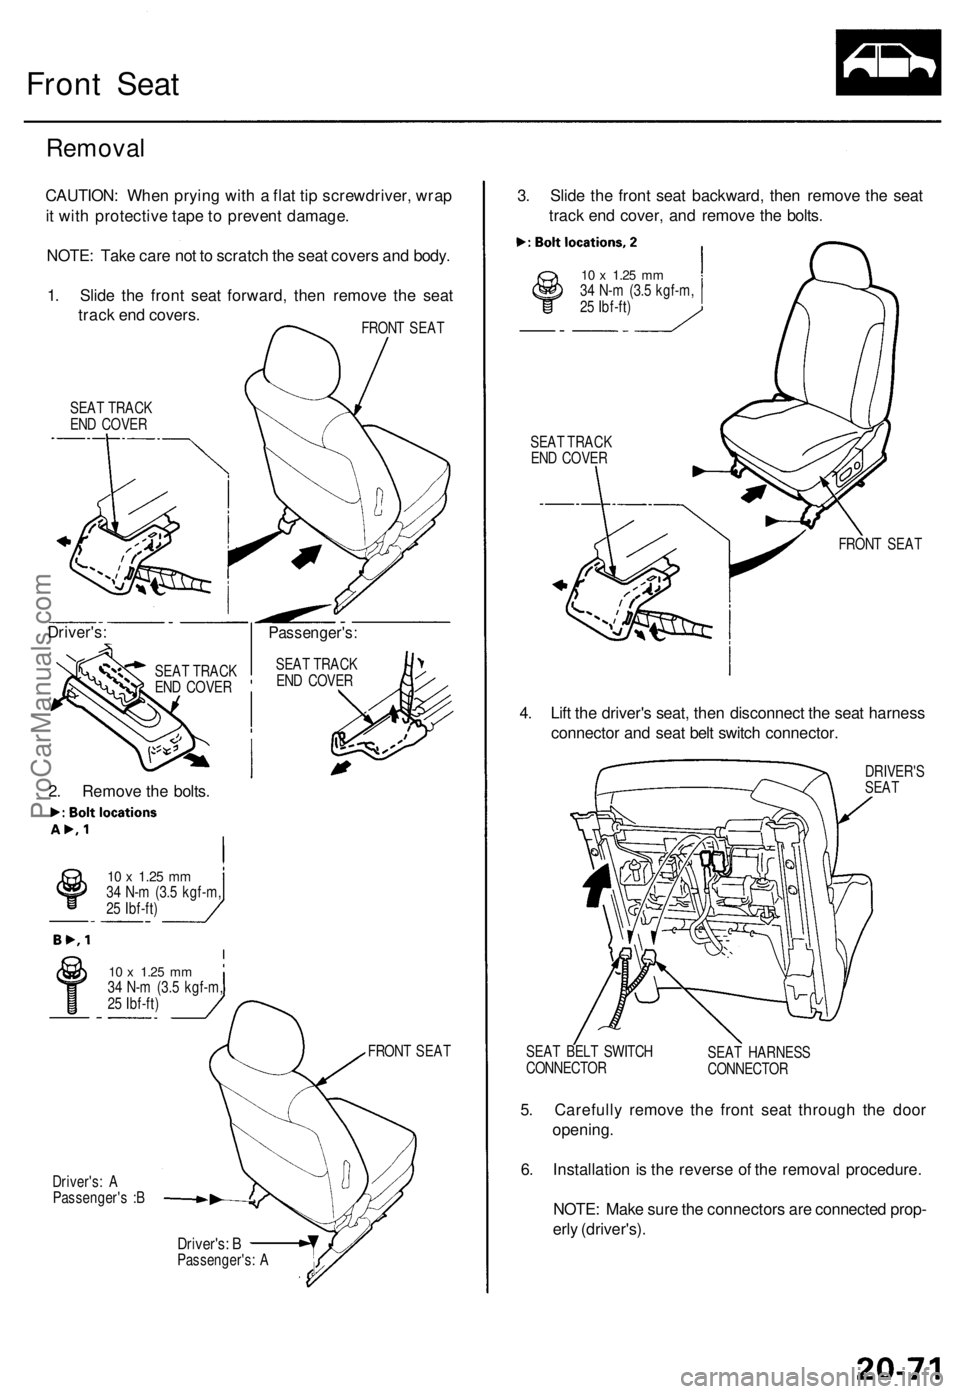
1. Slide the front seat forward, then remove the seat
track end covers.
FRONT SEAT
SEAT TRACK
END COVER
2. Remove the bolts.
10 x
1.25
mm
34 N-m (3.5 kgf-m,
25 Ibf-ft)
FRONT SEAT
Driver's: A
Passenger's :B
Driver's: B
Passenger's: A
3. Slide the front seat backward, then remove the seat
track end cover, and remove the bolts.
10 x
1.25
mm
34 N-m (3.5 kgf-m,
25 Ibf-ft)
SEAT TRACK
END COVER
FRONT SEAT
4. Lift the driver's seat, then disconnect the seat harness
connector and seat belt switch connector.
DRIVER'S
SEAT
SEAT BELT SWITCH
CONNECTOR
SEAT HARNESS
CONNECTOR
5. Carefully remove the front seat through the door
opening.
6. Installation is the reverse of the removal procedure.
NOTE: Make sure the connectors are connected prop-
erly (driver's).
10 x
1.25
mm
34 N-m (3.5 kgf-m,
25 Ibf-ft)
Passenger's:
SEAT TRACK
END COVER
SEAT TRACK
END COVER
Driver's:ProCarManuals.com
Page 1441 of 1771
Rear Seat
Removal (cont'd)
3. Remove the seat-back by lifting it upward.
CAUTION: Use protective plates on the bottom of
the rear pillar trim.
6 x 1.0 mm
9.8 N-m (1.0 kgf-m,
7.2 Ibf-ft)
4. Installation is the reverse of the removal procedure.
NOTE: Before attaching the seat-back and seat cush-
ion, make sure there are no twists or kinks in the rear
seat belts and center belts.
SEAT-BACK
PROTECTIVE
PLATE
PROTECTIVE
PLATE
HOOK
(Body side)
ROD
(Seat-back
side)ProCarManuals.com
Page 1444 of 1771
Seat Belt
Inspection
Retractor Inspection
1. Before installing the retractor, check that the seat belt
can be pulled out freely.
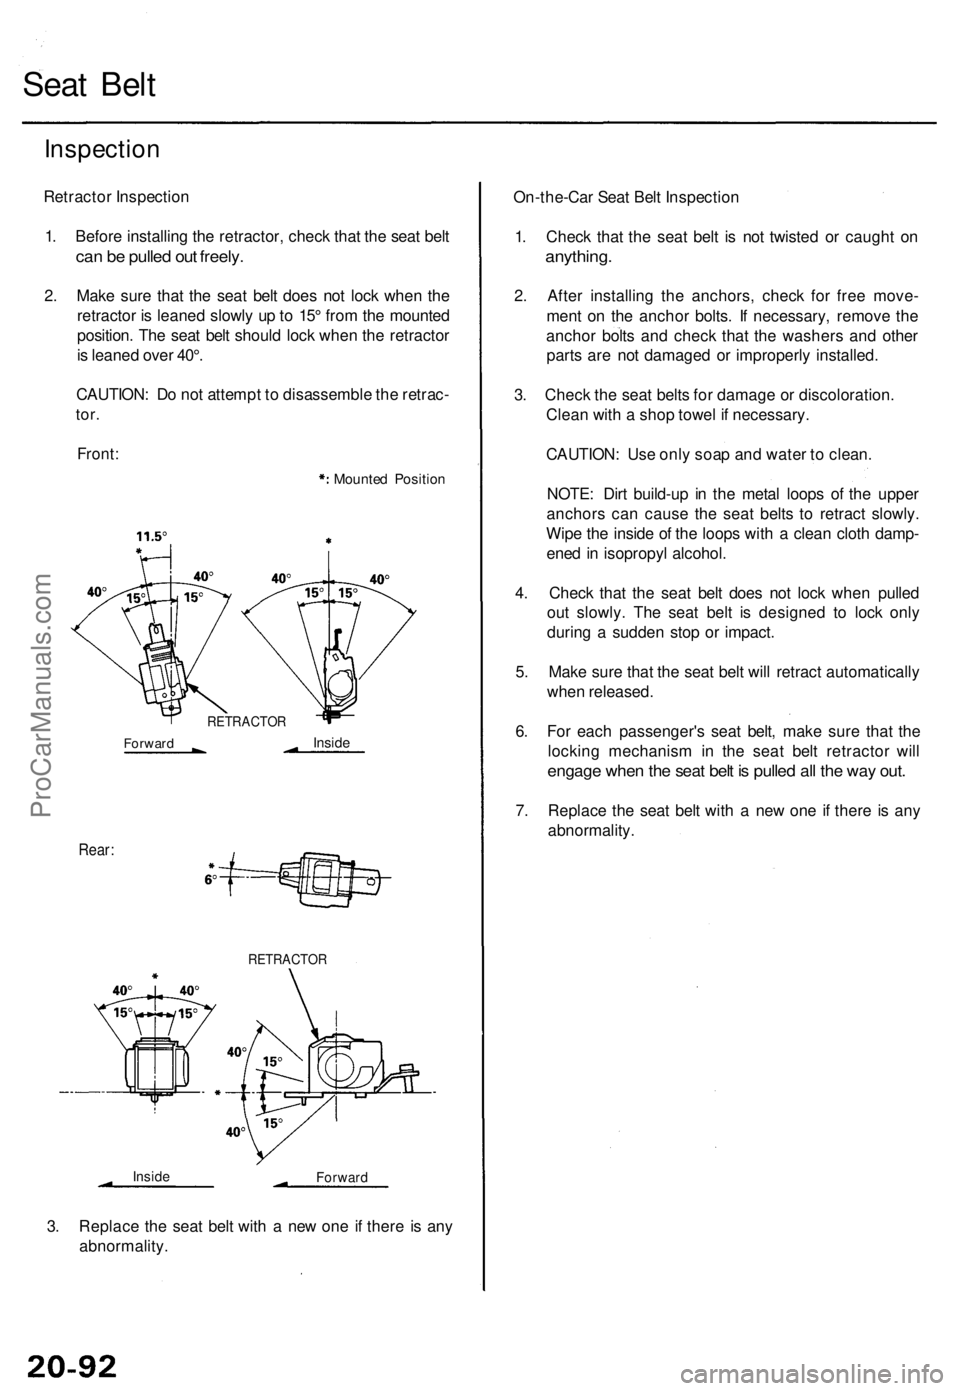
2. Make sure that the seat belt does not lock when the
retractor is leaned slowly up to 15° from the mounted
position. The seat belt should lock when the retractor
is leaned over 40°.
CAUTION: Do not attempt to disassemble the retrac-
tor.
Front:
Mounted Position
Rear:
RETRACTOR
Inside
Forward
3. Replace the seat belt with a new one if there is any
abnormality.
On-the-Car Seat Belt Inspection
1. Check that the seat belt is not twisted or caught on
anything.
2. After installing the anchors, check for free move-
ment on the anchor bolts. If necessary, remove the
anchor bolts and check that the washers and other
parts are not damaged or improperly installed.
3. Check the seat belts for damage or discoloration.
Clean with a shop towel if necessary.
CAUTION: Use only soap and water to clean.
NOTE: Dirt build-up in the metal loops of the upper
anchors can cause the seat belts to retract slowly.
Wipe the inside of the loops with a clean cloth damp-
ened in isopropyl alcohol.
4. Check that the seat belt does not lock when pulled
out slowly. The seat belt is designed to lock only
during a sudden stop or impact.
5. Make sure that the seat belt will retract automatically
when released.
6. For each passenger's seat belt, make sure that the
locking mechanism in the seat belt retractor will
engage when the seat belt is pulled all the way out.
7. Replace the seat belt with a new one if there is any
abnormality.
RETRACTOR
Forward
InsideProCarManuals.com
Page 1489 of 1771
Special Tool s
Ref. No.Too l Numbe r Descriptio
nQtyPag e Referenc e
*07JGG-001010 A
07SAZ-001000A
Belt Tensio n Gaug e
Backprob e Se t
22-7 8, 22-24a
22-42 , 22-45 , 22-4 6
Include d i n th e Bel t Tensio n Gaug e Set , 07TG G - 001000A .
ProCarManuals.com
Page 1529 of 1771
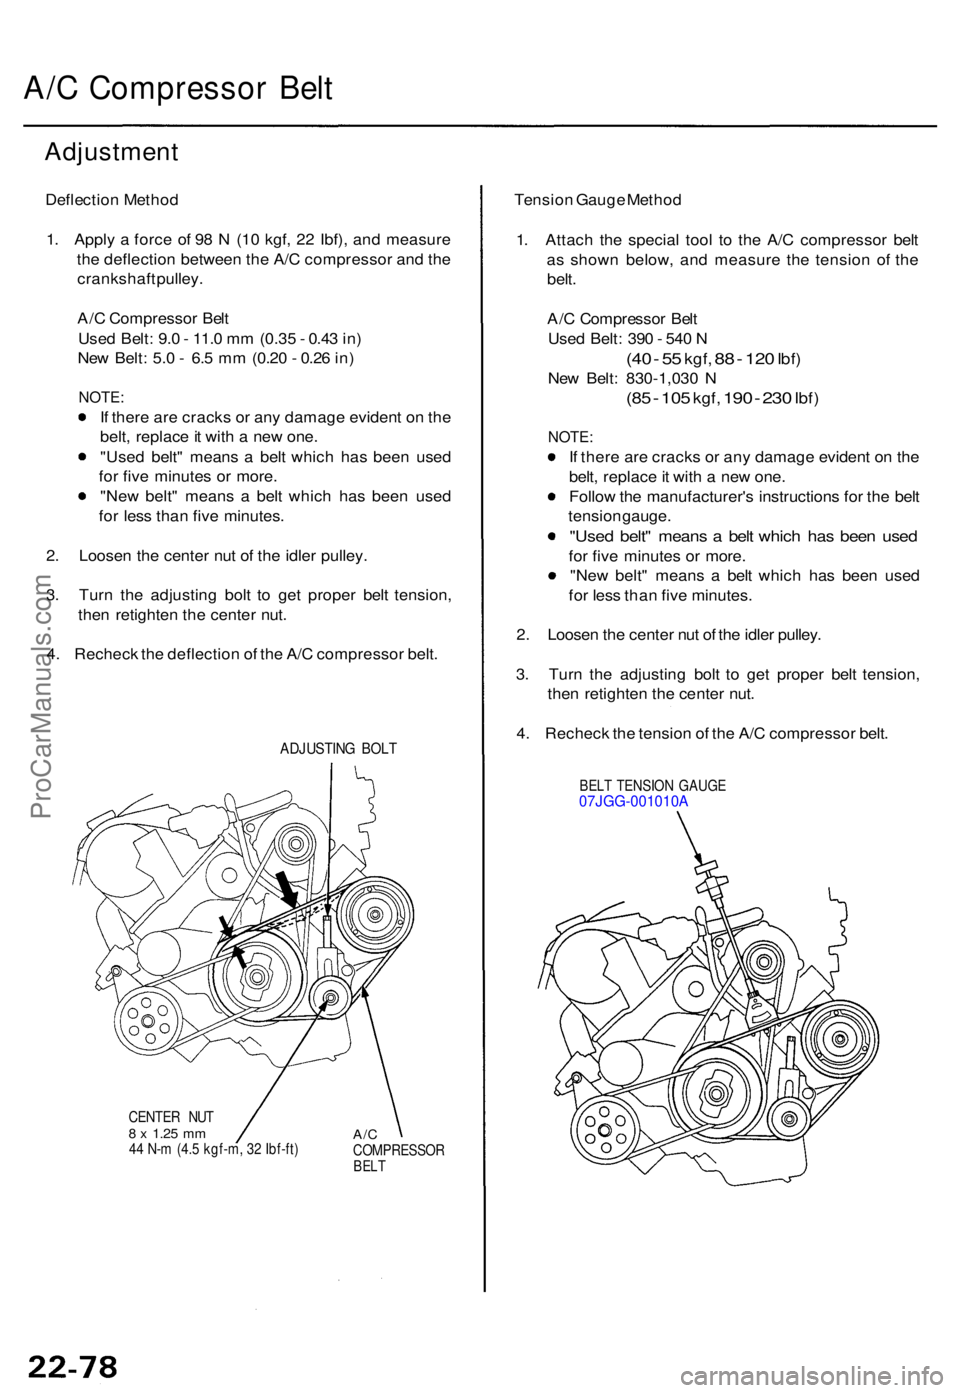
A/C Compresso r Bel t
Adjustmen t
Deflection Metho d
1 . Appl y a forc e o f 9 8 N (1 0 kgf , 2 2 Ibf) , an d measur e
th e deflectio n betwee n th e A/ C compresso r an d th e
crankshaf t pulley .
A/ C Compresso r Bel t
Use d Belt : 9. 0 - 11. 0 m m (0.3 5 - 0.4 3 in )
Ne w Belt : 5. 0 - 6. 5 m m (0.2 0 - 0.2 6 in )
NOTE :
If ther e ar e crack s o r an y damag e eviden t o n th e
belt , replac e it wit h a ne w one .
"Use d belt " mean s a bel t whic h ha s bee n use d
fo r fiv e minute s o r more .
"Ne w belt " mean s a bel t whic h ha s bee n use d
fo r les s tha n fiv e minutes .
2 . Loose n th e cente r nu t o f th e idle r pulley .
3 . Tur n th e adjustin g bol t t o ge t prope r bel t tension ,
the n retighte n th e cente r nut .
4 . Rechec k th e deflectio n o f th e A/ C compresso r belt .
ADJUSTIN G BOL T
CENTE R NU T8 x 1.2 5 mm44 N- m (4. 5 kgf-m , 3 2 Ibf-ft )A/CCOMPRESSO RBELT
Tensio n Gaug e Metho d
1 . Attac h th e specia l too l t o th e A/ C compresso r bel t
a s show n below , an d measur e th e tensio n of the
belt .
A/ C Compresso r Bel t
Use d Belt : 39 0 - 54 0 N
(4 0 - 5 5 kgf , 88 - 12 0 Ibf )
New Belt : 830-1,03 0 N
(8 5 - 10 5 kgf , 190 - 230 Ibf )
NOTE :
If ther e ar e crack s o r an y damag e eviden t o n th e
belt , replac e it wit h a ne w one .
Follo w th e manufacturer' s instruction s fo r th e bel t
tensio n gauge .
"Used belt " mean s a bel t whic h ha s bee n use d
for fiv e minute s o r more .
"Ne w belt " mean s a bel t whic h ha s bee n use d
fo r les s tha n fiv e minutes .
2 . Loose n th e cente r nu t o f th e idle r pulley .
3 . Tur n th e adjustin g bol t t o ge t prope r bel t tension ,
the n retighte n th e cente r nut .
4 . Rechec k th e tensio n o f th e A/ C compresso r belt .
BEL T TENSIO N GAUG E07JGG-001010 A
ProCarManuals.com